Home 3D Art Showcase & Critiques

Hard surface sculpting using as much zbrush as possible

1
polycounter lvl 6
Offline / Send Message
tac0m polycounter lvl 6
Like the title says im gonna try and model as much as possible using only zbrush.

So far these meshes are just dynameshed cubes and spheres.

Gonna retop them and create nice clean topology for hipoly loveliness :)

Concept by Oskar Pavlovskis
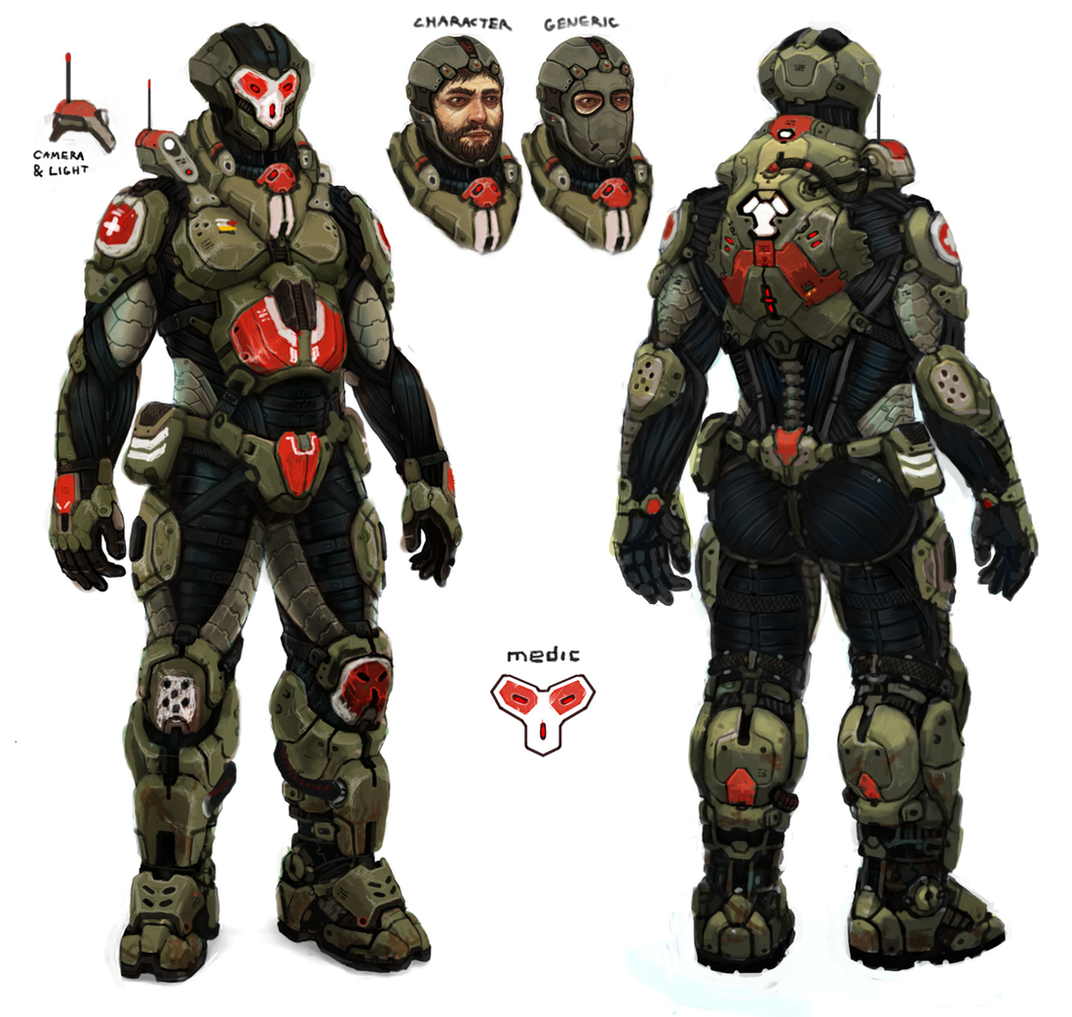

drawover-medic_back_009.png

Beauty Render

medic_beautyshot_zps3251c517.jpg

Replies

  • tac0m
    Options
    Offline / Send Message
    tac0m polycounter lvl 6
    Edit: Removed image (old and crappy)
  • Aga22
    Options
    Offline / Send Message
    Aga22 polycounter lvl 11
    Hm. nice. you re not exactly following the concept, i guess? if you want it to be absolutely like the concept i would suggest stop adding detail and work on the forms a little more.
  • tac0m
    Options
    Offline / Send Message
    tac0m polycounter lvl 6
    Went back and changed some of the forms. I'm not looking to be exactly 100% like the concept as i've noticed some things don't transfer from 2d to 3d as well... but it's all a WIP still :)

    Still just using zbrush

    Note: Left kneepad is only placeholder until i fix the other one
    retop_quick.jpg
  • Major D
    Options
    Offline / Send Message
    Lookin good Jeff. Cool shit.
    The boots at the ankle look a bit stiff and cylindrical. There's a bigger cascading overlap in concept that I think is key to get for the silhouette.
    The knee area of this guy also looks kinda skinny.

    Bang up job on the helmet design and the collar piece. Like it.
    Are you adding tread onto the shoes too?

    I think you're missing a strap that connects to the rigid back piece. It travels across over some rhomboid muscles and over the rear delts to the shoulder armor. It looks as if it tethers the back piece securely to the shoulder pieces giving it a greater sense of connectivity.

    maybe add more depth to the inlay for the light on the back pack and other features on it. It looks to be at one level of depth at the moment. The concept looks as though it's more stratified (not sure its the best word to use) it would make it much more interesting, like the chest piece. the chest has like 6 different height levels to it, where as the back has one or two.

    the progress is looking good. Happy to see it coming together.
    hope I've pointed out some good sheeiittt. If you want clarification, let me know too.

    If you need anims, also let me know.

    -Warren
  • tac0m
    Options
    Offline / Send Message
    tac0m polycounter lvl 6
    Thanks for the pointers Warren, noted :)
    Another update, still a couple more things that need to be fixed.

    medic2.jpg
  • Brian "Panda" Choi
    Options
    Offline / Send Message
    Brian "Panda" Choi high dynamic range
    Oh man, I would LOVE to see a tutorial vid on how you did this.
  • hamzaaa
    Options
    Offline / Send Message
    hamzaaa polycounter lvl 11
    yeah me too!!! TUTORIAL! :) Awesome work! Subscribed!
  • KyleReeceHall
    Options
    Offline / Send Message
    KyleReeceHall polycounter lvl 11
    Looks great, very clean though, you should rough it up abit :)
  • M1KES
    Options
    Offline / Send Message
    Awesome work! I am also doing a work in progress with hard surfacing only in zbrush. It feels kinda cumbersome in the beginning but it's actually pretty handy when compared to max or maya..

    The feet seem a little too short to me.. maybe try and stretch it out just a little bit. It might also be distortion from the perspective, so i'm not sure.
  • tac0m
    Options
    Offline / Send Message
    tac0m polycounter lvl 6
    Thanks for the comments guys :) A friend of mine tore it apart last night and there's some changes I can make without goin back and changing everything.

    I don't have any capture software but if you guys don't mind looking at pics and reading a bit I'll make a written tutorial.
  • hamzaaa
    Options
    Offline / Send Message
    hamzaaa polycounter lvl 11
    I'd love to see a written tutorial even! Can't wait for it. Keep going! :)
  • Neox
    Options
    Offline / Send Message
    Neox godlike master sticky
    so this is all made in zbrush? nice and clean, but you didn't follow the concept very much, the bigger shapes are not even close to as chunky as in the concept and the details are off too - so i'm not quite sure how to give crits, overall i think your shapes are just too flat in comparison with the concept which gives it an overall different appeal.
  • sefice
    Options
    Offline / Send Message
    sefice polycounter lvl 8
    Subbed! Great work so far. Keep it going.
  • Essynim
    Options
    Offline / Send Message
    you should push the depth and partition of the muscle fiber groups of the suit. everything is feeling too flat, more like lines cut into a wetsuit than a series of articulating muscle groups like the concept shows. try dividing them into their own sub tools, should help make pushing the volumes way easier too
  • tac0m
    Options
    Offline / Send Message
    tac0m polycounter lvl 6
    Cool, i'll write up a tutorial when i get some time for this.

    Essynim - I rendered out the body suit for you. Maybe this shows the lines better without all the armor on top. I see what your saying but the concept of the body looks relatively flat and tightly pressed together.

    I gave it a shot at separating the armor a bit but it looked very bulgy and balloon like... I agree that although it looks nice in the concept something is missing in 3d. I will try and tackle this soon and add do something about this. Thanks for the positive critique.

    medic_bodysuit.jpg
  • tac0m
    Options
    Offline / Send Message
    tac0m polycounter lvl 6
    Went back and fixed a few things that were bothering me. Got some critiques and changed what I could without going back too far.

    medic4.jpg
    medic5.jpg

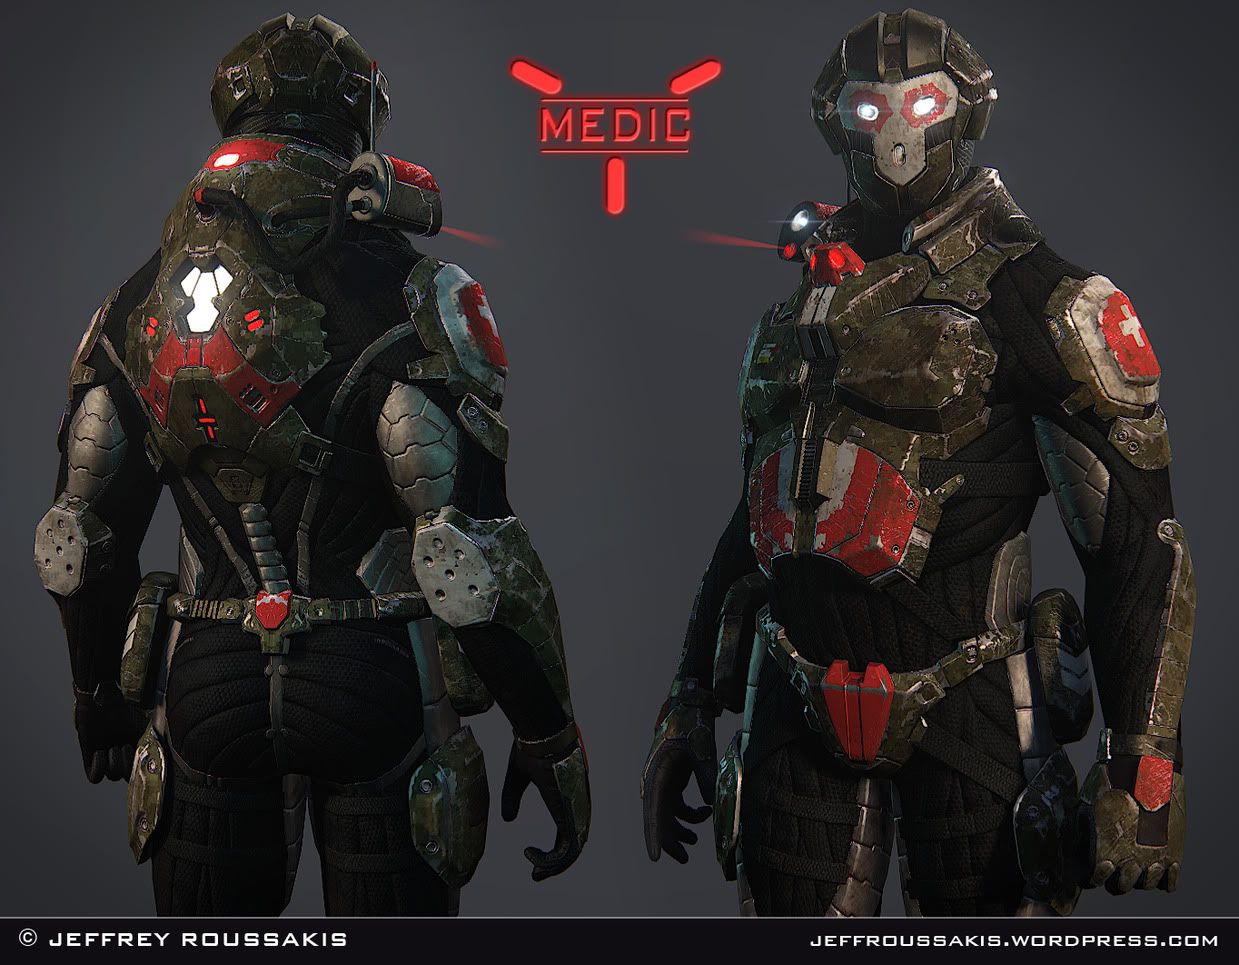
    Changed the beast plate chest armor , bodysuit bicep/tricep area(armor now sits in the suit instead of on top), kneepads, boots.

    Overall i think it looks much better and closer to the concept.
  • tac0m
    Options
    Offline / Send Message
    tac0m polycounter lvl 6
    Added some more geometry around the hands/wrists and some small parts here and there. Refined a bunch of the straps. Still procrastinating on the pouches on his hips... guess that's for tomorrow :)

    medic6.jpg
  • Benton
    Options
    Offline / Send Message
    Oh man, how do you like this compared to sub-d?
  • PyrZern
    Options
    Offline / Send Message
    PyrZern polycounter lvl 12
    I think the lines at his thighs should go up and down instead of side to side, following the muscle.
  • tac0m
    Options
    Offline / Send Message
    tac0m polycounter lvl 6
    Thanks for the comments/questions guys.
    @Benton - i love working in zbrush but I still think the best, cleanest and most optomized hard surface work comes from a modelling package like max. It might be because I'm more used to using Max for hard surface but I'm still having a great time getting to know these new tools in zbrush.

    @PyrZern - I'm trying to follow the concept image I have at the first post. I've already made some significant changes to the body suit but I agree that the lines may look better vertical rather than horiztonal.
  • tac0m
    Options
    Offline / Send Message
    tac0m polycounter lvl 6
    Another update.

    medic7.jpg
  • Vertrucio
    Options
    Offline / Send Message
    Vertrucio greentooth
    Watch the angle of the striations on the gluts. I'm assuming those are part of its movement systems as much as they are armor. Since they help with movement, they should probably follow musculature somewhat.

    The gluteus maximus has a distinct diagonal appearance. The original concept follows this, but on yours they're horizontal. They also flow down into the sides of the thigh in the original concept.
  • tac0m
    Options
    Offline / Send Message
    tac0m polycounter lvl 6
    Hey Vertrucio, thanks for the feedback. I went with some artistic freedom on the body suit but your right. the butt needed to be fixed.

    Butt update :) Still needs to be polished a bit in that area again.
    medic8_zpsf9db92c5.jpg
  • Pabs
    Options
    Offline / Send Message
    Pabs polycounter lvl 11
    sweet progress, you can push this alot further
  • tac0m
    Options
    Offline / Send Message
    tac0m polycounter lvl 6
    Thanks Scapulator. I know this is taking awhile but i'm goin back and fixing a few things i've noticed that need cleaning up or maybe even remaking.
  • tac0m
    Options
    Offline / Send Message
    tac0m polycounter lvl 6
    Added more detail and changed the boots a little bit. Wasn't too happy with how they looked at certain angles.

    medic9.jpg
  • Brian "Panda" Choi
    Options
    Offline / Send Message
    Brian "Panda" Choi high dynamic range
    Hmm . . I'm not sure if it is good that so much of the weight seems to be in the feet atm, or if it is bad.

    Maybe the eventual diffuse map might help.
  • tac0m
    Options
    Offline / Send Message
    tac0m polycounter lvl 6
    Update: STIIIIIILLLLL MORE FIXES LOL

    Edit: Also i didn't realize that the image was so small until after the upload.
    @JadeEyePanda - I wasn't too happy with the boots over the last couple days and i have made them a little smaller. Although you didn't suggest to make them smaller it was a good eye as they were a tad too big.

    medic10_zps7e74e2a7.jpg
  • Kon Artist
    Options
    Offline / Send Message
    Kon Artist polycounter lvl 8
    Tacom, this keeps getting better! Look forward to seeing your breakdown-- on how you went about creating the under part of the suit. What version of Z are you using?
  • tac0m
    Options
    Offline / Send Message
    tac0m polycounter lvl 6
    Started adding some details. Some of these are just quickly dropped in and on a morph target so they'll be changed.

    medic11.jpg
  • SimonT
    Options
    Offline / Send Message
    SimonT interpolator
    In the upper part of the body-suit you try to follow human anatomy which works pretty well. But why you don't follow this also for the legs? If I look at your current state the legs are more or less mummified. But you proved that you can do it better with the upper part of the body. So why not do it more anatomy-correct also for the legs?

    But in the end: Great work!
  • tac0m
    Options
    Offline / Send Message
    tac0m polycounter lvl 6
    Thats a really great compliment/comment SimonT. Thank you for that. I do agree with you, as i mentioned in the past I wanted to show i can follow a concept. But now that i'm thinking about it i'm really at a point of no return. This is where i'm gonna need some other peoples input. Should i go back and change the body suit legs area or keep it like the concept? Don't answer this as what you think would "look better" but what you think would be better to show on a portfolio. Would an employer look at my body suit and say "the body suit isn't the same as the concept so maybe he can't follow direction well" or "he took something that was okay and made it better."

    I was wondering if i could get some peoples opinions on this. Do you think following a concept exactly (or very closely) is better, or is it better to show that you can change something to make it look better than in the concept?
  • tac0m
    Options
    Offline / Send Message
    tac0m polycounter lvl 6
  • RaPtoR_v9600
    Options
    Offline / Send Message
    RaPtoR_v9600 polycounter lvl 4
    This is so good good model, i like render from the taken from the side but i think that holes for the eyes are too small, if its real life it would suffer from tunnel vision ( like modern night goggles).

    And i totally agree that you shouldn'tfolov concept to the smallest detail try diferent things
  • Iciban
    Options
    Offline / Send Message
    Iciban polycounter lvl 10
    well the concept is a great way to start things, but its always good to add some of your flare to the project. Something that you think looks better. Doesn't hurt to have another file with your changes. Then you can compare
  • tac0m
    Options
    Offline / Send Message
    tac0m polycounter lvl 6
    So i made a version with the body suit legs flowing more along with anatomy. It doesn't match the anatomy perfectly but flows along some major muscle groups.

    medic13.jpg
  • tac0m
    Options
    Offline / Send Message
    tac0m polycounter lvl 6
    another one. side by side

    medic14.jpg
  • tac0m
    Options
    Offline / Send Message
    tac0m polycounter lvl 6
    So I'm gonna call the hipoly finished now and start workin on the low poly

    medic15.jpg
  • SA_22
    Options
    Offline / Send Message
    this came out really nice tac0m! maybe some scratches/ damage would make it pop even more
  • SimonT
    Options
    Offline / Send Message
    SimonT interpolator
  • tac0m
    Options
    Offline / Send Message
    tac0m polycounter lvl 6
    body suit. Still needs some fixing but coming along.

    bodysuit_MR.jpg
  • tac0m
    Options
    Offline / Send Message
    tac0m polycounter lvl 6
    Another render again. Haven't had a lot of time to work on the low poly so just a couple renders here and there :)

    scifimediczbrushsculpt.jpg
  • tac0m
    Options
    Offline / Send Message
    tac0m polycounter lvl 6
    so i need some pointers. Since i haven't done an armored hard surface character before i don't know the best way to retop this.

    Should i make this all one mesh and bake it all together (obviously the head would be separate)

    Should i break it up into chunks and retop those individually ie. torso/back armor, boots, helmet, crotch armor/belt... keep these main pieces separate would seem the best as some of the armor is floating off the body suit and might create artifacts when baking....

    Anyone with experience or knowledge with this can ya please let me know what approach i should take?
  • Neox
    Options
    Offline / Send Message
    Neox godlike master sticky
    i would do something like this

    breakup.jpg

    everything that is clearly floating seperate, everything else as one skin. it will not be skinned as rigids anyways so you don't need every piece of armor to be seperate
  • tac0m
    Options
    Offline / Send Message
    tac0m polycounter lvl 6
    Thanks for the help neox. I decided because the large torso armor hung off the body a little further than what i'd like for a single mesh. I decided to make the chest and back armor a single chunk itself.

    I looked around at some current games and how they retop'd their characters and i was surprised at how many unique pieces of geometry were being used instead of combining them into fewer meshes. With that in mind I still want to show I can do this with just a few pieces of geo instead of 20 different pieces.

    Progress so far.
    medic_retopology1.jpg
  • tac0m
    Options
    Offline / Send Message
    tac0m polycounter lvl 6
    This is what i had in mind for retop groups but i'm kinda thinking i'm gonna add the boots to this main mesh I have just one post prior.

    retopogroups.jpg
  • mLichy
    Options
    Offline / Send Message
    Yeah, having the chest piece seperate is not a bad idea. Can customize it alot more. If you wanted to anyways.
  • tac0m
    Options
    Offline / Send Message
    tac0m polycounter lvl 6
    Retopo update
    this is what happens to me when i use the max retop tools
    167866_o.gif

    Still need to retop the head inside the helmet

    medic_retopology2.jpg
  • tac0m
    Options
    Offline / Send Message
    tac0m polycounter lvl 6
    So just using my reference meshes as a placeholder hipoly i did a test bake of the knee pads.

    Can't seem to fix this bad bake crap.

    testbake_zpsd9e2f4b7.jpg

    this is the wireframe... do i need to add more poly for this to bake properly? I'm not sure because if you look near the bottom of the knee pad where there's that little arch there's this happening all over that place as well.

    testbakewire_zpsd6030512.jpg

    I broke my UV seams to match the smoothing groups and the edges look like shit. But if i have only 2 smoothing groups (1 for the back of the kneepad and one for the front area) i get realy nice edges but the flat pieces are a little eff'd up.

    Not really sure where to go from here. Kinda frustrated and hope maybe someone can give me a pointer.
  • tac0m
    Options
    Offline / Send Message
    tac0m polycounter lvl 6
    finally back with an update...

    lowpoly bake. Couple places need to be fixed but overall it took pretty well :)

    lowpoly_medic_bake_zps35433827.jpg
1
Sign In or Register to comment.