Low Polygon Joints - What is the best way?
I found 2 good tutorials on this that explain it with images
Jonathan Rush Ancient-Pig's basic deformation tutorial
Ben Mathis (poopinmymouth) Limb Deformation tutorial

But then I saw something on these forums that had these 2 pictures
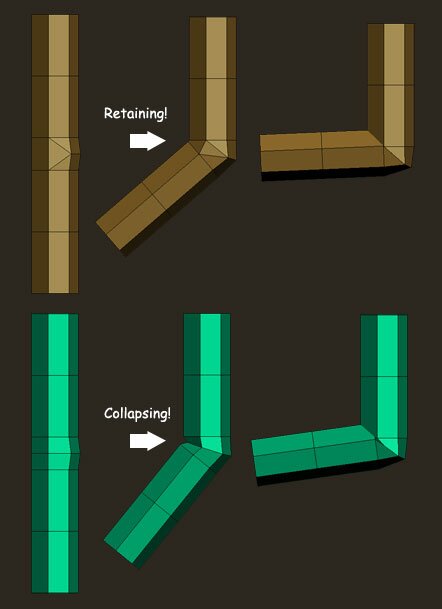
Spacey's post on polycount
pnyx's post on polycount

That last example with the purple leg, does it have 2 bones in it? I'm new to rigging so I cant tell. But I really only need it for posing my low poly 3d model (that isnt done quite yet, because I need to figure this out and a few other thing :poly124:).
Are they all good methods or do I just need to use whatever helps me the most for polycount?
EDIT: added links before each image, sorry for not mentioning the tutorials.
Jonathan Rush Ancient-Pig's basic deformation tutorial
Ben Mathis (poopinmymouth) Limb Deformation tutorial
But then I saw something on these forums that had these 2 pictures
Spacey's post on polycount
pnyx's post on polycount
That last example with the purple leg, does it have 2 bones in it? I'm new to rigging so I cant tell. But I really only need it for posing my low poly 3d model (that isnt done quite yet, because I need to figure this out and a few other thing :poly124:).
Are they all good methods or do I just need to use whatever helps me the most for polycount?
EDIT: added links before each image, sorry for not mentioning the tutorials.
Replies
All of the second examples could be improved if they adjusted the joint placement, but they probably didn't do it, because its more dramatic with it poorly aligned.
The first one in the second example could be transformed into a more usable form if they pushed the inner collapsing loops out away from each other. They could also strengthen the last example by adding one loop to either side of the joint that would be weighted to each bone near 100% it would do something a little similar to lowest right example just before the purple leg. Wouldn't actually need two loops, probably just one would do it. but at that point you might as well go with AP's top example...
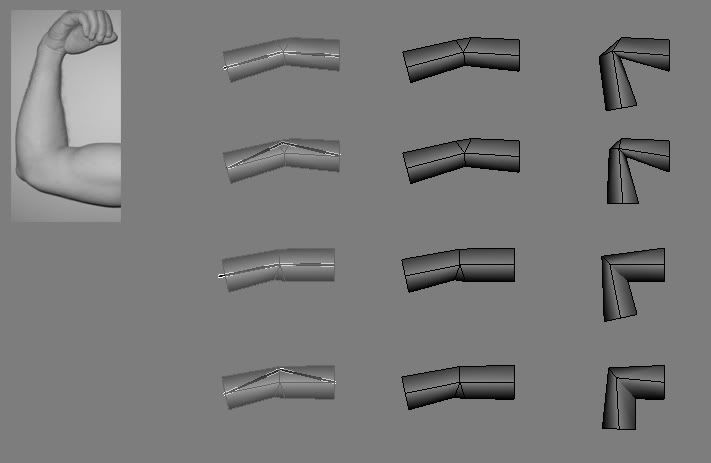
In AP's exmaple you can get sharp pointy joints by placing the joint at the back, or pretty rounded by putting in the center.
For higher-end stuff, it's always going to look better if you have more polygons in the areas that deform, otherwise you can end up with a fairly ugly "sharp" lowpoly silhouette.
Joint position is fairly important too, although personally I try to be more anatomically correct with joint positions when it comes to more high-end characters since it helps them deform more realistically. As Vig says there are tons of things you can do with angle deformers, helper bones and other more advanced rigging methods.
(I think in Maya you must create the edges but in max you can edit the invis edges)
And to cover the basic weighting, if it wasn't clear already.
With the patch you can create, pointy, nubs the farther out you push the joint. Good for bug limbs, old people, skinny people, and cartoons. But the inner part clips more. So you're more likely to add geo to control the clipping. For most things you'll probably get by ok just to place the joint where the center 50/50 vert is.
Ben Mathis is a member of this forum not sure about Jonathan. Either way though you can't always just go reposting stuff you find on the net without asking permission or giving credit. You'd be better off giving a link to the page with the tutorial on it.
With that being said it is nice to see all these examples in one place I've searched the web for weeks looking for good info on low poly joints and I've come across those as well as others, but you need to make sure you have permission to post them as you have.
@ Vig awesome reinteration of pig's info with your twist. Very well explained thanks for that.
Sorry about that, I've posted links for each one before the image. :poly122:
Thanks for the shout out... it's kind of impossible to peg who exactly came up with these joints, as the way I do it is kind of a blend using info I've gotten working with various other artists through the years.
The examples I'm giving aren't so much for use straight out. I should be more clear about that on my site (actually, I should just update the tutorial). These are just base ideas to build upon...
Vig made a much nicer example than mine, and the addition of the weighting diagram goes a long ways too.
Mop and Vig are also dead on when referring to modern applications, with more advanced rigging.
I'm having a hard time with shoulders right now. Perhaps you guys can post a couple pics with suggestions on how the geo should flow on the shoulders and maybe thumbs?
They rotate ok along the Y axis? (I think that's right) But along the X axis The deformations can get all nasty.
Some tips maybe?
Allow me to. It has a few example images that might be useful.
http://wiki.polycount.net/Limb_Topology
I've done a similar method for a while, essentially like they mentioned above, the bendy straw type. I wanted to break into more pronounced muscle geometry, kind of the way a lot of asian games have it, it's been a great challenge so far.
Several times I've wanted to just give up and move on. Seeing what some people can do (like move the arm all the way back and still have near perfect muscle definition) is rather depressing. Once I got everything working good, suddenly I ended up with a bunch of shadow errors (low res fighting the normal map).
So it just never ends.
Part of the problem I would have with the model you posted helldriver is that its all triangles and they're flow is kind of chaotic this is another reason why its good to work in tri strips and quads it makes skin weighting much easier. That's not to say what you have can't work but its going to be harder than it needs to be.
Hang in there everyone goes through those headaches when they're learning
http://www.hippydrome.com/
This might help with topology, joint placement, articulation and weighting.
I made some changes and it fixed some of the issues I was having. Basically it was the inside of the elbow join. I've never had issues before, but now that I'm using normal maps and such, shadow errors are very glaring. Stuff I might have ignored before (such as a sligh dip) now become nasty ugly silloutte errors when you have the normal and specular highlighting things.
I'm on a crunch for time but I'll edit this post with a pic of the shadow error, although I've aleviated it a bit, it still more or less there.
[edit]
Ok the first error
Notice how strangely the lighting behaves as his forearm moves up. This was worse before, but I added additional geo in order to alleviate some of it.
Still, the way the inner forearm-bicep joint highlights seems wrong to me. I could be wrong and I'm just nitpicking. Hence I post it up, perhaps you folk can give some tips. Maybe I'm doing something else wrong.
If this didnt have a normal map, or specular or any of that (standard guraud shaded) this probably wouldnt have been an issue at all.
Second problem:
Middle of the bicep just shadows kind of wierd. In the t-pose I didn't notice that problem, soon as his arm moves downward and the forearm bends up it seems this problem comes up. Now if you notice the other images above, this area is all 1.0 in weight, so it shouldn't really deform at all.
Maybe I'm being nit picky. Anyhow as always the tips, links, and help is always appreciated.
So inside a game engine the lighting system is better I presume?
Taken from: http://www.hourences.com/book/tutorialsvertex.htm
But it all depends on what engine and how they handle lighting and what shaders are applied. That's a big bag of what if's =/
Make sense?