Tutorial - Normal maps from photos. Version 2!
polycounter lvl 20
Take 2! This is a more in-depth version of the tutorial. I'm now using an action i made to generate a blue channel from a normal map. It pumps up the details and makes them VERY punchy so they stick out and actualy look much more convincing.
The tutorial files. - Sorry had to save a 512 to save on space.
So i've been seeing quite a few new environmental artists trying to use the nvidia filter to generate normal maps from photos on your textures. Just a note, its not a "generate a good normal map for me please!" button! The normal maps that come straight out of a non tweeked photographs are poo poo. Please stop using them. You can get great results in just a few more minutes and the results are much more impressive.
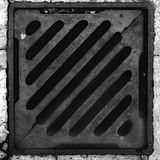
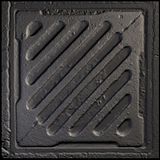
Step 1: Start with your diffuse. This is a cropped image from mayang. Nothing done to it at all.
Step 2: Contrast/Brightness adjustment Basicly just trying to darken the areas that are going to recess and get the brightest highs i can. You can also try auto contrast.
Step 3: Blur it untill you get a medium type level of detail.
Step 4: Blur it again untill you get a high level of detail. High level as in what you would see from a distance.
Step 5: take step 3 and step 4 and make those layers multiply layers. Then add a brightness/contrast adjustment layer and try to adjust the contrast to represent the lowest areas and the highest highs without blowing out all your high detail or crushing out your low details. Collapse these adjustment layers untill you're back to 3 layers. Small details, Medium Details, Large details.
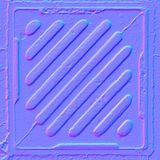
Step 6: Run the nidia filter on all of these layers leaving the small detail layer set to normal. go to the medium level normal map. Run my Fix Blue Channel action (or set it to overlay, go to the blue channel and fill it with 128,128,128). Now do the same to the large level of detail normal map. Clone these layers untill you get a good looking normal map with plenty of contrast. You can tell its a good normal map because of the large areas of transition. This means you'll be able to see all of that high level of detail. If you zoom out of your normal map and you can't see hardly anything but blue you need to clone the layers more untill you get more of a punch as picture above. Here are how many times I cloned the layers.
Step 7: Ok, so you could stop there but here's another action i wrote. This one generates a blue channel based on the normal map. No, it cant TRUELY generate a blue channel to show depth but it can get damn close. You can add depth by painting the cracks or lower areas but it works ok without doing that. Save the normal map as a flat TGA and load up that TGA. Run the Generate Blue Channel action on the tga and it will come up with this black and white map. Copy this layer back into your normal map and name it "NewBlueChannel" just like that... no quotes. Now run my NewBlueChannel (named the same as what your layer should be). It will copy this black and white layer into your normal map's blue channel. I havn't gotten around to combinding these two actions yet but i'll release a one click action later...
 vs
vs 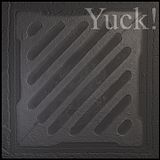
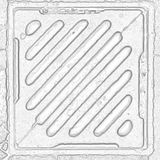
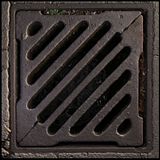
Here is the resulting normal map just from the tweeked photo. I think it shows that a simple photo can produce quite a good looking normal map without any modeling. Of course you're going to need to model anything specific but this technique mixed with modeling can generate awesome results.
 vs
vs 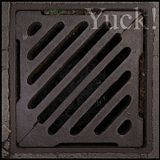
The final Image.
So spend a little more time on your normal maps! They aren't something you just generate and then dont touch. They are quite fun to tweek.
My Normal map actions that will be posted soon.
Fix Blue Channel - Sets the layer to Overlay and fills the blue channel with 128,128,128 grey.
Flip X - Flips the X (aka Red channel) of the normal map.
Flip Y - Flips the Y (aka Green channnel) of the normal map.
Grab Z Depth - Grabs the Blue channel and creats a new layer you can use to overlay on top of your textures. Useful for adding depth to specularity.
Grap Y Light - Grabs the Red channel to be used as a fake light from above. Again, useful in some specular situations.
Gen. Blue Channel - Generates a layer based on the normal map's Red and Green channels to simulate a blue channel. This can be used to pump up the value of a normal map if pasted into the blue channel. You can also use this layer as a specular overlay.
NewBlueChannel - RUN ONLY ON A FLAT TGA! Clone the layer created from the above action back onto a flattened TGA version of your normal map. Name this layer "NewBlueChannel"; the same as the action. It will paste the layer into the blue channel. I've gotten some great results using this technique!
The tutorial files. - Sorry had to save a 512 to save on space.
So i've been seeing quite a few new environmental artists trying to use the nvidia filter to generate normal maps from photos on your textures. Just a note, its not a "generate a good normal map for me please!" button! The normal maps that come straight out of a non tweeked photographs are poo poo. Please stop using them.
You can get great results in just a few more minutes and the results are much more impressive.
Step 1: Start with your diffuse. This is a cropped image from mayang. Nothing done to it at all.

Step 2: Contrast/Brightness adjustment Basicly just trying to darken the areas that are going to recess and get the brightest highs i can. You can also try auto contrast.

Step 3: Blur it untill you get a medium type level of detail.

Step 4: Blur it again untill you get a high level of detail. High level as in what you would see from a distance.

Step 5: take step 3 and step 4 and make those layers multiply layers. Then add a brightness/contrast adjustment layer and try to adjust the contrast to represent the lowest areas and the highest highs without blowing out all your high detail or crushing out your low details. Collapse these adjustment layers untill you're back to 3 layers. Small details, Medium Details, Large details.

Step 6: Run the nidia filter on all of these layers leaving the small detail layer set to normal. go to the medium level normal map. Run my Fix Blue Channel action (or set it to overlay, go to the blue channel and fill it with 128,128,128). Now do the same to the large level of detail normal map. Clone these layers untill you get a good looking normal map with plenty of contrast. You can tell its a good normal map because of the large areas of transition. This means you'll be able to see all of that high level of detail. If you zoom out of your normal map and you can't see hardly anything but blue you need to clone the layers more untill you get more of a punch as picture above. Here are how many times I cloned the layers.


Step 7: Ok, so you could stop there but here's another action i wrote. This one generates a blue channel based on the normal map. No, it cant TRUELY generate a blue channel to show depth but it can get damn close. You can add depth by painting the cracks or lower areas but it works ok without doing that. Save the normal map as a flat TGA and load up that TGA. Run the Generate Blue Channel action on the tga and it will come up with this black and white map. Copy this layer back into your normal map and name it "NewBlueChannel" just like that... no quotes. Now run my NewBlueChannel (named the same as what your layer should be). It will copy this black and white layer into your normal map's blue channel. I havn't gotten around to combinding these two actions yet but i'll release a one click action later...
 vs
vs 
Here is the resulting normal map just from the tweeked photo. I think it shows that a simple photo can produce quite a good looking normal map without any modeling. Of course you're going to need to model anything specific but this technique mixed with modeling can generate awesome results.
 vs
vs 
The final Image.
So spend a little more time on your normal maps!
They aren't something you just generate and then dont touch. They are quite fun to tweek.My Normal map actions that will be posted soon.
Fix Blue Channel - Sets the layer to Overlay and fills the blue channel with 128,128,128 grey.
Flip X - Flips the X (aka Red channel) of the normal map.
Flip Y - Flips the Y (aka Green channnel) of the normal map.
Grab Z Depth - Grabs the Blue channel and creats a new layer you can use to overlay on top of your textures. Useful for adding depth to specularity.
Grap Y Light - Grabs the Red channel to be used as a fake light from above. Again, useful in some specular situations.
Gen. Blue Channel - Generates a layer based on the normal map's Red and Green channels to simulate a blue channel. This can be used to pump up the value of a normal map if pasted into the blue channel. You can also use this layer as a specular overlay.
NewBlueChannel - RUN ONLY ON A FLAT TGA! Clone the layer created from the above action back onto a flattened TGA version of your normal map. Name this layer "NewBlueChannel"; the same as the action. It will paste the layer into the blue channel. I've gotten some great results using this technique!
Replies
thanks dude. good sharing
For example you may have a bright metal surface painted with grey paint. Now if you simply convert that to a normal map it will appear the grey metal sits on top of the dark paint and that's not good. While it's good to take the extra steps to make the normal map "pop" I think it's equally as important to make sure you're feeding the normal mapper correct height information first by painting and adjusting your heightmap before converting.
slum: absolutely.
Marshal Banana: its just photoshop and max. It works the same for any application though.
Or i find it easier to work on a 2D schematic instead of a 3 dimensional surface on a 2d canvas...
However, pretty nifty, but at the end you just edit a colorful bumpmap. Though, maybe you can vibrate the surface via the normalmap leading to some natural forms?
Anyways I have a quick question, is it totally acceptable in the industry for environmental artists to have normal maps that are completely made by the Nvidia filter? Or is the Nvidia filter normally a follow up to some other normal map generator (i.e. high poly mesh or zbrush)? Hopefully its fine for me to ask this here. Im one of these new lower level entry guys who needs help. Thanks again!
For details like cracks and grit. Possibly some rock surfaces using photo's is perfectly fine. In fact if someone handed me a portfolio to look at that had all of the detail zbrushed out i'd think the person was crazy. You need to show the use of photo's as overlays because people in the industry use them all the time. It saves tons of time. However, at least one piece with crazy detail would be good to show off your modeling skills.
For Example, It makes sense to build some bricks in 3d App of choice, load them into zbrush or mudbox and add some details (mostly irregularities, dont go over the top). Later you can reuse the normalmap in several other textures and overlay it with a nvidia filter generated normalmap. Also it is worth to take the time to work with multiple normalmaps (things from highpoly, highpoly presets, photosourced and mixed) also feel free to mask them out!.
But to totally agree with you Sean.But, I think the main problem is people dont even know what a normal map really is (no foundated knowledge). Its so simple, but for some its some sort of "detailing map", seeing a lot of contrast and weird contextless shapes ontop of their washy textures...Next-Gen.
Defintly worth a try, so no pun intended or so Sean ,S r. Character Artist, Hi-Rez Studios
http://www.crazybump.com/beta/download.html
or... you could just avoid all this and use crazybump
http://www.crazybump.com/beta/download.html
[/ QUOTE ]
ftw
or... you could just avoid all this and use crazybump
http://www.crazybump.com/beta/download.html
[/ QUOTE ]
i never used that program untill now. its reallllllyyy helpful.
after its beta is the author going to charge for it or is it going to be a free app?
rawkstar: crazy bump is ok. I still find if you mix its maps with photoshop maps you're going to get much better result. Nothing is ever going to generate you a good normal map just by sliding a slider or clicking some buttons.
Jarrod: The results are up there in the form of a max render. I'm at work right now but i'll try to find a place to upload the PSD as i dont have a webpage anymore.
In the end to each his own method. I still think you'll never get the right results from something that crunches everything down into one layer and does all the work for you. Get your hand dirty. Rawkstar, i know you know how normal maps work. Alot of people at PC do.
Material Editor > Maps > Bump (set to 100) > click None (under Map) > select Normal Bump > under Normal tab click None > select Bitmap > apply the normal there.
i got this from crazybump. the nice thing about crazy bump is its fast to create a pretty good normal map. although some of the details are a bit too harsh for my liking, but that is my mistake in my greyscale map:
however i would still be interested in seeing the .psd file so i can learn how to produce even better normal maps, and without the assistance of another app.
Thanks
Spark
www.bbriley.com
No problem spark, I'm actualy re-doing the tut now including pics on the stages and i'll try to find a place to host the PSD.
[/ QUOTE ]
exellent, images would help, you kind of skipped items in your description at times which made it hard to follow exactly what you were doing.
i could host the .psd for you if you want, or even better you can put together a quick html tutorial page and i'll host it.
e-mail it to me at metalgearsolido8@hotmail.com
updated to version 2.
[/ QUOTE ] .psd and other files
Let me know what you think of version 2 everyone.
Nice one, now stop sucking and come work here!
[/ QUOTE ]
hahaha! If I can convince my wife to move all the way across the US then maybe eventualy.
Jarrod: glad to help!
but in my opinion crazybump is just god gift=)
Sean, nice tutorial. thanks for time!
but in my opinion crazybump is just god gift=)
[/ QUOTE ]
yes it is, but i've actually found seans method to produce slightly better results.
I always want to encorage people to try tweeking normal maps and depend less on filters and "do it for you" programs.
I always want to encorage people to try tweeking normal maps and depend less on filters and "do it for you" programs.
[/ QUOTE ]
i try to do this myself. i feel that if i say i can do something on a resume, then i must be able to do it with the minimum amount of tools required. after i can do that then i feel ok to use "do it for me" programs.
reason being for this is, you are not always going to have the luxury of having those "do it for me" programs with you all the time with every instance you need to do something.
I am sorry but i have to ask you this maybe stupid question.
But how can i collaps my adjustment layers?
If i merg down, it affects and other layer, and it changes the way i want it to be.
Either flatten image (if that works for your situation), or group them (ctrl G) and select the base layer and "merge group". They won't fuck themselves up that way
[/ QUOTE ]
Thanks for the help