Digital painting a pencil sketch - step by step
polycounter lvl 20
Here's a step by step I wrote a few months ago. I haven't posted it around, frankly I am a bit ashamed cos I feel I am a hack when it comes to art (never spend too much time with my art fundamentals). But I'm looking for feedback anyway. Thanks in advance.
Painting Cassy's Face
1.

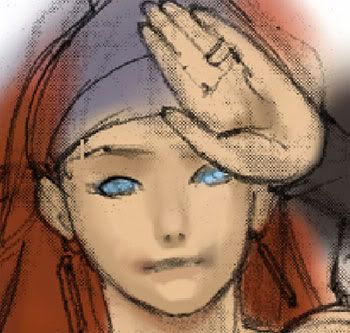
I didn't define her face too well in the sketch, so I have some work to do here. I start by sculpting in the major planes, keeping the palette tight.
I added just tinge of red to give her skin a little flush, and I didn't go too dark. Don't want the colors to go out of control too early on. The eyes were blocked in with a cool base to pop them out the face. A little warm vs. cool contrasting here.
2.
Changed some things I didn't like. Her face was looking chubby, so I brought her chin down a bit, and gave her almond shaped eyes. I drew in the outline with a cool near-black color to back up the base color, and to give them punch. Also drew in her nostrils.
When drawing in features, I like to start by indicating the darkest areas of the t-zone, the area of the face covered by the eyes, nose, and mouth. I p corners of the mouth, the nostrils, the upper eyelid, and the pupil. Plot those down right, and you should have a solid foundation to build on.
Check this out:
Here's a face. It's easier to evaluate in grayscale.
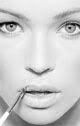
Look what happens when you push the values to the extreme. This is your roadmap.

These gray areas around them are secondary.
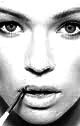
Of course, it really depends on the lighting in the picture. And then it's a matter of how hard you push those contrasts.
3.

Nothing much happens here, just committing the shape from the last step, softening the shadows around the dark areas. I generally work dark to light, transparent brushes (5%-20%)for laying down shadows, opaque brushes for drawing in highlights. And I paint opaque over transparent, or "fat over lean" as much as I can.
I gave her fuller, heart-shaped lips. I used a picture of Rachel Urd-Wood for reference, she has very pretty features, and being only 13, I think is the perfect template for this character. Cute face.
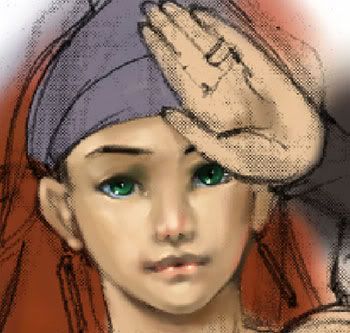
4.
Here's fat over lean in action. Dabbed in the initial highlights using a lighter shade of the flesh color with a little yellow and white mixed in. Notice how the highlights "cut" into the darker areas. I apply highlights with a high opacity (70-90%). Blacked in the eyes, again because I like working from a dark base, but in hindsight maybe using black was overkill. For this stage, sculpting the all the features into an arrangement I like is my main objective.
I also brushed in some dark pinks over her nose and lips using very low opacity, to add some variety to the skin tone. Yeah, yeah, so she looks like she has the sniffles....
5.
Now to get down to details. Very often it's a good idea to start painting from the eyes outwards. The eyes hold 50% or more of the viewer's gaze. Get that part right, and technically you're half done! I wasn't feeling too sure about green eyes, so I searched for a reference picture.
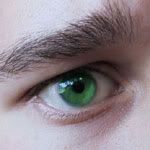
Perfect! When in doubt, use reference.
As for values, I'm going back and forth now, glazing on dark pinks and dabbing on hot highlights, picking colors from the mixing palette. Again, I am sculpting her face, picturing the planes in my head. Here's an example of the kind of visualization you should be doing. (Hogarth example)
I also painted the ear, same process, but in 5 minutes. Hehe. I really did forget to color it in earlier. And the neck got some shadow cast on it, just to leave the face for a bit.
6.
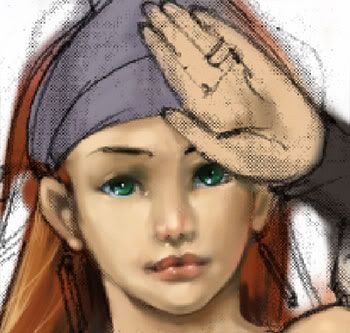
After sitting back and evaluating her face, I thought the look was too angular, so I softened her features by moving around the edges of the planes, especially along her cheeks. Past that, most of the painting here was done around the mouth (since I brought the eyes to about 80%). Eyes, then mouth, is the order I like to work. I feel they are the defining features of a typical human face. Here is a classic example:

Case in point!
I eased up on the shadows around her smile line to make her grin more subtle, by brushing my base color very lightly over the shadows. I am pretty satisfied so I leave the face for now.
7.
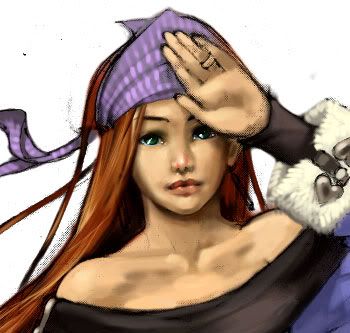
Here is the picture at about 90% done. Not too much has changed. I darkened the overall color, and added near-white highlights in areas to give it punch. Try not to go overboard with the brightest highlights, and leave them as the last step, so they stay clean and crisp. I also framed her face in shadow. Adorable, isn't she??
Certainly not finished, but that is my process in a nutshell! Hope you likes!
Painting Cassy's Face
1.
I didn't define her face too well in the sketch, so I have some work to do here. I start by sculpting in the major planes, keeping the palette tight.
I added just tinge of red to give her skin a little flush, and I didn't go too dark. Don't want the colors to go out of control too early on. The eyes were blocked in with a cool base to pop them out the face. A little warm vs. cool contrasting here.
2.
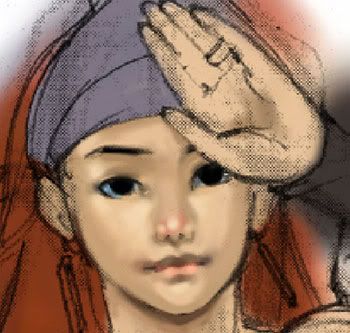
Changed some things I didn't like. Her face was looking chubby, so I brought her chin down a bit, and gave her almond shaped eyes. I drew in the outline with a cool near-black color to back up the base color, and to give them punch. Also drew in her nostrils.
When drawing in features, I like to start by indicating the darkest areas of the t-zone, the area of the face covered by the eyes, nose, and mouth. I p corners of the mouth, the nostrils, the upper eyelid, and the pupil. Plot those down right, and you should have a solid foundation to build on.
Check this out:
Here's a face. It's easier to evaluate in grayscale.
Look what happens when you push the values to the extreme. This is your roadmap.
These gray areas around them are secondary.
Of course, it really depends on the lighting in the picture. And then it's a matter of how hard you push those contrasts.
3.
Nothing much happens here, just committing the shape from the last step, softening the shadows around the dark areas. I generally work dark to light, transparent brushes (5%-20%)for laying down shadows, opaque brushes for drawing in highlights. And I paint opaque over transparent, or "fat over lean" as much as I can.
I gave her fuller, heart-shaped lips. I used a picture of Rachel Urd-Wood for reference, she has very pretty features, and being only 13, I think is the perfect template for this character. Cute face.
4.
Here's fat over lean in action. Dabbed in the initial highlights using a lighter shade of the flesh color with a little yellow and white mixed in. Notice how the highlights "cut" into the darker areas. I apply highlights with a high opacity (70-90%). Blacked in the eyes, again because I like working from a dark base, but in hindsight maybe using black was overkill. For this stage, sculpting the all the features into an arrangement I like is my main objective.
I also brushed in some dark pinks over her nose and lips using very low opacity, to add some variety to the skin tone. Yeah, yeah, so she looks like she has the sniffles....
5.
Now to get down to details. Very often it's a good idea to start painting from the eyes outwards. The eyes hold 50% or more of the viewer's gaze. Get that part right, and technically you're half done! I wasn't feeling too sure about green eyes, so I searched for a reference picture.
Perfect! When in doubt, use reference.
As for values, I'm going back and forth now, glazing on dark pinks and dabbing on hot highlights, picking colors from the mixing palette. Again, I am sculpting her face, picturing the planes in my head. Here's an example of the kind of visualization you should be doing. (Hogarth example)
I also painted the ear, same process, but in 5 minutes. Hehe. I really did forget to color it in earlier. And the neck got some shadow cast on it, just to leave the face for a bit.
6.
After sitting back and evaluating her face, I thought the look was too angular, so I softened her features by moving around the edges of the planes, especially along her cheeks. Past that, most of the painting here was done around the mouth (since I brought the eyes to about 80%). Eyes, then mouth, is the order I like to work. I feel they are the defining features of a typical human face. Here is a classic example:
Case in point!
I eased up on the shadows around her smile line to make her grin more subtle, by brushing my base color very lightly over the shadows. I am pretty satisfied so I leave the face for now.
7.
Here is the picture at about 90% done. Not too much has changed. I darkened the overall color, and added near-white highlights in areas to give it punch. Try not to go overboard with the brightest highlights, and leave them as the last step, so they stay clean and crisp. I also framed her face in shadow. Adorable, isn't she??
Certainly not finished, but that is my process in a nutshell! Hope you likes!
Replies
Thanks for the tut Snowfly, and very nice pic so far