The Bi-Monthly Environment Art Challenge | November - December (99)

quad damage
Hello everyone and welcome to the 99th edition of the Bi-Monthly Environment Art Challenge for the months of November and December!
This challenge is a way for real-time 3D artists to test their skills and create a piece of work based on concepts provided. It's open to those of all skill levels and we do our best to provide meaningful feedback along the way so everyone can come away from the challenge with actionable points on which they can improve their craft!
- ENVIRONMENTS -
HARD SURFACE ENVIRONMENT:
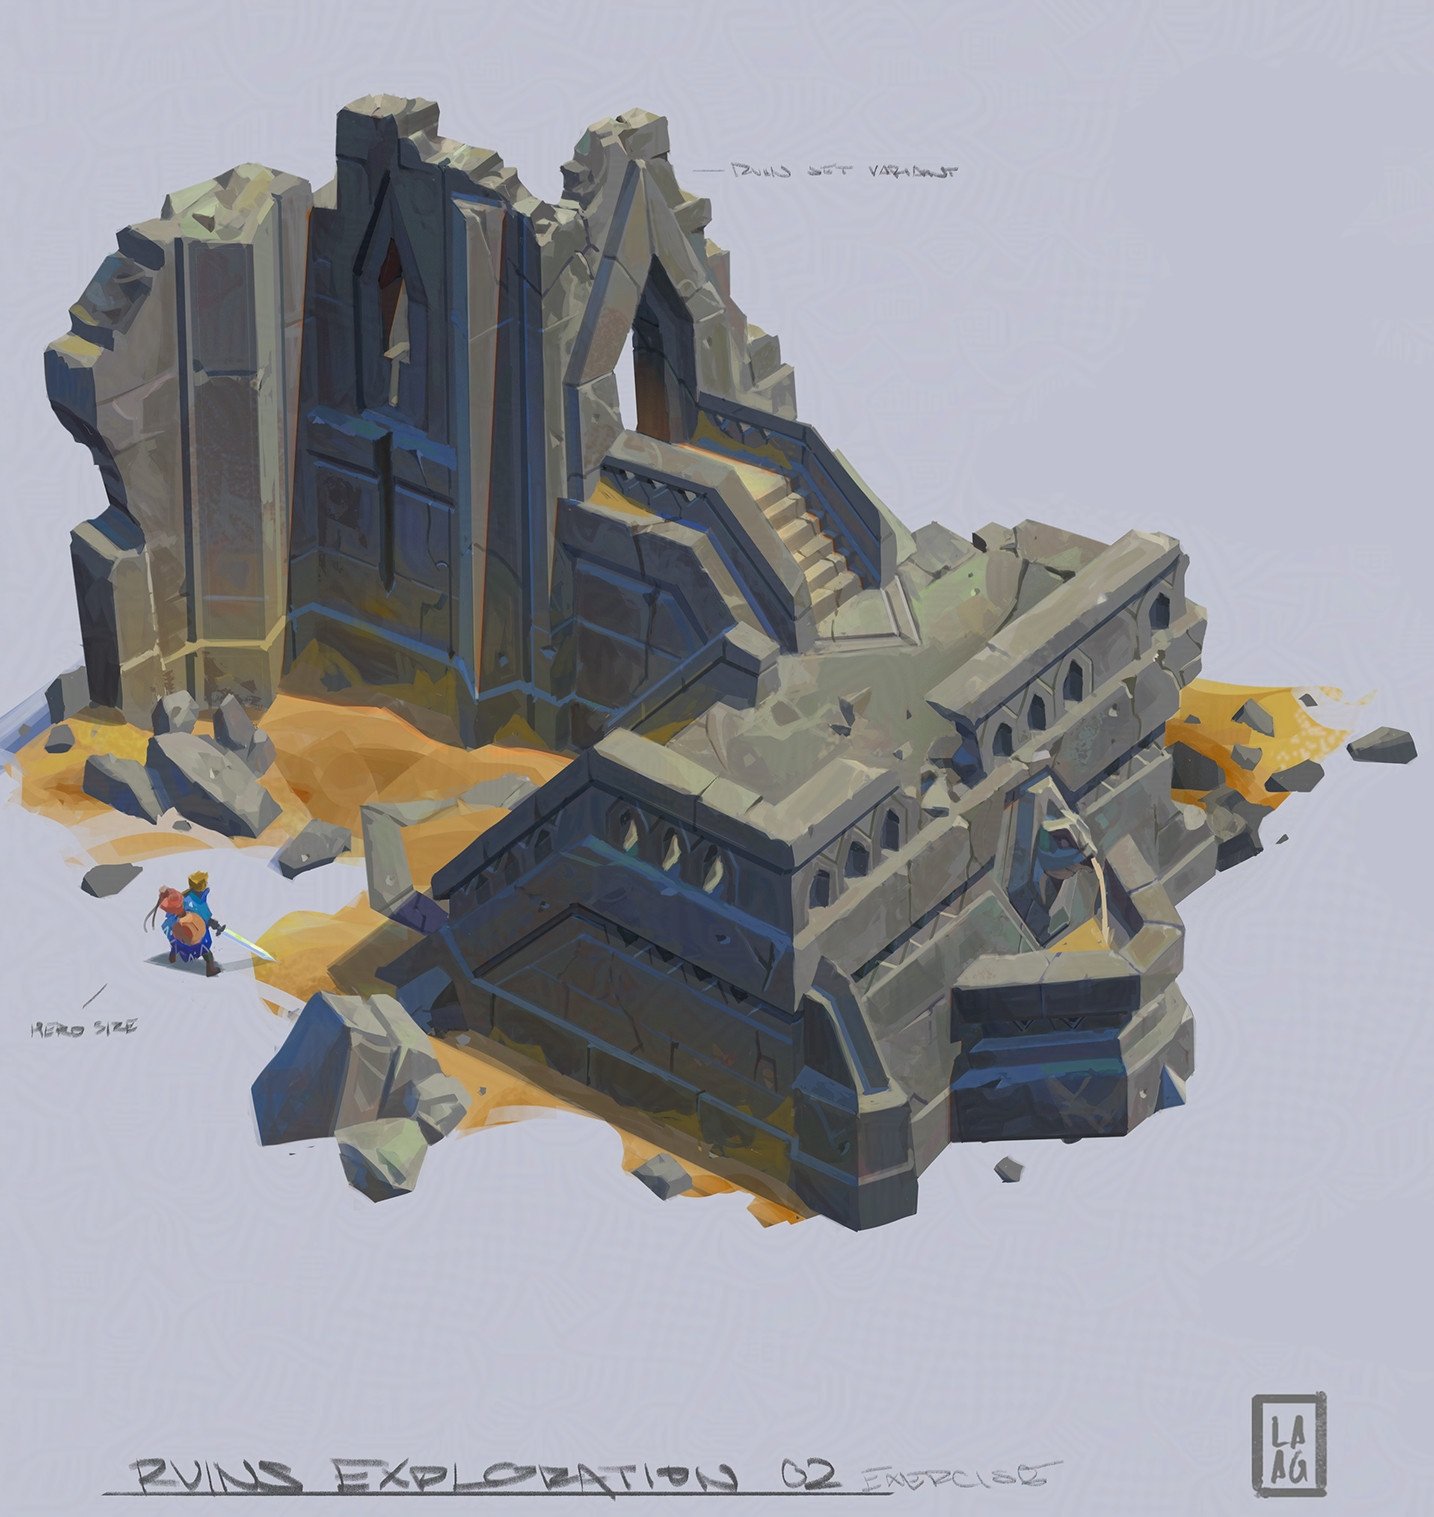
Dungeon Stage - Foundations Course by Jose Vega
STYLIZED ENVIRONMENT:
Enviroment Art & Worldbuilding by Dardo Studios
- PROPS -
HARD SURFACE PROP:
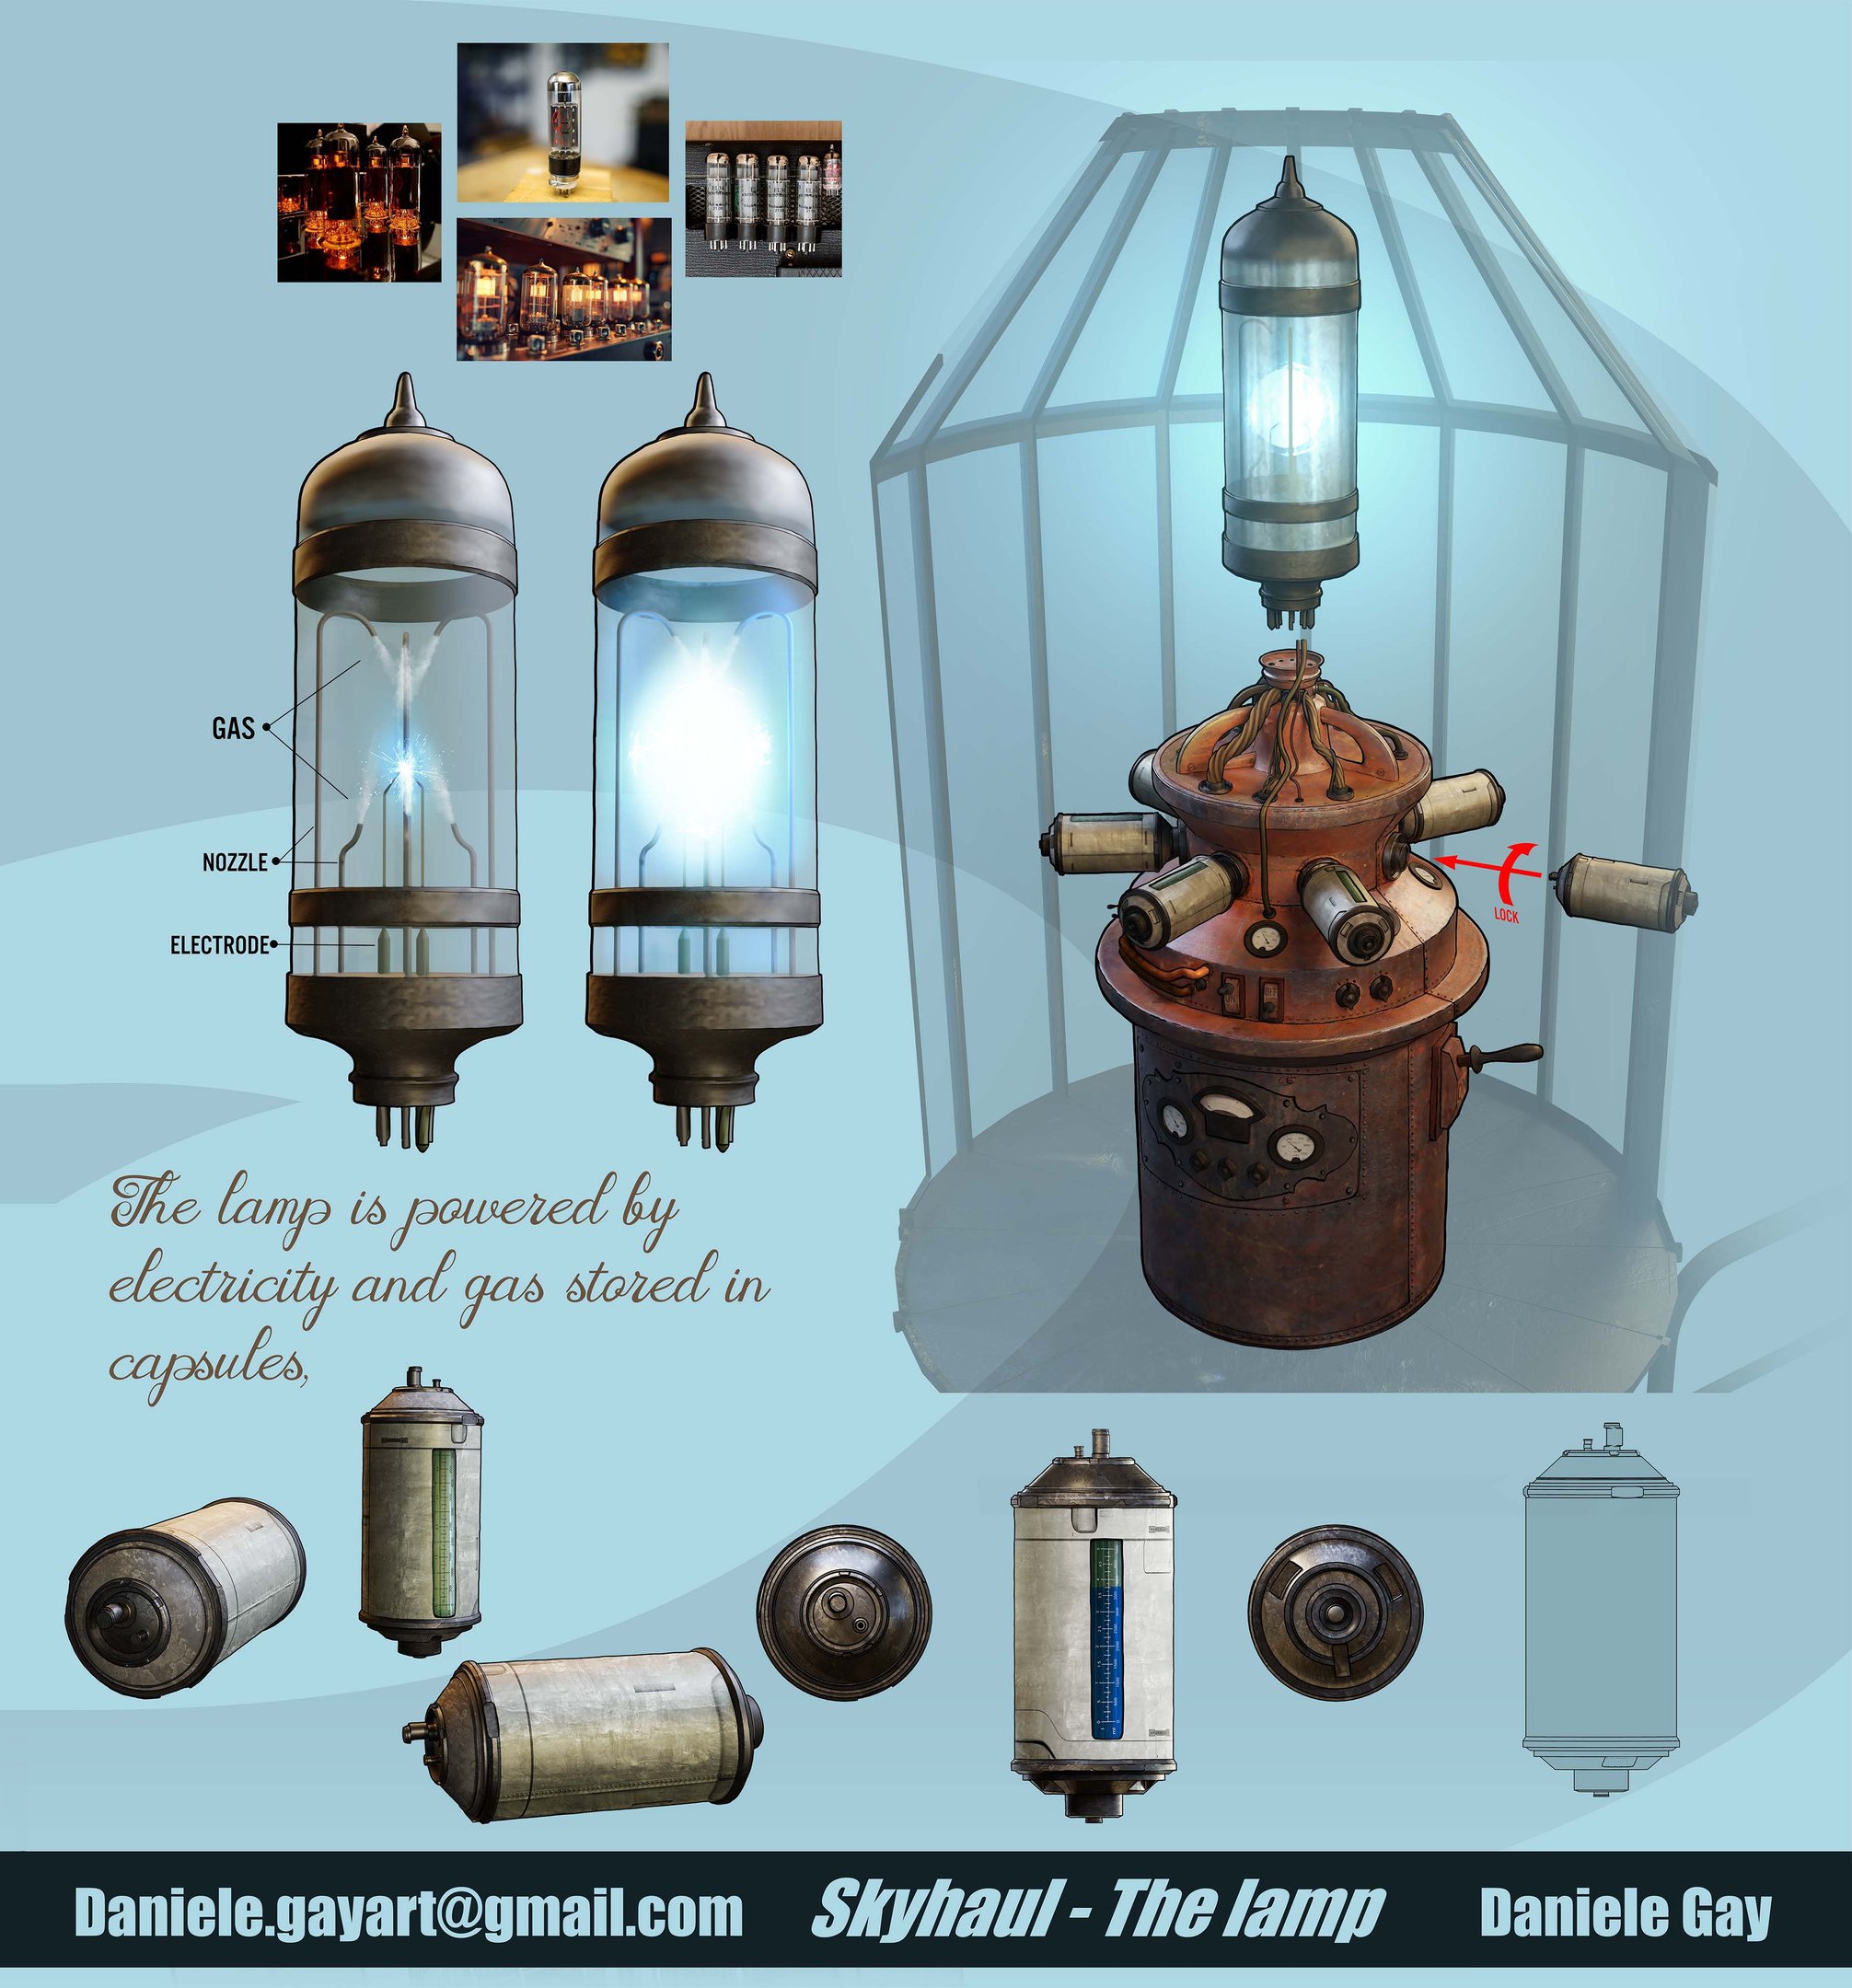
Skyhaul - Karlsson house - chapter 01 by Daniele Gay
STYLIZED PROP:
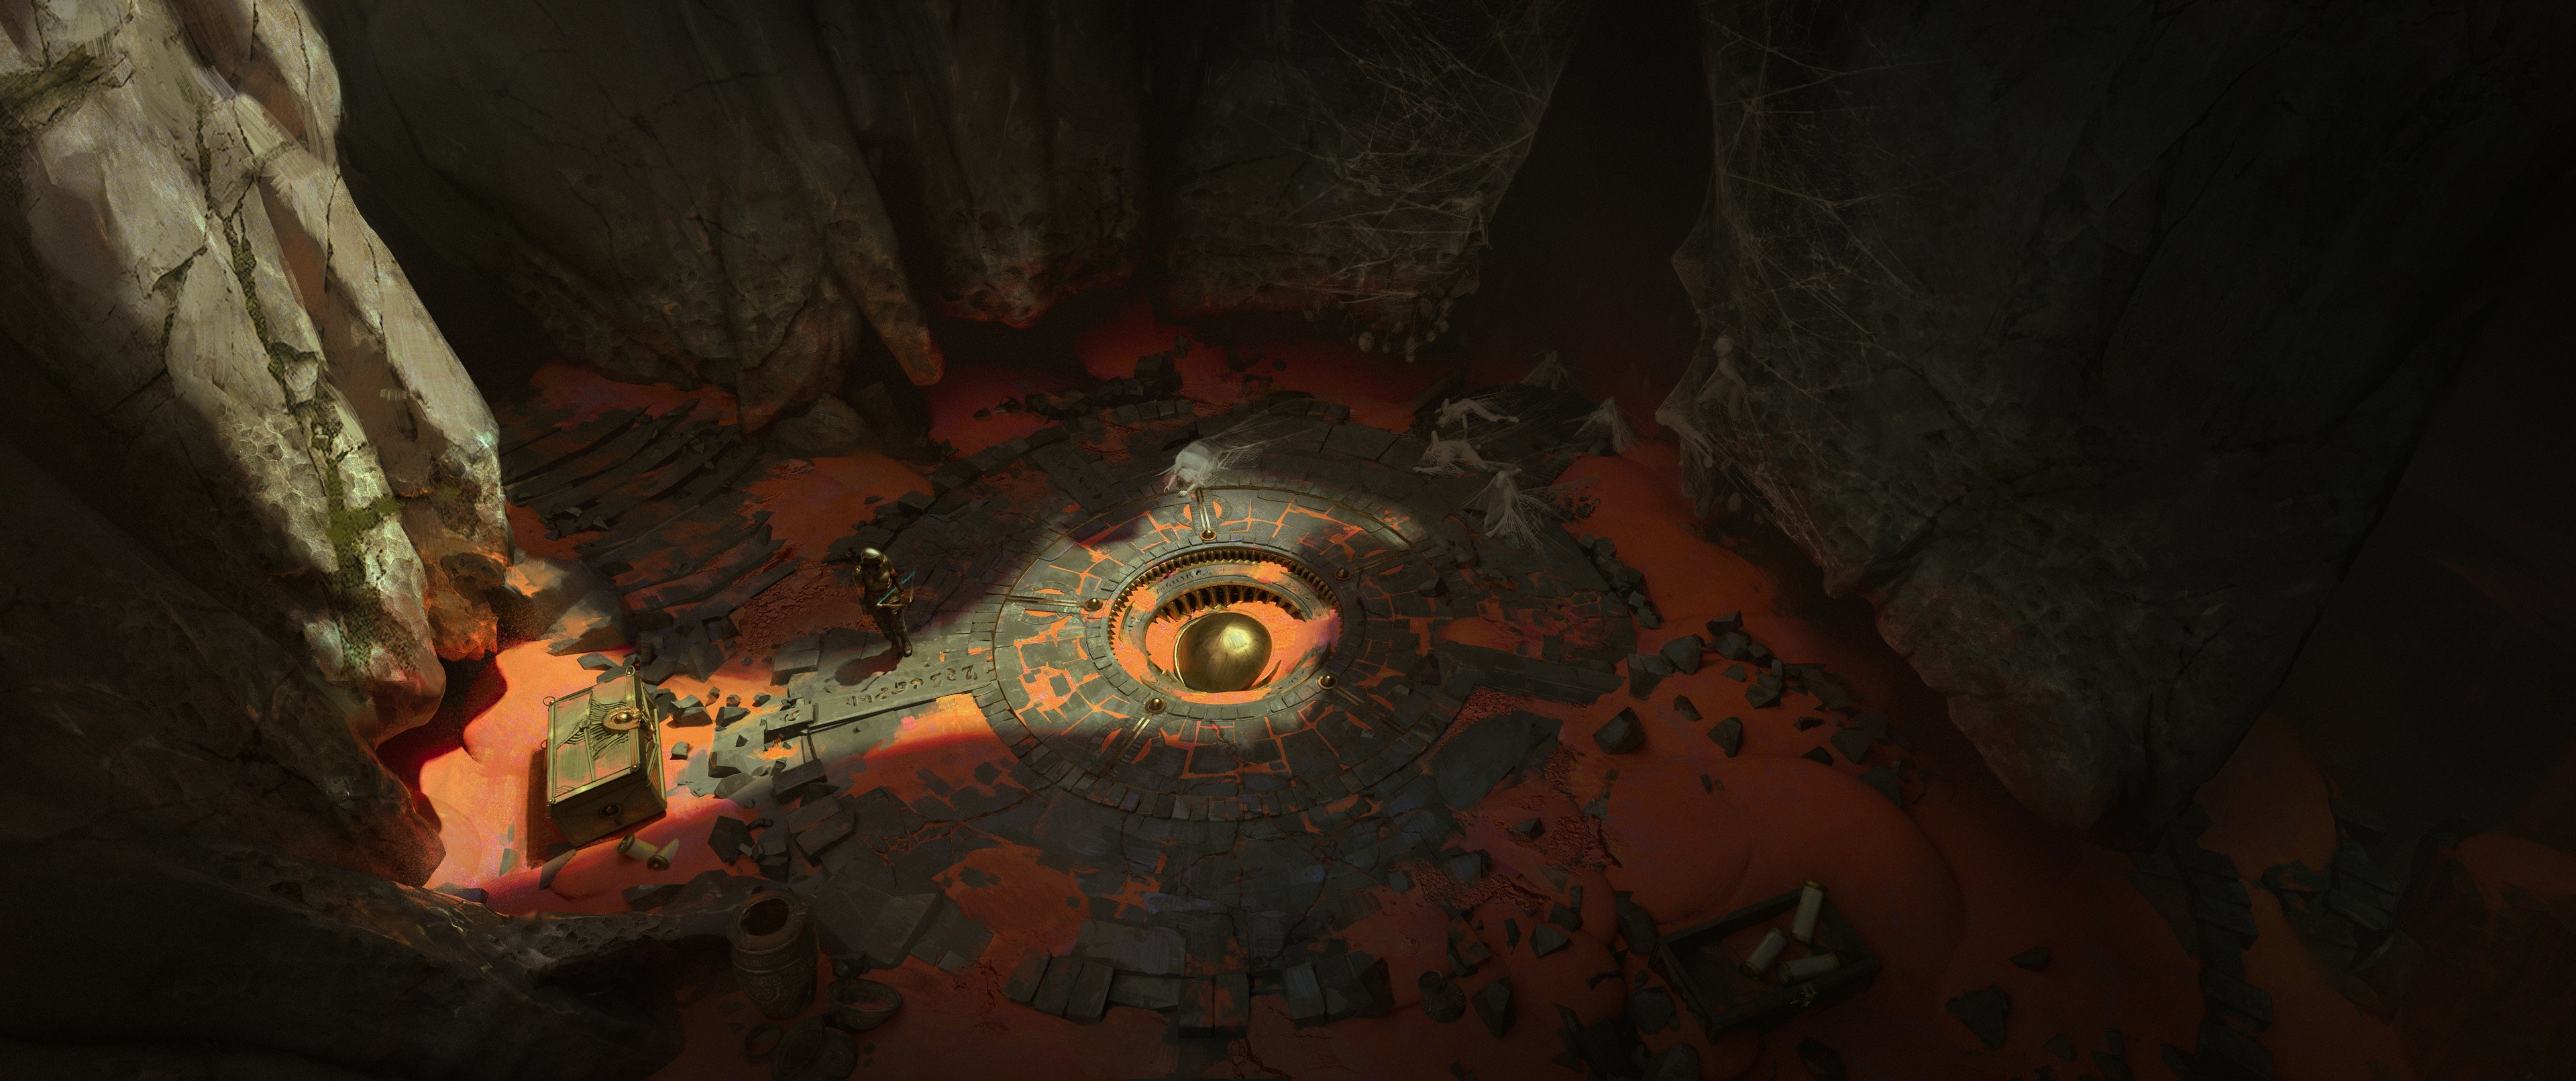
Neo Cortex's Castle and the Toxic Tunnels concept art for Crash Bandicoot 4: It's About Time by Jeff Murchie
- RULES -
Please read all the rules before starting:- Try to post at least one critique for every post that you make. This will make for a better learning environment and help us all grow as artists.
- Try your best to finish as much as you can in the time frame provided, but remember even if you don't finish by the end of the challenge we encourage you to keep pushing and finish your piece!
- Post what you are working on in this thread so that way it's a more centralized place for advice and critique. Please avoid creating a new thread as we don't want to spam out the forums.
- It is recommended to use a game engine to present your work. Unreal Engine, Unity, and Godot are very common engines that can be used but feel free to use any alternatives that you want.
- 3D Viewers (Sketchfab, Marmoset Viewer, etc) are welcome, but please note that their contents can be stolen by those who know how. Please ensure you're comfortable with this potential before using one.
- Feel free to change up your chosen concept a bit if you want! Interpret these concepts to your liking, especially if your aim is to add storytelling elements.
- If you finish your project and decide to post it to something like Artstation, make sure you give credit to the concept artist in the form of a link to their profile. Additionally, it is recommended to ask a concept artist for their permission to post a 3D piece based on their work before doing so.
- RECOMMENDATIONS -
- When you are just starting out making a scene, it can seem complicated or imposing. Take your time planning and blocking out, it will set you up for success later on.
- Think about how you can re-use assets, re-use textures, break it down as simple as possible and plan it out. A lot of people will break it down in their own way when they start out their challenge. Gather some reference images as well for different parts of the scene, don't be afraid to make it your own.
- We strongly encourage you to go and look at other games and see how they make their assets as well as get concept art to give it your own feel.
- The goal is to learn and grow both artistically and in your ability to both give and receive critique, but don't stress about it and remember to have fun!
Replies
Just simple modeling, controlling shading via hard edges, don't intend to do any highpoly/ sculpting. Rendering in Unity engine, baked lighting with Bakery. Next, I would apply surfacing, probably using a hand-painted trim atlas. Final result could be a web build with camera controls, would be sweet to have a pawn to walk around the scene.
Ah, wip on Sketchfab
model
Well, excited to see what others do with the concepts :-B
edit: Oh wow that yellow looks garish. Should have double-checked the color without f.lux enabled. Ok, updated renders
I chose the Hard Surface Prop, which in my head I said I would model in one go. But now that I've started, that doesn't seem as feasible. I'm thinking the thing that took up the most of my time was trying to figure out the scale.
In any case, I'm not trying to take too long on this one. I mostly want to get it finished, so I'm moving on even if things are imperfect.
My goal is literally to just finish a project (y'all know how it is...)
I'm using Maya to model and will be using Substance for textures later on.
Here is my blockout progress and then my started model:
The blockout was used to simply get an idea of the shapes and sizes in reference to one another (I'm telling y'all I was struggling with the scale).
If anybody has tips or feedback on the scale thing when you don't know how big things are, that would be greatly appreciated.
What I did use was the scale of the human on their artstation page, but it still seemed inconsistent, so maybe I'm missing something here.
Below is the model so far. Like I said, I thought I could get this all done in one go, but I lost momentum as the day went by.
Overall it took me about an hour and 20 mins to blockout. About 2hrs to get the model to this state.
Thanks in advance for feedback/tips! Good luck everyone!
I made progress on the canisters and have been UVing some things here and there along the way.
Minor changes, but I'm hoping tomorrow I'll do more re: the wires and affixing things to the frame.
Overall I did another 2hrs of modeling today + 20mins or so of UVs.
Here I have a wireframe as well^
Lastly, the progress on the canister:
On the left is what it was before and on the right is where I ended up today. Everything else I'll be doing within Substance as Normal decals and such.
I'm predicting I'll be working on this for another 3 days and call it finished.
Today I did about an hour and 20 mins of modeling + 20mins of UV mapping.
I focused on the top lamp part, which had previously only been a cylinder. I changed the proportions and fit it onto the main base mesh.
I also started added more details toward the top of the base where all the wires are supposed to come out of.
Speaking of wires, I'm adding those next. I started adding some curves in order to start but had a Friendsgiving dinner to attend to today and did not get to continue.
Will try to finish the model tomorrow + all UVs. I want to start organizing my outliner and texturing right away.
This is it so far:
See y'all tomorrow~
-K
I think my use of the boolean modifier is pretty standard. The newly cut faces receive UVs and Material IDs from the cutter, which makes it possible to control their appearance. Possibly vertex color transfers too, haven't checked that. The main difference to Maya might be that the boolean operation is non-destructive, done with a modifier, and I don't know if Maya has something like modifiers (Iirc Max has). But I think modeling and re-projecting UVs is not much slower, possibly even good to commit to a shape at some point.
I have started some textures and applied it to the model. And of course, I started going down rabbit-holes
Created a simple figure based on third person template to walk around the environment, switched lighting to mixed (dynamic directional light, baked GI), simple skybox texture, added some particles. Did a web build and uploaded it on itch (will update it).
Screenshot of current web build:
My next step could (should) be refining and completing the texture atlas for the structure. Here is the 2D texture I have been using so far (at half res). I wonder if I should model and bake or hand-paint.
Good week!
Today I did about 3hrs of only modeling + doing some tutorials for some of the twisted cable parts, which I think turned out super awesome and learned a new way to make cables/wires that twist: using Sweep Mesh tool, under the Create Menu.
Here's the tutorial I used. I think the cylinder on an EP curve is great, but Sweep Mesh allowed me to add complexity to my cables in one fell swoop. Definitely a tool I loved (I only found out about it for the twisty wires, so I had already done all the others "by hand" lol).
I also started the inner part of the light fixture, which I've decided not to put too much detail into, since I assume it will be hard to see with the light on. I've also added some bevels and more fidelity to the canisters (I have yet to duplicate special them, I should've used instances instead of copies...)
Overall, I think it's going really well. I reached out to the concept artist to ask if I could post this when I'm finished and they said yes! So I'm excited to share it on my page afterwards. I've been working through this as a practice piece more than anything else, but I still think it's worth sharing it, even if doesn't end up in my portfolio.
The next thing I will tackle with this one is UVs and moving on to texturing. Is this going to be a project I finish? *gasp* Stay tuned haha!
-K
As for software, I think I'll either just present it within the Substance Painter Renderer BUT I do want to try putting it into Unreal Engine, so maybe that one.
Your web build is pretty cool! Did you model that character or used a store asset? Did you rig it? Or did it come already rigged?
As for baking vs hand painting... It's a pretty small piece that I think it could even be meditative to hand paint it so... that's my vote!
Personally, I like bringing the assets into a game-engine, since this opens up more options in regards to lighting, camera/ sequences, custom materials, particles and so on. And of course, it's a good implementation practice. Targeting game engine, I find it helpful to setup the assets in engine from the very beginning, then just update them throughout the process, evaluating in engine.
Thanks for checking out the web build
DataTransfer modifier used to copy skin-weights, Mask modifier to remove occluded geo (defined by vertex group) to reduce clipping
Not quite happy with how the cape is deforming yet. Tried using some cloth-sim, but in the build it looked to jittery so I disabled it for now. Perhaps I find a way to improve it.
Do you think I'm able to do the same thing you did in Blender, but in Maya? About using the Unreal Mannequin?
I think you did a great job, are you going to mess with the cloth-sim further? Or just leave it?
In Maya, the function to transfer skin weights from one mesh to another would be Skin > Copy Skin Weights. Transferring skin weights from a proxy mesh is particularly useful when dealing with double sided cloth. Since the Unreal Mannequin was likely created in Maya, I assume the skeletal mesh would import without issue. If it is so, some standard, automatic skin-weighting to the skeleton should be very achievable as well. Then, you need to export so it matches the unreal skeleton (hierarchy), here perhaps the Game Exporter becomes handy (for game asset exports generally). I'm sure there are a tutorials about this.
Today I did about 2hrs of UV mapping shenanigans, fixing things I kept messing up with, and another hour of last minute modeling and organizing my scene.
Clean outliner FTW
I added a separation for the measuring thing on the canister and started setting up Vertex Colors.
Unfortunately I got so caught up with the Vertex Colors that I forgot to add actual materials within Maya so when I baked in Substance Painter it turned out like this...
Yikes!! I'll definitely have to fix this, but I'm pretty tired today so I'll tackle this tomorrow.
Does anyone have any tips for a checklist when texturing/exporting? I think I tend to forget steps from time to time, so I think I'll have to make a checklist for my workflow haha (admittedly forgetting the actual materials is kinda wild of me lol but I think I was just excited to get to texturing)
In any case, hopefully tomorrow I can finish and present this thing!! How exciting!
Cheers!
-K
I can't wait to see your web build with updated cloth sim!
What did I do since last update? Adjusted cloth skinning some (can't seem to get cloth sim to work correctly for web), added some other elements from concept, checking the concept scaled up main structure, worked on textures and materials, extended ground, added some movement to skybox via UV distortion.
Pressing '1' and '2' on the keyboard allows switching between turntable (turning way too fast
Looking at the screenshots, I'd like to add geometric detail to the main structure, bevels and damage, improve textures, improve scene layout, iterate on additional structures. Then color wanderer using vertex paint? Some moving sand would be cool. It's getting more and more
Looks like the top of this vase is missing a cap:
Two screenshots of the latest build:
Some notes on what I did:
Footsteps
Bounce light from sand
While I increased the indirect lighting contribution of the main lights, the bounce-light felt too subtle. I added some more by placing some area lights below the sand and added a 'bakery light mesh' component to the sand skirts. I also added another non-shadowcasting directional light, just affecting the figure to light it up from below, as light was reflected from the sand. I first tried doing this effect in the shader, but couldn't make it look good. For the sand material, blended in a macro texture to lessen visible tiling (well, it's same texture with a different UV scale) by a sphere mask from camera pos. Switching between two radius values based on what camera is active.
Light source
Added a light-source emitting a blueish light. It has a non-shadowcasting component just affecting the figure and a baked component for the static environment. Created a simple sprite sheet in Photoshop, to be used by a particle system.
What do I want to do next? Flesh out the area around the light, add some moving/ flowing/ falling sands elements, improve structures, improve figure.
I got to the texturing part finally! I'm running into some issues though. This time I focused mostly on the base of the model, I used a Smart Material to start off and added some of my own things in there and tweaked things a bit. Added color variation and a subtle height map with some bumps, as well as AO.
I also added some decals and normal details like the rivets and screws. I want to add even more dirt/grime to this.
I got some artifacts in the bake and I'm not sure how to fix them. They're not particularly egregious but if I can prevent them from happening again, that would be great, so if anyone has any tips on baking, please send them my way!
I added another smart material that I plan on modifying to the canisters, but didn't get a chance to tweak them. Overall I spent about 3 hrs within the texturing process so far. A lot of that time was spent playing with the brushes, decals, and trying to figure out the vertex colors thing.
I used vertex colors but forgot how to use them while texturing... *sigh* I'll just have to go have a look at the tutorial again.
Unfortunately I told myself I wouldn't spend longer than a week on this project and thus, I will have to stop this here for now. I got frustrated with the textures and realize I have to recap the tutorials I watched, so I can jump in again. However, I really need to move on to a different project as of now. BUT I WILL BE BACK and finish this, I'm literally so close to finishing it, how could I not? I'll probably have to give updates on a separate thread once this one closes for the challenge.
Anyway, cheers to all those working on the challenges! (I think just you @Fabi_G and me?)
@Fabi_G
I checked out your latest build! I love the the footsteps! Nice detail.
Oh and the polycount shoutout!
It was a pleasure to be in this challenge with you. Great work and good luck out there in the pixelated world!
That bake issue is curious :-B Could try if triangulating that area fixes anything (if you haven't already done so). If you want a second pair of eyes on it, feel free to share that part by attaching a zip to post or pm.
With some new work starting tomorrow, I tried to wrap it up. Quite some tweaking and builds happened since my last update, so I'll write what I can remember :P
(hope the video shows :P)
Not done yet, BUT I made some good progress for the past two days. I fixed some stuff with the bake and have been mostly just texturing.
My goal for this pass is just to get all the parts organized and with some sort of texture on them. I've done about 4 hours of texture work on this from last time. Here is my progress so far:
Added decals for gauges, ON/OFF buttons and decals for canisters. Added materials to most things including wires and a lot of secondary geometry.
Any feedback is much appreciated! I'll still be working on it this weekend and hopefully finish by Sunday. I have other projects needing my attention, but couldn't leave this like this!!
Next thing I gotta figure out is how to do see-through glass in Substance...
Hi guys! Lovely to see everyone having fun with this challenge.
TW: TRYPOPHOBIA
I attempted to recreate artist Jose Vega’s Dungeon Stage concept in Unreal Engine. His ideation process is fascinating and the featured artwork has so many interesting elements that ended up giving me serious scope creep.
For this project, my focuses were material blending, lighting, and set dressing. Partly due to time constraints, I employed minimal modeling and primarily used third-party props, continually experimenting with composition while working on other elements. I had a lot of fun scattering rubble around the scene and trying to be intentional with every set of debris.
I tried to break repetition through scale, rotation, and placement to match organic variation in the concept. The honeycomb rock material was made in Substance Sampler, duplicated with adjusted tiling values, then blended back into the original using mesh painting. Even though there were some deviations early on, I eventually decided to follow Jose's composition.
Here, spotlights are used for softer transitions and focal guidance. I would love some feedback and advice on this area as I find lighting challenging but incredibly fulfilling.
Here's the final render. Hope you like it!
This is my first completed project in Unreal Engine. Even though my focus is on another assignment right now, I’d 100% like to revisit this environment and refine it further. Any critique is welcome!
Featured Asset Packs:
Valley of the Ancient
Dark Ruins Megascans Sample
Ancient Treasures
Dungeon Environment
Wow, that looks great @1ordqn
I think it would be cool if there was some sand bounce light coloring the bottom part of the walls. Perhaps a mix of bounce light and sand/ dust coverage.
The stones of that round platform look tad too round/ bumpy in my opinion, perhaps more fit for wall than floor. But perhaps it was a deliberate choice.
Thank you @littleclaude Changing the big forms is always intimidating for me, but the rocks definitely could use more contrast... I'll see what I can do!
I'm really happy with it! I could've kept pushing but overall I'm proud of where it is right now (trying to be deadline-driven, not focusing on perfecting all the details... plus the point was to finish and I did!)
Here are some renders I did within Substance. I was going to try to render in Unreal but I think I'm going to have to save that for later.
I just uploaded to artstation so if you want to see more renders please check it out: https://www.artstation.com/artwork/RKxabv
It was my first time doing a challenge online and this was honestly really fun. Thank you @Fabi_G and everyone who's been quietly cheering us on!
Happy winter solstice everyone! Happy New Year!
started on this one a while ago but didn't have much time to finish, hope to do so soon (not 6 months later)
i made it into a high poly, the wires were kinda looking bad when its low, and baking the details didn't feel good either, so i kept the high as it is.
to do: guage meter to spin around with noise like it can't detect the numbers, adjust lighting for close shots, and particles for the light above like smoke > into sparts > into lit
[for some reason it fail to upload 5 scale render, this is 3 scale, glass shader on can's dosen't show well from this distance.]
the gauge above dosen't show as much but this is closer, still adjusting ligthing for close up shots.
https://www.artstation.com/artwork/Gvov8N