Confusion with Normal baking issues around edges/borders

polycounter lvl 6
Hi
This issue has been a reoccuring problem that I've not been able to figure out and was wondering if someone could help me? For a clothing asset I've made, I've followed this workflow on getting clean topology and UVs from Marvelous Designer to Maya/ZBrush - https://www.artstation.com/blogs/emilie_boisvert/RDKR/marvelous-designer-to-maya-part-1-retopology-domo-arigato-auto-retopo
Everything has worked nicely and I used the same method for adding thickness, unitizing the thin outer edges/borders and they've all baked nicely in Substance Painter. Can't say I've noticed any glaring issues; they all look pretty clean.")


But with another piece - a gorget - I don't seem to be getting the same results. There are thin strips that I've used Unitize on and then unfolded along either U or V and then straightened. It has the same resolution. For test bakes 1K and for the final bakes it'll be 4K. However for the gorget, I'm not getting clean results.

What could the reason be for this? Is it because edges like this need to be thicker...? They certainly are for the clothing anyway. The low and high are matching pretty well, though I know there's a few areas where the silhouette isn't quite right. I can sort this out another time. I've deleted the inside faces and part of the back, which won't be seen, and I've also included some additional edge loops to better match the curvature. And yes, I've played around with the Frontal Distance slider. I get that these long thin strips aren't very big, and therefore won't get much resolution, which is what I chalked it up to before, but then, they're not for the clothing either. And those baked out fine.


Any ideas? Or any advice on how to get them to bake nicely? Thanks.
This issue has been a reoccuring problem that I've not been able to figure out and was wondering if someone could help me? For a clothing asset I've made, I've followed this workflow on getting clean topology and UVs from Marvelous Designer to Maya/ZBrush - https://www.artstation.com/blogs/emilie_boisvert/RDKR/marvelous-designer-to-maya-part-1-retopology-domo-arigato-auto-retopo
Everything has worked nicely and I used the same method for adding thickness, unitizing the thin outer edges/borders and they've all baked nicely in Substance Painter. Can't say I've noticed any glaring issues; they all look pretty clean.
But with another piece - a gorget - I don't seem to be getting the same results. There are thin strips that I've used Unitize on and then unfolded along either U or V and then straightened. It has the same resolution. For test bakes 1K and for the final bakes it'll be 4K. However for the gorget, I'm not getting clean results.
What could the reason be for this? Is it because edges like this need to be thicker...? They certainly are for the clothing anyway. The low and high are matching pretty well, though I know there's a few areas where the silhouette isn't quite right. I can sort this out another time. I've deleted the inside faces and part of the back, which won't be seen, and I've also included some additional edge loops to better match the curvature. And yes, I've played around with the Frontal Distance slider. I get that these long thin strips aren't very big, and therefore won't get much resolution, which is what I chalked it up to before, but then, they're not for the clothing either. And those baked out fine.
Any ideas? Or any advice on how to get them to bake nicely? Thanks.
Replies
But it's mainly these thin strips/borders here:
The quality always looks quite low or there's some bleed.
https://www.dropbox.com/scl/fi/kfnzhduj1mleakc8ve11w/gorget_high.fbx?rlkey=wyh6tu60stir1cgndqf9y710n&st=retamg50&dl=0
https://www.dropbox.com/scl/fi/r2g4vs4pdd85xy2qo6noo/SP_PretaGarb.spp?rlkey=qz2wiel8lnlj7bxk50wh7qelz&st=bzun9s5h&dl=0
Ironically enough, when I did another experiment with just the object on its own, and did a test bake at 1K, everything was perfectly fine. o_O
EDIT: The links don't work for me :-\
I think big part of the issue your describing is that the difference of the curvatures between high and low of the gorget is too great - but the highpoly would be best improved as well (see below).
Low Poly
Comparing the density of the different lowpoly meshes, it looks inconsistent, the gorget element being the lightest. I would reduce polycount on some smaller elements (purse strings quite dense) and increase resolution of the gorget, particularly it's curvature. Occluded areas, such as the insides of the gorget can be reduced, or even capped off, depending how you want to use it. Currently, the head opening of the gorget has the same amount of edges as the chest one - in such cases you can split edges as a shape is expanding, with the goal to keep a more even density.It looks like there are some hard edges without UV splits. When baking the normal map, I expect some visible seams here.
In areas where you have a UV seam along edges with steep angles, like on the seams on the knotted cloth, I would add hard edges. That way the normal map has to compensate less.
Aligning UV borders with the pixel grid will minimize aliasing artifacts. Doing so will likely introduce some stretching. Personally, I would trade stretching for cleaner bakes. For example:
I attached an edited lowpoly with all those points implemented, named 'Accessoirs_low'.
Highpoly
Looking at the highpoly, I see it has hard edges. Recommend to make those smooth, unless you want faceting in your bakes, which become more obvious at higher texture resolutions. With the extrusions/details some edges are so close to each other that the shading will remain fairly sharp. Note that super sharp, un-beveled edges means very tight shading, no shading gradients and therefore the information to be captured by the normal map is very narrow. I would try slightly exaggerated bevels. I think you'd basically want your highpoly to read nicely a various distances, edges having enough width to catch light.Using a Mid-Poly?
Likely depends much on the specific workflow and subject, but I'd argue in certain cases you might get a better result baking from a more mid-poly with cautiously authored shading. At the same time lowpoly and 'high'poly match more closely. Here is a quick test (at 2k res):A - baked highpoly (edited some, removed hard edges), textures showing waviness, attached file 'gorget_high_modified'
B - baked a modfied lowpoly (beveled edges/ shading), attached file 'Gorget_high_midLowpoly'
Skewing
I would keep skewing, as a result of baking with averaged vertex normals, in mind. I think the shading of the lower rows of rivets in the screenshots you shared earlier shows this. Based on the cage preview in Painter, you can tell where it's going to happen.There are several options to address this (and probably more I can't think of currently):
Random notes
With the exported mesh imported, it appears the gorget element is symmetrical, but the mesh is not centered. I would make sure that symmetrical elements are centered so they are easily mirrored or edited symmetrically.Since the bake settings in the Painter file were quite high (4k with 64x Supersampling
Well, that took longer than I expected
Much success with the project!
I was a bit unsure whether or not to modify the purse strings. I didn't want to reduce them too much in case there wasn't enough curvature and the bakes came out bad. I don't think they're that dense personally. If anything, I think the cloth knot is a bit much for what it could be. The tri budget is around 25-35K. Everything together, including the clothing, sits at around 36K. So I could get that cloth knot reduced a bit. Maybe even the coin purse. I'm a bit confused why you've written 4K for the cords. Unless the file I sent is using a slightly higher subdiv than I intended. In my Maya scene, they're about 1120K. ^^
To be honest, I didn't even think about capping off the hole of the gorget; good call. The inside faces/thickness I was going to remove after the bakes, but capping would be better. Will probably do that for the high as well. I'm a little bit unsure about this part:
Currently, the head opening of the gorget has the same amount of edges as the chest one - in such cases you can split edges as a shape is expanding, with the goal to keep a more even density.
How do you mean exactly? Do you mean for me to add additional edge loops through the main body of the gorget and then terminate them with tris towards the neck?
Regarding the edges of the knotted cloth - wouldn't a bevelled edge be any good then? I figured for things like cloth, edges would be better bevelled to make them a bit rounder to avoid baking issues...?
Regarding the aliasing - is that one of the reasons why so many UV shells are Unitised...? And so they're cleaner looking by all being rectangular? I've always used that for UV islands that are tube-like and straight, but I've never used it for more organic and awkward shapes.
I didn't realise that having harder edges would produce faceting, especially if they're at a high subdiv level. I tend to use Polygroup/edge creasing in ZBrush. Rather than that, would you recommend I just give edges more supporting edge loops to make it a bit softer? Also what/where do you mean by 'waviness'? Is that caused primarily by hardened edges?
Regarding the skewing - I'm actually okay with how those rivets turn out, so that's not an issue.
Regarding the mesh's symmetry - I'm guessing the enemy character I modelled over as a reference isn't quite centred to the world...? Or is asymmetrical.
But yes, usually when I'm doing test bakes, I tend to bake at a lower resolution.
Again, thanks for the suggestions. ^_^
Also, do you happen to have the quaded version of the lowmid poly? I'm no longer able to reconstruct the subdivisions on the modified high in ZBrush. ^^
Reading your comment on the polycounts, I double checked them and indeed, I managed get those numbers wrong, ugh how? Can't read numbers apparently
The point I wanted to make generally, regardless of exact numbers, is that the mesh density varies quite a bit across elements and that I would boost the mesh density of the gorgot so it matches the others, if not exceed them, given it's next to the head. Since the waviness in the bakes is due to the difference of low and high this should already improve things.
If I had to optimize the cords, I would start by eliminating the loops running along the cords. Yet another solution, giving more flexibility, would be to bake a straight, tiling segment and then use that to build the cord, probably array and deform along a curve (example below).
I can't speak to any Zbrush workflows, as I haven't used it in ages and then for detail/damage pass. I would always check the exported highpoly in a regular 3d soft to confirm that the shading is like it was intended and if not, edit it. Regarding edge thickness, I think this image in the wiki by racer445 illustrates it well.
I think baking trims separately is a handy method (if baked to a planar surface removes any skewing) which can be combined with unique textures (or to add detail to a face-weighted mid poly) and I believe can help to optimize texture use. It's not as simple as bake high to low (some additional elements, you have offset the UVs using trims so they're outside of 0-1 space and don't get baked), but I think a useful thing to have in the toolbox. It's probably a bit finnicky in the case of the border with rivets, as they can look distorted when the UVs are not correct.
Test also shows some tiling cord mesh baked down and applied to the meshes. Sure you won't get a unique AO, but you can build cords for days reusing the same texture and without fighting to match an highpolys curvature.
So nothing awful per say, just some seemingly minor things that will eventually make the bake look unpolished.
Hmm. Okay. Still trying to process and figure some of this out. Specifically, the trim method, which sounds great. So, correct me if I'm wrong, how one would go about that, would be to make the pattern as floating geo, like you've shown, duplicate it to make it longer if needed, and then overlay its UV where you want it to bake to...? Though you say the UVs need to be offset...? And they don't get baked...? Bit confused with how you'd do it. ^^; I presume the trim patterns would also need to be brought in with the whole high poly? I will definitely have to make use of that method for my next project, if not for this.
Will definitely increase the density of the gorget. That's something I need to bear in mind in future - ensure the density is consistent throughout, with the more important areas having the most.
Thanks again
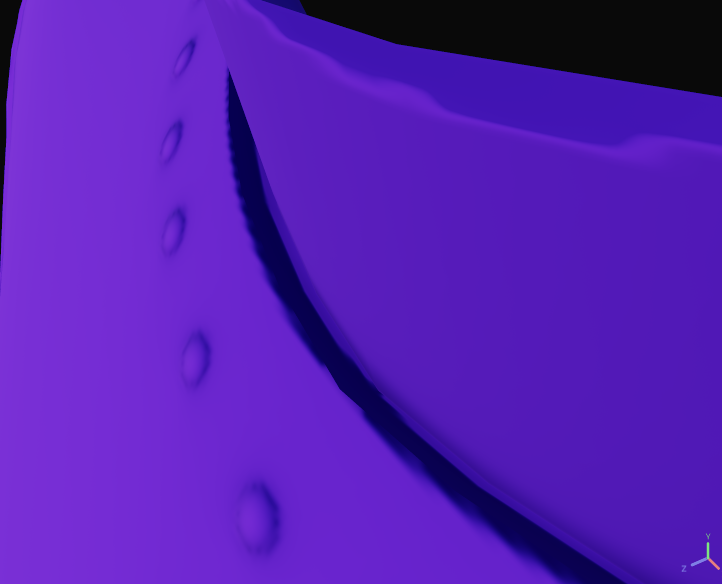
Thanks for the pointers. I never noticed that area on the upperside of the chest area. That's another thing to bear in mind for next time - avoid deep sharp valleys. Though I thought with things like that, it just means they need their own UV island and smoothing group? Especially if it's a 90 degree angle? Would bevelling it slightly not help either?
[edit] Thanks.
"Though I thought with things like that [...]"
Well it's not so much about any hard technical imperative, and more about things being a pain to work with, like having to fuss with a cage in a way too tight space. And also the look being just a tad unsatisfying - but that's subjective of course and depends on intended art style.