Gina (critique welcome)

greentooth

After browsing this section for a while I've come to a conclusion that I'm supposed to start to post only if my project has something substantial to show. But then what if I commit to a grave mistake early on? I do need help with the whole thing after all. Deciding to just go for it, I'm starting this WiP thread, sorry X)
This is a pretty straightforward interpretation of Unreal's default character - Gina.
I'm aiming for something relatively simple in design, down-to-earth materials. I do want to play up some of the original model's... perceived features.
One such feature is a "hooked nose", been dead set on that one for years =D
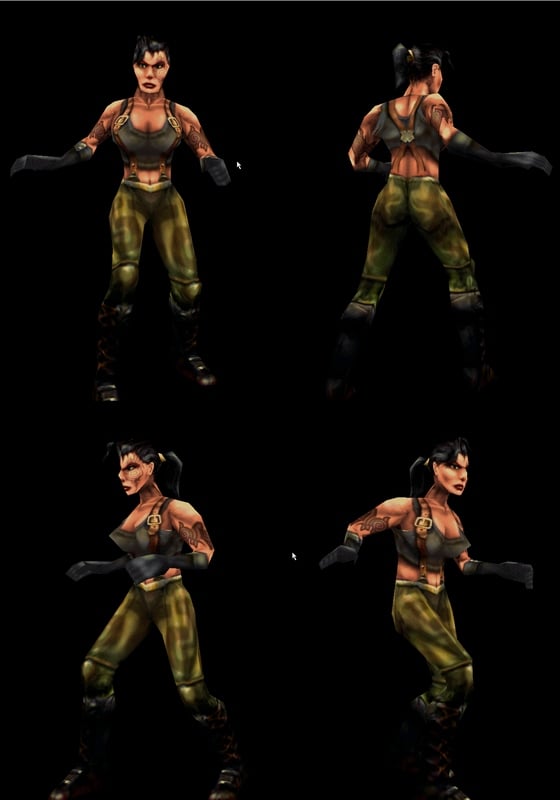
The goal is to push for a more realistic model - something that I don't normally do, as I don't have an eye for realism. I can enjoy it, but how to achieve it?..
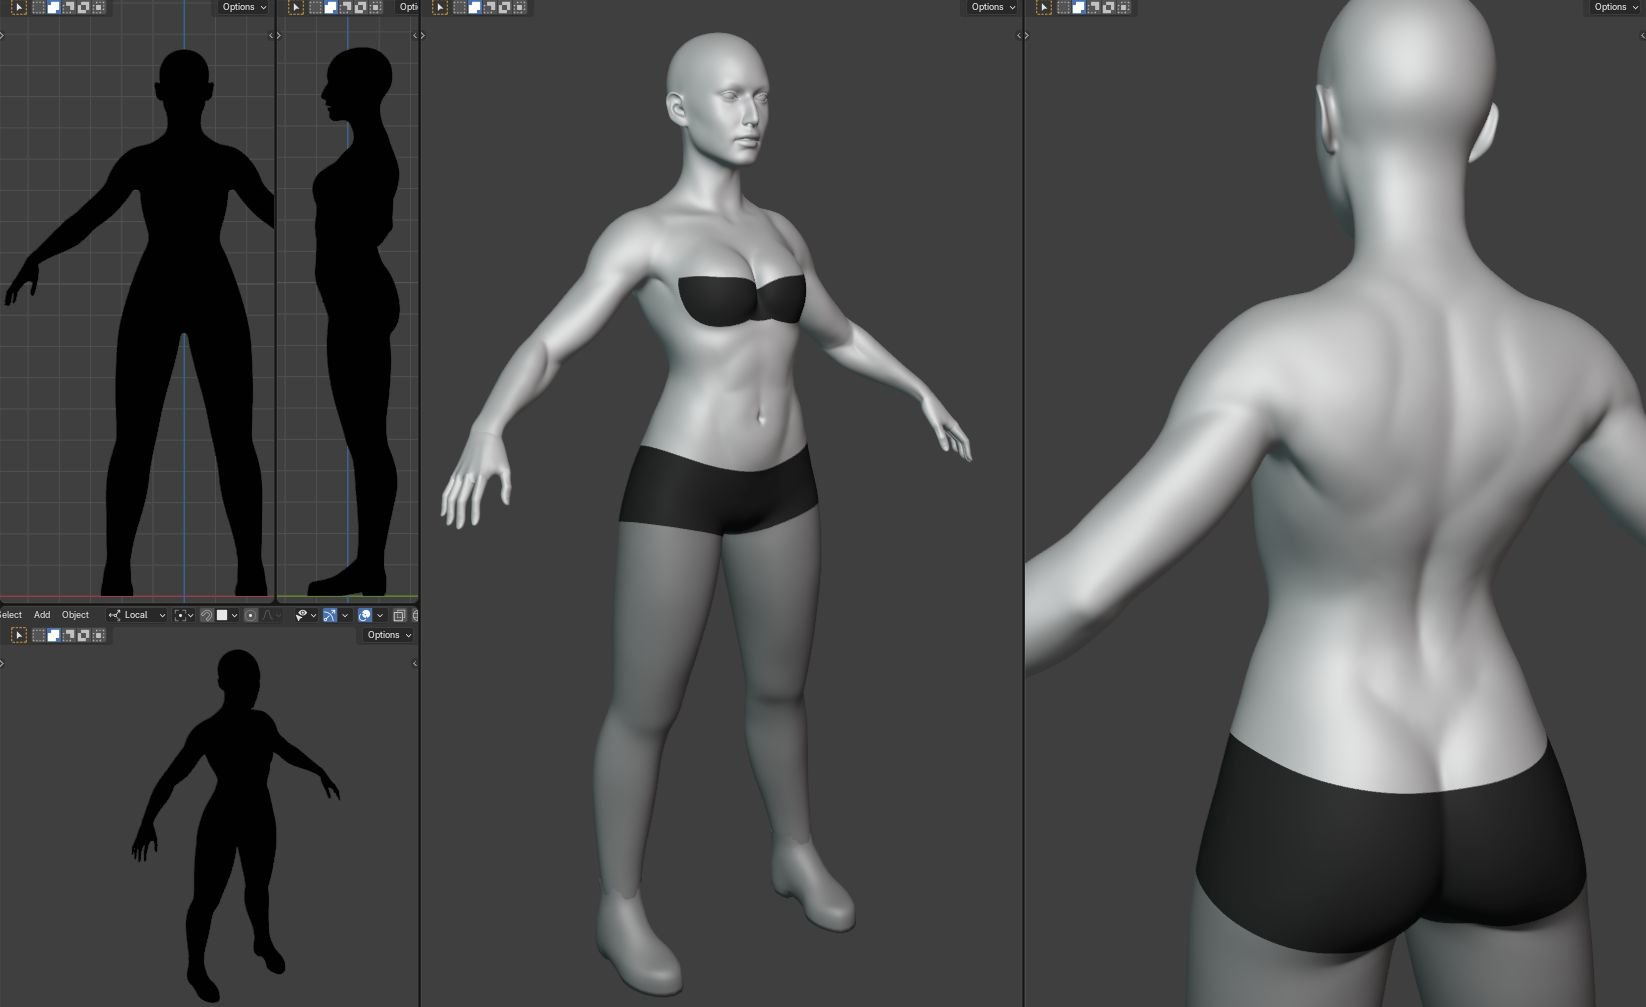
Started on the body, it's still easy enough to change things around.
Goal: a somewhat tough-looking lady, but not "super-human super-model" type. Can use just a little more volumes all around I guess? Or not.
Already not sure if proportions are realistic or not. Especially with the arms and hands. Are they tiny?
The head so far. Never made a fully realistic one before, so quite a bit lost here.


Any help would be most appreciated! Thank you for your time.
Replies
Remade the forms. Abs seem less broken now. Still have doubts about the arms.
Now I'm not sure how to proceed further D= The face seems off-target and I can't see why.
I was making cream for a cake today, and it feels like a very similar process: "Oh no, it's still too liquid. Did I mess up the ingredients? Maybe it needs more time? But it's burning a little. Did I miss a step? There's like only two of those though, how could it possibly go wrong? Well darn it, it's never going to work, the blasted thing is ruined now, it... oh wait, it's done"
The point is, I guess, there's no need to be so dramatic every step of the way XD
The head and hands of my current basemesh are separate from the main body because it wasn't easy to resolve different loopcounts. I just shrinkwrap a few loops on edges between these objects a couple of times - haven't failed me so far, but I guess it only works, because there are no small details in overlapping areas.
Yeah, I always check proportions this way (since the hand is easily detachable =D). But I always doubt what I see anyway =')
Here's what I've got:
____
It occurs to me, that I should've put a firm time limit. It's not like I'm in a hurry, but there are other things I want to try sometime in this lifetime.
With this in mind, I'm wrapping up "blockout" stage. I thought about adding armour, but I'll leave it for later. There enough new things here to learn as it is.
First time trying out Blender's Cloth brushes. It took a while, and I still don't quite understand how to control the results.
The resolution of the mesh influences the size of the folds - can't get small folds if there's no geo there, but at the same time, it seems hi res geo can only result in small ones.
Drawing XYZ-folds beforehand seems to almost guarantee that these will get reinforced by the simulation though.
I do love using floating geo for seams. So crisp. So far had no issues baking them, though my previous tests were more stylized.
But it only feeds my indecisiveness (and slows down performance eventually), so maybe I should turn these to meshes sooner rather than later ='D
_____
Meanwhile:
I have no idea how I'm going to retopo and bake this harness thing and I'm definitely going to regret those loops on pants if I leave them like that...
Probably have to rethink the gloves, because they still don't match the rest of the clothing and it looks odd.
Other than that what's left to do is another iteration of the face, collapsing the last of non-destructive geo, adding wrinkles/imperfections here and there on the cloth and... I feel like I'm supposed to be doing something more, but I don't see what that could be.
Seems like the "trick" was to use very low-pressure Draw brush to gradually build it up. It's easy to zone out and completely forget about structural considerations though. Having PureRef open during the whole process helps staying focused a little bit, or at least reminds me to kick myself to attention once in a while and make conscious decisions about what to put where.
Not sure which tutorials I should focus on though. I'm learning a lot just reading through this forum and wiki, but it's chaotic as I don't really know what exactly I'm lacking.
____
Well, at any rate, I think this is as far as I can push the hipoly at this time. Maybe add slight face asymmetry, but that's it.
Time for retopo then D= Except...
...how straps and belts are normally retopoed in these cases? Or rather, how the empty spaces between them are handled?
Feels like in this case I'm supposed to glue the belt loops to the belt and retopo it as one solid geo... but what if I want these additional loops below?
Just retopo the whole loop as a separate object? That would be much easier to unwrap, but harder to pose/animate...
As for the belt loops, smushing them down and maybe filling them up might be the most optimized solution, depending on how close you want to get later, but keeping them separate should be fine, too, if you match up vertex positions with the main mesh (basically cut the intersections of the loops into the main mesh) so that there's no unexpected interpenetration during animation.
Hmmm, to be honest, I'm a little reluctant to touch the anatomy at this point, though I can probably smooth the transition from deltoids a bit.
Now it's the question of getting the resolution right. I guess, I've added too much, going to even it out a bit. The point is for it to look good enough at "portrait distance". And to go with haircards (which, however I look at it, will take A LOT of polycount).
But this is the moment where I make things weird. Here's my reasoning - please, tell me if I'm making it more complicated than it needs to be:
Now I know that it's normally recommended to keep things in quads. Of course, a "game" topology is tris anyway, but quads still play better with editing tools.
But conforming to ridges and cavities (like clavicles) AND keeping it all quads bumps up the polycount pretty quickly (yes, you probably can't tell I care about such things from my face topo =D ). Plus there's "animation flow" to consider.
So. If one were to start aggressively triangulating parts of the mesh to ensure a "secondary flow" of sorts... is it legal? For mid/high res models, I mean (I imagine it's a must for low-poly). Or are they supposed to be as "pure" as possible (with possible exception of areas of resolution increase/reduction).
Is some kind of topology purity police already coming after me? D=
This one is pretty much the same as the "sculpt" topology, but cut and adjusted along pronounced plane changes:
Neither of these meshes are final, of course, plus I'm still figuring out the density.
I'm convinced that my current retopo is a failure and it would be better to redo from scratch now, then keep trying to "fix" it.
Should've started with higher density and worked from there. It seems harder to increase, than the other way around.
In this particular work, it's probably better to do it more detailed.
After reading "waviness"-thread (pure gold, by the way, thanks for keeping this forum and its knowledge alive
I'm looking through some "modern" game examples right now, and those models I could find with wire look like 4 times more dense than what I'm doing... The level of details I'm looking for is something like Devil May Cry V or Jedi: Fallen Order.
I think I only ever "finished" retopo when I was tired of guessing the right way to do it and gave up on potential problems
We are probably looking roughly along the projection direction, here, which is why the lower/outer edge of the rim looks smooth. If the top wasn't a seperate object, the transition to the skin would likely show the same smooth curve (from this angle or a bit higher, which is close to eye height, so not a bad compromise, and assuming it isn't hidden by the geometry).
Since it is a separate object, we don't have that advantage, but any sloping etc. won't help much either, since this is simply your geometry showing. It's not that the edge looks awful, but that the lower/outer edge of the rim looks much smoother in comparison. A sloped rim (which you could do in the LP only, too) might help you to even that out from different viewing directions or shift the projected edge away from the geometry edge so that the angle change doesn't alternate across the latter and/or we see both sides of the edge from a wider angle (less chance to see the silhouette), but it can't change your geometry, which might have added to your decision to aim for a higher polycount.
In this case, because we don't have to see the inside of the top, you could indeed model the rim with a slightly flatter angle than 90 degrees from the start and it might improve things a bit without detracting from the realism in a meaningful way. But you are also correct that this doesn't apply for shapes that are equally visible from all sides and since you can't make it too obvious, it's probably not worth the trouble at this point and not as impactful as increasing the resolution.
Like you have probably gathered from the wavyness thread, there will almost always be some warping from some viewing angle if the geometry is different enough. If you want to avoid that completely and have a dense and regular enough mesh for the overall shape, you could e.g. do your normal details in 2D directly for your lowpoly or bake from a subdivided lowpoly (assuming high and low are more or less the same SubD mesh with the same topology and the only difference are details like ridges or seams). In this case, that would mean that all elements would be as angular as your outer edge, though, just consistently.
As for much higher LP resolutions, I don't have any experience with that, but I'd wager at one point it makes sense to stick to quads and subdivide. Or at least use tools like quad fill and do triangles at the very end (if necessary at all, which seems less likely with increasing resolution). The basemesh for high and "low"poly could even be the same.
For what it's worth, I wouldn't increase the resolution at this point and finish with the old specs. This is a bit like someone throwing a spanner in the works from outside, only you are doing it to yourself. But it's your decision.
After some agonizing consideration, I've decided to go the high(er)-poly route after all (among other things because it doesn't really cost me anything other than the time already spent and a little self-esteem - I didn't decide on any definitive poly limit at the start after all).
Beside looking up some examples, I went over my own models and figured I never actually tried this approach. It's like I panic every single time when polycount rises for some reason XD
The problem here it being often at odds with what I'd like to try: smoother shapes, higher res haircards. Maybe doing things differently will be beneficial. Could get a better feel for different geometry density and what it entails. Maybe. Hopefully.
Stop running around screaming, do things hipoly, use enough texture res, focus on the face and eyes, and work on better hair - guess that's the plan.
None of this feels right, but I have to stop somewhere.
Around 85k tris. Plus I estimate a few dozens k for hair, so I guess it's fine, but man, what am I even doing...
ok then <inhales> AAAAAAAAAAAAAAAAAAaaaaaaaa........
After packing and re-packing UVs, then doing test bakes, then changing my mind and re-packing again, I've ended up with 4 x 2k textures sets...
Everything's baked fine (once I've fixed all the spelling mistakes), as far as I can tell. Set up layers and filled in some base properties... now what?
But yeah clothing textures isn't too tough, but it can be time consuming!
____
Now that I made a screenshot, the face looks weird. Not sure if it's because of lack of eyelashes, or if it really is strange.
Still need to adjust colors and paint skin roughness map.
Time to assemble final materials in-engine?
I was trying to understand eye refraction. After finding some examples, attempted to recreate the effect... and it sort of looked correct. There was just that one issue I spent a good deal of forever chasing down. The whole thing distorts depending on whether you look along tangents or bitangents. At least I think that's the root of the problem - converting refracted vector from WorldSpace to TangentSpace. Same thing happens with parallax method, so either I'm doing it very wrong, or it's just the way things are...
I think I'm observing the same thing in UE Digital Human example? I don't know anything anymore X____X
Yep, I'm not much of a shader artist T_T
LATE NIGHT EDIT: as it often happens, you only need to loudly complain about stuff and the solution will come to you immediately after *facepalm*
Inclined to think that I've been interpreting "Digital Human" example incorrectly, but I still don't see the exact logic behind its space conversion
This turned out to be pretty straightforward, so I'm surprised I couldn't find this "solution" explained anywhere...
Looks like it works in Blender, hopefully assembling it in UE4 won't be any problem (though it's my first time using it).
>>> end of detour <<<
I was hoping to get away with one of the pre-made rigs, but couldn't get anything working. Figured it would be faster to just rebuild a rig from last project than looking for solutions.
Quick corrective wrist bone:
And here's a problem that plagues EVERY ONE of my projects and makes me want to give up for good: I can't really make the models pose-able. Not really. They can stand around heroically. But perform something mundane like sitting? Nope.
Everything breaks. And I don't just mean the pelvic area - I know it's a complex problem - but the legs look ridiculously short. And crouching? Simply not possible. Sure some geometry collapsing is always expected, but this is not usable.
I don't know what I'm doing wrong T______T
There are minimal twist bones (which I'm not sure were set up correctly) + corrective bones at wrist, knee and hip front to "fix" the worst of the deforms.
The leg bones rotate away from IK bones driving them.
Here's an old rigged Hellknight in rest pose to make it less depressing.
Use Weight Paint Mode: Use the weight paint mode to adjust bone influence on specific vertices
Avoid "Bendy Bones": If you're using bendy bones, be aware that they can cause unwanted deformation
Ensure Proper Parenting: Make sure the mesh is properly parented to the armature
Use Constraints: Use constraints to control bone movements and create more complex animations
Parent to a Bone: Parent the prop/clothing to the appropriate bone in pose mode, using "Bone" instead of "Automatic Weights"
4 - Resetting Pose
Enter Pose Mode: Select the armature and enter pose mode Select Bones: Select all bones (press 'A')
Reset Transformations: Press 'Alt' + 'G' (reset location), 'Alt' + 'R' (reset rotation), and 'Alt' + 'S' (reset scale)
5 - Techniques
Rigify: useful for creating rigs in Blender
Data transfer modifier to copy data (like shape keys or animation data) between objects
Blender YT quick fix workflow
I'm mainly working on a simplified version of this mesh and use DataTransfer from it (haven't done any fixes on the final weight-painting yet).
The problem is not in tools themselves (as far as I can tell), but more... basic - how to minimize broken deforms (on the model this dense), where do I place the joints (including the whole length of spine), what kind of fixes are commonly used for real-time skeleton (I'm not sure about the use of blend-shapes for a model like this)..?
The tutorials that I've seen are mostly focused on tools and hierarchy and rarely bring up the logic behind real-life decisions on an actual dense organic game-ready models. So I'm stuck.
This is the full skeleton (green bones) for the moment:
____
Cleaning up the controls and shifting joints around in hopes of finding better positions. Fortunately, it doesn't break IK starting position too much.
The legs are the least broken now, though there's still some weirdness with thigh twist. Either it's the limitation of using two thigh bones, or I've set it up wrong - don't know which.
Still they seem a bit too short to me. It's decided: next time I'm making a model it a) will be obviously stylized, and b) will have legs for dayzzz.
Also, the neck is really hard to figure out: it's so darn looong for some reason, even though it doesn't seem so in rest pose. Is it a problem with the mesh proportions or with the skeleton? Dunno.
Changed clavicle again - can't find the proper place for it.
I've said I've given up, but this was me procrastinating, avoiding the face rig (I mostly only want to do something about the eyelids, but it is probably the hardest part).
I'm assuming there were some changes in Blender, because the (simple) face rig was much easier to make this time. Weight painting was the most time-consuming though. But it's as finished as it's going to be, I think. At least until I add hair. By this point I got used to seeing her without it. Wonder how that part will go.
Will have to go back to SP to readjust some values before export.
Otherwise just need to place hair and figure out how to properly render things.
For hair, I wanted to try mid wavy/curly textures as seen (barely) in some head references.
Started with wavy hair texture.
Two base (almost opaque) strands + one breakup:
Regenerated the texture, to have two wave frequencies - the second is doubled to be used in longer strands:
Anyway, it felt like a wrong approach - the waves easily turn into unmanageable noise, they look really bad when viewed at an angle and I don't think it will improve much even by stacking more layers on top, they easily go out of sync with each other (even though the waves are matching between the strands)... they look like planes even more then straight haircards.
Most examples I've found use straight strands, with an exception of afro styles, which go into the opposite extreme.
So I guess, what I'm going to attempt now is make a "straight" base and then strategically put increasingly waved/curled geometry on top to give an impression of waviness.
Restart:
Still got to make a hairline and eyelashes.
Beyond that i have doubts about adding more detailed hair - the polycount is already almost 1/4 of a whole character.
Yeah, you're right, it is probably too full/thick. Going to rework it.
I'd like to keep the length though - I think it would be very "Unreal" thing to do, where even manly men can have nice hair flowing in the wind =D
Here's what I'm thinking:
The original ponytail is pretty high, but I'm going to lower it a little further still to make it appear a bit more "utilitarian".
Curly hair reference (it seems to focus mostly on naturally curly hair): https://www.hairromance.com/category/curly-hair/
I'd like to imagine that (if it were a game remake) I'd make her hair have three phases - undone (during the ship crash), quick pony tail, and maybe something like a dutch braid updo - as she explores, gets to rest in one of the villages and finds more time to re-assess her situation and prepare for the next step. That would go with new gear like pieces of armor and shield belt.
...none of which is going to be seen in FIRST person shooter anyway ='D
Had to readjust the whole hair mass quite a few times, because I kept putting the hairline too high. Then it occurred to me to just draw the line on the face with Grease Pencil so I could properly see where to put what.
Current polycount: the hair is almost 40k out of 142.
Before I make final steps and move it for final render to UE... if anyone is reading this: any thoughts, advice, critique would be most appreciated.
Am I missing anything obvious? Should I go all the way back and remove these dark green "patches" from pants? Is her face really that weird or is it just me?..
@pxgeek, well, it's "stock" in a sense that it's built with Blender's Geometry Nodes modifiers (a node-based system for procedural geometry).
I have a set of simple modifiers for generating hair from splines for baking texture (there are some hair modifier assets that come with Blender, but I can never get around to study them).
...and another modifier for generating the haircards (and now pre-defined hairclamps) on a spline - with this the resolution of the resulting haircard is based on spline's resolution, while its shape is sampled from an unwrapped "uv source" mesh.
The current version is messy though, because I was building it up as I went:
I'd like to make some "portfolio" renders to wrap up the project for now. There are tons of things I want to fix and/or add, but this thing took much more time than expected, and I think it would make sense to take a step away from it for a bit before proceeding.
Of course, the problem is I don't know much (anything) about rendering in UE, or what kind of renders I should make.
I know that Blender's Eevee is very different from UE, but still wonder if I can get similar results. So far the differences are... confusing. Maybe it's SSS in skin material, maybe it's lighting, or maybe there's something about AO...
Boi, will there be A LOT of cleaning up to do after this! The project folder is almost 15GB with all the paranoia-fueled backups and various tests. Going to have to tidy it up for eventual "part 2" of this model.
For now, still have to take care of a couple of small import/export accidents to address, make final render-friendly poses, setup the final-final light scenes... Unless I'm missing something, should be just one more update here, I suppose.
____________
Phew, think that's that for the time being: Artstation
It took a while trying to figure out the lighting and rendering in UE. Various exposure settings nearly killed me. Makes me really appreciate how friendly Blender is =D It was made all that much harder because of ill-timed hardware adjustments that messed up my screen settings - what are the chances it would happen now?
In any case, one serious headache later, I got things working and ready to call it finished (for now). She really could use some props (like an Automag to heroically aim at things) and some NaPali enviro assets, but I'll just have to put it on the list of things to (hopefully) do in the next iteration.
I've read prologue from Unreal manual and thought it would be a shame to make the Prisoner a "stoic space marine convict" type of character in terms of facial expressions. They seemed to me like someone capable of having fun as a normal human being, despite whatever experiences landed them in prison.
So bonus EEVEE renders:
Side-by-side (kinda makes me want to try making a lowpoly character, a Nali maybe, with vertex animation):
Some days ago I came upon UnrealRedux project (by Krull0r) and my whole model suddenly felt so... bland. Like an unnecessary high poly amateur cosplayer. There is still some stronger style to be found for this project, something that would make it a little bit more like Unreal. Wish I knew what that was.
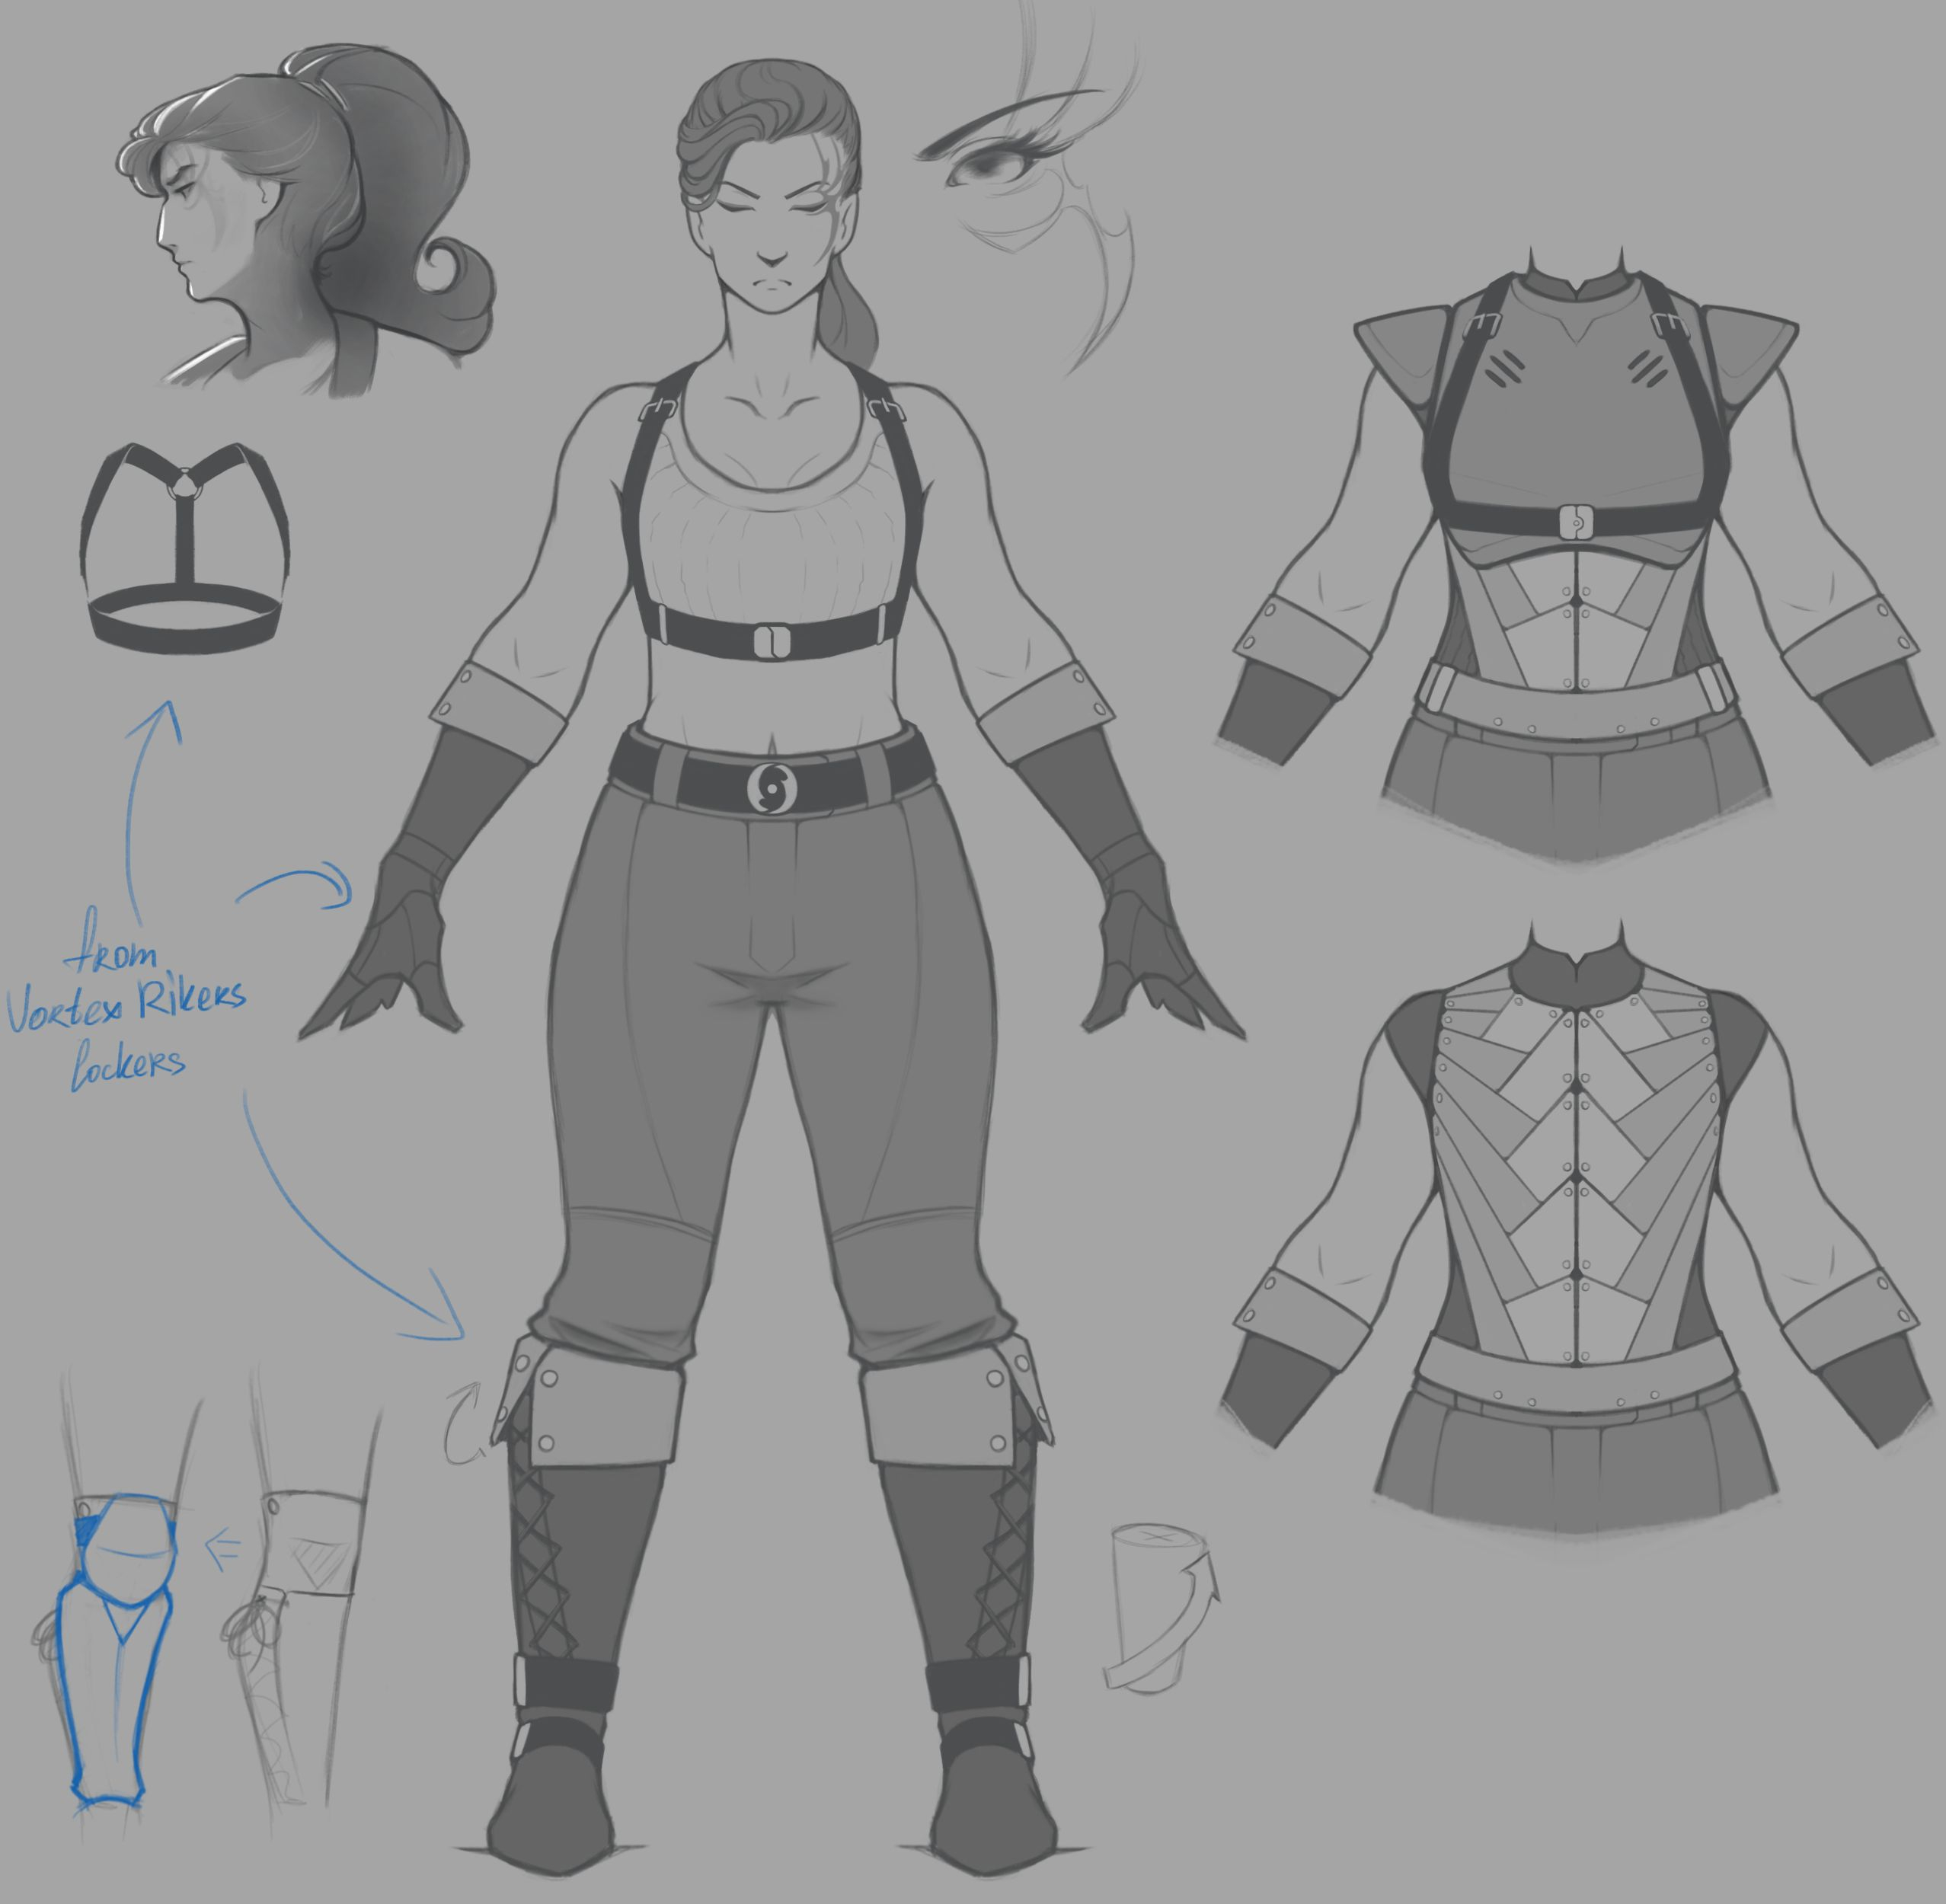
Some exploration from before I started on the model: