[WIP] DaYong | Real-time Environmental Model | Chinese Style
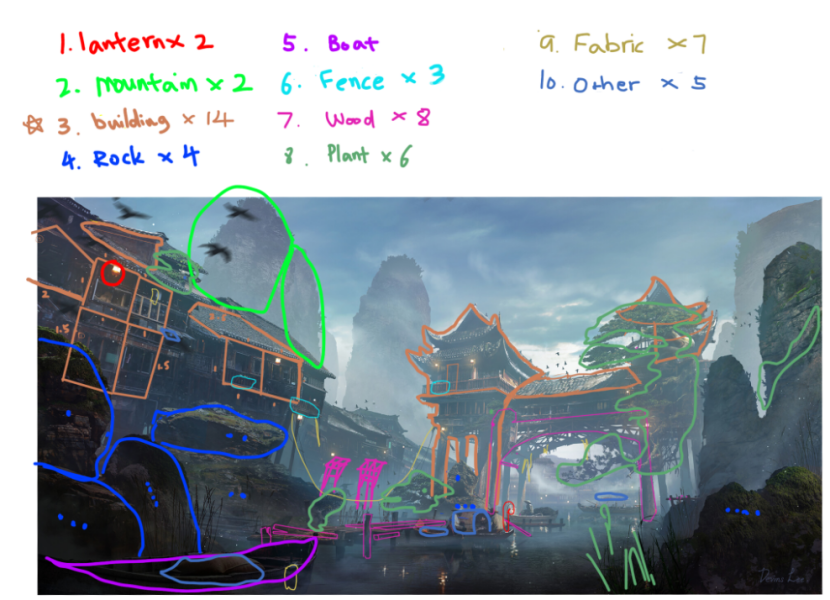
I will be making the environmental scene based on the concept art done by Devins Lee- DaYong: https://www.artstation.com/artwork/B1XK3A
Week One
Day 1- I found concept art and AAA benchmark examples and knew what scene to create.
Day 2- I collected reference images for the asset about to be created. I dissected the scene to determine the modular pieces and how many asset versions were needed.
Day 3- Workday
Day 4- I accidentally replaced my latest Pureref file with the old one. I cannot recover the file afterward because of no previous version in the properties, have to recollect my reference images again. To prevent this from happening again, I will save my file to an external hard drive every day when I finish my work.

Day 5- I analyzed the scene to determine the material needed and planned the trim sheet.

Day 6- I finished the material analysis.


Day 7- I’m starting to work on the block out.

Summary: The most challenging part during this week is figuring out the modular pieces and planning the trim sheet. It took me some time to get my head around how to reuse the materials in the scene. Also, blocking out the scene that matches the concept art is a little challenging, but after tries and errors, I can get it as close as possible. I want to learn how to use Speedtree and Substance Designer in this project, so I would use Speedtree to create my vegetation and Substance Designer to create the tiling texture of the rocks. I’m glad that I started a new journey in modeling, and hopefully, by the end of the project, I will have honed my skills and stepped up a notch.
Welcome any suggestions or feedback!
Replies
Looking good so far.
Are you planning on adding texture blending for variety and weathering? This could reduce the need for unique bits in your sheets, or at least help you increase reuse without visual repetition.
Some links that might help ...
http://wiki.polycount.com/wiki/Modular_environments
http://wiki.polycount.com/wiki/MultiTexture
Week Two
Day 1- I finished the block out in Maya, then imported it into Unreal Engine for fine-tuning. After that, I imported the adjusted block out back to Maya.
Day 2- I finished blocking the trim sheets and prepared for sculpting in Zbrush.
Day 3- I started to sculpt the first trim sheet in Zbrush. Today I spent the most time learning Zbrush's interface, navigation, and standard hotkeys.
Day 4- Work Day
Day 5- Work Day
Day 6- Rest Day
Day 7- Work Day
Summary: This week, I completed the basic block out of the scene in Unreal Engine and trim sheets in Maya. I got started on the Zbrush and learned some essential tools there. I hope to finish at least two trim sheets of sculpting by the end of next week. I wish everybody a happy new year!
Thank you so much for the reply! About texture blending, I will consider that after I finish texturing all my assets, see if there's a need to cover up repetition. Because as far as I can see from the perspective set for the scene, it might be hard to find the repetition on the roof or the wood since they look tiny in the view. However, if I decided to do a closer shot, I would use texture blending to add variety!
Thank you for the links! They are really helpful!
Week Three
Day 1- I got more familiar with using Zbrush and almost finished all the sculpting for the wood trim sheet. I forgot to export one part of the trims from Maya before sculpting in Zbrush, so I need to fix that and will finish this trim sheet by tomorrow.
Day 2- I ran into an issue with the tilling seam on the trim sheet today. The seam is prominent and doesn’t tile properly. So then I resculpted it again, but the same problem occurred. I will either cover up the seam in Substance Painter down the line or try to paint the height map in Photoshop as suggested by someone that kindly gave the advice. I also started on the second trim sheet today.
Day 3- I finished all the sculpting for the second trim sheet and started to work on the third one.
Day 4- I finished the third trim sheet and fixed the seam issue in Zbrush by duplicating the mesh, then offset the seam to the middle, then sculpting around the seam area to cover up (TrimSmoothBoard+Alt draw horizontally). Thanks to the guys that advised me on the method in Polycount (https://polycount.com/discussion/comment/2776608#Comment_2776608)!
Day 5- Work Day (Test out the trim sheet in Substance Painter, and the tiling looks seamless!)
Day 6- I also fixed the seam for the wood trim and tested it out in Substance Painter. The Substance Painter crashed many times when baking the high poly to low poly, but after I lowered the subdivision level for some parts of the mesh, it fixed the problem. However, there are issues with my window&roof trim sheet when I test it in Substance Painter. I'm going to export the height map and fix that in Photoshop.
Day 7- Work Day
Summary: This week, fixing the tiling seam issues is the most challenging and time-spending thing. I want to thank the kind people in Polycount who provided a possible approach to my problem (https://polycount.com/discussion/comment/2776608#Comment_2776608). Without them, I won’t be able to have ideas on how to fix the seam and gain creative ways to solve a problem like this. The good thing is I finished all the sculpting before the 14-day trial of Zbrush expired. Next up, I will fix the last trim sheet issue in Photoshop. I hope it goes well as I expected, and then I can move on to painting the texture.
Week Four
Day 1- Work Day
Day 2- I spent a lot of time trying to fix the seam issue on the height map in Photoshop. Then tried many ways to convert the height map to a normal map or generate other maps based on the height map in Substance Painter.
Something I found during the process that I need to keep in mind for the future:
lCan’t generate a normal map in PS because my height map is grayscale only in the channel instead of RBG.lDon’t try to use a height map as the base to generate other maps in Substance PainterThe approach that works for me:
1. Bake the high poly sculpt to low poly in Substance Painter (if there is an error or not tilling properly, move to the next step)
2. Export the baked normal map from SP
3. Import the baked normal map into PS
4. In PS, duplicate the original map and hide the original one. Offset the map to the right. Then, use Clone Stamp Tool or Patch Tool in PS to fix the seam on the copied map.
5. After finishing fixing, offset again.
6. Export the new normal map from PS, then import it into SP.
7. Drag the new map on top of the old normal map to replace it. Then, rebake the rest of the maps in SP.
8. If any part of the normal is inverted after baking, use this method: https://www.youtube.com/watch?v=U2vNX-BoRX4
Finally, I finished fixing all the errors in the window trim sheet and am ready to paint tomorrow!
Day 3- I finished the painting on the wood trim sheet and started on the window trim sheet.
Day 4- I finished the painting on the window trim sheet.
Day 5- Work Day
Day 6- I finished the painting on the unique trim sheet.
Day 7- Work Day
Summary: This week mainly focused on painting the texture map, and my challenge was fixing the seam in Photoshop. I’m glad I was able to solve the problem in the end. Now that I have finished the texture maps, I can start modeling the modular meshes next week! I'm very excited about that.
Week Five
Day 1- I decided to create all the wooden pieces in the scene because they have taken a large part of it. In addition, I wanted to start on the wooden bridge and determine what else is needed as I go along. Today, I just created five pieces of wood that will be used to build the bridge.
Day 2- I finished with the bridge and started working on the gate.
Day 3- I got the basic wood structure of the first and second floors done and planned to finish the middle area of the gate tomorrow.
Day 4- I completed the middle part of the gate and spent some time searching for the construction of Dougong that I like to add to the roof later on.
Day 5- Work Day
Day 6- Rest Day
Day 7- Work Day
Summary: This week's most challenging part is constructing the gate and ensuring the scale and proportion are reasonable and match the concept. Next week, I plan to start on the boat, which takes a short break from complicated mesh such as the gate. Afterward, I’m going to build the roof for the gate.
Week Six
Day 1- I finished creating one of the boats today and started on the second one.
Day 2- I finished the creation of the other three boats and got three more left for tomorrow.
Day 3- I finished all the needed boats and started building on the roof pieces.
Day 4- I spent most of the time constructing the square roof and tried to figure out the best way to create the roof corner. I also altered the window trim sheet a little in Substance Painter, adding a white wooden material and darkening the certain area.
Day 5- Work Day
Day 6- Rest Day
Day 7- Work Day
Summary: I’m glad I finished all the boat meshes and started on the roof as planned. The most challenging part of this week is about constructing the roof. It took me some time to figure out the best way to build it and achieve my desired presentation. A great tool that’s helpful in the progress is the Preseve UV for the transformation, and I’ve learned more functions of the mirror tool. The plan for next week is to complete the roof construction for the gate.
Week Seven
Day 1- I’m still working on the middle roof of the gate.
Day 2- I finished the middle roof of the gate and one sample of DouGong.
Day 3- Today, I was experimenting with the approaches from some inspiring tutorials on making pagoda roofs. I learned a lot of new tools in Maya, especially the MESH tool. However, this tool is not perfect and not working very well with curve surfaces (like the raised corner area).
Luckily, I found the best way to deal with the curve surface is to create each column one by one. I’m going to record my steps below for future reference.
Three tutorials that I found inspiring:
1. https://www.youtube.com/watch?v=BvWEoi-ua3s
2. https://www.youtube.com/watch?v=CbxE5AUh1IM&t=470s
3. https://www.youtube.com/watch?v=zC0foK4Vqo4&t=1443s
Step 1: Create the quarter base mesh and use CONNECT tool and MUTI-CUT tool to add equal edges. (Shown in Video One: 0:0-6:40)
Step 2: Adjust the SMOOTH selection tool to the corner to meet your expectation. (Shown in Video One: 6:40-8:40)
Step 3: Separate components using Duplicate Faces by MMB. Remember to separate the curved area into individual columns.
Step 4: Create the needed tiles or shingles.
Step 5: Create the straight area of the roof using the MESH tool. (Shown in Video Two: 1:11-10:25; Video Three: 14:54-23:05)
Step 6: Create curved columns individually, plus some manual adjustment afterward. (Shown in Video Three: 14:54-23:05)
Day 4- Continued working on the roof.
Step 7: Create the unique edge shingles using the same method above. Then, adjust one by one manually to match well with the previous shingles. This method is like a faster way to make numerous copies of one shape along the surface in one direction, but it’s not perfect. Or, it could be that I don’t know it yet. If anybody knows an easier way to create a complex pagoda roof, feel free to share it!
Step 8: Do the same thing to the other side of the roof, and use the MUTI-CUT tool to cut off extended meshes on the intersection.
This is what I have so far, and I still need to refine it further down the line.
Day 5- Work Day
Day 6- Rest Day
Day 7- Work Day
Summary: I spent most of the time working on the roof shingles this week, and a lot of tries and errors occurred because I tried to grab various tools shown in the three tutorials and combine them to achieve the best appearance that matches the concept. I didn’t complete the gate roof this week, so I will boost my efficiency and try to finish it next week.
Week Eight
Day 1- I refined the position on the roof tiles and added more details on the hips. Also, small statues were created on the top of the hips.
Day 2- I completed three statuses today and had fun with the quad draw tool!
Day 3- I finished the top part of the whole roof!
Day 4- I started to work on the second story today.
Day 5- Work Day
Day 6- Rest Day
Day 7- Work Day
Summary: This week, I completed the whole construction of the first story of the roof. Although I didn’t meet the goal I set last week, I chose quality over time. This is my first time doing such a roof, so next time, it won’t take so long since I already have a clear workflow. And this is true because the second story was quickly built in a shorter time. Next week, I think I’ll be able to finish this roof and create a broken version, which is placed on the right.
Week Nine
Day 1- I finished the sculpt and retopo on the hips.
Day 2- Today, I made a big mistake went creating the wooden part underneath the second level. I didn’t make sure the size of the roof and DouGong matched the proportion of the gate. Therefore, when I discovered I’d made a mistake, I had to redo it again. After that, I adjusted the size of the roof, and then I set the DouGong to where it should be and created a plane to cover up the bottom empty area.
Day 3- Finally, I finished the whole gate after one month!
Day 4- Work Day (Also, I made a lantern.)
Day 5- Work Day
Day 6- Rest Day
Day 7- Work Day
Summary: I’m glad I completed the whole gate and lantern this week. I had some troubles when doing the under area of the second story of the roof, but I managed to work it out. Next week, I will work on the buildings on the left side of the scene. I hope it won’t take too long.
Great attention to detail!
Thank you for your comment!
Week Ten
Day 1- I created a concrete wall that used to separate two houses and started building the first house.
Day 2- I finished creating the first house and started working on the second house that’s to its right.
Day 3- I created more houses for the foreground.
Day 4- I created two more houses. Then I started to break the house into small modular meshes that can be used to build various houses in the background later in Unreal Engine.
Day 5- Work Day
Day 6- Rest Day
Day 7- Work Day
Summary: Everything went smoothly this week. Next week I will create more house modular pieces, import all the meshes I have into Unreal, and start to set up the scene using those meshes. For the rock and mountains, I plan to use Megascan if there are any that fit. Also, I will try to create a tiling texture for the stone wall in Substance Designer later.
Week Eleven
Day 1- I finished creating all the modular house pieces.
Then, I created the master material first in Unreal. Thanks to the tutorial provided by Sander Agelink, I learned how to set up some basic and critical parameters: https://www.youtube.com/watch?v=sJyEVqvOVmQ&t=780s
Just remember to convert the textures maps into parameters as well, so you can group them.
To connect both opacity and normal map connected to the material, I changed the Blending Mode to Translucent, and the Lighting Mode to Surface TranslucencyVolume. I’m unsure if that is the best way, but at least it works for now.
(I ran into issues that the master material and material instances were not displayed after applying it to my mesh, but now the problem is solved.)
Tips I learned during the process:
For now, Nanite static mesh only supports opaque blend mode. If we changed the Blending Mode to Translucency, we can’t apply the material to static mesh that has Nanite on. So, I created one more master material that contains opacity information and is ready to use this to non-Nanite static mesh.
Day 2- I reset the pivot of all my meshes in Maya. Then I exported them out again to have the pivot in the position I expected when importing them into Unreal.
I ran into an issue after assigning material on the mesh in Unreal. For some reason, the shader didn’t display correctly on some parts of my mesh.
So, I went back to Maya to reset the UV for those parts, but it turned out that only some had been fixed. The problem even extended to the big pillar on the left. Therefore, I separated the box from the gate and imported them respectively. Then, the shader on the gate worked accurately, but the shader on the box was off, which let me know where to tackle the problem. Ultimately, the problem was solved by not building Nanite for the box mesh.
Another problem when importing into UE5 is that some parts of my mesh appear black or disappear. The Outlog shows the error of “has some nearly zero tangents/bi-normals which can create some issues.”
To solve it, back in Maya, make sure the dark areas or polygon UVs are unfolded or use Orient Shells, then export it again.
Day 3- Work Day
Day 4- The problem I encountered today concerns the opacity/Alpha. I only want certain parts to be transparent, but instead, it makes the whole UV sheet transparent.
I’ve made a lot of tries and errors, and one good tip to remember for the future is that Nanite doesn’t support opacity.
The best way to achieve the half-white transparent glass effect I want is first to change the Blend mode to Masked and import the Alpha mask to connect to the Opacity Mask node.
However, the window didn’t look white tint and half-transparent (unlike the windows in the first image). They are fully transparent instead.
After trying many methods, my final approach is to leave the house mesh like that, then create an independent glass mesh with its own opacity material.
Day 5- Work Day
Day 6- I successfully imported all my meshes into Unreal with the correct texture placement. I also create four more houses with modular pieces. Below is what I had by the end of the day.
Day 7- Work Day
Summary: This week was dominated by problems and solving problems, and many tries and errors happened. Luckily, all my problems were solved. I’m happy to finally make progress in the UE5 scene and love how it turns out. Next week, I will keep creating more houses to fill the background and create some stone walls behind the houses.
Qq: Why does this basic geometry need nanite enabled?
A house with roof should be ~15k polys, right? So the whole scene is 100k at most. So why waste all that time finding workarounds for a non-problem?
If the meshes are quite poly-heavy then maybe do another round of optimization on them
Thank you for the comment! I enabled nanite because, due to my research, we should enable nanite for every mesh we have.😂
I didn't know there was a standard polycount for a house with a roof or a scene like that. Thank you for telling me! I will do more learning on that. Optimation is an unfamiliar concept to me, so I will also spend some time learning it in the future.😀 Really appreciate your help!
Week Twelve
Day 1- I made more houses in the background.
Day 2- Work Day
Day 3- Work Day
I watched beginner tutorials to get basic ideas on Substance Designer. Then I decided to follow a tutorial about creating a brick wall in Substance Designer.
Substance 3D Designer First Steps: 01 - Overview & Basics
https://www.youtube.com/watch?v=VyFgpitTsYg&list=PLbX7ESNWG72pSkSrLXvk3c38kCQgUdFeW&index=2&t=1s
Aged Wood Planks: 02 - Creating the planks pattern
https://www.youtube.com/watch?v=N4aNIDJ84nM&list=PLbX7ESNWG72pSkSrLXvk3c38kCQgUdFeW&index=3
Substance 3D Designer First Steps: 03 - Parameters & Materials
https://www.youtube.com/watch?v=22fZAM6r6Hg&list=PLbX7ESNWG72pSkSrLXvk3c38kCQgUdFeW&index=4
Substance Designer - Medieval Brick Wall Tutorial
https://www.youtube.com/watch?v=LjTONstmYz0&list=PLbX7ESNWG72pSkSrLXvk3c38kCQgUdFeW&index=5
Day 4- I followed the tutorial step by step to create the brick wall material in Substance Designer.
Day 5- Work Day
Day 6- I was stuck on the last bit of the tutorial on Medieval Brick Wall, but able to finish the brick wall material with the help of two additional tutorials.
Brick wall in Substance Designer (tutorial): Part 1 - height map
https://www.youtube.com/watch?v=mk315cvzYP0&list=PLbX7ESNWG72pSkSrLXvk3c38kCQgUdFeW&index=6
(This video inspired me on how to start and end with the project file.)
Channel Packing In Substance Designer | Channel Packing Series
https://www.youtube.com/watch?v=xKB-XALAf94&list=PLbX7ESNWG72pSkSrLXvk3c38kCQgUdFeW&index=1
(This video helped me to pack the textures together at the end.)
Day 7- Work Day
Summary: This week, I finished creating all the houses in the scene and started to get my hands on Substance Designer. I felt overwhelmed when I first watched the tutorials. But, as I followed along with the tutorial on creating the brick wall, I was having fun with it gradually. Next week, I will set up this brick wall material in UE5, create the wall meshes, and hopefully, they all work well. Then, I will make two more Substance Designer materials to familiarize myself with the software.
Week Thirteen
Day 1- I made some changes to my brick wall textures. Instead of exporting a channel-packed map, I export every map independently using Parallax Occlusion Mapping and World Aligned Texture nodes in Unreal.
I followed two tutorials on using or setting up height maps and World Aligned Texture in Unreal.
Bump Offset and Parallax Occlusion Mapping - UE4 Materials 101 - Episode 8
https://www.youtube.com/watch?v=wc0StMr3CQo
World Aligned Texture Setup In Unreal Engine 5
https://www.youtube.com/watch?v=JW8LfB5Gkm0&list=PLbX7ESNWG72rEPdM8QaQVG8TIKC6LvVj5&index=10
Because I can’t find a way to use both nodes, I decided to use World Aligned Texture solely, which didn’t affect much on the wall display since it’s been placed underneath the houses and is not apparent.
Day 2- I followed a new tutorial on creating a mossy wall texture in substance designer.
Creating Detailed Realistic Mossy Wall Texture in Adobe Substance Designer w/ Javier Perez
https://www.youtube.com/watch?v=cr5xutRazB4&t=1966s
Day 3-The creation of the material had been completed!
Day 4- I set up the stone material in unreal and tried to use material blend and vertex painting. I followed Javier’s tutorial once again. Also, fix the problem of the base color map washing out by changing the 16-bit image to 8-bit.
Vertex Painting in Unreal Engine 4 w/ Javier Perez | NVIDIA Studio Sessions
https://www.youtube.com/watch?v=D1XhB_DRiEY&list=PLbX7ESNWG72rEPdM8QaQVG8TIKC6LvVj5&index=11
Day 5- Work Day
Day 6- Rest Day
Day 7- Work Day
Summary: This week mainly works in Substance Designer and creating other material. The second material is more complicated than the first, and I gained more depth in the Substance Designer workflow. Hopefully, someday, I will be able to create my own material. Next week, I will search for tutorials on the correct workflow for creating rocks in the game environment and finishing all the rocks in the scene.
Week Fourteen
Day 1- I watched some tutorials on different mapping and found one that’s simple to learn. I want the moss to appear on the rock’s top surface.
Create Snow Effect On Objects - Unreal Engine 5.1
https://www.youtube.com/watch?v=SJdl7XUTI2M&list=PLbX7ESNWG72rEPdM8QaQVG8TIKC6LvVj5&index=12
Now I have three materials to apply to the rock, which could create variation despite the subtle differences.
1. Cliff combined textures blended with cliff only textures (HeightLerp) + vertex painting
2. Cliff combined textures blended with moss only textures (HeightLerp) + vertex painting
3. Cliff combined textures blended with moss only textures (WorldAlignedBlend)
Day 2- I sculpted some rocks in Zbrush.
Day 3- Continue to sculpt.
Day 4- I finished all the sculpting and set them up in Unreal. Below is what I have so far.
Day 5- Work Day
Day 6- Rest Day
Day 7- Work Day
Summary: This week, I learned more about projection texture in Unreal and focused on sculpting the rocks. Next week, I will learn how to use SpeedTree to create vegetation. I hope to make resemblance pine trees that showed in the concept art.
Week Fifteen
Day 1- Work Day
Day 2- I watched some tutorials by Cat Yang about SpeedTree and gathered references and needed vegetation textures from Bridge.
Environment Production - Part 5 - Tree Production Using SpeedTree
https://www.artstation.com/learning/courses/QBp/tree-production-using-speedtree/chapters/3NB1/reference-gathering-and-planning
Day 3- I started to work in SpeedTree. Below is the tree that I’m aiming for first.
Day 4- This is what I have so far.
Day 5- Work Day
Day 6- I applied the leaf material onto the truck, but its outcome could have been better.
So I reworked the truck and added more branches to it.
It looks better after applying a different leaf material to it. However, it doesn’t have the round shape as the concept art. I will leave it like that until I find a way to fix it, and I might need to watch more tutorials.
Day 7- Work Day
Summary: This week’s work progress is a little slow because there were several redos on the tree truck. I will need to work on it again to achieve my desired shape. I never thought creating a bonsai tree would take me so long. Part of the reason is that I haven’t got to know enough tools in SpeedTree that are helpful to achieve the effect. Also, there are not many direct tutorials that taught me to create a bonsai tree in SpeedTree. I would give myself three more weeks to work on SpeedTree and see how it goes.
Really inspiring work!
Thank you!😀
Week Sixteen
Day 1- Work Day
Day 2- I watched some inspiring tutorials.
SpeedTree_TutorialSeries_Preview
SpeedTree - Boxwood Modelling
Day 3- I learned to use Mesh Force today. Although the force is not working perfectly when applying multiple forces on one branch, it works fine with one force on just one branch.
Day 4- After a lot of adjustment, experiment, and optimization, I finally finished the first tree in SpeedTree. I’m glad that it is pretty close to the concept art.
Day 5- Work Day
Day 6- I tried to set up the Speedtree mesh in UE5. However, the Wind Directional Source didn't work on the mesh. I will leave it like that for now and return to it later. Hopefully, I can solve the problem then. I also started on the second tree today.
Day 7- Rest Day. Happy Easter!
Summary: This week, I completed my first tree using SpeedTree. However, the wind effect didn’t work in UE5. Since I couldn’t fix the issue yet, I moved on to my second tree. Next week, I will finish the second tree and start on the third tree.
Week Seventeen
Day 1- I completed the second tree, which is a dwarf umbrella. And not a surprise; the wind effect didn’t work on this tree in UE5 either. I also started on the second pine tree.
Day 2- I nearly completed it.
Day 3- Today, I surprisingly fixed the wind issue, completed the second pine tree, and started on the last one.
For future reference, I will remember to manually add the SpeedTree node to World Position Offset in all shaders/materials and adjust the options on the left accordingly.
Day 4- Made some progress on the last pine tree.
Day 5- Work Day
Day 6- Rest Day
Day 7- Work Day
Summary: I’ve completed two vegetation, solved the wind issue, and worked on the last pine tree this week. Some program issues occurred when working on the last pine tree, but recreating a new file allowed me to move on with it. Next week, I will finish the pine tree.
Day 1- I made some progress on the pine tree.
Day 3- I finished the last pine tree and set it up in Unreal.
Day 4- Today, I found some Meganscan plants to fill the scene.
Day 5- Work Day
Day 6- Rest Day
Day 7- Work Day
Summary: This week mainly worked on the last pine tree in SpeedTree and added more vegetation from Quixel Bridge into my scene. Next week, I will continue adding vegetation, then work on the lighting, fog, and water. I will probably try to use spline meshes to add more details to the scene.
Day 1- I added vegetation to the mountains and discovered a new and efficient tool to create realistic moss. The tool is GraphN Library, and the link to the free download and tutorial is below.
Polygonflow's GraphN Library Gets a New Tool For Scattering Moss
https://80.lv/articles/polygonflow-s-graphn-library-gets-a-new-tool-for-scattering-moss/
Create instant moss magic with GraphN tools library for Unreal Engine
https://www.youtube.com/watch?v=2EHON9-TPdQ
Although my rock has some moss scattered on top of them, they look less realistic because of the lack of height. Using the new tool helps increase the moss's realism and makes it look more appealing.
Before: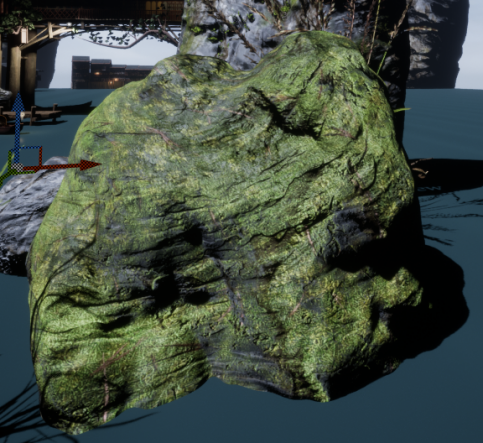
After: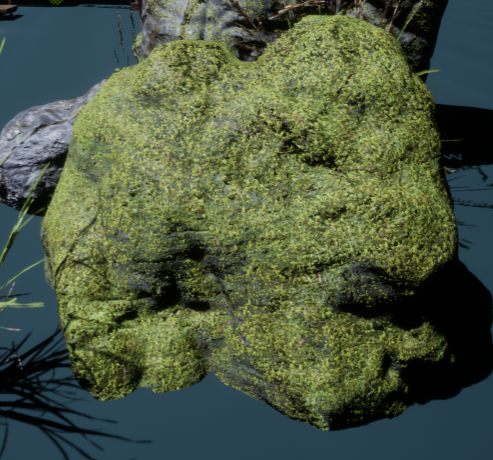
Tips for Sky Atmosphere & Fog - Unreal Engine 5 (& UE4)
https://www.youtube.com/watch?v=SbxO-Z5rzwk&t=123s
Volumetric Cloud Secrets [Unreal Engine 4 & 5] Works in UE5!
https://www.youtube.com/watch?v=yolGEIrhu0s
Day 3- I tried to use the HQSky blueprint, which has better quality and more effortlessly creates a visually appealing sky and atmosphere. However, for some reason, weird flashing light occurred when I adjusted any parameter. So I couldn’t use it and moved on to add more lights to my scene.
Day 4- I added more lights to the scene and created a custom water shader. A mistake I made was that I didn’t create a landscape at the very beginning, so now that I can’t use the water system properly (I could not raise it to the height matching the landscape and displaying it normally).
Environment Production - Part 7 - Water Shader Creation in UE5
https://www.artstation.com/learning/courses/qPV/water-shader-creation-in-ue5/chapters/GMGP/introduction
Day 5- Work Day
Day 6- Today, I finally found a way to get rid of the weird flashing light using the HQSky blueprint! So, I did two things:
1. Instead of using migrate function in Unreal, I copied the HQSky folder and pasted it into my project content folder. (This time, no error warning appears)
2. Add a Sky Light to the scene; turn it off and on whenever making adjustments to the parameter in HQSky (Not sure why this helps to stop the light flashing)
HQSky
https://www.youtube.com/watch?v=d8pFYYgQ1Bg
I also added some great fog into my scene.
Introducing EasyFog for Unreal Engine 5
https://www.youtube.com/watch?v=CyRksVjviwg
Day 7- Work Day
Summary: This week, I spent most of the time adjusting the parameter of the sky and lights, with a lot of back and forth. I also used some new tools, such as GraphN, HQSky, and EasyFog, and using them really sped up my process of decorating the scene. Next week, I will add small meshes to spice up my scene and create video shots.
Day 1- I finished adjusting the lights in the scene and added some small dry leaves on top of the roof.
I created some level sequences and rendered them out. The rendering process didn’t go smoothly; my screen crashed several times, and errors constantly appeared in the image sequence. Anyway, after all these tries and errors, I had a short video clip ready to be polished in After Effect.
Day 2- I discovered many small imperfections in the video that was rendered yesterday. Fortunately, I found a way to render a video that meets my expectation and no error.
Unreal Engine 5 Beginner Tutorial | Cinematic Renders in UE5
https://www.youtube.com/watch?v=GHFq4Dj7sVs
For future reference, I’m going to record it:
1. Create Level sequences (Shot01, Shot02, etc.)
2. Create a Main Level sequence and insert shot tracks into it (Director)
3. Make sure the Video render is turned on in Plugins
4. Then, open Window--> Cinematics--> Movie Render Queue
5. Use png Sequence, add Anti-aliasing (Temperate Sample -->32)
6. Change the frame rate to 24 fps if you want the rendered video to match the playing speed presented in Cinematic Viewport.
7. Use Render (Remote) if Render (Local) doesn’t work correctly.
After I rendered the video I liked, I went ahead and added background music and names to the video and posted it on YouTube.
Link: https://www.youtube.com/watch?v=N83ccK9iVQA
Day 3- I made some final polish in Photoshop and created a progress workflow image. I uploaded everything onto my Artstation and am ready to update my resume! That’s the end of this project!
Project link: https://www.artstation.com/artwork/GekoX3
Summary:
Glad I make it to the end, and I’ve learned a lot of new technologies within these five months. I’ve met some goals that I set at the beginning: learn to use Zbrush, Substance Designer, and SpeedTree—I also learned to create modular pieces, trim sheets, tiling texture, prefabs, channel packing, and blending texture/vertex painting. In addition, I discovered some latest tools that can speed up the creation progress and level up my environment, such as GraphN.
During the process, I discovered I’m more into modeling and setting up the whole scene and less in favor of creating shaders or material. I prefer to focus on the aesthetic aspect compared to the technical side. However, making the scene alive with those technical settings still feels fun. Later in the future, as I get more familiar with using nodes, I might not be so intimated by them. For the current stage, I would like to develop my modeling and sculpting skills to create more delicate work.
I can’t create this project without the most important thing, and that is the concept art! The concept art helps set a standard or goal for me to reach, pushing me to exceed my limit. So, strong concept art can be salient and make all the following work smooth and fast. I really appreciate Devins’ concept!
Recording my progress daily helps me keep going and not give up in the middle of the way. Also, the daily workflow has recorded my solution to the problems that may occur again. Moreover, the resource links shared in the workflow can be a reference for me to use in the future.
Thank you to everyone who helped me along the way and followed my workflow. I hope this workflow might inspire someone also interested in game modeling. Please leave any comments or feedback; it will help me develop my work better in the future!
Lighting-wise think the shadows in the final renders turned out quite dark, like there is no indirect lighting. The environment reflecting in the water body and casting shadows on it would help make it look more grounded.
Good luck with your next project!
I just noticed that, for some reason, the HQSky didn’t have indirect lighting working correctly, and the lighting didn’t affect the objects placed in the scene. It only affects the sky. Therefore, I deleted the HQSky and manually set those visual effect actors into the scene, and the cast shadow and the indirect light option are working.
I also add a planar reflection, which has given the water some reflection.
I wish you all the best!