The Bi-Monthly Environment Art Challenge | March - April (83)

Hello everyone! Welcome to the 83rd edition of the Bi-Monthly Environment Art Challenge for the months of March and April!
This challenge is a way for real-time 3D artists to test their skills and create a piece of work based on concepts provided. It's open to those of all skill levels and we do our best to provide meaningful feedback along the way so everyone can come away from the challenge with actionable points on which they can improve their craft!
Anyone is welcome in this challenge no matter your skill level! It's a test of your own ability not a competition between members. We're all here to improve as artists and learn from each other.
- ENVIRONMENTS -
HARD SURFACE ENVIRONMENT:
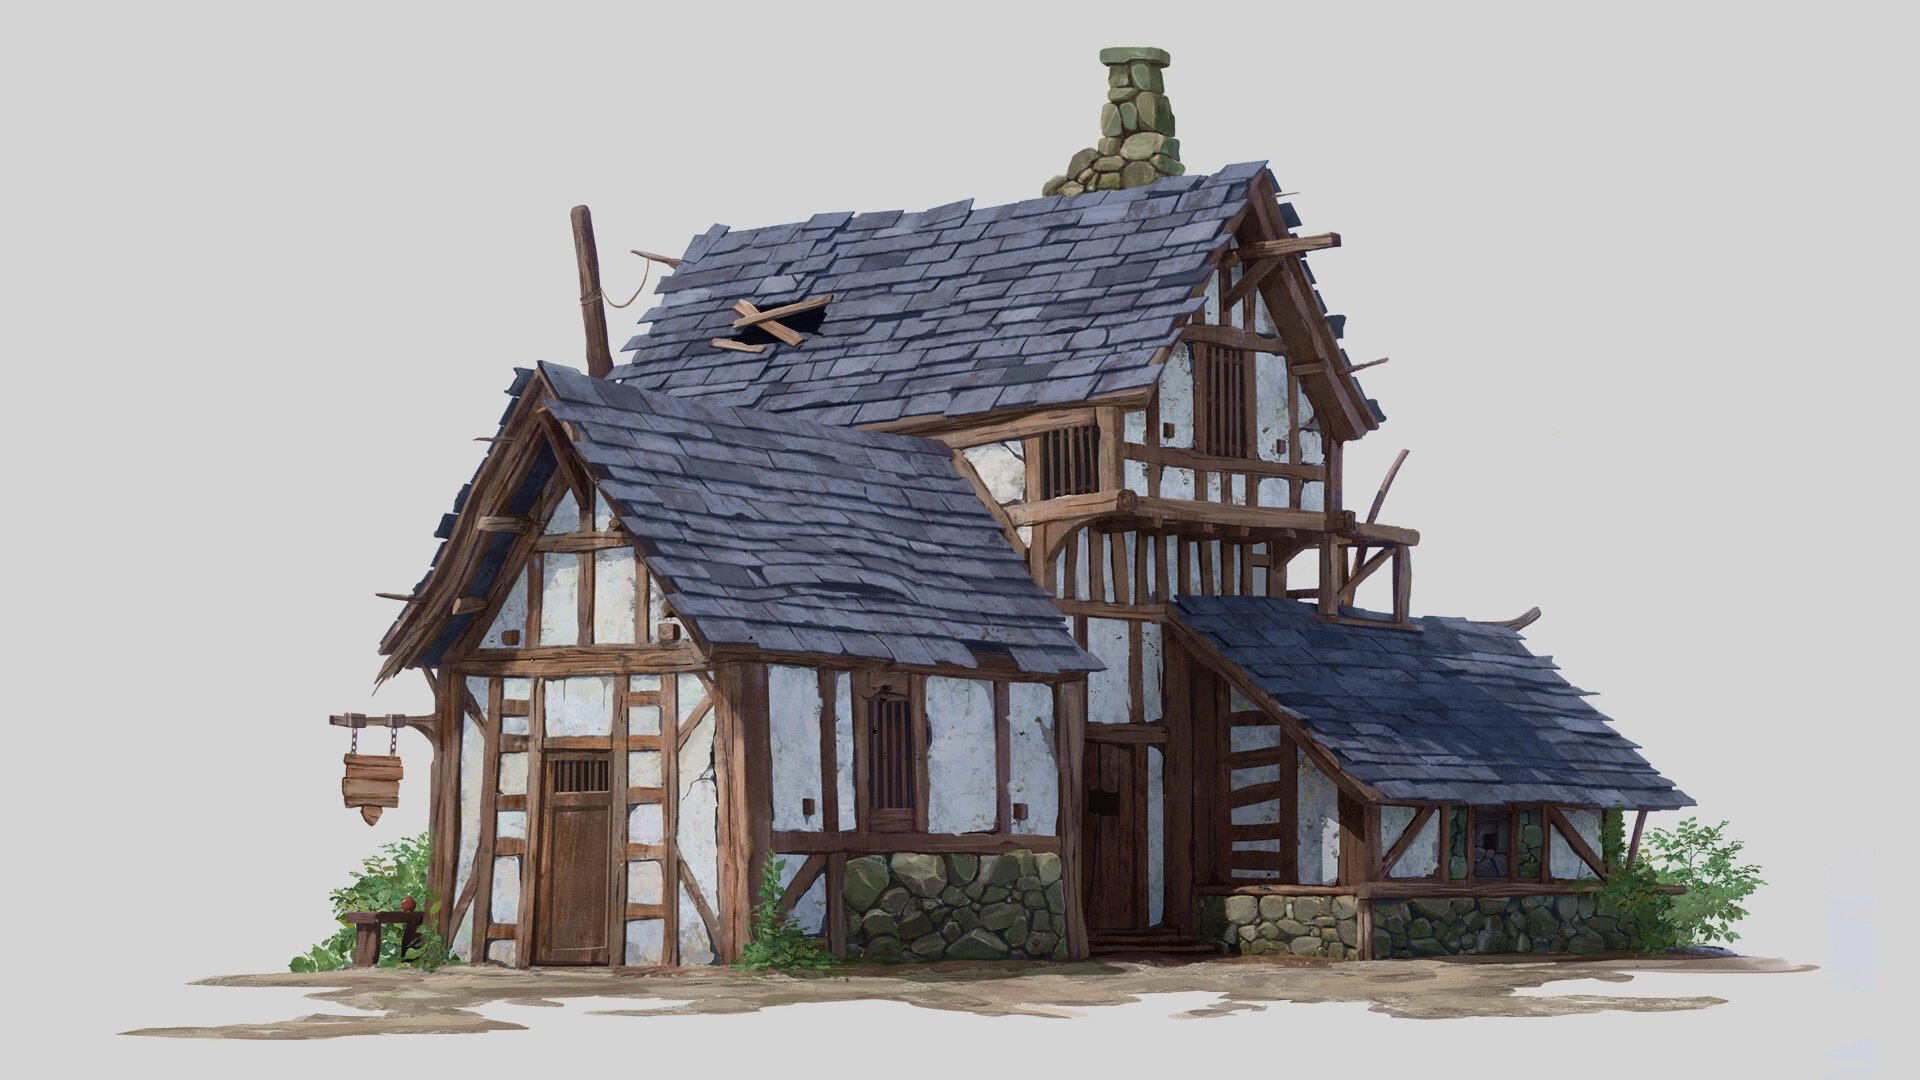
Half Timbered House by James Arkwright
https://www.artgram.co/a/half-timbered-house-gIvkmC
STYLIZED ENVIRONMENT:
Wóska - Concept Arts by Inès "Ourka" Rotzinger
https://www.artgram.co/a/bird-village-environment-concept-arts
If you're looking for even more of a challenge with this one, check out the artist's link to find a view of the interior space as well!

- PROPS -
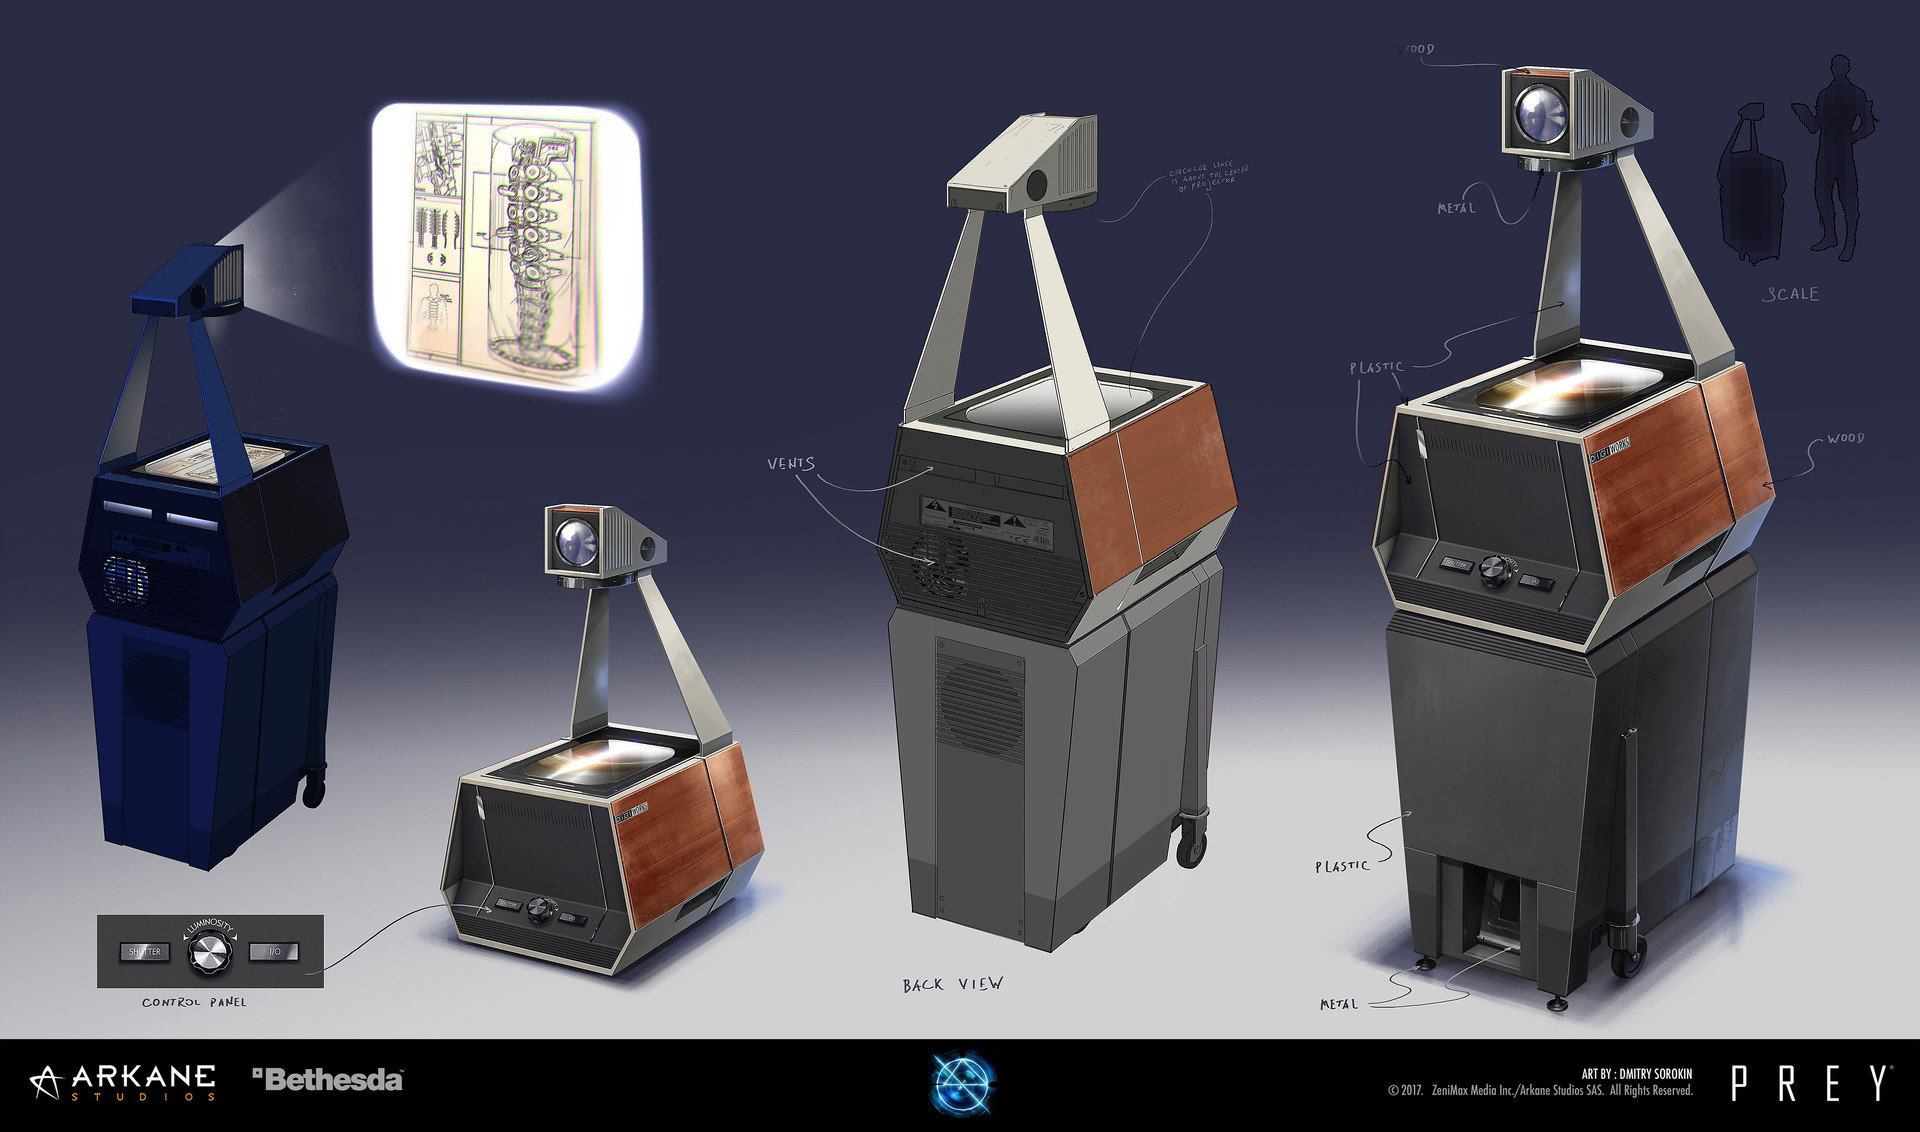
HARD SURFACE PROP:
PREY - Props by Dmitry Sorokin
https://www.artstation.com/artwork/62OD5
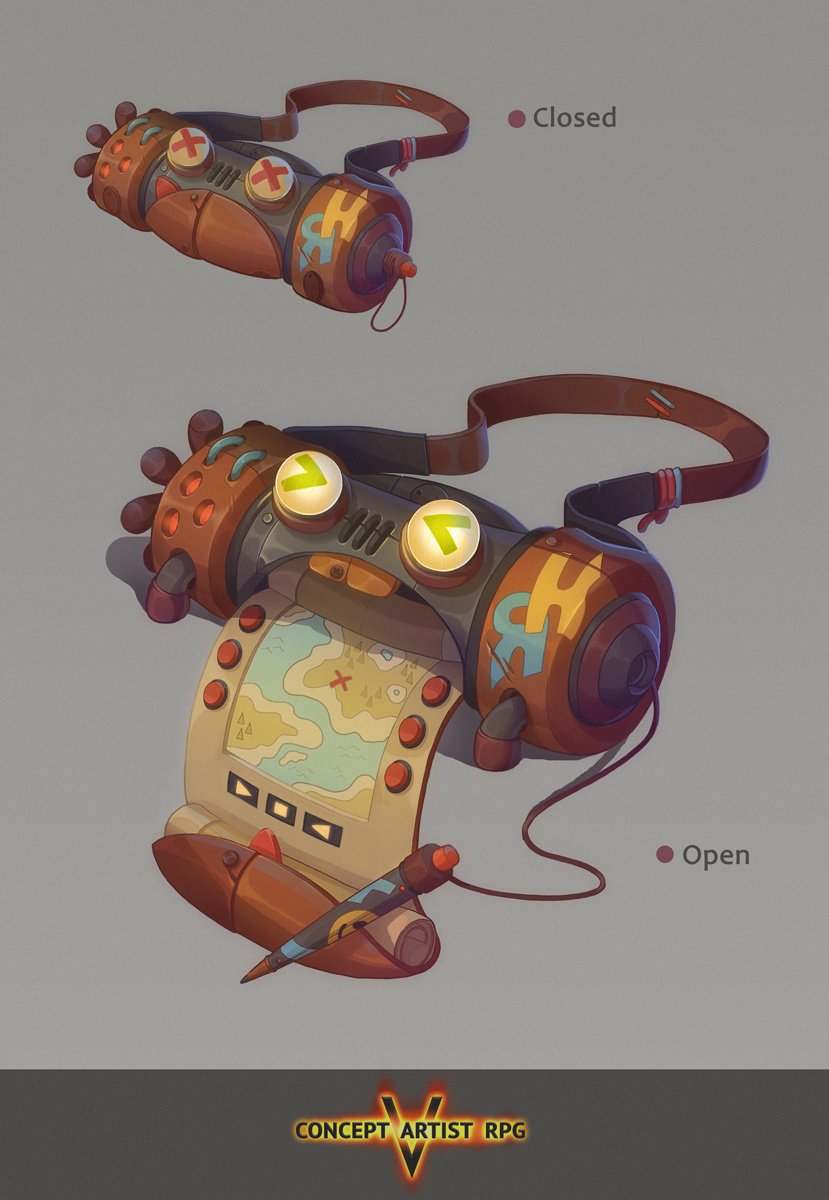
STYLIZED PROP:
Concept Artist RPG 5 by Ekaterina Bek-Nazarova
https://www.behance.net/gallery/74230707/Concept-Artist-RPG-5
- RULES -
Please read all the rules before starting:
- Try to post at least one critique for every post that you make. This will make for a better learning environment and help us all grow as artists.
- Try your best to finish as much as you can in the time frame provided, but remember even if you don't finish by the end of the challenge we encourage you to keep pushing and finish your piece!
- Post what you are working on in this thread so that way it's a more centralized place for advice and critique. Please avoid creating a new thread as we don't want to spam out the forums.
- It is recommended to use a game engine to present your work. Unreal Engine, Unity, and CryEngine are very common engines that can be used but feel free to use any alternatives that you want. (Marmoset Toolbag for example.)
- Feel free to change up your chosen concept a bit if you want! Interpret these concepts to your liking, especially if your aim is to add storytelling elements.
- If you finish your project and decide to post it to Artstation, make sure you give credit to the concept artist in the form of a link to their profile. Additionally, it is recommended to ask a concept artist for their permission to post a 3D piece based on their work before doing so.
- RECOMMENDATIONS -
- When you are just starting out making a scene, it can seem complicated or imposing. Take your time planning and blocking out, it will set you up for success later on.
- Think about how you can re-use assets, re-use textures, break it down as simple as possible and plan it out. A lot of people will break it down in their own way when they start out their challenge. Gather some reference images as well for different parts of the scene, don't be afraid to make it your own.
- We strongly encourage you to go and look at other games and see how they make their assets as well as get concept art to give it your own feel.
The goal is to learn and grow both artistically and in your ability to both give and receive critique, but don't stress about it and remember to have fun!
Good luck everyone!
Replies
Really cool concepts here. That hard surface environment looks like it'll be a good challenge for modularity.
Hi! Decided to start with the Half Timbered House by James Arkwright. I don't know yet how much time I will have for this. But at the very least, I want to make a couple of nice texture sets.
Rough notes about textures and structures:
Current state of blockout:
I find it particular challenging to imagine the obscured part of the structure. I decided to make the top floor for storage, so there should be some platforms and fixtures to lift things up. The vertical support currently in place might be a bit overkill.
Looking forward to see more WIPs 🤓
So far I'm done with the model, I still need to study topology a lot, it's currently a mess
@Fabi_G I love your idea for the back!
I've also decided to go with the hard surface environment. My blockout isn't finished yet, but I've sculpted some rocks I'm really happy with. I'm not sure whether I will bake them into lowpoly models (I'm going with more of a next gen approach) or just into a material, but here they are :D
@elfennani nice, certainly resembles the concept 👍️ Some still renders would have been nice, to get a better look of the model. What's your plan for texturing? Will you bake details down or keep it as geometry?
@mxrxq Thanks! I'm curious to see someone else's interpretation 🤓 Stones look like a solid start, nice! Could do both, a tiling material and a couple of single stones. Keep it up!
Hello!! Just found this forum love the challenges! Is there a discord? or just post here?
Even the blockout looks so nice allready! How did you do the roof texture/material? Substance designer or, something more manual?
The plaster texture, so far is looking a bit wierd. To me it feels like it is going in diagonal lines:
Maybe if you try a plaster material that is more soft, it would ressemble the reference a bit more:
@lucardo Thanks for the feedback, absolutely agree. It should improve over time.
My overall aproach is to bake down geometry to use as a base in Painter. In the case of the Roof, it's some low poly slabs arranged in a tiling manner. Going forward want to give them a sculpting pass for more detail.
I kinda finished the first module (although it's still missing the stone wall, and there is a lot to be improved in materials). I really like how the roof turned out, and it has way lower polycount than I thought it would have (3k tris). In the future, I will definitely make a new slate material, sculpt the plaster a bit and add dirt masks to the plaster material, but for now, I'm happy with the progress :D
Never had participated in one of those and they seem fun!
I'm making the projector first, wanted to try out this method of making the high poly/ detail model in fusion 360 then used max to make a low poly version and bake and make the textures all up.
here is the fusion 360 model done!
tried to keep all of the shapes and silhouetes as close as possible while also maintaining the rule that the lense must be in the centes of the projector.
Taking a stab at this. Any notes on proportion would be appreciated.
@SimãoSilva - Nice! I think there's some minor differences in proportions/placement of the projector arm and lamp on the back, otherwise super nice!
@Fabi_G Nice write up breaking down the shapes and such. This is gonna be helpful for others taking on this concept.
First post on the site ! Doing the projector for some hard surface practice. Here's my low poly , some of the cuts I'm gonna bake in. Any feedback welcome 👍️
@Gannon - looks good from this angle 👌
@SimãoSilva - Good job mate, nailed it ! Nice to see someone doing the same ref. Only critique I got is the lamp at the top, seems a bit to squished compared to the ref .
Hey all
After a long time I've returned and looking forward to tackling this challenge.
I have decided to go for the Wóska village by Ourka, it looks lots of fun.
Not sure how much I’ll be able to do but I will aim on finishing it!
This is what I have so fare
Modeling is almost done, which means I have plenty of time for everything else :D I went with fully modeled stones. I tested a few different approaches and this looks the best in my opinion. It allowed me to only use a single material for all of the stone walls and the chimney while keeping the stones' placement aligned with wooden beams. This is desirable, since with nanite, polycount isn't really a concern anymore, but textures amount still is. Personally, I don't believe nanite is a good excuse not to optimize assets at all because bigger polycounts still take up memory, therefore the stones are baked into low poly meshes. The whole scene is now about 60k triangles, which I think is perfectly fine since there are buildings in God of War: Ragnarok with over 200k triangles, and this game doesn't use nanite :) With sculpted plaster this will definitely go up, but I think I will be able to keep triangles under 100k.
Left to do: Sculpt pass on plaster, dirt mask, tweaking materials, vegetation, and obviously lighting and background.
Been working on some modular trims that i could duplicate around. Just started placing them, here's just some texture flats. Pink assets will be unique unwraps, blue/teal will be tiling.
Block out finished! Now onto details :)
Hi, giving the Prey prop a go as its one of my favourite games!
Just the blockout so far. I'm attempting to use the scale shown on the concept art sheet, with the Unreal Mannequin as reference (Looking at it now I might need to scale it down a bit). Screenshot taken in Unreal, Modelled in Maya. Any feedback is welcomed :)
@Benny_Jam Looks amazing! I don't know if its the angle, but it looks like your missing the back wheels.
Ok was able to finish off the model . Was a fun little exercise! Blender, Substance and Marmoset were the software used for the piece.
@ItsReasonArt Thanks man . Yeah the wheels are there . Just hard to see in most angles
@Benny_Jam Looks great! My only critique is that I would add a little bit more variation in the roughness, but it's definitely a preference.
I think I'm done with that project :D
I decided to take a more next-gen approach with this building. It has 93,000 triangles (not including vegetation and props). I knew I was going to use Nanite, so triangle count was never an issue, however, I still decided to bake sculpted slate and rock to low poly models for the sake of memory optimization and to make working with those models more manageable. there is definitely one big thing I learned the hard way - Nanite actually does support vertex color. You cant paint it per instance in engine, but you can still import it. At first, I thought I will use texture masks for detailing the plaster, so I heavily decimated the meshes after sculpting and that kind of topology is really inconvenient for vertex painting.
I have only used a few materials for this building: wood trimsheet, rope and steel trimsheet, stones that are baked and uniquely painted and then assembled into walls and chimney, slate which was made the same way, and plaster, which is a tiled material with 3 grunges that are mixed in using vertex color masks.
Huge shoutout to James Arkwright, who created the original concept art, and my amazing colleagues at Paradark Studio who provided me with feedback through this project
current state of things as I chip away at this.
@Benny_Jam Really nice job!
Hey all! This is my second time joining this challenge, and although I didn't finish the project last time I did, I'll hopefully manage it this time!
I decided to go for the stylized prop this time around, as I really want to work on my prop art and I figure I could also have fun animating this little guy, too! Gonna try to make it game-ready so I'm forcing myself to not go too crazy with the poly count (heh!).
Here's where I'm at after about 2 hours:
@Gannon Really liking that wood material! Are you making them all yourself?
Edit:
After a handful more hours, I've finished most of the modelling - still need to work on the actual 'map' which is relatively terrifying to say the least, as I'm likely going to have to rig it.
@mxrxq Congrats, turned out nicely! Like the solution you found for the back side.
@Gannon Wood texture looks great! Keep it up!
@PeculiarSana Nice! Already has some character. Do you use any baking or paint the texures directly? If I had to make a rigged prop, I would probably make a mockup first, to identify potential problems.
Found some time to continue working on the house. Added some Megascans foliage.
Currently simple materials use a vertex painted mask to add some variation.
@Fabi_G Looking great! Two suggestions I'd maybe have is to extrude the roof a bit, maybe? Having the main tile surface as just a plane does stand out on the edges a fair bit. Even though the reference is fairly flat too, adding just a bit of depth would help, I think! Wouldn't add too many extra polys either, I imagine. Also, you could perhaps have the moss on the roof more confined to crevices or anywhere it'd be more protected from the sun (unless you're trying to go for a more abandonned look!).
Also, what do you mean by a mockup? For the animation? I have a solid idea of how I want the whole thing to move, and only the map section would get weight painted. I intend to scale down the bones that are inside the body so that I can move the whole assembly in cleanly.
As for my progress for the day, I finished all of the modelling phase (outside of the rope for the pen, but it's sitting at a cozy 6,400 polys), and fully UV unwrapped it. Easily my most complex UV map and I'm honestly pretty proud of it! 😅 I could probably optimise the space I use further, but I was kind of impatient to jump into Substance instead… The textures are very basic still, mostly just slapped some quick layers on in Substance with my mouse since I don't currently have my pen display, but I'm really happy with how this is turning out!
I was sort of hoping I could also work on the Stylized Environment concept, too, but this is taking me a lot longer than I expected. Maybe I'll do it in my own time after this challenge is done! Looking forward to seeing everyone elses' progress, too!
@PeculiarSana thank you, and yep. sculpting all the wood things is cathartic. The hard part is figuring out the size of the bevels out of context. Your prop is turning out stellar. I'm so excited to see the material phase and the animation phase of it.
@Fabi_G Thank you, I feel like i'm hitting my stride finally. What are your thoughts on putting a couple of deformers on your building to help taper it as it goes higher?
@PeculiarSana By mockout I meant, doing rigging early with placeholder/blockout mesh and texture to see how it deforms, but it seems you already have a clear idea how to want to do it. Textures coming along nicely! How will you make the eyes change state?
Thanks for the feedback peculiar and gannon! Added roof thickness and made adjustments to geometry so it's less simple/uniform/straight. Also worked over vertex colour masks and added height lerp into the blend. Altough there is more to improve (roof could be better, both, surface and geometry, surfaces/materials overall, …), I have to move on to other things.
Weekend progress on the roof
@exitshadow Wireframe looks cool! Will you keep all the gratings for the lowpoly? I imagine all those faces would amount to some noticeable texture space.
Looking forward to your updates!
Gave the projector a shot with the goal to experiment a bit with mid-poly and floaters. Baked the shading down to a low-poly which used a bevel modifier with two segments and a profile of one to add support loops to the edges and an edge split modifier to preserve the hard edges - this helped to reduce the skewing when baking with averaged normals. The final geometry consists of the same meshes, just without the bevel and edge split modifiers. To maximize UV space all parts are mirrored, except the body in the middle with the veneer. The model is using a 2k texture set.
Sketchfab screenshots:
midpoly + floaters:
lowpoly:
model
Yes, the roof is a unique mesh that mixes tiling materials to maintain a nice texture resolution. I'm using a lot of different techniques just to refresh myself and learn some of the new quirks that are associated with Unreal 5 and Nanite, such as no displacement vertex blending. I'll have to learn RVT to create some transitions between the stone pavers and the building itself.
Little more progress.
Next steps, I'll create some transition models, redo the base of the chimney, some foliage and additional supporting props such as curtains for the roof window, a doormat, and maybe even some of those birbs.
https://polycount.com/discussion/233029/the-bi-monthly-environment-art-challenge-may-june-84/
For anyone still working on their piece, please keep going and keep us up-to-date in this thread! It's always excellent to see people reach the end and that's a goal you should always strive for.