Documentation: Hatched Ink Shader for Concept Art
polycounter lvl 6
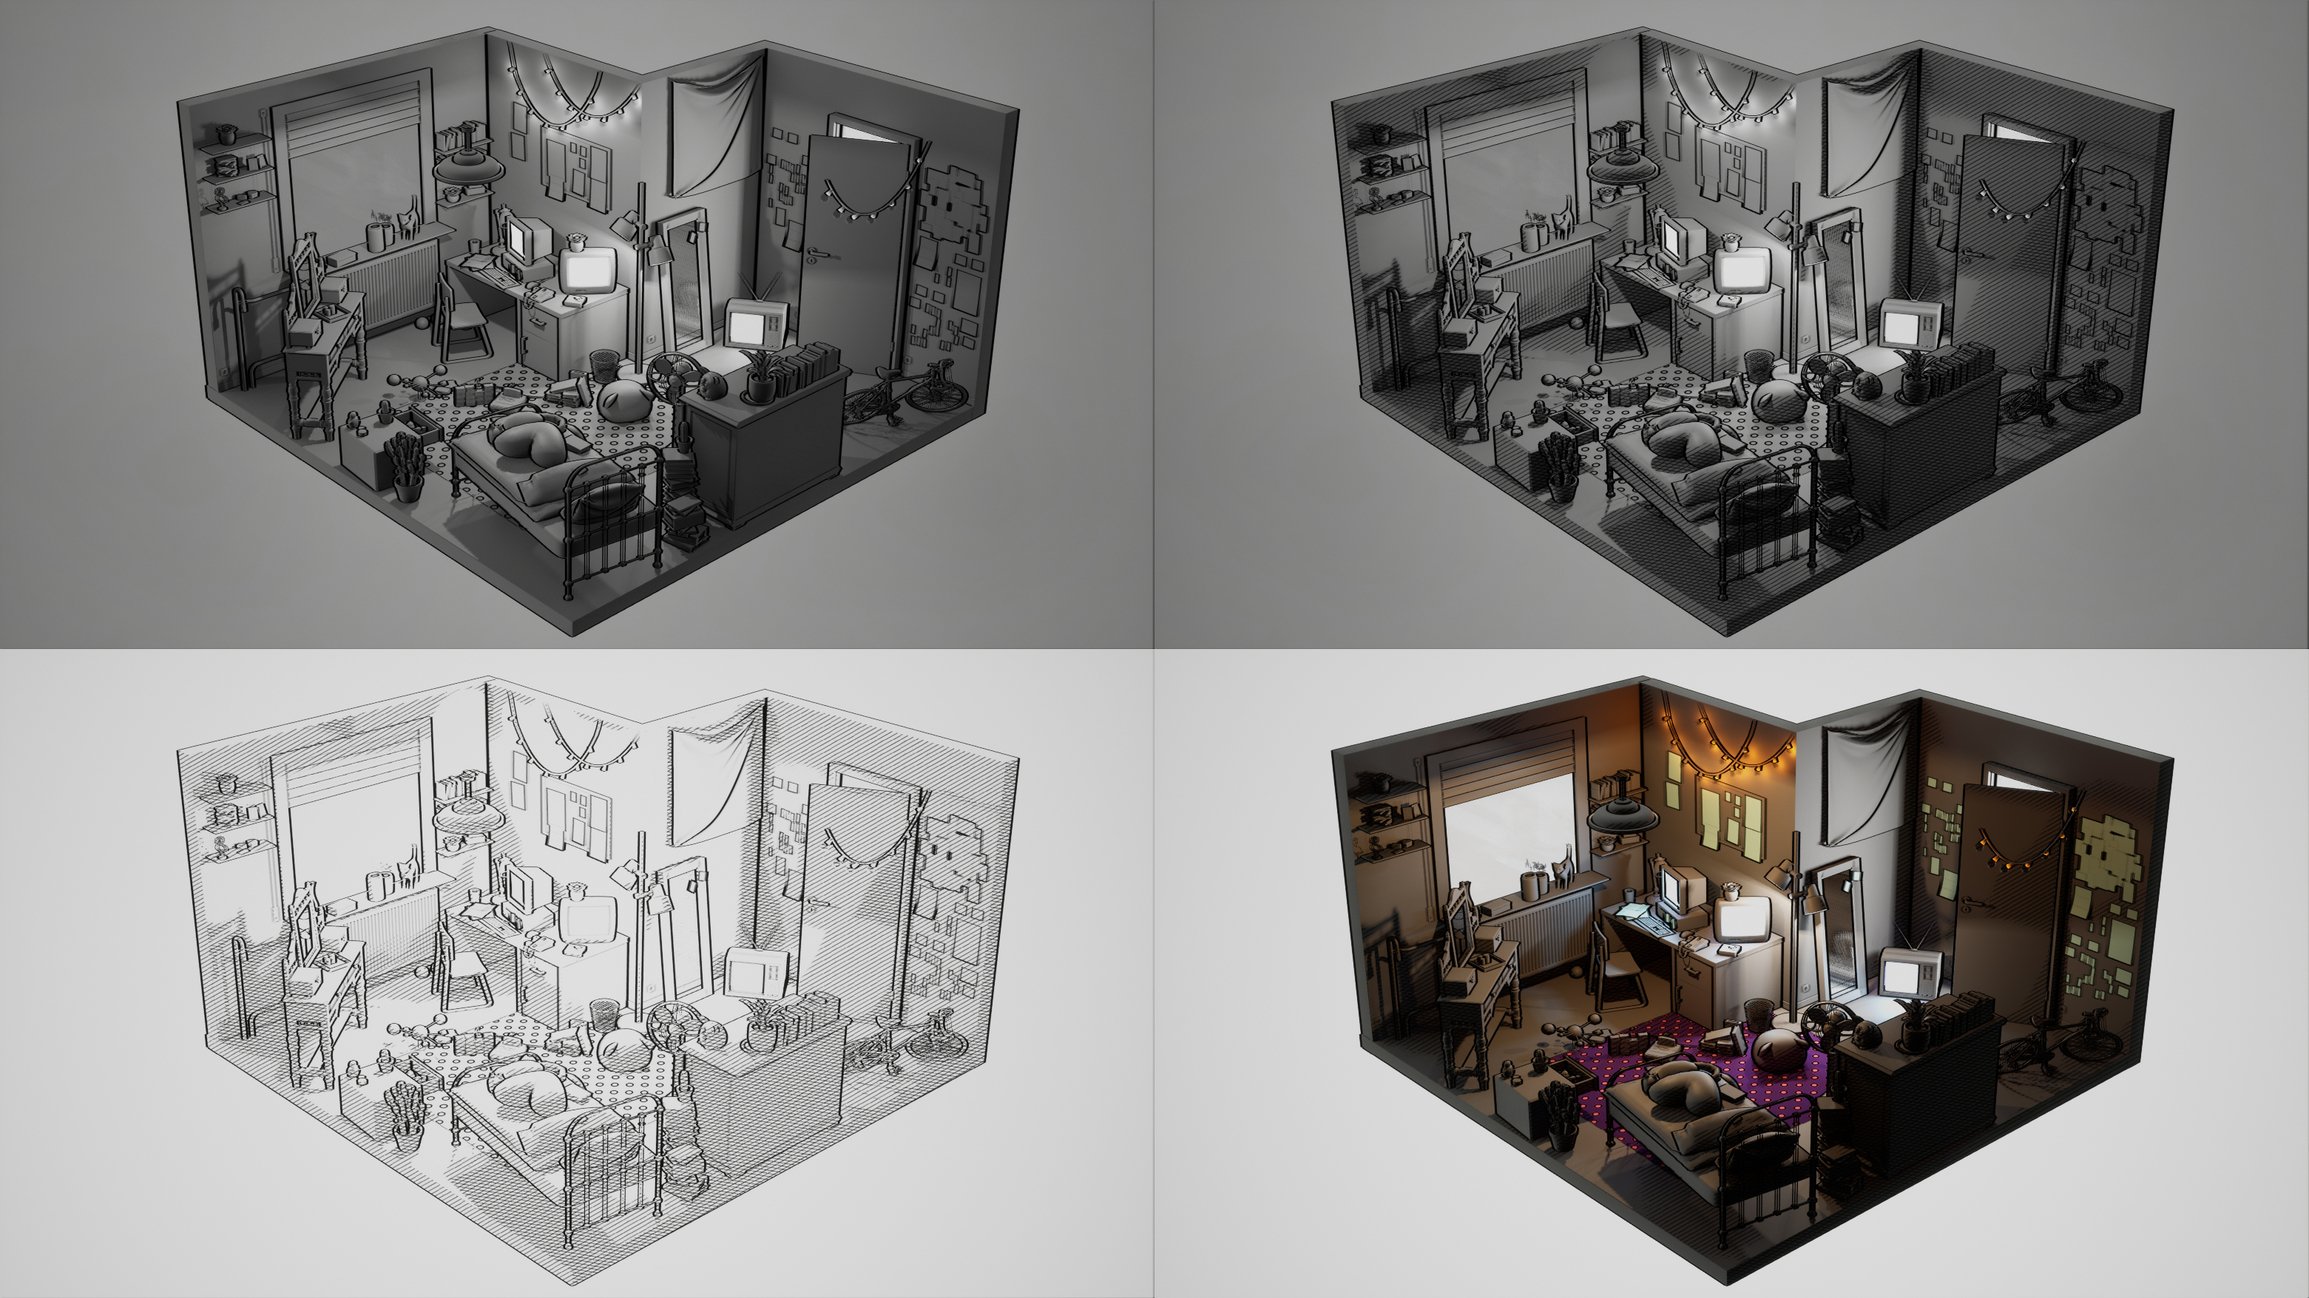
In this documentation, I describe in-depth the Hatched Ink Shader for Unreal Engine. I aimed this shader specifically at Concept Artists, but I can also imagine a use for it on games or anything else.
If you have somehow stumbled over this documentation without knowing about the shader, you can get it here:
https://www.artstation.com/a/7610042
This document is structured as followed:
You can also create a black & white cel-shading to create an ink- or print-like look, or overlay a paper texture directly in the engine.
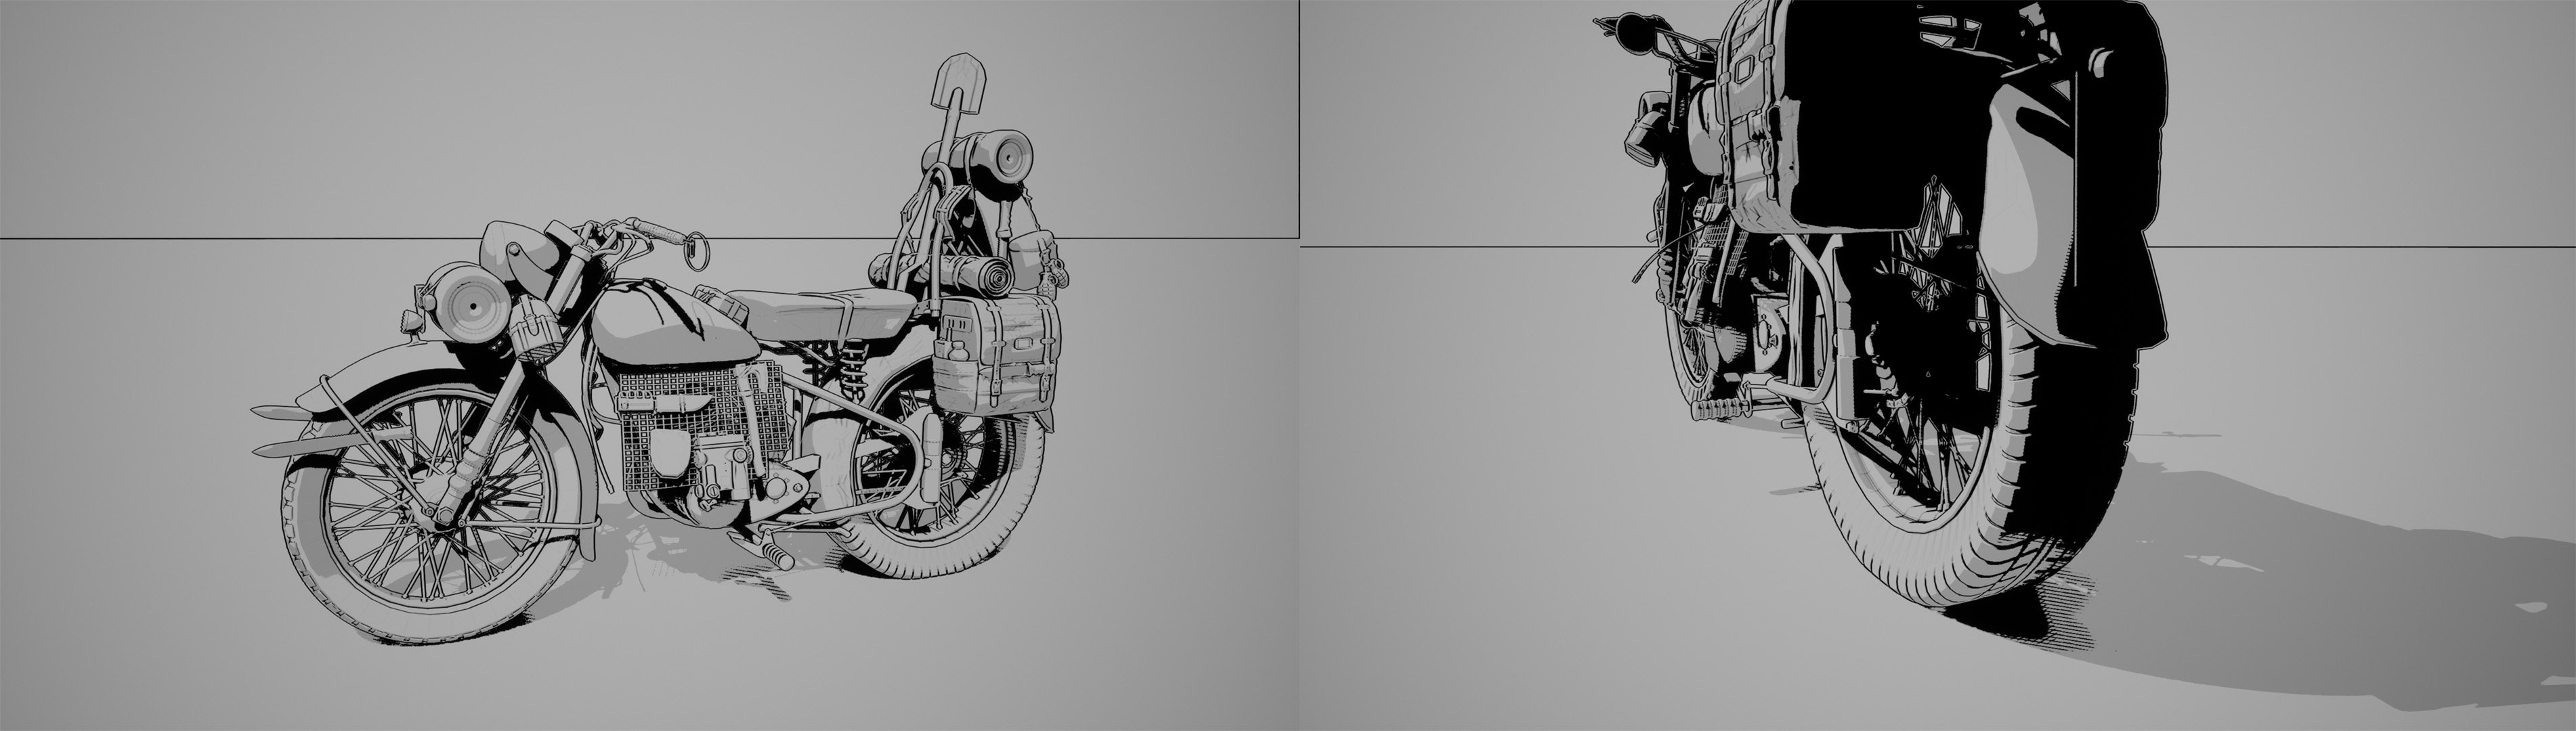
With it, you can create images similar to those:
Concepts by Maya Squar (https://www.artstation.com/mayasquar)
It is easy to use, adaptable and versatile.
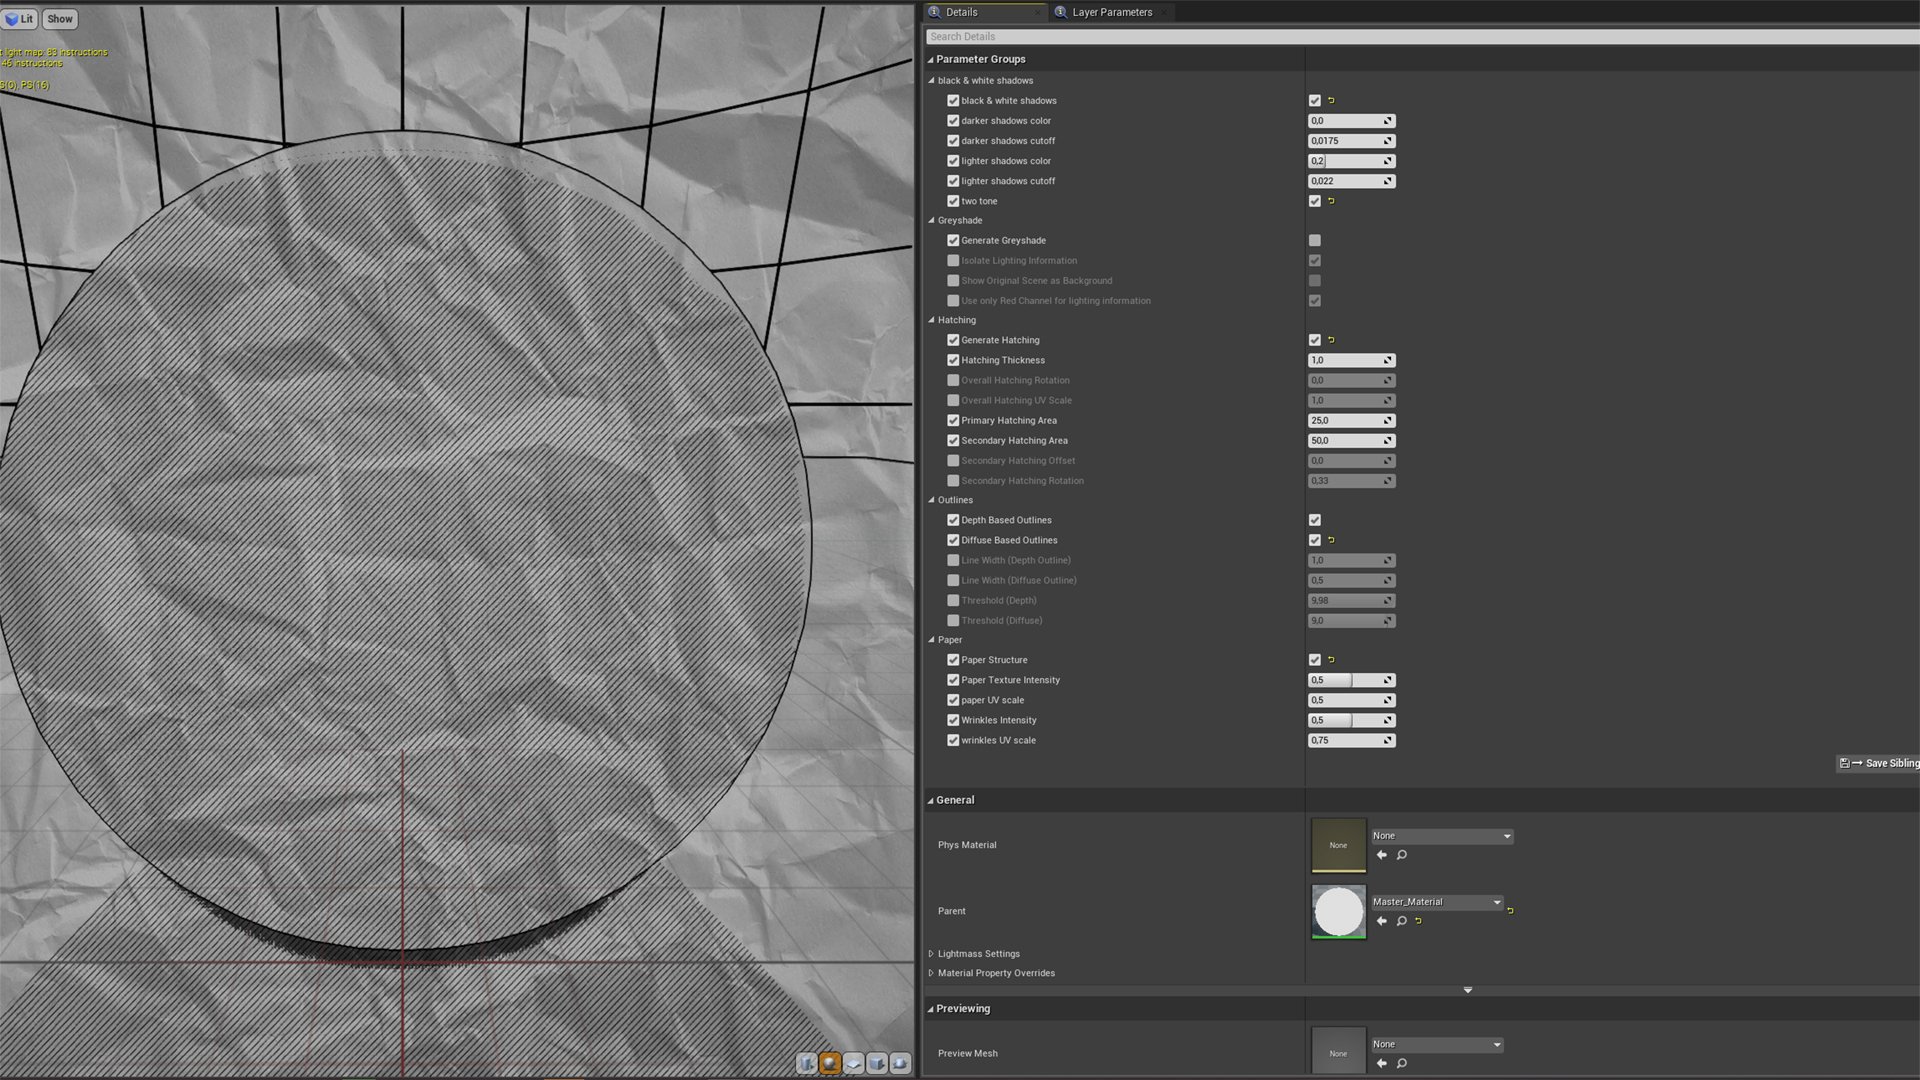
Note that some settings will only show up when certain others are selected.
You can make as many copies of the Instance as you want, to save your settings.
You need to activate the checkboxes on the left to be able to edit the belonging parameters!
Here is how they work.
3.1. Outlines
There are two methods of generating the outlines. "Depth Based Outlines" and "Diffuse Based Outlines". As the names suggest, one generates the outlines based on the depth information of the scene, the other one based on the color information.
"Depth Based Outlines" is active by default and should always be used as the main method. You can edit the thickness of the outline with the "Line Width (Depth Outline)(near)" Parameter.

(low and high line width)
The "Threshold (Depth)(near)" defines the minimum distance that needs to be between the geometry so that outlines are drawn. The Higher the Value is set, the more lines are created. You might have to work in the top range of the value to adjust it, and only set it to a lower value if you only want outlines on the edges of your objects.

(low, medium, and high threshold)
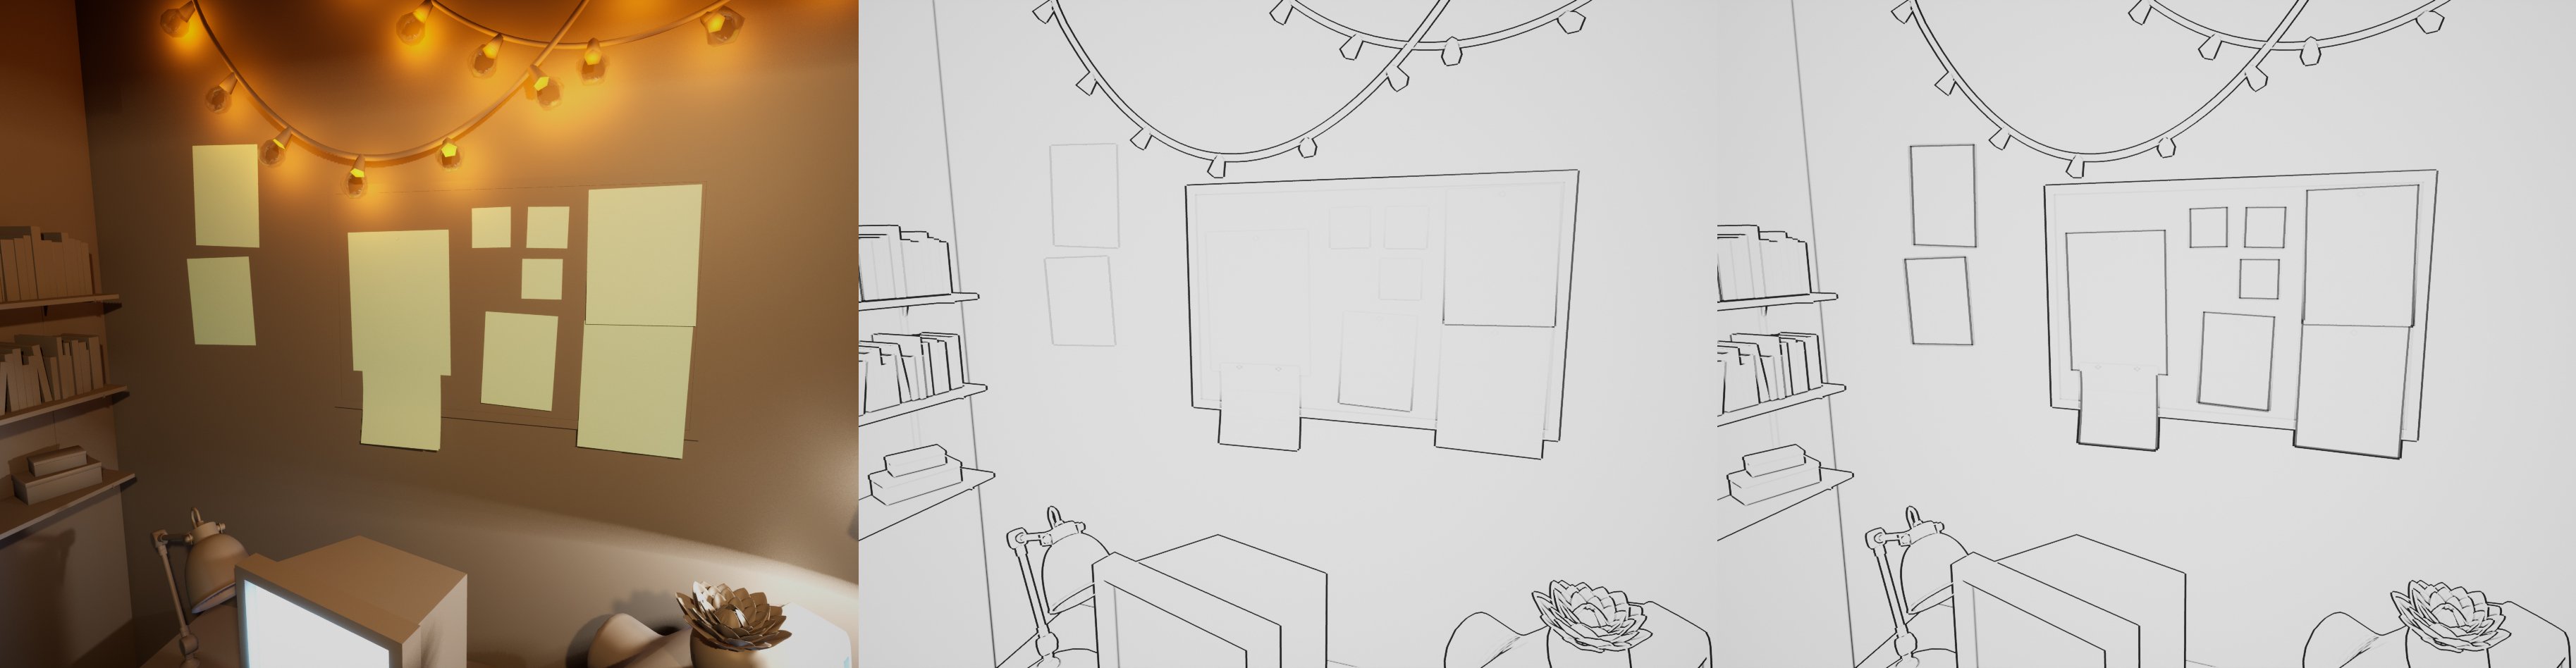
The "Diffuse Based Outlines" work best in combination with the Depth Based Outlines to get additional information from the image.
Check out these notes for example. They only stand out a little from the wall, so they barely show up.
To counter this I gave them a different colored material than the wall and activated Diffuse Based Outlines.
It's a similar situation with this dotted carpet. Without Diffuse Based Outlines there is no pattern visible, but with it switched on, the pattern shows up.
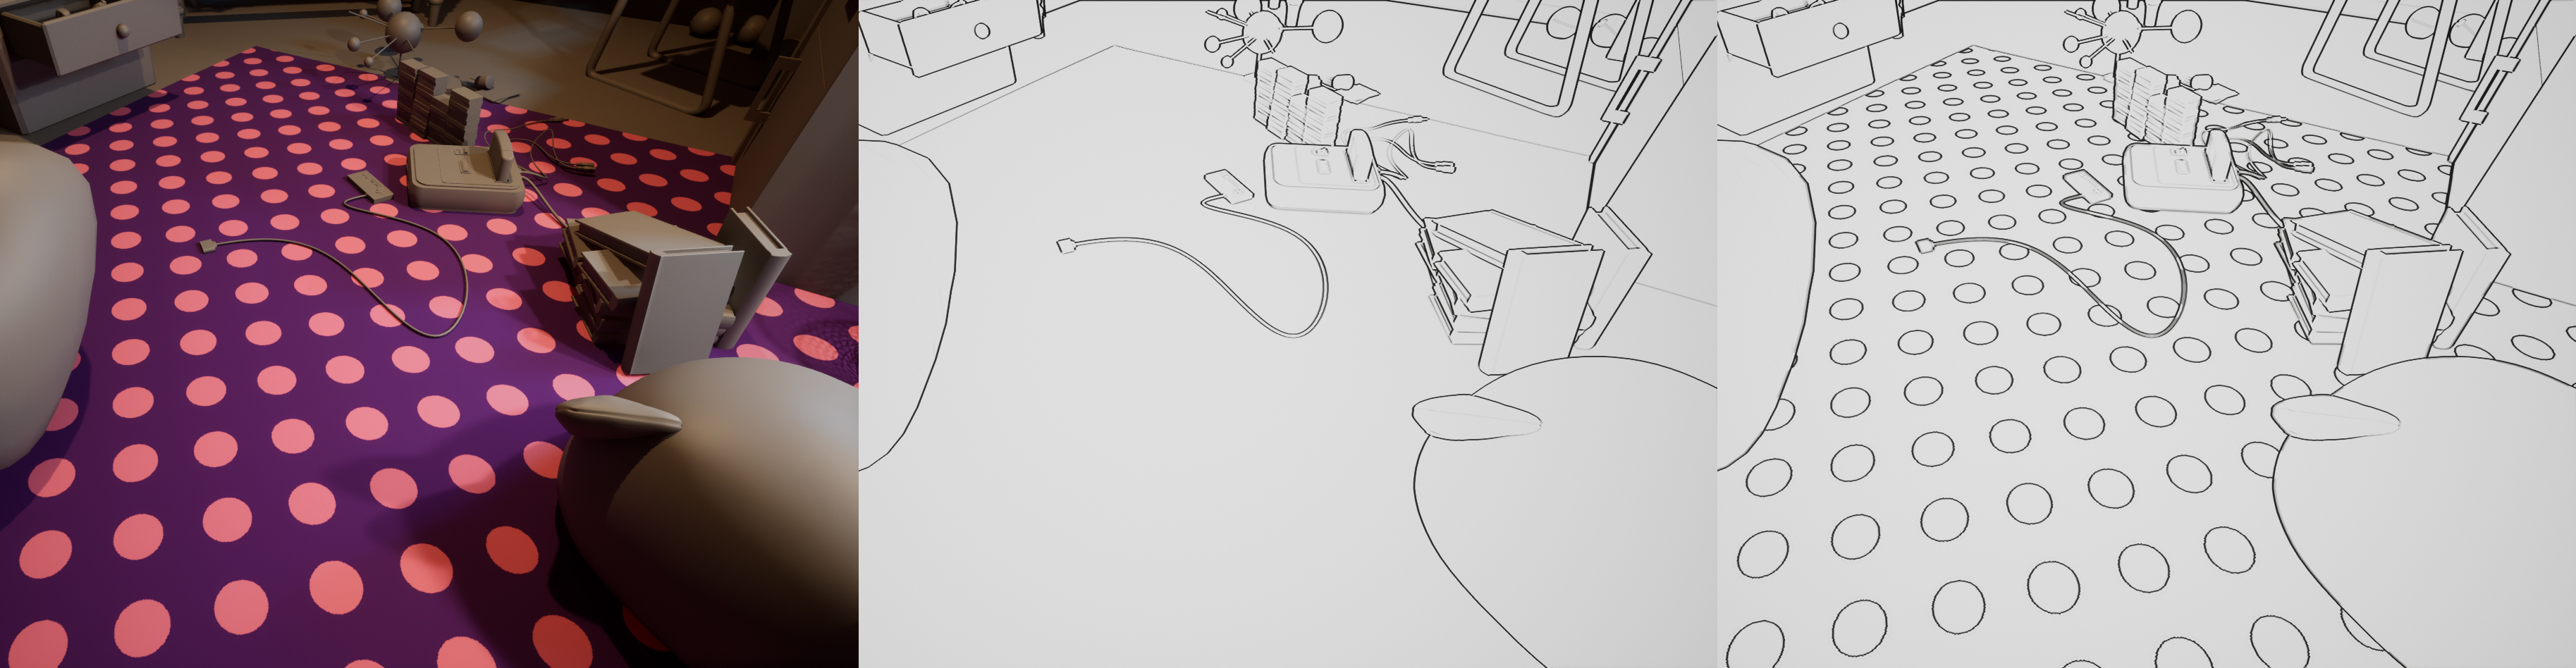
For the Diffuse Based Outlines, you have the same settings as for Depth Based Outlines. "Line Width (Diffuse Outlines)(near)" and "Threshold (Diffuse)(near)". They do exactly the same.
An option that has been added recently is "Use Distance Blend". With it enabled, the Line Width, as well as the Threshold, will decrease over distance. Therefore you now have the parameters "Line Width (Depth Outlines)(near)"/"Line Width (Diffuse Outlines)(near)", which define the maximum thickness of the lines that are close to the camera, and "Line Width (Depth Outlines)(far)"/"Line Width (Diffuse Outlines)(far)" which define the minimum thickness of the lines that are far from the camera.
As well as "Threshold (Depth Outlines)(near)"/"Threshold (Diffuse Outlines)(near)", which define the maximum threshold close to the camera, and "Threshold (Depth Outlines)(far)"/"Threshold (Diffuse Outlines)(far)" which define the minimum threshold far from the camera. (more information about the Threshold parameter can be found above)
The "Blend Distance" parameter defines the distance within which the blending occurs. The value is NOT representative of any length unit like meters.
Another option that can be enabled is "Exponential Blend Distance". By default this option is disabled, but especially for exterior scenes, it is recommended to use it. When it is disabled, the blending distance is linear (e.g. line thickness 5 after 1m, 4 after 2m, 3 after 3m, 2 after 4m, 1 after 5m). With it enabled the blending distance is exponential (e.g line thickness 5 after 1m, 4 after 2m, 3 after 4m, 2 after 8m, 1 after 16m)
With "Blend Distance Exponent", you can also edit the exponent that is used. By default, it is set to 2.
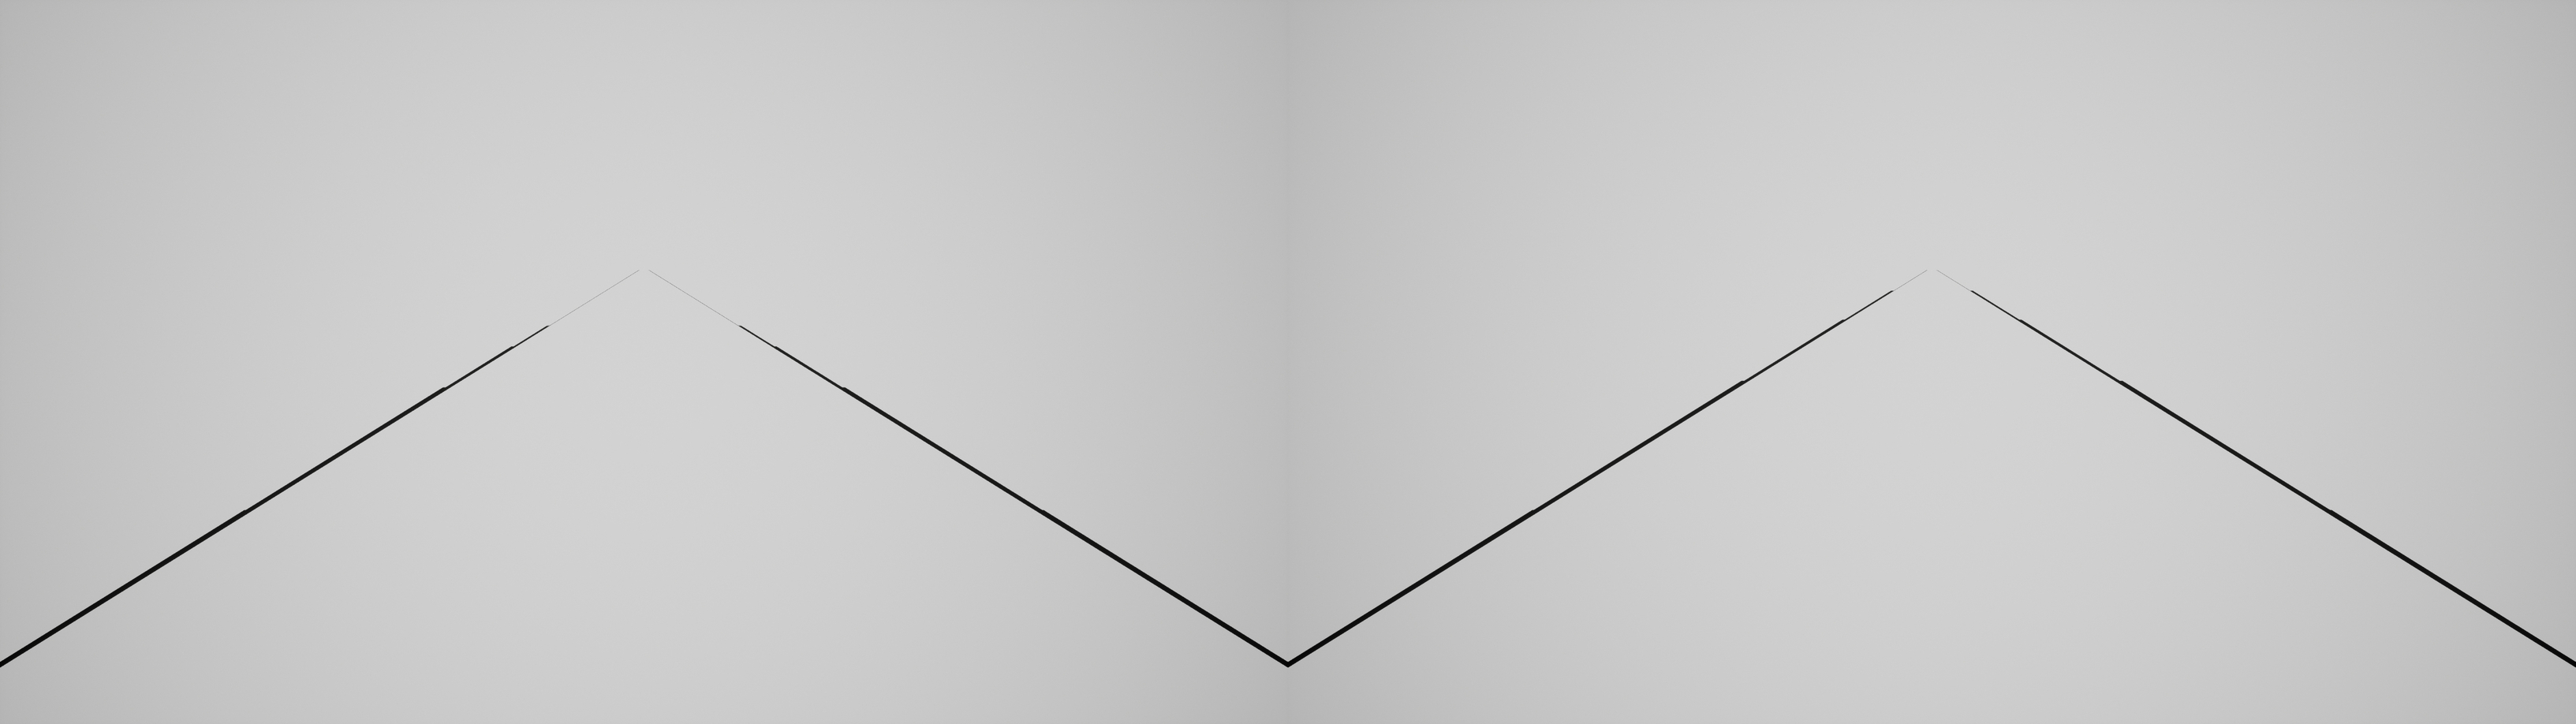
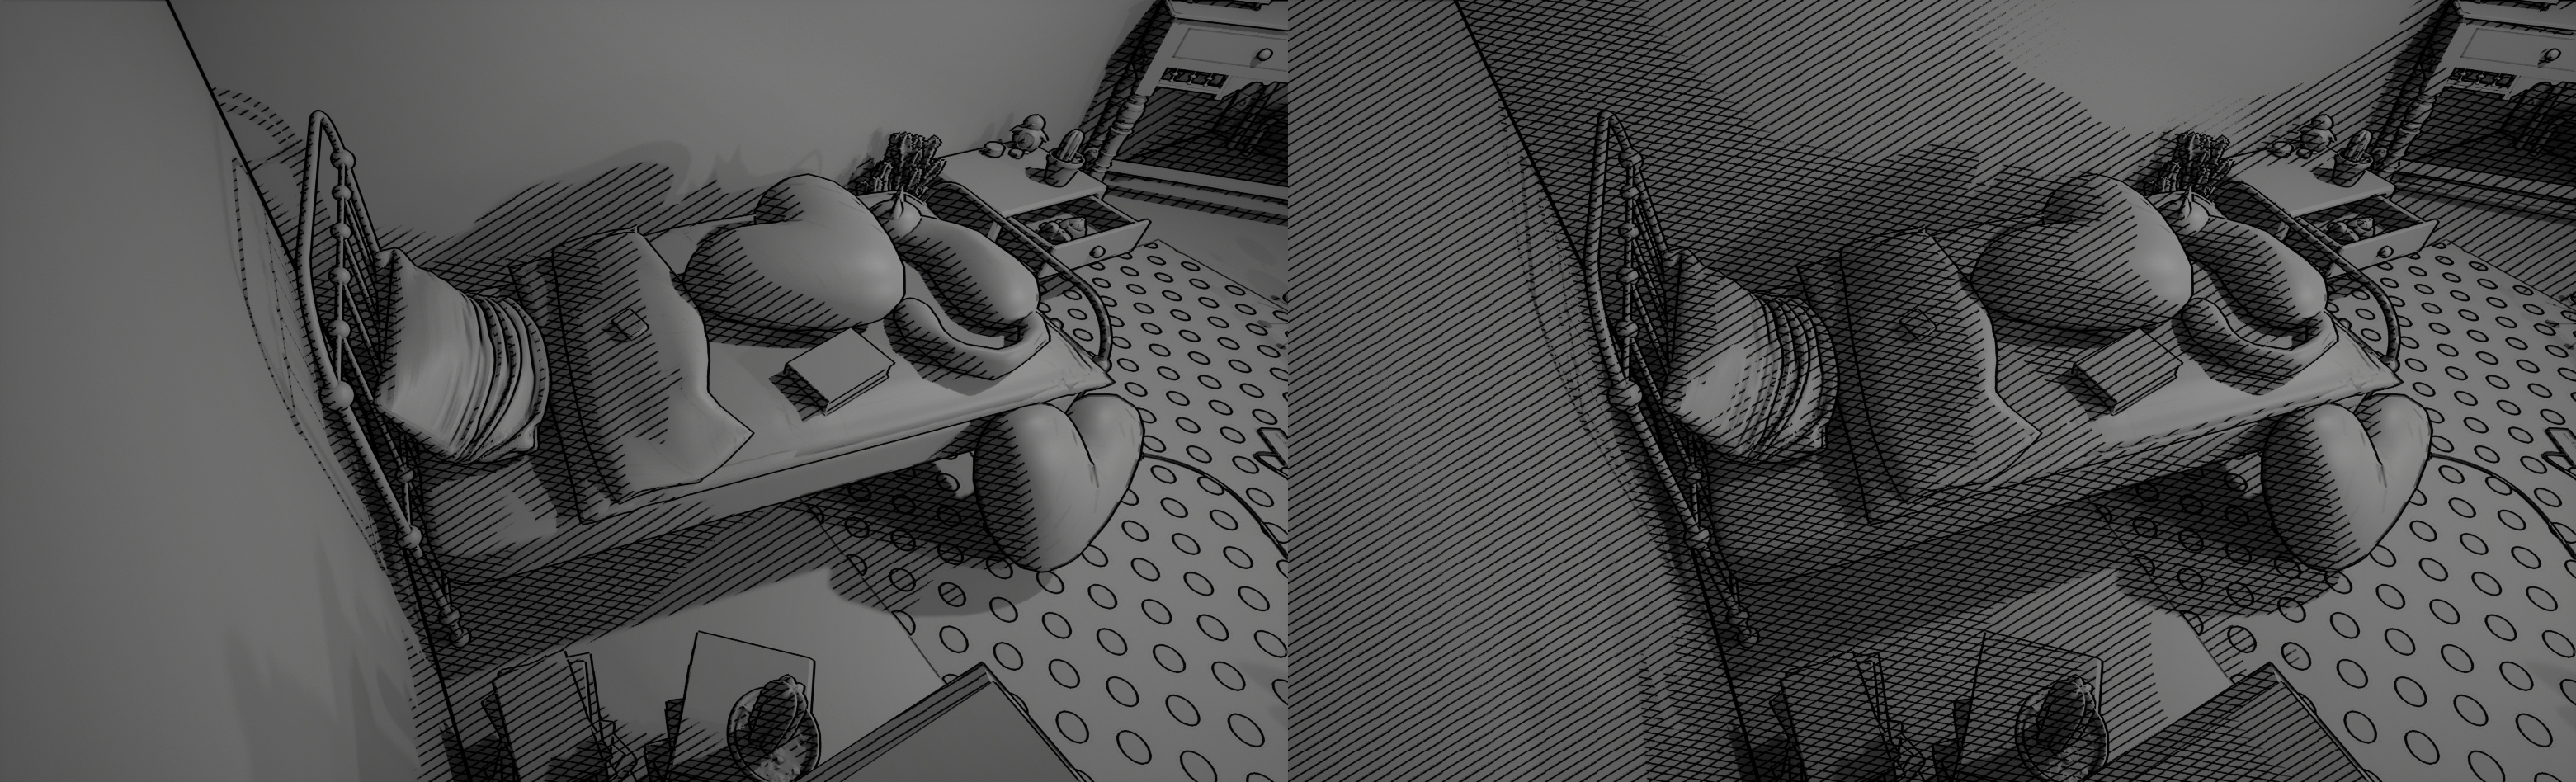
Here is a comparison of Linear Blend Distance (left) vs Exponential Blend Distance (right)
The "Blend Distance Debug Plane" helps to visualize at which point the Distance Blend stops, or in other words, at which point the outlines have reached the minimum set width. It moves with the "Blend Distance" parameter.
You can also freely adjust the color of the Debug Plane with the parameter "Debug Plane Color"
The following screenshots show the Debug Plane at a different Blend Distance, the parameter "Line Width (Depth Outlines)(far)" is set to "0"
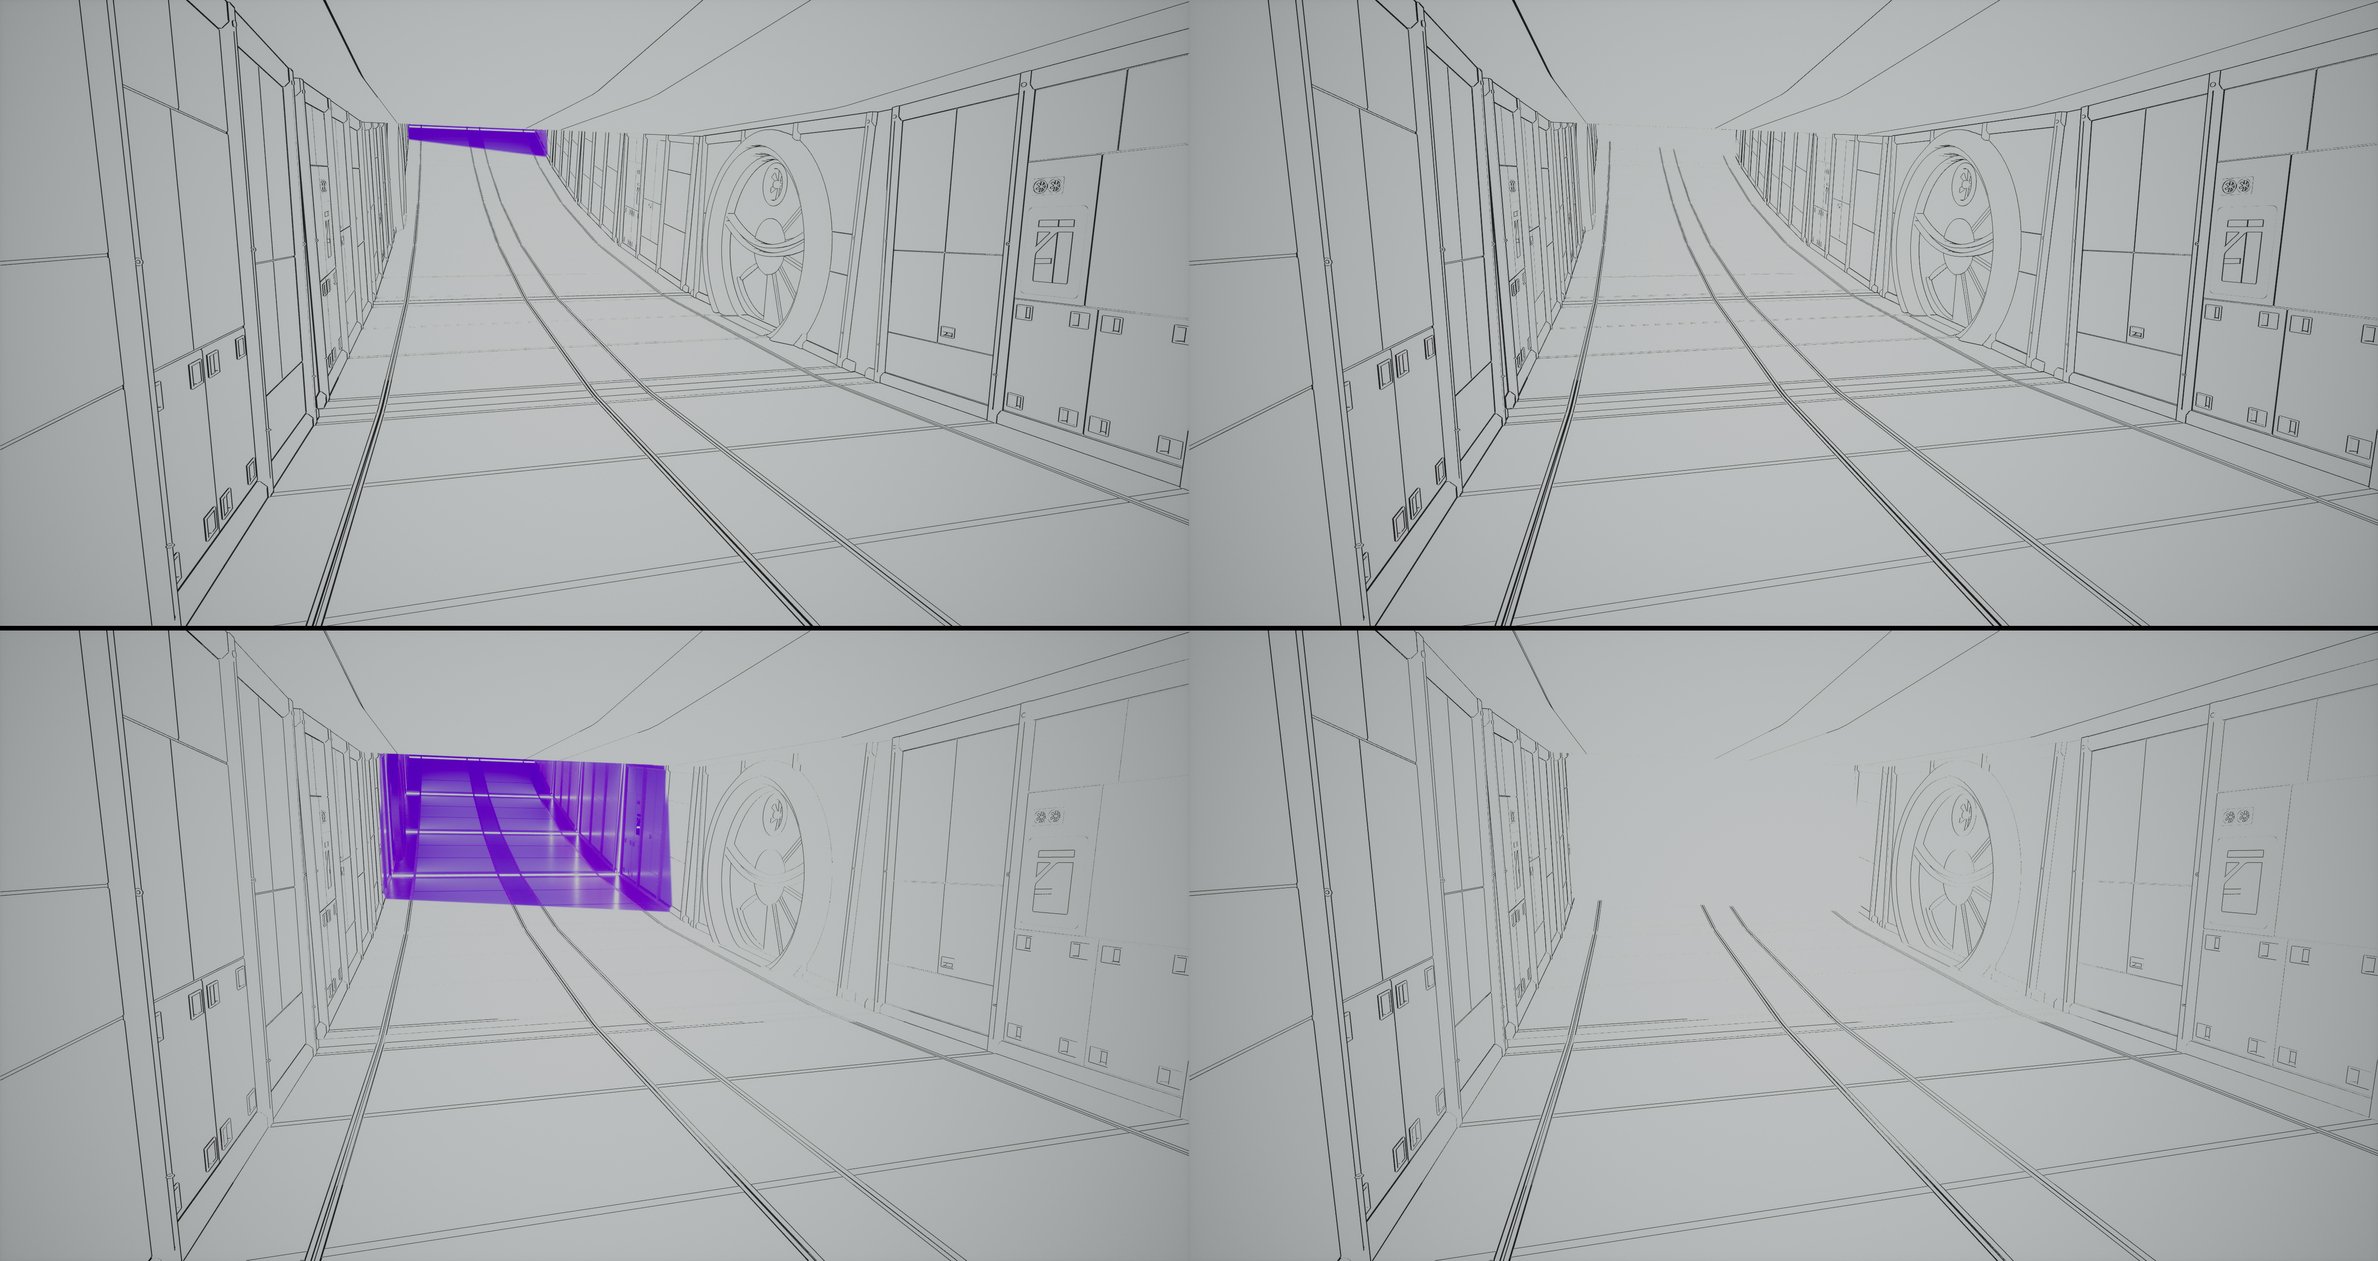
(left: Debug Plane enabled, right: Debug Plane disabled)
There's also the option "Show Original Scene as Background". If you have outlines or hatching enabled this means those will be drawn on top of your original scene and not on white as in the screenshots above. When outlines or hatching are not active, this means only your original scene will be shown, as if there is no post-process applied.
Next up:
3.2. Greyshade
Make sure "Show Original Scene as Background" is disabled, otherwise, these options will not show up.
With the option "Generate Greyshade", the shader generates a grayscale image from your original scene. When "Isolate Lighting Information" is disabled, it means the image will just be desaturated completely.
By default "Isolate Lighting Information" is turned on though. When it is active, the shader tries to filter out all the information from the diffuse color and leaves only the lights and shadows.
It is important to mention that "tries" means, due to technical limitations it is using a workaround to achieve this. This doesn't always work perfectly, especially if you have very dark or high contrast colors in your scene. Usually, it will lead to a better result, if you simply assigning the same grey material to all your objects.
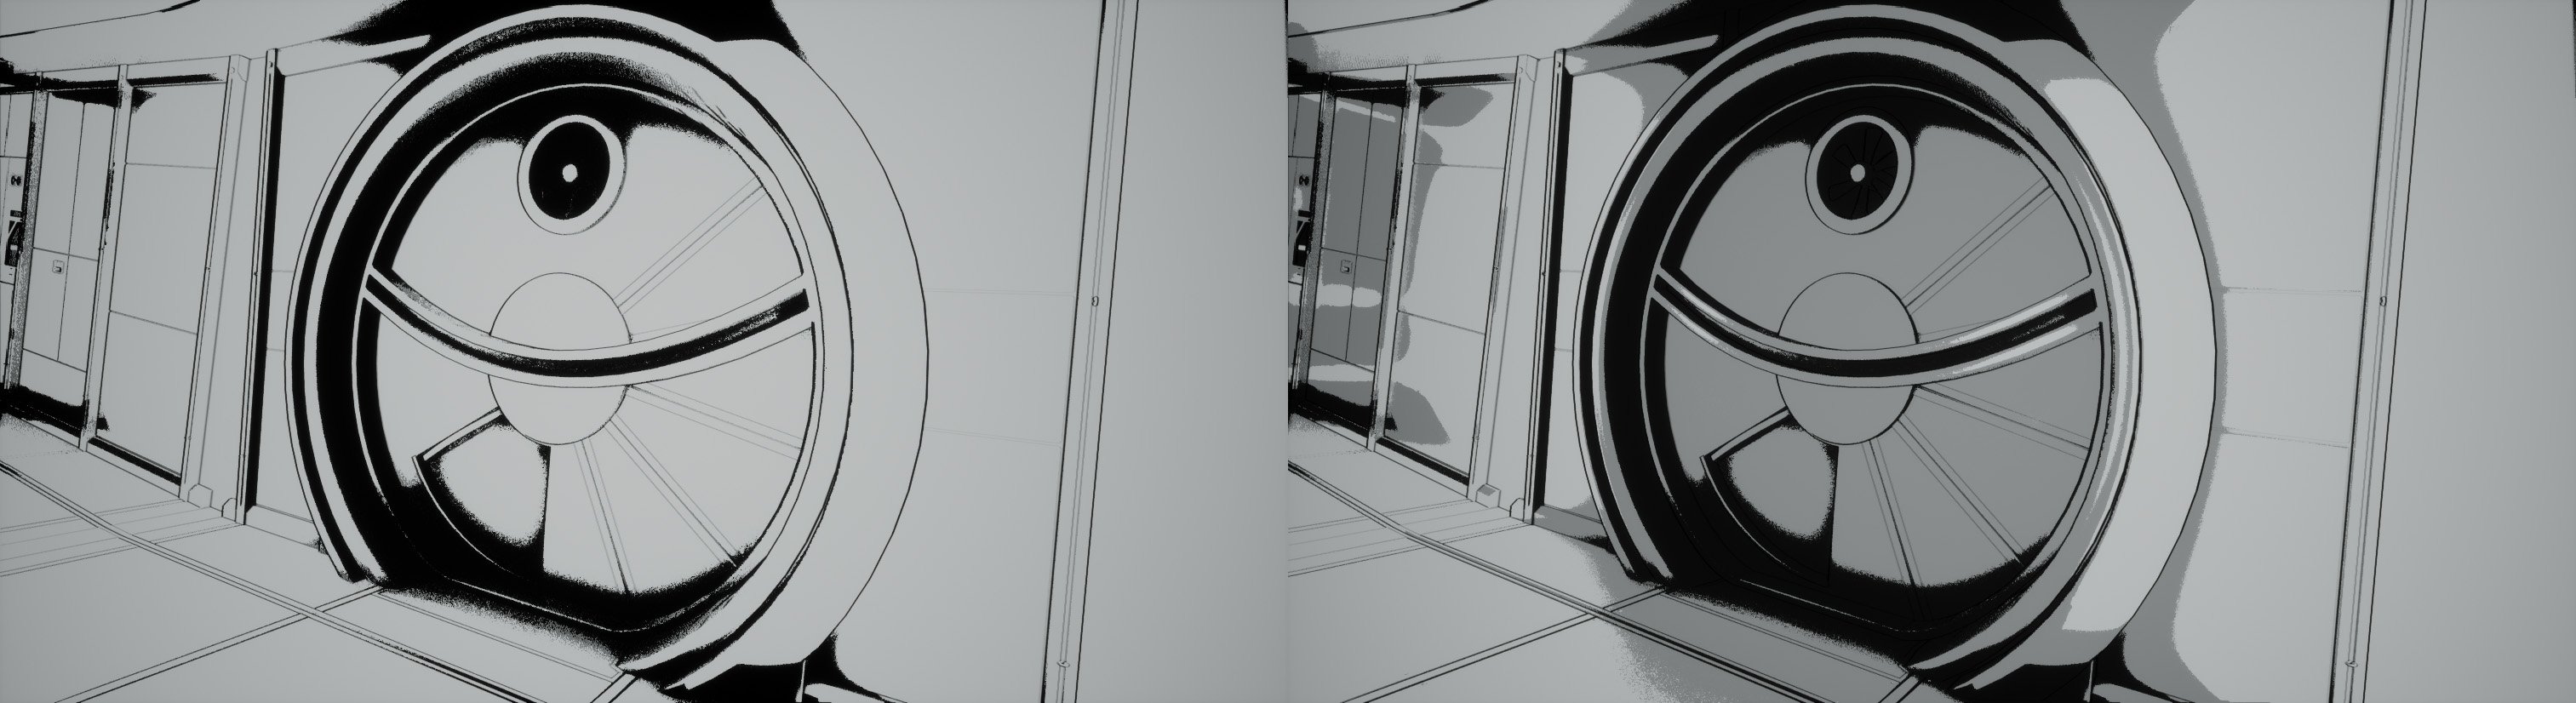
On the left, Isolate Lighting Information is turned off, on the right, it's enabled:
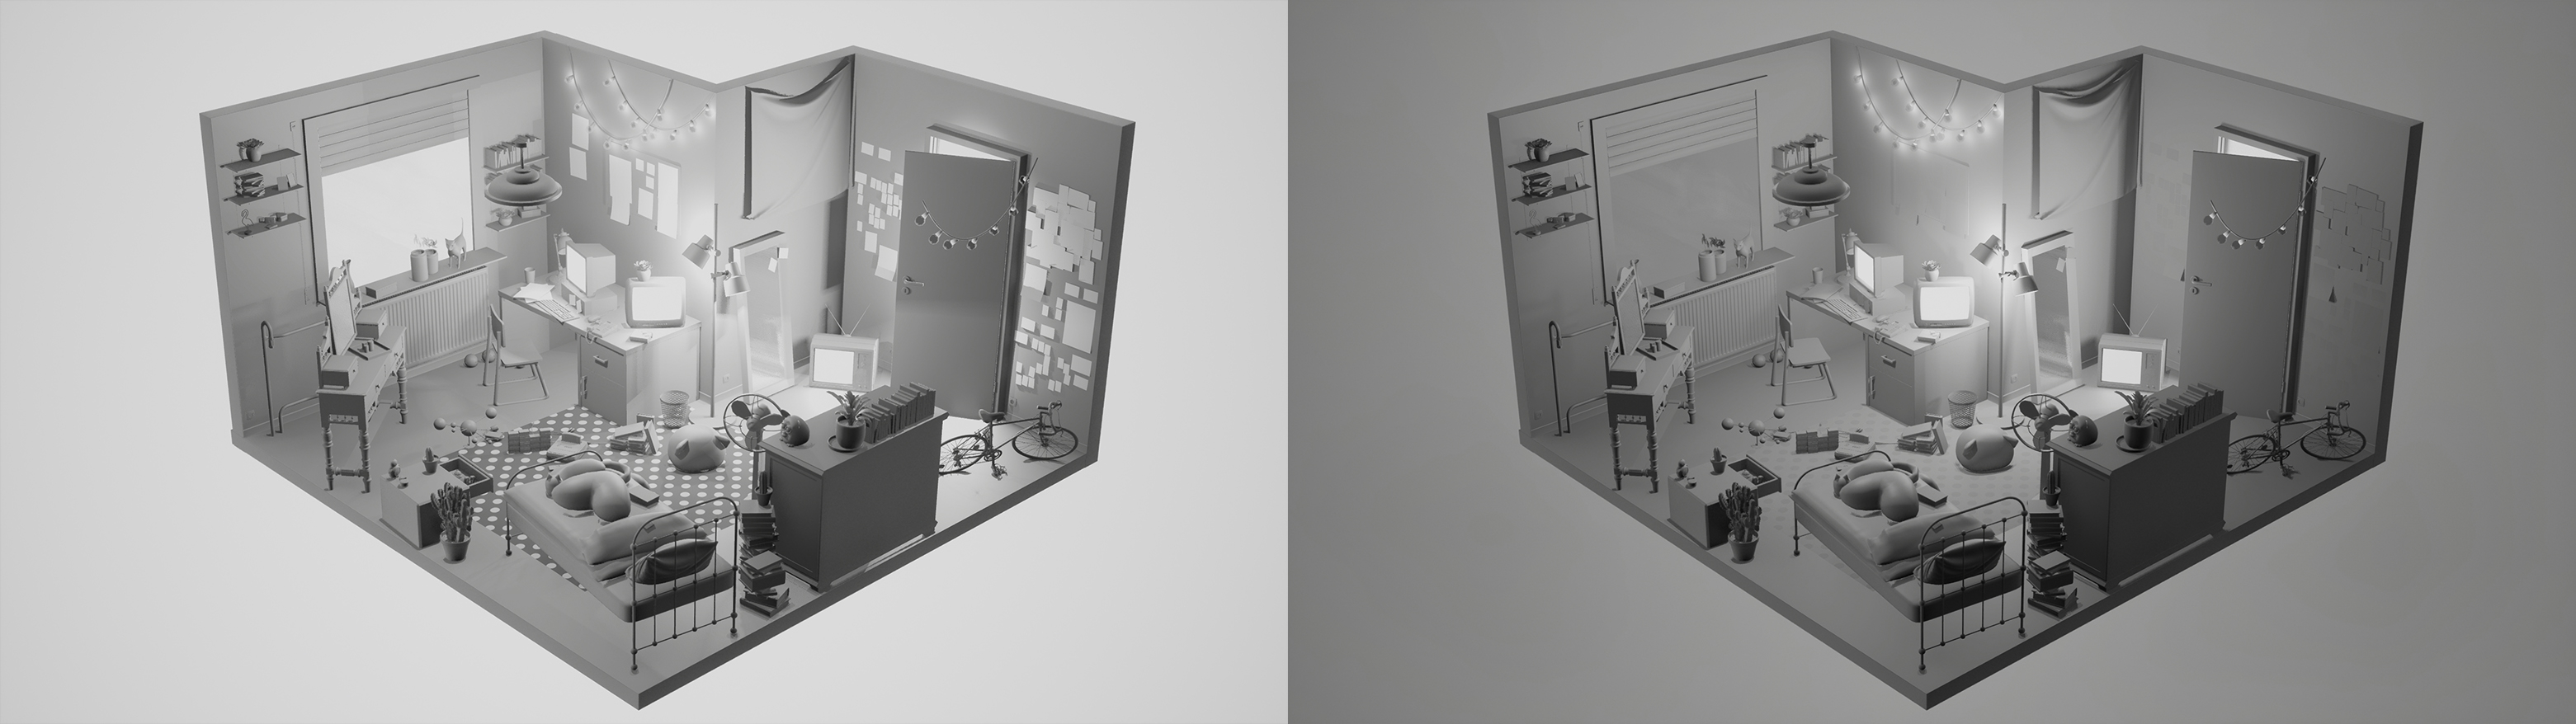
When "Isolate Lighting Information" is enabled, there's also the option "Use only Red Channel for Lighting Information". This is enabled by default and generally, you should leave it like that since it gives the best result. However, if you have completely blue or green lights in your scene, they will just not show up with this option enabled. in this case, you should uncheck it.
You can also adjust the "Greyshade Brightness (Multiply)" and the "Greyshade Contrast (Power)" of your image.
3.3. Hatching
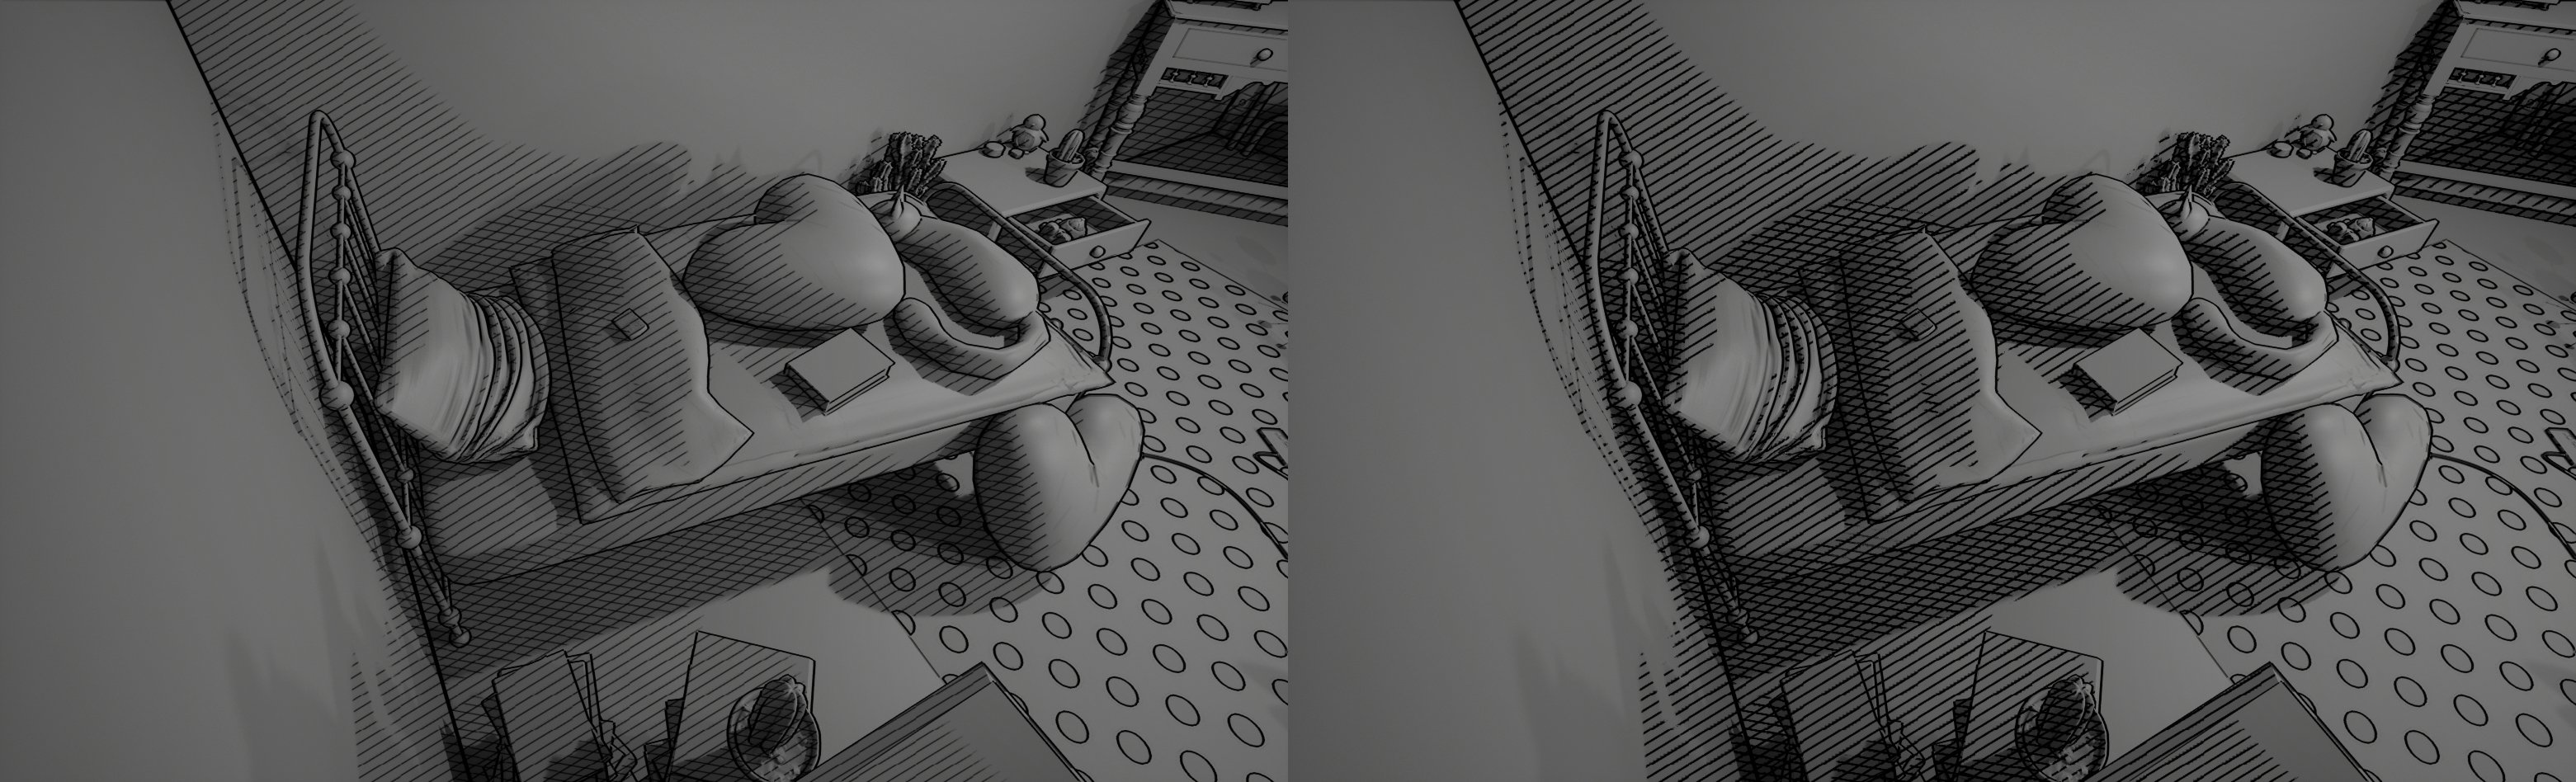
You can also "Generate Hatching" and Crosshatching on your image.
"Hatching Thickness" defines the overall thickness of your hatching lines:
you can also go into the negative values if you want the hatching thinner up to the point where they completely disappear.
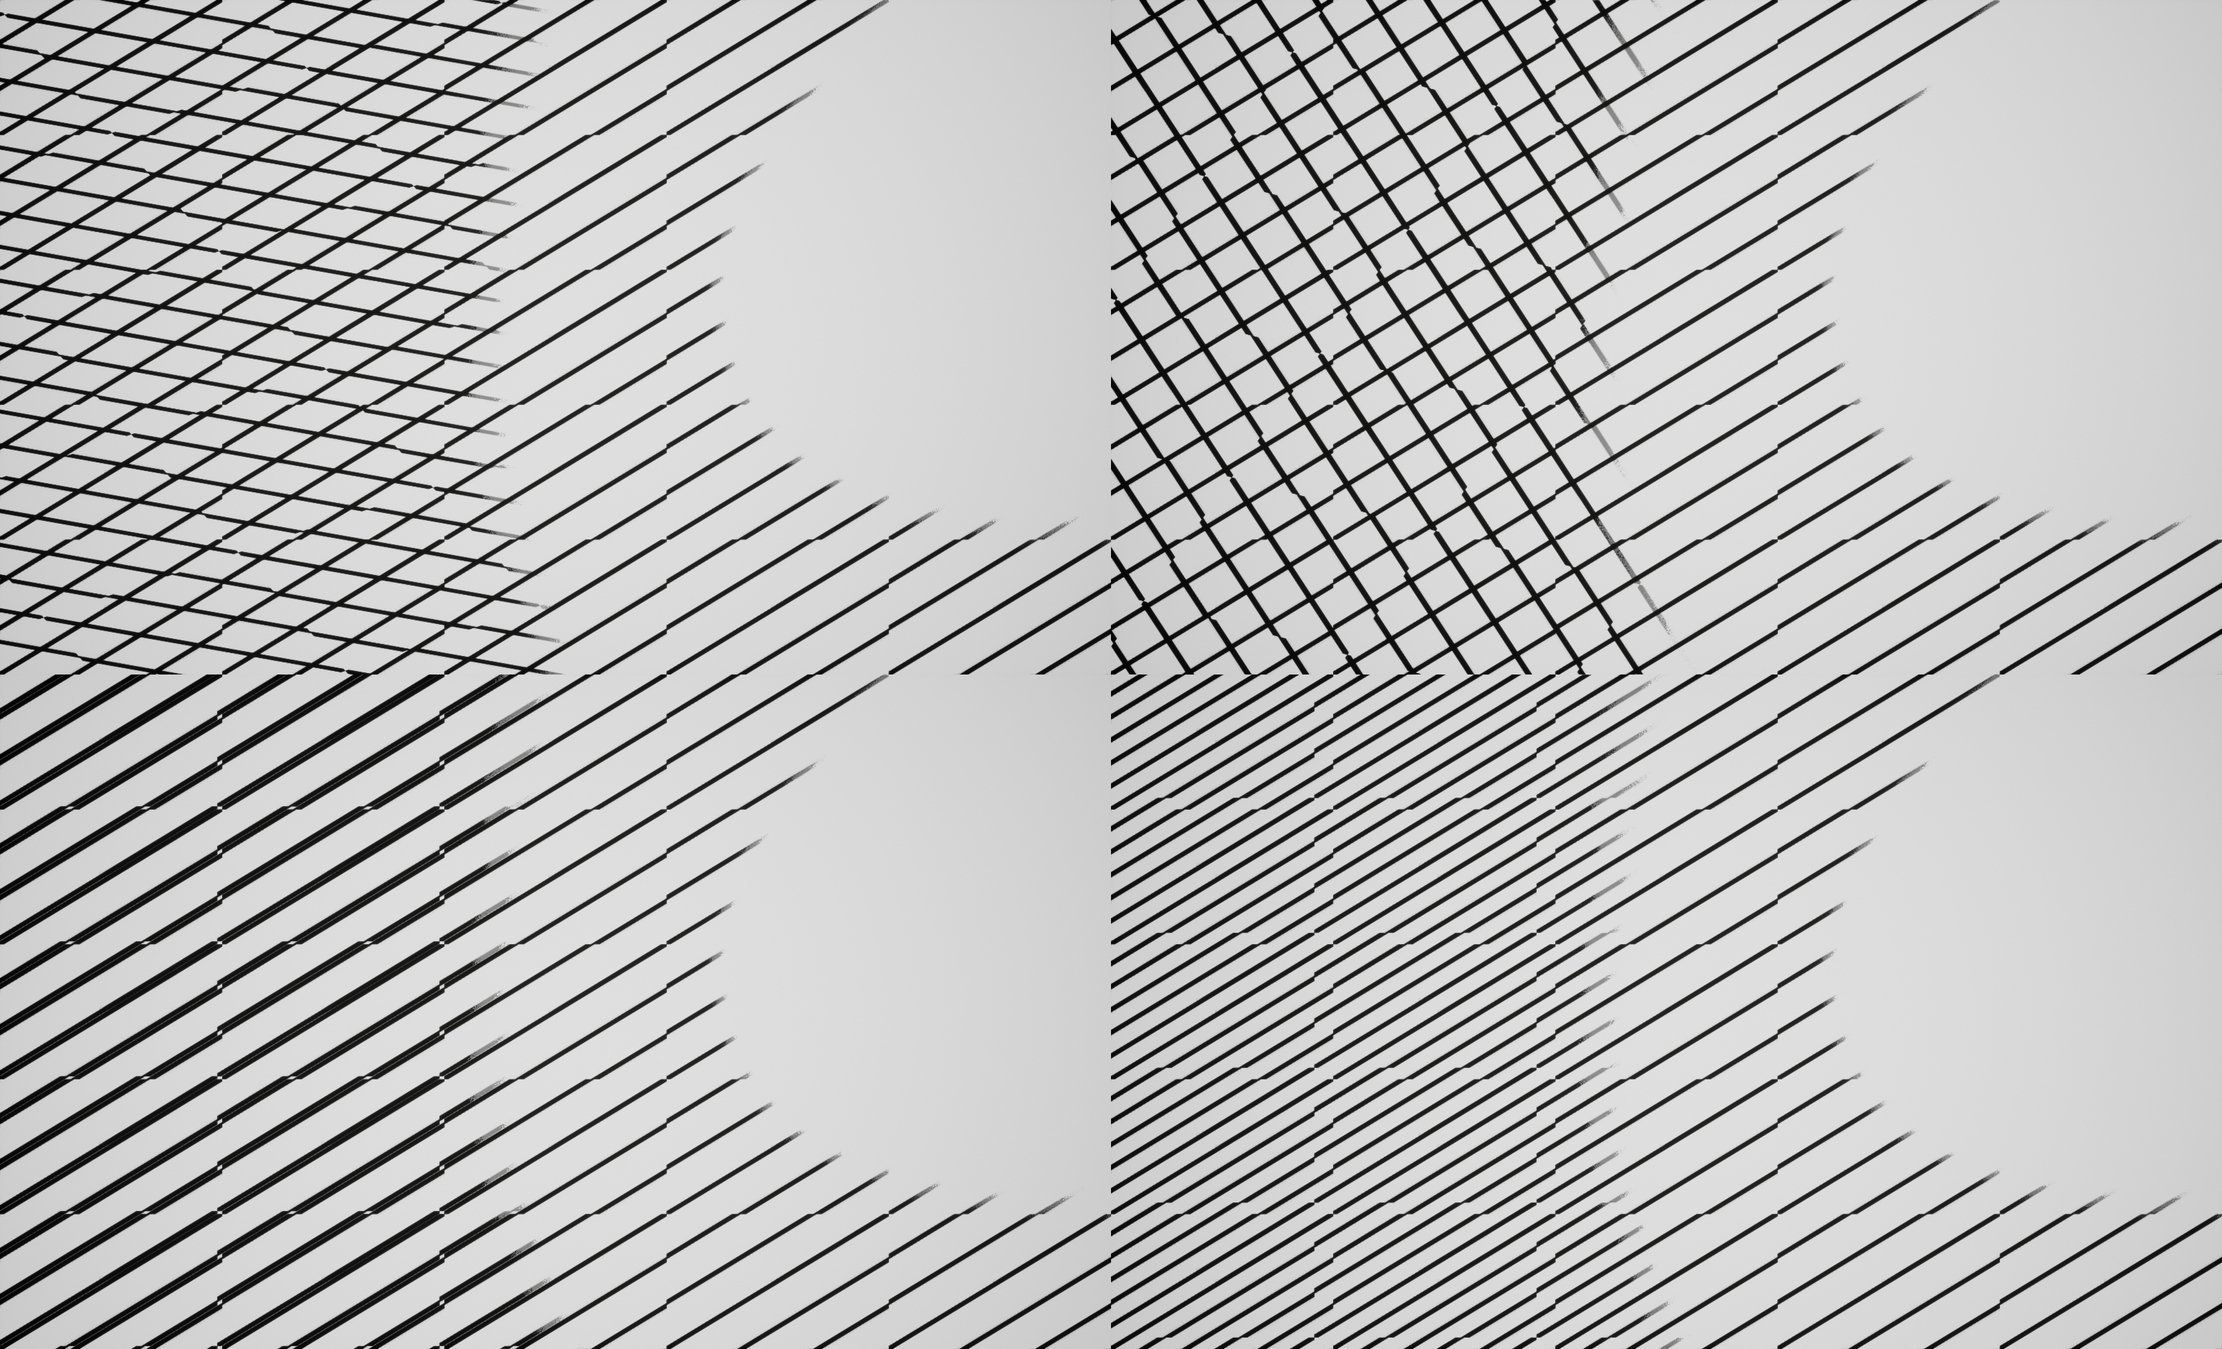
"Overall Hatching UV Scale" defines the size of your hatching:
this will also affect the width of the lines, so you might want to counter this with the Hatching Thickness again.
"Overall Hatching Rotation" does exactly what it says.
"Primary Hatching Area" and "Secondary Hatching Area" define in which light situation hatching lines start to appear. Primary lines are used for the less dark, and secondary lines for the darker areas.
A higher value means only the darker areas are affected, which usually means less area.
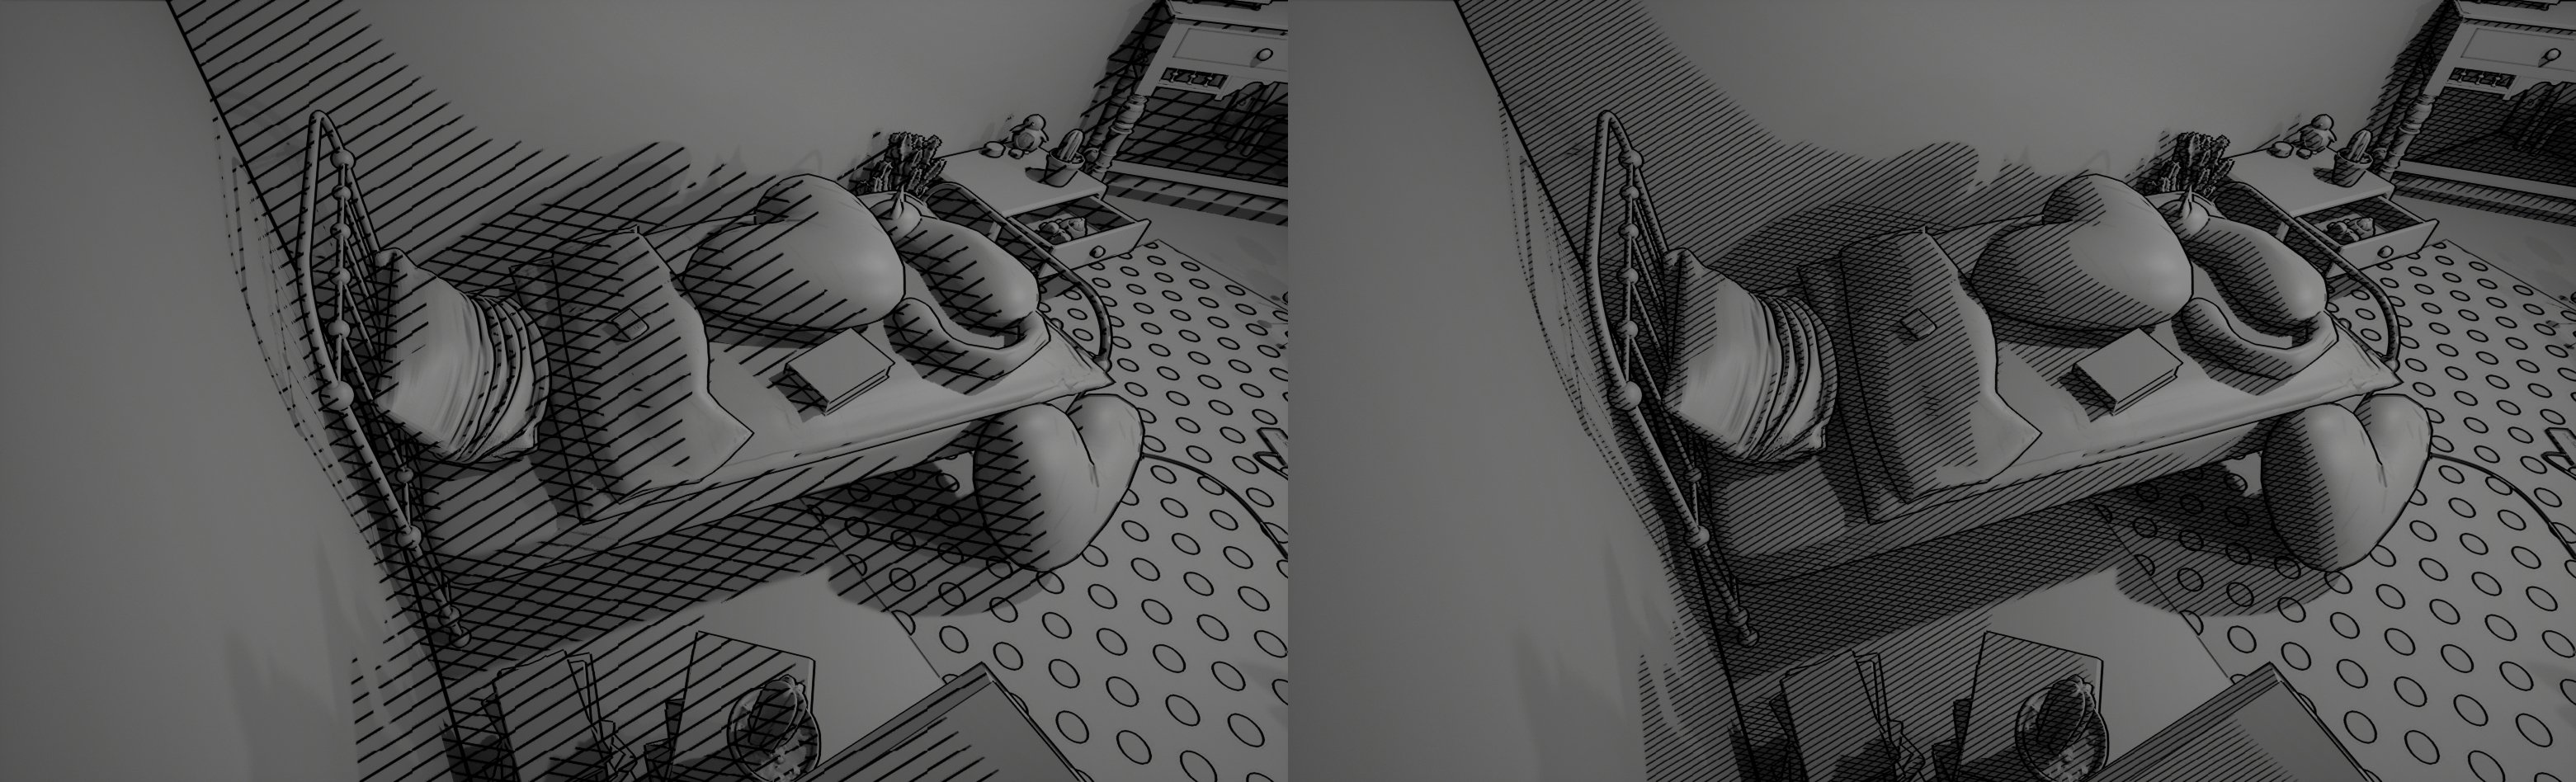
"Secondary Hatching Offset" and "Secondary Hatching Rotation" can be used to achieve different styles of hatching.
The rotation is defined with a value from 0-1
Here are some examples:
3.4. Black & White Shadows
The option "black & white shadows" works a bit like a cel shader. It paints the darker areas of the image black, and the lighter areas white. The option is only available when "Generate Greyshade" is disabled, but you can also affect where it's generated by turning on and off "isolate lighting information" in the grayshade tab. You can also enable "two tone" to have darker and lighter types of shadows together.
The area where the shadows are painted can be adjusted with "darker shadows cutoff" and "lighter shadows cutoff". The darkness of the shadows can be adjusted with "darker shadows color" and "lighter shadows color".
3.5. Paper Look
If you want the image to look like it's painted on paper, enable the "Paper Structure" parameter. It overlays the rough structure of paper over the image, and also adds some wrinkles if wanted.
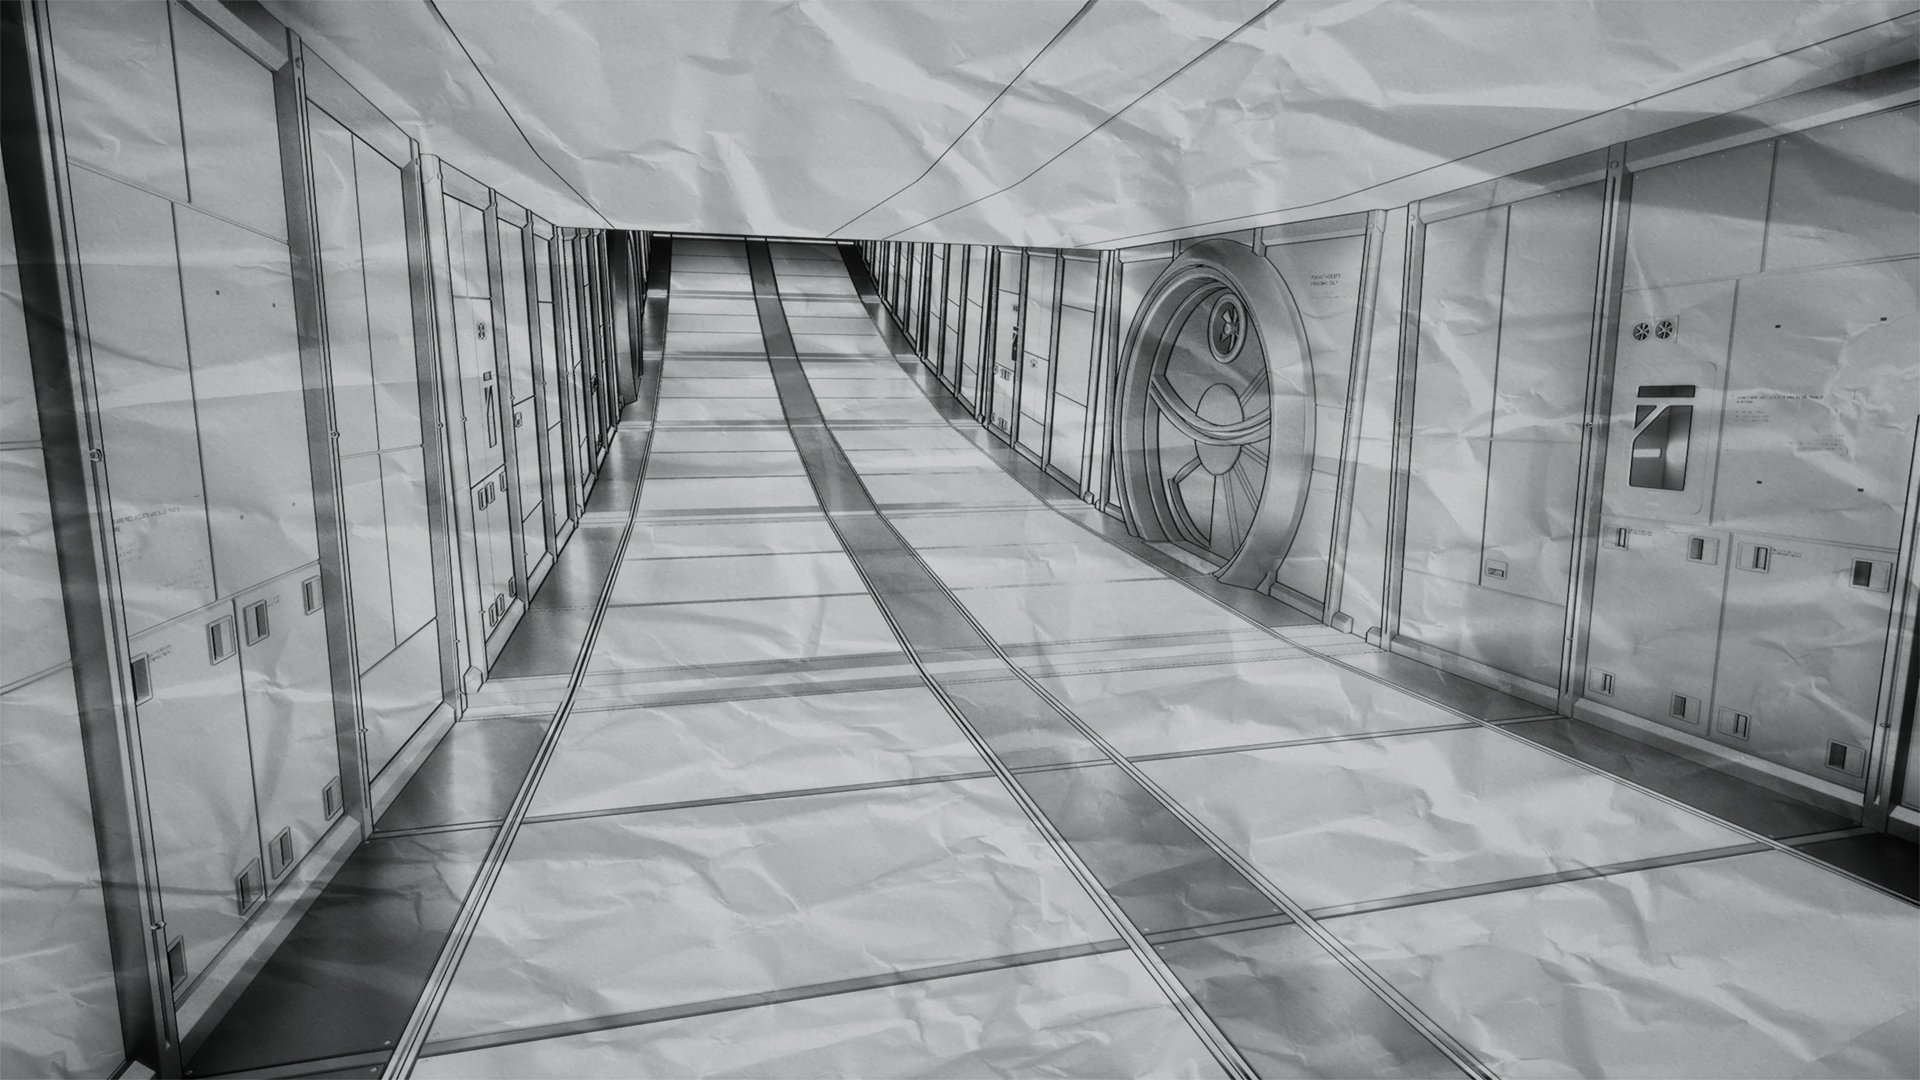
Both textures can be adjusted according to your needs. "Wrinkles Intensity" and "Paper Texture Intensity" can be adjusted or set to 0 to disable them completely. "wrinkles UV scale" and "paper UV scale" controls the size of the textures.

If you have somehow stumbled over this documentation without knowing about the shader, you can get it here:
https://www.artstation.com/a/7610042
This document is structured as followed:
- Overview - What does the shader do
- Initial Setup
- Features and how to use them
3.1. Outlines
3.2. Grayshade
3.3. Hatching
3.4. Black & White Shadows
3.5. Paper Look - Advanced Usage - tips and tricks
- Features that may follow
1. Overview - What Does It Do
The Hatched Ink Shader for Unreal is post-process material. It can create outlines with or without different styles of hatching, on a white background, on grayscale, or on your original scene background.You can also create a black & white cel-shading to create an ink- or print-like look, or overlay a paper texture directly in the engine.
With it, you can create images similar to those:
Concepts by Maya Squar (https://www.artstation.com/mayasquar)
It is easy to use, adaptable and versatile.
2. Initial Setup
which version to use:
currently, the Hatched Ink Shader is available for the Unreal Versions 4.27 & 5.0
Which version to use is of course primarily dependent on which version the project runs on that you want to merge it in.
If you don't already have a project and can choose the version freely, I recommend using 5.0, since the antialiasing of the outlines works a lot better here than in 4.27 (at least with the default engine settings). However, remember 5.0 is currently still in Early Access and therefore might run less stable.
- create an Unreal Engine Project if not already existing
- unpack the downloaded zip file and merge the "content" folder from there into the content folder of your project (via the windows explorer, not the unreal content browser)
- in your 3D scene, go to your "Place Actors" window, search for Post Process Volume and drag & drop it into the scene
- in the settings of your post process volume, search for "Infinite Extent (Unbound)", and check it, so it affects the whole scene
- then also search for "Post Process Materials", click on the plus next to Array, choose "Asset Reference" and then drag & drop the instanced material in there.
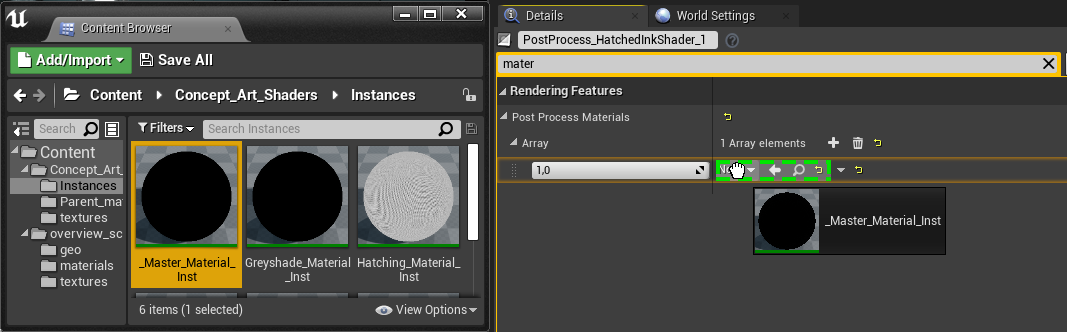
- you can find it under Content > ConceptArtShaders > Concept_Art_Shaders > Instances. I recommend using "_Master_Material_Inst", but the other materials are also an option if you only need a single function.
Note that some settings will only show up when certain others are selected.
You can make as many copies of the Instance as you want, to save your settings.
3. Features and how to use them
The Material is split into five main features. Drawing outlines, generating a gray shade image, generating hatching, generate black & white cel-shading, and overlaying a paper look. They can be used separately or combined freely.You need to activate the checkboxes on the left to be able to edit the belonging parameters!
Here is how they work.
3.1. Outlines
There are two methods of generating the outlines. "Depth Based Outlines" and "Diffuse Based Outlines". As the names suggest, one generates the outlines based on the depth information of the scene, the other one based on the color information.
"Depth Based Outlines" is active by default and should always be used as the main method. You can edit the thickness of the outline with the "Line Width (Depth Outline)(near)" Parameter.
(low and high line width)
The "Threshold (Depth)(near)" defines the minimum distance that needs to be between the geometry so that outlines are drawn. The Higher the Value is set, the more lines are created. You might have to work in the top range of the value to adjust it, and only set it to a lower value if you only want outlines on the edges of your objects.
(low, medium, and high threshold)
The "Diffuse Based Outlines" work best in combination with the Depth Based Outlines to get additional information from the image.
Check out these notes for example. They only stand out a little from the wall, so they barely show up.
To counter this I gave them a different colored material than the wall and activated Diffuse Based Outlines.
It's a similar situation with this dotted carpet. Without Diffuse Based Outlines there is no pattern visible, but with it switched on, the pattern shows up.
For the Diffuse Based Outlines, you have the same settings as for Depth Based Outlines. "Line Width (Diffuse Outlines)(near)" and "Threshold (Diffuse)(near)". They do exactly the same.
An option that has been added recently is "Use Distance Blend". With it enabled, the Line Width, as well as the Threshold, will decrease over distance. Therefore you now have the parameters "Line Width (Depth Outlines)(near)"/"Line Width (Diffuse Outlines)(near)", which define the maximum thickness of the lines that are close to the camera, and "Line Width (Depth Outlines)(far)"/"Line Width (Diffuse Outlines)(far)" which define the minimum thickness of the lines that are far from the camera.
As well as "Threshold (Depth Outlines)(near)"/"Threshold (Diffuse Outlines)(near)", which define the maximum threshold close to the camera, and "Threshold (Depth Outlines)(far)"/"Threshold (Diffuse Outlines)(far)" which define the minimum threshold far from the camera. (more information about the Threshold parameter can be found above)
The "Blend Distance" parameter defines the distance within which the blending occurs. The value is NOT representative of any length unit like meters.
Another option that can be enabled is "Exponential Blend Distance". By default this option is disabled, but especially for exterior scenes, it is recommended to use it. When it is disabled, the blending distance is linear (e.g. line thickness 5 after 1m, 4 after 2m, 3 after 3m, 2 after 4m, 1 after 5m). With it enabled the blending distance is exponential (e.g line thickness 5 after 1m, 4 after 2m, 3 after 4m, 2 after 8m, 1 after 16m)
With "Blend Distance Exponent", you can also edit the exponent that is used. By default, it is set to 2.
Here is a comparison of Linear Blend Distance (left) vs Exponential Blend Distance (right)
The "Blend Distance Debug Plane" helps to visualize at which point the Distance Blend stops, or in other words, at which point the outlines have reached the minimum set width. It moves with the "Blend Distance" parameter.
You can also freely adjust the color of the Debug Plane with the parameter "Debug Plane Color"
The following screenshots show the Debug Plane at a different Blend Distance, the parameter "Line Width (Depth Outlines)(far)" is set to "0"
(left: Debug Plane enabled, right: Debug Plane disabled)
There's also the option "Show Original Scene as Background". If you have outlines or hatching enabled this means those will be drawn on top of your original scene and not on white as in the screenshots above. When outlines or hatching are not active, this means only your original scene will be shown, as if there is no post-process applied.
Next up:
3.2. Greyshade
Make sure "Show Original Scene as Background" is disabled, otherwise, these options will not show up.
With the option "Generate Greyshade", the shader generates a grayscale image from your original scene. When "Isolate Lighting Information" is disabled, it means the image will just be desaturated completely.
By default "Isolate Lighting Information" is turned on though. When it is active, the shader tries to filter out all the information from the diffuse color and leaves only the lights and shadows.
It is important to mention that "tries" means, due to technical limitations it is using a workaround to achieve this. This doesn't always work perfectly, especially if you have very dark or high contrast colors in your scene. Usually, it will lead to a better result, if you simply assigning the same grey material to all your objects.
On the left, Isolate Lighting Information is turned off, on the right, it's enabled:
When "Isolate Lighting Information" is enabled, there's also the option "Use only Red Channel for Lighting Information". This is enabled by default and generally, you should leave it like that since it gives the best result. However, if you have completely blue or green lights in your scene, they will just not show up with this option enabled. in this case, you should uncheck it.
You can also adjust the "Greyshade Brightness (Multiply)" and the "Greyshade Contrast (Power)" of your image.
3.3. Hatching
You can also "Generate Hatching" and Crosshatching on your image.
"Hatching Thickness" defines the overall thickness of your hatching lines:
you can also go into the negative values if you want the hatching thinner up to the point where they completely disappear.
"Overall Hatching UV Scale" defines the size of your hatching:
this will also affect the width of the lines, so you might want to counter this with the Hatching Thickness again.
"Overall Hatching Rotation" does exactly what it says.
"Primary Hatching Area" and "Secondary Hatching Area" define in which light situation hatching lines start to appear. Primary lines are used for the less dark, and secondary lines for the darker areas.
A higher value means only the darker areas are affected, which usually means less area.
"Secondary Hatching Offset" and "Secondary Hatching Rotation" can be used to achieve different styles of hatching.
The rotation is defined with a value from 0-1
Here are some examples:
3.4. Black & White Shadows
The option "black & white shadows" works a bit like a cel shader. It paints the darker areas of the image black, and the lighter areas white. The option is only available when "Generate Greyshade" is disabled, but you can also affect where it's generated by turning on and off "isolate lighting information" in the grayshade tab. You can also enable "two tone" to have darker and lighter types of shadows together.
The area where the shadows are painted can be adjusted with "darker shadows cutoff" and "lighter shadows cutoff". The darkness of the shadows can be adjusted with "darker shadows color" and "lighter shadows color".
3.5. Paper Look
If you want the image to look like it's painted on paper, enable the "Paper Structure" parameter. It overlays the rough structure of paper over the image, and also adds some wrinkles if wanted.
Both textures can be adjusted according to your needs. "Wrinkles Intensity" and "Paper Texture Intensity" can be adjusted or set to 0 to disable them completely. "wrinkles UV scale" and "paper UV scale" controls the size of the textures.
4. Advanced Usage - tips and tricks
- if you have multiple cameras set, instead of setting your post-process volume to unbound, you can leave this option turned off, then position multiple post-process volumes where your cameras are and define a different instance of the shader to each of them. This way you can save different settings for each camera.
- When using Black & White Shadows, combine them with Hatching with a high thickness value in the same area, to achieve a better look.

5. Features that may follow
- more hatching styles like dotted, or more organic looking ones
- cel shader
- colored lighting on top of the grayscale image
- improvement of the "Isolate Lighting Information" option
Replies
does this support motion ? - i.e will an animated/skinned object swim through the hatching or does it take it's hatching with it
the hatching doesn't support motion, unfortunately. It's basically just an image overlaying the scene. But this is actually a pretty good Idea that I could try to implement somehow.