Home 3D Art Showcase & Critiques

Zerg Drone

1
greentooth
Offline / Send Message
demigodssw greentooth
Hi guys, I am making a creature for my portfolio which represents my current skill in zbrush and to practice zbrush 4r8 a bit. Been doing it for a while now here it is in wip stage.
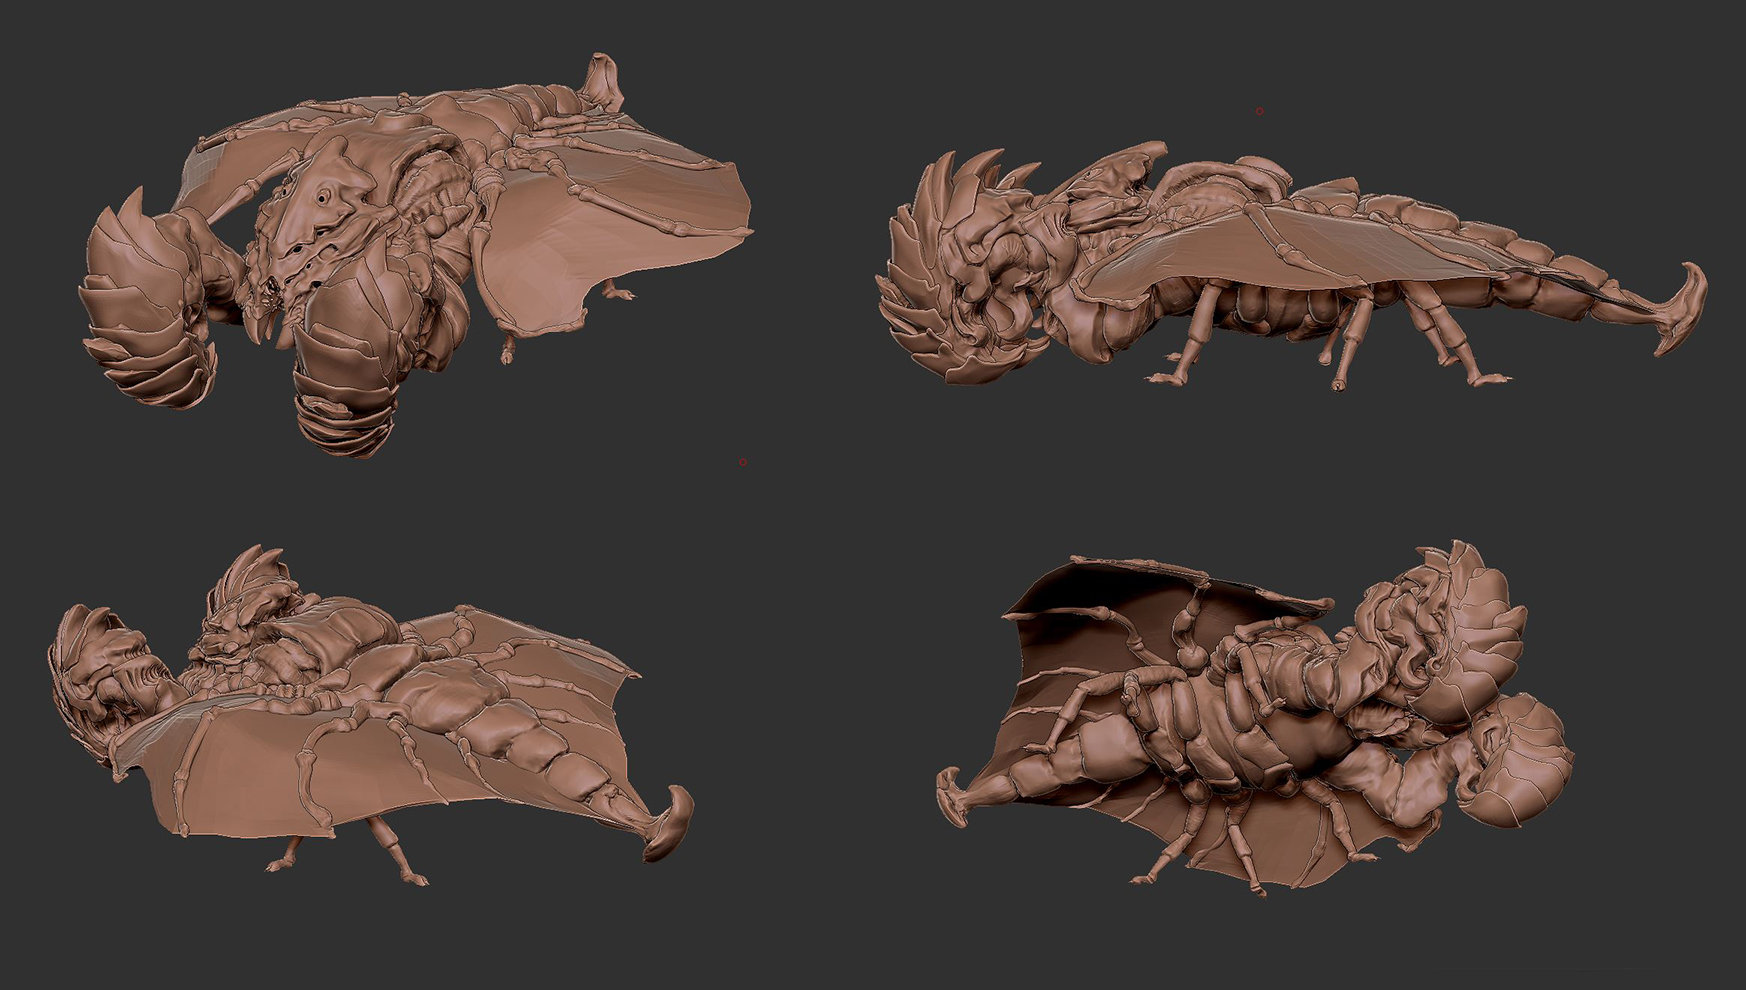
Sculpting will take some more time to complete. After this i will be making a game res and texturing it. I thought its in a good stage to get some helpful feedback, so created this topic

Replies

  • demigodssw
    Options
    Offline / Send Message
    demigodssw greentooth
    Here are the references I am using,
  • CybranM
    Options
    Offline / Send Message
    CybranM interpolator
    When you say "game res" I'm assuming you're not talking about the SCII <1000tris lowpoly but more like a showcase model right?
    Looks good so far, the claws look weird compared to the ingame model but they're like your model on the concept image so I don't know.
    Keep up the good work :smile: 
  • Tectonic
    Options
    Offline / Send Message
    Tectonic polycounter lvl 10
    this is looking really sick so far
  • demigodssw
    Options
    Offline / Send Message
    demigodssw greentooth
    CybranM said:
    When you say "game res" I'm assuming you're not talking about the SCII <1000tris lowpoly but more like a showcase model right?
    Looks good so far, the claws look weird compared to the ingame model but they're like your model on the concept image so I don't know.
    Keep up the good work :smile: 

    Thanks man, yeah i will be going for the showcase model, I am planing to do a full manual retopo in Maya, to keep the mesh optimized, but will just zremesh it depending on how much free time I will have.
    For the claws, I am using the concept as the main reference, I still kept the game res image just to get some ideas

     
    Tectonic said:
    this is looking really sick so far
    Thanks dude :)
  • demigodssw
    Options
    Offline / Send Message
    demigodssw greentooth
    Added some more details. Wasted a lot of time playing with different materials and preview shadow settings :D .

  • demigodssw
    Options
    Offline / Send Message
    demigodssw greentooth
    Did some detailing on the body will do the surface details later
  • demigodssw
    Options
    Offline / Send Message
    demigodssw greentooth
    I have been slow with my progress, been busy with other stuff. Anyway here is the current progress.
  • StraightDraw84
    Options
    Offline / Send Message
    StraightDraw84 polycounter lvl 9
  • demigodssw
    Options
    Offline / Send Message
    demigodssw greentooth
  • demigodssw
    Options
    Offline / Send Message
    demigodssw greentooth
    Adding details to wing! and took a really cool render.

  • demigodssw
    Options
    Offline / Send Message
    demigodssw greentooth
    I wanted the wings to be translucent in the zbrush render but don't know how. Any help will be appreciated!!
  • Nuclear Angel
    Options
    Offline / Send Message
    Nuclear Angel polycounter
    I would recommend to do a clown pass and just do dual renders, one without the wings and one with the wings, and then use the clown mask from the BPR passes to mask out the wings and add opacity in Post. 
  • demigodssw
    Options
    Offline / Send Message
    demigodssw greentooth
    @Nuclear Angel I was looking for more of a 1 click solution jk haha   =)
    This method should work fine for me, I will try it out. Thank you!

  • Obscura
    Options
    Offline / Send Message
    Obscura grand marshal polycounter
    That was a long break :D
  • demigodssw
    Options
    Offline / Send Message
    demigodssw greentooth
    Obscura said:
    That was a long break :D
    This project won't die until I am alive!! 
    I am really inconsistent with my personal work. I Need to be more disciplined
  • DavidCruz
    Options
    Offline / Send Message
    DavidCruz interpolator

    If its just for a render, its here ^ you have to click the BPR button for it to show up though.
    The composite approach might be the best if you want the details to show up also, and i hear fiddling with the jellybean material with this setting might help also.   So best bet would be to do a composite, recently I've been on some kick where i have to have things be in the render, so nearly real-time, otherwise to me it feels a bit fake.  That is just me i am an odd one so do as you wish.

    Wings have to be a separate subtool for the transparency to work, if i miss understood your request for help, sry.

    Edit:
    Also loving the details i am glad you took on this design i always loved his works and glad to see one re-created in 3D looking forward to more.
  • demigodssw
    Options
    Offline / Send Message
    demigodssw greentooth
    @DavidCruz Thanks a lot of for the tip!! This is more than enough to preview the model and get an overall feel off it.  And Yeah, I will probably will have to do the compositing  for the final sculpt renders.
    btw How do you achieve translucency in real time? I tried to do it in Unreal in my last project but it didn't look good. I had to settle for sub surface maps and AO. Here are some screenshots of the final output  https://www.artstation.com/artwork/1nkbeZ.


    Screenshot of my last translucency attempt in UE4 =) 
  • DavidCruz
    Options
    Offline / Send Message
    DavidCruz interpolator
    @DavidCruz Thanks  
    btw How do you achieve translucency in real time?
    If my life doesn't get flipped upside down in the next few days i'll give it a shot atm, irl is getting in the way of everything.  I'll post somewhere if i end up doing it and let you know.  Otherwise your unreal renders are pretty nice and works well enough if you wanted the sun rays and such.  (wild guess did you bake in the lighting and shadows?) Also add alpha map, maybe with subsurface and an edge/details retaining / map (made up name to get the point across) might work.  Its what i thought of (right now) if i tried to do it. 

    Nice looking renders (to me) on the wings transparency. <can try same for the wings. ^what i say about the alpha map.
    (did it myself video posted soon, irl changed to nvrmnd so i went ahead and did what i said above and added some pizzazz.)

    okay hopefully this works if not let me know:

    https://i.imgur.com/t7s0NdQ.mp4

    Do not think i will share it right now, but just giving you an idea of what can be done. (i like it) Description: its a whole object with the sides cut, i did that cause i wanted to get both shines on the wings as i feel it added a good amount of depth to it and flesh in general.  Says H! and DC.
    & obviously by the screenshot as with everything i got it looks 100X's better than that video sadly.
    Got to love you-tube updating their explorer and forcing users to update when they don't want snoioping,bs on their machines, oh well thankfully i didn't get hooked like other people, nothing of importance was lost.
  • demigodssw
    Options
    Offline / Send Message
    demigodssw greentooth
    @DavidCruz yeah man difficult times, hopefully they will find a vaccine soon.
    Glad you like my stuff. For the cloth I used emessive, ao and sub surface to get the sunrays thing.
    This red material looks quite good really like how the normals and alpha look toghether, I think it should work for my wings (is it marmoset?). Do post a breakdown of it when you get the time though. I am quite far from texturing stage atm.
    Have no idea about what's up with youtube, the video you attached in imgur is looking fiine!
  • DavidCruz
    Options
    Offline / Send Message
    DavidCruz interpolator
    @demigodssw: idk about the "19", situation, won't talk about it myself cause i know a little more how V's work.  Otherwise yea. 

    Like the way your sheet of cloth came out i was thinking about it while checking it out the 1st time and was like is it just a 1024 with an amazing alpha, seamless tiling? cause that might work really well.  I got a few ideas for cloth now, might give the idea a quick run. :p

    Yea i like this piece you are making looks like you are really going in on it.  Yes is marmoset, all my "quick", ideas like this fog and gems are marmoset.  I sit here trying to figure out the stuff so i can learn how this stuff works more and what tricks i can get away with.  Fixed it a bit more on the station, if anyone wants to see it, i want to do a lot more to it but, other things going on atm.
    I really should just release the info on all of them already, trying to use them before hand :p & finish my current thing.

    Youtube changed something once again besides pretty much silencing everyone under the sun and making way for main stream trash like news stars to take over the site, telling them constantly its going to kill their site but they don't care.  Anywho, can't wait to see more when you get around to posting again. 

  • demigodssw
    Options
    Offline / Send Message
    demigodssw greentooth
    @DavidCruz I can post emessive and sso maps of the cloth if you want to take a look and yeah Having a page like what Obscura has should be a place to post your experiments.
    On the project I made some more progress on the weekends, Added details on all the remaining wing parts. I am feeling good about how it came out but also feeling like I am adding unnecessary details :/ . This is how it looks now


    More cool renders!! This time a different material =)

    Also, these are the references I am using for wings

  • demigodssw
    Options
    Offline / Send Message
    demigodssw greentooth
    Sculpt polish is still in progress. Saw a really cool stylized texturing tutorial on youtube, where he textures using gradient map. Gave it a quick try in photoshop and to see how the end result might look also added the green eyes in photshop. The results look promising!!.
  • demigodssw
  • demigodssw
    Options
    Offline / Send Message
    demigodssw greentooth
    @Eric Chadwick Thank you for the front page!! My motivation is 10x higher now. :p
  • Ashervisalis
    Options
    Offline / Send Message
    Ashervisalis grand marshal polycounter
    Damn that's solid. Good job!
  • demigodssw
    Options
    Offline / Send Message
    demigodssw greentooth
    @Ashervisalis I am glad you liked it! :) This isn't textured though, this a gradient map I applied on top of the sculpt renders. 
    I am hoping the gradient filter in substance painter gives me a similar result, when I start texturing this.
  • Ashervisalis
    Options
    Offline / Send Message
    Ashervisalis grand marshal polycounter
    Honestly this looks cool as it is. Looks hand painted and nicely at that. I like the monochrome vibe :)
  • Brian "Panda" Choi
    Options
    Offline / Send Message
    Brian "Panda" Choi high dynamic range
    I love the sculpt.
  • demigodssw
    Options
    Offline / Send Message
    demigodssw greentooth
    I love the sculpt.
    Thanks man!
  • demigodssw
    Options
    Offline / Send Message
    demigodssw greentooth
    These are screenshots from the notes I make in onenote about my progress and I don't post them here as It might get too spammy. Anyway here are some past few updates.


    Tried the same gradient map thing on the last renders I took to check whether the details from back and side are sufficient.


  • demigodssw
    Options
    Offline / Send Message
    demigodssw greentooth
    All the sculpt work Is complete, and now I am trying to get some good renders. I don't have a specific method just trying a lot of things in zbrush and photoshop to get decent result.
    The render are low res atm. I saw a tutorial on how to get high res renders so will be doing that this weekend


    Also made an attempt to pose the sculpt but not entirely happy with it. Posing is more challenging than I expected, might do it properly when I create the low poly version of this.
  • Quasar
    Options
    Offline / Send Message
    Quasar polycounter lvl 19
  • demigodssw
    Options
    Offline / Send Message
    demigodssw greentooth
    Quasar said:
    Looks great!
    Thank you! :) I am having fun playing with all the rendered layers in photoshop.
  • demigodssw
    Options
    Offline / Send Message
    demigodssw greentooth
    Completed taking high res renders.
    Had to increase the cavity by double to render the material cavities correctly in high res.

  • demigodssw
    Options
    Offline / Send Message
    demigodssw greentooth
    Also tried @Nuclear Angel method to add transparency to wings.
    I might make translucent wing renders to for the back and side view as well.

  • Nuclear Angel
    Options
    Offline / Send Message
    Nuclear Angel polycounter
    Nice one! I dont think the black bckground lends well though to your presentation, the render is all in all i svery dark atm. But nice sculpt, I am looking forward to see the lowpoly.
  • demigodssw
    Options
    Offline / Send Message
    demigodssw greentooth
    Thanks a lot for the feedback @Nuclear Angel. You are probably right about the darkness level, I will experiment with a lighter background.
  • GOODGRIEF
    Options
    Offline / Send Message
    GOODGRIEF triangle
    Amazing sculpt! Loving the detail and the forms all read really well! I'd have to agree with Nuclear Angel. The presentation could use some adjustments. Try some lighter backgrounds and I'd lose the vignette that's hiding a lot of the tail end. You did so well with the sculpt might as well show it off right! :)

    Fantastic work, keep it up!
  • demigodssw
    Options
    Offline / Send Message
    demigodssw greentooth
    @GOODGRIEF Thanks you for the feedback! One of my colleague also pointed the dark render thing out. 
    Also, I am glad u liked the sculpt.
  • demigodssw
    Options
    Offline / Send Message
    demigodssw greentooth
    I took some new renders! Tried to make them a bit brighter and changed the background
  • demigodssw
    Options
    Offline / Send Message
    demigodssw greentooth
    I have been experimenting with zremesher, and I am getting  pretty decent results with it. It will still require manual edits in maya though. Still it should save me a lot of time in theory. 
    I decided to document the process in this gif as it might help someone out.


  • demigodssw
    Options
    Offline / Send Message
    demigodssw greentooth

    Current retopo progress. Completing the body took a lot of time as I had to quad draw it in maya from scratch. Wing arms are all done, zremesher helped a bit on them but around 50% still had to be done manually .
    Some of the areas look a bit too poly dense at the moment. I have done this so it is easier to bake them I might reduce them after I am satisfied with the bake. Also While working on the retopo I realized that the baking process will not be easy for this because of sculpt artifacts and polys which are close to each other. It might require a lot of editing in photoshop.

    After both the wings are completed I will move to legs.
  • demigodssw
    Options
    Offline / Send Message
    demigodssw greentooth
    I am still slowly working on the low poly, had to study for my undergraduate exam in between. Body, legs & wings are completed and head is in progress. Not really sure how a character artist would retopo the head part for animation. I am kinda doing it like I would do an organic prop with a better loop flow, I won't be animating this anyway, so that might not be something I should focus on.
  • demigodssw
    Options
    Offline / Send Message
    demigodssw greentooth

    Found some time to complete the low poly 😀.

    Before heading to UVs did some test bakes with Auto Uvs to make sure that there is no mismatch between low poly and high poly,

    Initially I was trying to do the bakes in designer, but switched to marmoset later after one of my friends suggested it to me. Marmoset bake tools are awesome!!


  • Sora123
    Options
    Offline / Send Message
    Sora123 polycounter lvl 5

    Yo really looking good will keep my eye on this goodjob on the renders and details!

  • demigodssw
    Options
    Offline / Send Message
    demigodssw greentooth

    @Sora123 Thanks dude! I have been making slow progress on it.😀

  • Grubber
    Options
    Offline / Send Message
    Grubber polycounter lvl 14

    The bakes are really clean! Keep it up. Why not continue using auto uvs? I assume you are not going to texture it in photoshop? :)

  • demigodssw
    Options
    Offline / Send Message
    demigodssw greentooth

    @Grubber Hi Grubber I decided against using the Auto UV's cause they are really messed up. It will be difficult in case I want to do some adjustments in photoshop, and sometimes they do introduce some seams in the diffuse map. Also, I want to make this a game asset, so Uvs will matter in that case.


  • Grubber
    Options
    Offline / Send Message
    Grubber polycounter lvl 14

    Ok. Thank you for explanation. Will be waiting for more progress :)

  • Ashervisalis
    Options
    Offline / Send Message
    Ashervisalis grand marshal polycounter

    Niiiiice, I like it.

1
Sign In or Register to comment.