The Bi-Monthly ENVIRONMENT ART Challenge | September - October (68)

Welcome, all! Time to get started on the fifth Monthly Environment & Prop Challenge for 2020!
Remember if you don't finish in the time allotted, just keep plugging away and post when your work is finished. There's always some good progress that falls off the radar - we want to see your work! So keep going and finish those pieces!
Without further ado, here are our official options for Challenge 68:
- ENVIRONMENTS -
HARD SURFACE: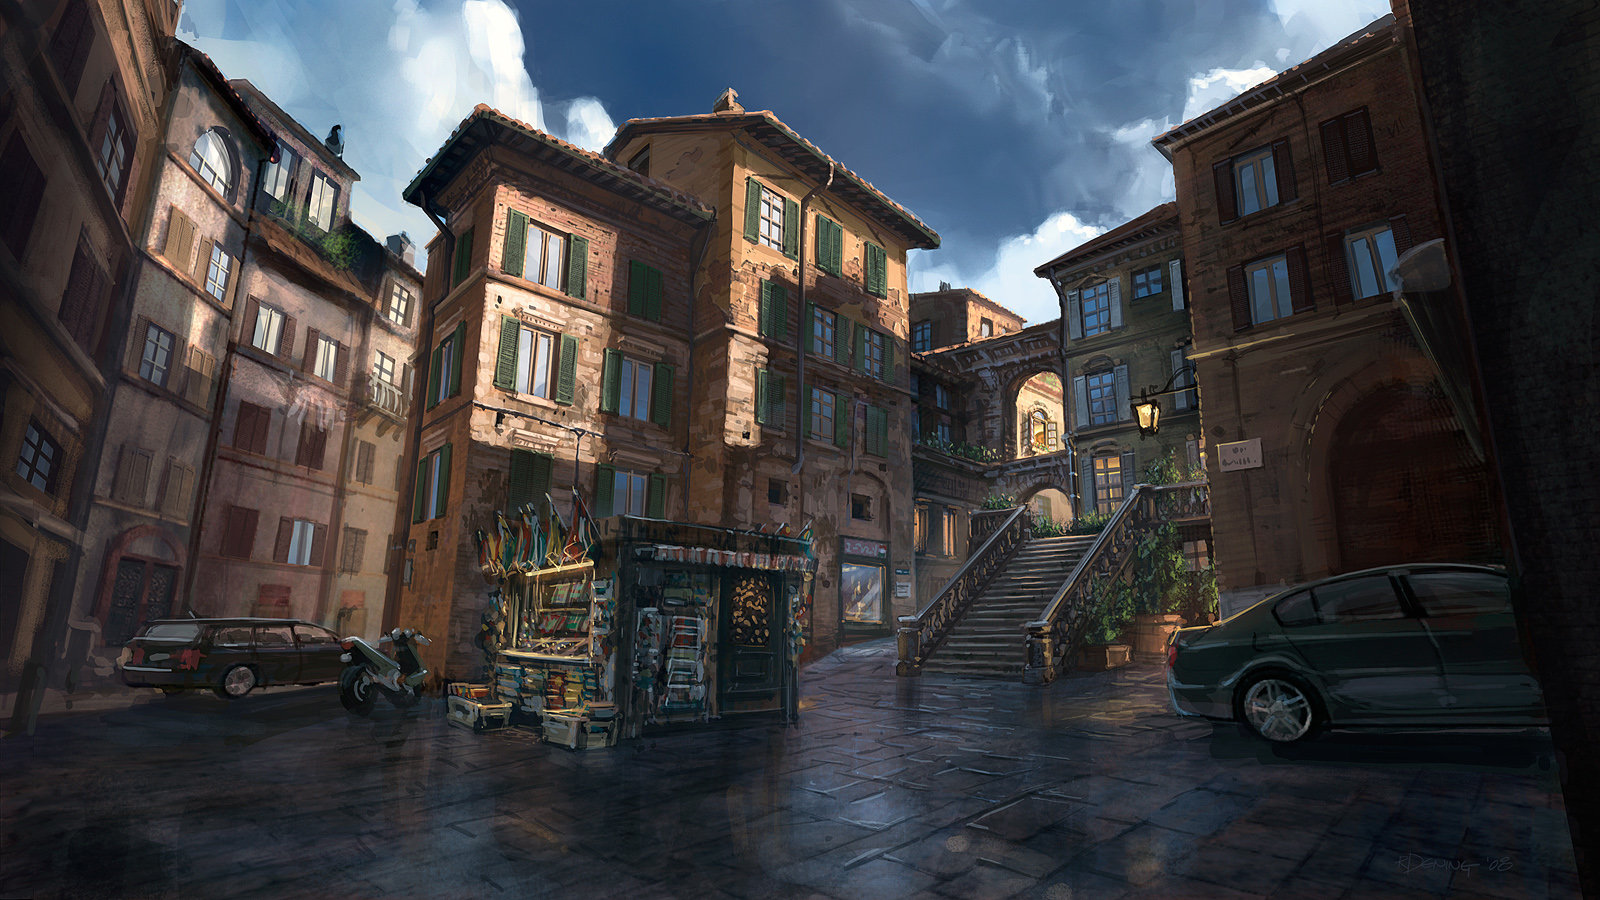
Artwork link: https://www.artstation.com/artwork/YK3OK
STYLIZED:

Artwork link: https://www.artstation.com/artwork/v1lVEA
- PROPS -
HARD SURFACE PROP:
Artwork Link: https://www.artstation.com/artwork/1d9w8
STYLIZED PROP:

Artwork link: https://www.deviantart.com/catell-ruz/art/Gypsy-caravan-534035833
- WILDCARD -
HARD SURFACE INTERIOR:
Artwork link: https://www.artstation.com/artwork/lVwXxJ
Once again, an interior environment to counterbalance the two exterior concepts. Much thanks to @Pinkfox for the suggestion!

Please read all the rules before starting:
-Try to post one critique for every post that you make. This will make for a better learning environment and help us all grow as artists.
-Try your best and finish as much as you can in the time frame provided.
-Post what you are working on in this thread so that way it's a more centralized place for advice and critique. We don't need to have 1000 disjointed threads littering the forums.
-It is recommended to use a game engine to present your work. Unreal Engine and CryEngine are very common engines that can be used but feel free to use any alternatives that you want. (Marmoset Toolbag is allowed as well)
-If you want to change up your chosen concept a bit, then feel free! Interpret these concepts to your liking, especially if your aim is to add storytelling elements.
And here are some recommendations:
-When you are just starting out making a scene, it can seem complicated or imposing, so take the time to break it down.
-Think about how you can re-use assets, re-use textures, break it down as simple as possible and plan it out. A lot of people will break it down in their own way when they start out their challenge. Gather some reference images as well for different parts of the scene, maybe gather some refs and make it your own.
-Take your time planning and blocking out, it will set you up for success later on.
-We strongly encourage you to go and look at other games and see how they make their assets as well as get concept art to give it your own feel.
All that matters is that you learn while being able to effectively critique others, as well as accept critiques on your own work. Remember to have fun!
Good luck!
Replies
@alytlebird I've been thinking about making a post asking if anyone would like to collaborate on the creature portion of the environment since modeling humanoid figures is not my strong suit. Ideally the end result would be we both end up with a nice portfolio piece and we credit each other for our work. Is this alright or are the environment challenges meant to be solo endeavors?
As far as the liquid, I've been pondering that conundrum myself. I remember a post a while back of a Dishonored 2 fanart piece which was a potion with an octopus tentacle in it, and the effect was achieved with baking from a highpoly rather than actual geometry. That would save us the headache of retopoing all those beasties, but I can't say I fully understand the technique yet. Worth looking into.
I'm finishing up and posting a personal project tomorrow, and then I'll probably jump right into working on the wildcard. Stoked to be participating in this challenge again after almost a year!
I finished the first variation of my trim. I think I'll be able to use this sculpt for the entirety of the scene with some texture variations. I also tested out the tiles in UE4 with some decals.
Hi, this is my first challenge for polycount and I'm fairly new to unreal, but I'm very excited to give this a go. I decided to pick the lighthouse to model, and I've modelled the basic pieces in Maya. I plan to hand paint the textures in substance, - then put it into unreal and create the larger environment (the ground, rocks water and the sky) and lighting & atmosphere using unreal.
I'm focusing on the awesome caravan for this challenge. Did some block in modeling to get a feeling for the proportions, weight and overall design. I'm going to do my own work on the back side and make that where the caravan is pulled from. Planning that still. The plan is to take this in for a little zbrush love and then paint in substance. My first big project in the pipeline. My skills are a little outdated so this will be a lot of fun and challenging.
Gone with the wildcard for this one, been starting off creating some basic meshes and getting a feel for the the scene. Trying to get the scale some what close to the concept piece (Which is awesome).
@ArtNowSleepLater That is looking great, loving the details you have on the undercarriage. I think you're capturing the curves and style of the body very well, but the wheels feel a little stiff and symmetrical compared to how whimsical the rest of the piece's proportions are turning out. Maybe try some stretching/bending/resizing?
I've decided to try the lighthouse piece. I've never really worked on a full 3d scene before, so I'm doing my best to plan things out so I don't trip myself up. I created a mood board, which I've never really done before, I think it is helping a lot!
I'm really unsure what is the best way to texture the tower. It seems like a unique unwrap for the whole thing is really overkill, so I'm thinking a few trimsheet rows... maybe the whole thing should just be a huge trimsheet, I don't know...
I'm thinking of using this kind of studio Ghibli toon shading effect for the greenery and clouds:
I think the base concept could use a little more visual interest, particularly around the base of the lighthouse. So I'm thinking perhaps some ivy wrapping around the tower and a door with some stairs. I also think the lighthouse feels too disjointed from the other structures, so I'm thinking of adding in a path from the new door to the main path. Also birds and flowers for some lively details
I'm going with the fun cart concept with the final output being having some more realistic textures than the concept. This will also be the first asset I've done in years that'll go through zbrush to game
Here is my blockout so far. I think my proportions on some of the curves need work but i'm hoping to play with that once its in zbrush
It's exciting to see so many people participating in their first challenge this round. Keep up the good work everyone!
I've been struggling with how to mix transparency and metal in UE4 on my vat mesh so it looks like what I made in Substance Painter. I tried applying two materials to the mesh but then my grunge leaks won't apply to the whole thing. Any advice?
@b_beauchamp I think ideally you will need to have two separate materials for the glass and metal, and that's how it would be set up in a production environment anyway. Going for that setup will give you a lot more control over the individual materials going forward, even if it's a bit annoying to lose some work now.
Time for my first update! So far, I've focused on planning out my take on the wildcard concept, honing-in on some deviations I'll be taking and figuring out how to optimize my asset list. I haven't yet done a blockout, BUT I did spend today attempting a vertical slice of the method I intent to use for at least some of the specimen jars.
I started with an "alien organ" sculpt (which is a great way to jump back into Zbrush if you haven't used it for a while):
Then I used the tentacle jar baking method I linked to earlier, took a good amount of fiddling, but I eventually got something workable:
After using a good number of the maps Marmoset can generate, I got a decent material, and tested it out in Unreal:
This method does have some downsides (a good amount of distortion projecting the organ onto the outer surface, etc.), and I will need to tweak the material for the actual project, but overall I think it looks decent, and this method could work really well, at the very least for the specimen jars along the walls.
I've spent a good deal of time today planning out various rendering techniques for achieving the Ghibli-inspired style I'm pursuing. I think I've got a good plot for how to achieve the grass, quick test in Blender, should be able to replicate in engine:
I fiddled around in Blender working out a way to do procedural vines that follow splines, which will allow me to quickly and easily adjust and compose them in the scene. Was a lot of fun:
I also started my block out. Probably spent a bit too much time a focus on detailing, rather than covering the whole scene. Haven't gotten around to the houses in the background yet...
Working in Unity for this project as that's very familiar to me. Don't want to also load learning Unreal onto my plate for this project, perhaps the next one!
I think I got the main vat looking pretty good by using two textures. The translucent material still doesn't show the roughness maps like I want it to, but I'll leave the model for now and get to working on the rest of the scene.
---
I bring updates! I just couldn't help myself and I had to mess around with the alien organ shader a bit more. And I'm glad I did! I used a Parallax Occlusion Mapping node in Unreal in conjunction with the height map from Marmoset, and that produced a really great result that kinda fakes depth in the liquid, and the organ looks a lot more convincing now, especially in motion. It's not perfect; there's a seam on one side cuz my UVs don't reach the edge and wrap around completely, but I can fix that for the actual assets.
Still plugging away at the blockout, will share that once I move on from that stage.
Keep up the good work everyone!
EDIT: @b_beauchamp yeah the distortion is inevitable if you're looking to project onto the outer surface like that. The real magic happens when you take it into Substance Painter and use the height map Marmoset generates to mask out the contents of the jar, and fill in the rest with the liquid material.
I'm doing the wildcard and I'm planning on finishing this time! I did a bit of blocking out, a bit of substance designer, and a bit of shader making in UE4 for my first day. I want to get a vertical slice of a completed specimen jar done so that I know exactly how I'm going to proceed with them. I focused primarily on the glass and liquid shaders. I also got some rough initial lighting in with emissives and a sky light.
I made a faux-volumetric shader for the liquid using fresnel in the UE4 blueprint graph. I used it to basically lower opacity near the edges of the shape and have it more opaque in the center. I tested it with some primitive shapes inside and it just gives the water a murky effect that I can tweak later on.
The water also has a normal map that gives the appearance of little air bubbles stuck to the side of the glass inside. The glass has a normal map as well as a roughness map applied.
I gave the central tank a different material with a condensation effect to make it a bit different. The creature inside looks like its alive and escaping, so I figured this pod would be life sustaining in some way. Maybe like a suspended animation chamber of some kind that is cooled down to preserve the living specimen. I'm planning on adding some variations in color to the liquids in the containers to match the reference (they range from greens to yellows) but right now I just have the one color applied.
Grab some more references (like this) and try to break down what is happening structurally in the surface you are trying to replicate. For instance, stucco is a layer that sits physically on top of the brick and is quite thick, enough to notice light and shadow in the edges. I think hardening the edge, plus making the stucco have more height than the brick will be a step in the right direction. I've never played with vertex paint blending in too much depth before, so maybe some other people will have clearer ideas.
@alytlebird Yep, agreed regarding the vine shading. I'm currently toying with a leaf technique for detailing the tree blobs that I'll probably reuse for the vine leaves.
@b_beauchamp I actually think distortion is a real strength of this technique for this particular scene. One of the great things about the extremely distorted, highly refractive jar goo is it makes it whatever is inside even more obscure, alien and ultimately horrific. Keep the monster in the shadows, as they say. I hope you're able to work out the kinks and overcome the artifacts, just thought I'd give my 2 cents.
@dyceus Thanks! Many things to come!
During my planning phase, I did a concept drawover where I broke down the composition, as well as other breakdowns for asset purposes. I spent a bit of time making sure the composition of my scene was close to the concept. I'm not looking for a perfect 1-to-1 match on the perspective/placement of every little object, but I want to make sure the leading lines and forms are preserved.
I also threw the organ jar vertical slice into the scene, ran it thru ProInstance, and filled up the shelves with some placeholder jars, surprised at how well they bake with the light setup!
Was nice to get a big burst of work done over this long Labor Day weekend, but I probably won't be posting another update for a while, tho I'll be lurking around. Keep up the good work y'all!
@alytlebird Thanks for showing this, the result looks brilliant! Will try at some point to give this technique a shot with some of the smaller Jars n such.
Update on the jars - roughly sculpted some fishes/tadpoles and then I tried using a Depth fade Node within the water material, this just helped me blend some of the specimens into the shader. I do have a slight issue, when viewed from the back, the murky effect almost disappears revealing just the meshes inside the jar - Also a few clipping issues too but bound to have a few problemo's
Blended some white specs into the shader as well, adding a panner to a texture so they slowly drift up to the top of the jars.
Currently working on a modular kit for the jars too, so just switching out different lids or bases to create new kits. Will post that a little later but thought i'd leave a quick update as I haven't posted anything for a lil while.
https://www.youtube.com/watch?v=2BxrGjPcirk Useful video on the depth fade if anyone is interested
@Donato I agree that the stucco effect needs some harder edges and maybe some height difference to look realistic. I don't know much about vertex painting so I can't really help with how to go about that, though. I saw a tutorial on Artstation for making puddles with vertex painting that could be helpful (since it uses height maps). https://www.artstation.com/artwork/6a8GV6 Other than that, I really like your modular elements so far!
@thomaswmanser Thank you for sharing the link about the Depth Fade Node. I'm still trying to figure out how to create the "suspended in water" effect for the larger sculpts and it seems like that method could help.
@b_beauchamp That's all good! I'm looking forward to seeing how yours turns out!
Today I did a quick sculpt and textures of the lighthouse and put it into Unreal just to test out my texturing workflow method...It doesn't seem to need a lot of texturing to look like the concept art, but theres still a lot more detail I can layer on in substance painter, and the normal map doesnt seem to be working very well...
For the straw houses I was a bit confused about the top structure thing on top of the houses so I did a bit of researrch and change the beam structure so it makes a bit more sense.
@thomaswmanser I came across this method while researching what I was going to do about the water effect myself. It involves subtracting the pixel depth from the scene depth. The guy in the video goes into a more accurate version but the version starting around 3:30 seemed to make the illusion work, at least for a still. It's just dependent on the angle of the camera to the object, so may cause issues there but might be worth a try.
https://youtu.be/TObymSnTwV0?t=211
Today I got some materials made in substance designer, including a paint peeling off of concrete material, some emissive materials for the light fixtures, and some labels for the containers. I was just testing out the labels and will go back and do them in a more efficient way later on. The labels were done in photoshop and designer. Tomorrow will finally be a fish sculpting day for me.
This is the peeling paint graph I created in substance for my walls (and also currently the cabinets), something I can keep using and tweaking in the future.
@dyceus Thank you for the compliment about my fish jar. I'm struggling with how to create a suspended water effect as well. Would you mind sharing how you got your labels to stand out on the jar models? I've been trying to use decals on mine but they don't work on transparent materials.
I've been working on making some of the glass jar props for the scene, but my glass textures look bad no matter what I do (for this material version, I'm also blending in some depth fade and refraction). I'm using two versions of my trim material for each jar, opaque for the metal, and transparent for the glass. If I turn down the opacity, the glass is practically invisible. If I turn it up, I get the cloudy, non-glass like effect in the image below. Roughness and reflections aren't appearing the way I want them to either. I want to blame the problems on the transparent blending mode, but I don't know how to fix it. Any advice is appreciated!
I've also been thinking about just using cardboard boxes from Quixel in the interest of time. (I've piled them up in the back of the scene in the image below). Would there be any benefit to me modeling and texturing a set of boxes myself instead?
For your glass material, is your lighting mode set to surface translucency volume as well?
Then use these surfaces to develop your 2 specular terms - low roughness with glass normal, higher roughness with fish normal, then take the maximum of the two terms together to get the overall specular for the material. I hope I'm making sense, explaining maths with words is always prone to confusion.
@clxddd Thanks. That grass prototype is using non-billboarded planes with a monochrome alpha-blended grass silhouette texture. Part of me feels like its a very greedy way to achieve the "velvet" effect - the large patches of similar colour are wasting a lot of polygons. It's fine for a static screen shot or a non-mobile platform, but I would love to export my scene and run around it on a phone or in VR when I'm finished. To that end I'm going to work on the project effects with mobile optimisation in mind.
Really enjoying this! My next target is going to be beginning detailing work on the tower.
Thanks so much for the suggestions. Through the tutorial and the references that you have recommended to me I think I have obtained a satisfactory result. However I think you are doing a great job in regards to your projects. I'm sorry I don't have any helpful hints.
I've begun toying around with how I'm going to texture this lighthouse tower. I made a very quick stone trimsheet for testing out bevelled/damaged edges. Quite new territory for me, so learning much. This is where I've gotten to in my testing:
I used 2 UV maps to do this - one to do the coloured pattern (edge loops running horizontally) and one to use the stone trimsheet normals (edge loops running vertically and scaled differently). It's basically a full cylindrical unwrap for the colour. Texel density is decent enough, so I'm thinking I'll be able to paint the various paintbrush-like hue shifts in the concept directly into the colour map. I still think decals will be the best solution for for isolated damage such as patches of peeled stucco.
The edge damage normal map was only meant as a test because its extremely exaggerated, but I do like the chunkiness it adds to the structure. I was originally going to use a very subtle edge bevel for the final result, but now I'm leaning more towards this bolder style.
I made a very simple square pillar and unwrapped it cylindrically. Then I cloned it and made a high poly sculpt. I baked the normals in substance painter. Whats cool about this is it tiles in X and Y, since the pillar surface wraps around. This means I can apply it to the 8-sided lighthouse tower and still have it seamless. Bit of a happy accident.
I did some test unwraps on all of the detailing around the top of the tower, as well as the window frames using my stone sheet. I just wanted to see how effective the edge damage would look, since the technique is new to me. I'm pretty pleased with it, so my plan is the make a wooden sheet with a similar layout to this stone one and replace the stone with wood on all the beams. This will also be reuseable for the various wooden railings I want around the stairs on the ground level.
I switched to the universal rendering pipeline in Unity as well, which I've never used before. It's really screwing around with the project, especially the lighting, but I'm going to stick with it and learn it for this project.
@gastrop0d said:Thank you for your suggestion! Could you elaborate on how I can get an overall specular from two terms? The whole model is just a bunch of texture layers on a single mesh. The glass layer does not have a numerical value, instead I'm using a roughness map to give more variety. I've attached a picture of my Substance Painter layers below if that's helpful.
@Donato I really like the stucco effect you came up with! Also, thanks for the compliment.
For my labels, I decided to buy a downloadable set of antique style laboratory labels. I clipped out the ones I liked in Photoshop and then brought the set into Substance Painter where I blended it with a parchment material and added some custom text and stains. I then modeled the individual labels from the curvature of each jar and matched the UVs. I think the result adds a lot to the scene already, but I will be making some more variations and trying the same method for things like cracks and extra grunge.
I'm still working on the block out. Need to get some scale issues under control, the stairs and roof tiles are too big. I'm using megascan textures for now, but hopefully I can start on a texture pass soon. One thing I am proud of is my first time using POM materials for the windows, so they're actually just flat planes against the side of the building. It lets me scale the windows and blinds without having to adjust the underlying BSPs. More progress soon hopefully.
let me join the fun by doing the wildcard challenge!
Here's my first block-out: tried to recreate the scene by using limited props.
also thanks to @alytlebird for posting the fake liquid method. would love to try it myself
https://polycount.com/discussion/comment/2659093/#Comment_2659093
@Zocky that modular kit is seriously detailed. I'm excited to see it with materials applied in the future. It has come together in your blockout amazingly.
@b_beauchamp those labels look perfect! The detail is great, I think your decision to use the stationary you found and then customize it was a smart one. They sit on the glass surface exactly right it looks like.
Took a bit off of the environment to try the hard surface prop. I just did some modeling, haven't gotten into any sculpting or materials yet. Did get a bit carried away in Marmoset with the photoshoot though (I don't really spend much time in Marmoset and usually like to dive into everything when I'm in a software I don't use a lot).