Answered: Quixel Bridge Maya Livelink Redshift Displacement issue
Hello!
I got Quixel yesterday and started playing around with MS Livelink in Maya. The 3d assets export correctly and get set up correctly inside Maya under Redshift Renderer. However the Megascans surfaces seem to get all messed up displacement. These are my steps:
1. Create a new scene in Maya. Select Redshift Renderer. Run the MSLivelink script to get the little dialog box and select Redshift inside that.
2. Make a poly plane and a Redshift light. Select the plane.
3. Open Bridge and select the Export button on any surface. Use default export settings and click Export while the geo is selected in Maya.
4. The material immediately gets exported successfully and a redshift material gets created and assigned. I render it and it looks like the displacement is insanely high.
This is the material i chose for example.

This is what it looks like in Redshift render on a 2D plane geometry.

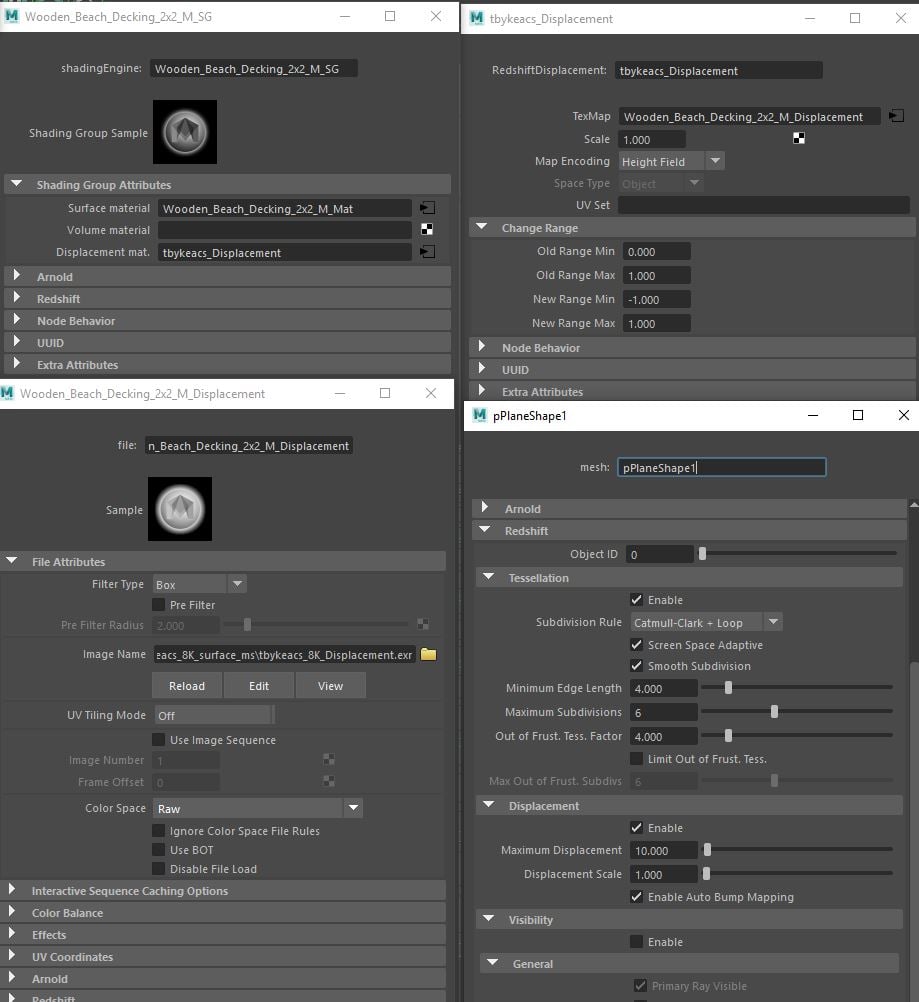
These are the settings that get created by default, I haven't changed any.
At this point I can set the scale in the displacement box on top right from 1 to 0.02 to get the result kind of like how it looks in Bridge but I feel like it still doesn't look the same. Like some setting is messed up somewhere.
I am assuming since nobody messaged here about this issue, I am the one doing something wrong as Quixel will obviously not have such a basic feature of Livelink broken.
Please somebody help me I have searched everywhere for answers, what is going on?
Cheers!
Indy
I got Quixel yesterday and started playing around with MS Livelink in Maya. The 3d assets export correctly and get set up correctly inside Maya under Redshift Renderer. However the Megascans surfaces seem to get all messed up displacement. These are my steps:
1. Create a new scene in Maya. Select Redshift Renderer. Run the MSLivelink script to get the little dialog box and select Redshift inside that.
2. Make a poly plane and a Redshift light. Select the plane.
3. Open Bridge and select the Export button on any surface. Use default export settings and click Export while the geo is selected in Maya.
4. The material immediately gets exported successfully and a redshift material gets created and assigned. I render it and it looks like the displacement is insanely high.
This is the material i chose for example.
This is what it looks like in Redshift render on a 2D plane geometry.
These are the settings that get created by default, I haven't changed any.
At this point I can set the scale in the displacement box on top right from 1 to 0.02 to get the result kind of like how it looks in Bridge but I feel like it still doesn't look the same. Like some setting is messed up somewhere.
I am assuming since nobody messaged here about this issue, I am the one doing something wrong as Quixel will obviously not have such a basic feature of Livelink broken.
Please somebody help me I have searched everywhere for answers, what is going on?
Cheers!
Indy
Replies
Sorry for the late response was caught up in work. So I tried to do what you said. Created a new scene. Made sure maya's working scale was set to centimeters. Create a plane. As its size is set to 1, I am assuming that is 1 unit = 1 cm. I made it's scale 200 so 200 units = 200 cm = 2 meters. Then went to Bridge, clicked the export button and as the plane was selected the texture changes from default lambert to Redshift Material and connections get made and still the displacement is just as massive. I checked the plane size with measure tool as well, it said 200.
Following screenshot has all the important panels open so you can see all aspects of the scene including the distance measure tool in the viewport saying 200.
Please do let me know what am I doing wrong, all the help is appreciated! Thanks!
"And just so you know, your remapping is making the displacement be twice as strong, since between -1.0 and +1.0, there is 2 units. The more correct remapping would be -0.5 and +0.5 and 0.5 at zero level."
So upon changing values in Redshift Displacement
Scale 1 > 0.5
New Range Min -1 > -0.5
New Range Max from 1 to 0.5
it looks perfectly natural. Here are the comparison images.
Scale 1
New Range Min -1
New Range Max 1
Too extreme
Scale 1
New Range Min -0.5
New Range Max 0.5
Almost there
Scale 0.5
New Range Min -0.5
New Range Max 0.5
PERFECT
So my question is, what should the remapping values be set to by default when the Export button is clicked in Bridge? Shouldn't they be 0.5 -0.5 and +0.5 as Redshift Support mentions? Or am I missing something here?
I retried doing the same thing, new scene, first set the Maya working units to centimeters. Created a new plane. Set scale to 200, so 200 units = 200 centimeters. Selected it, exported material from bridge and it loaded in Maya. I changed remap values to above mentioned ones and displacement was still messed up as you can see.
However I changed the scale from 0.5 to 0.005 by factor of 100 (meter to centimeter conversion) and lo and behold, it is an EXACT match to the 'PERFECT look' in had achieved in the above post when my scene was set to meters.
Can you explain what is happening here?
I just found the exact same texture and did the exact same steps and the results were the same, so nothing has changed in any of the later versions of Quixel mixer & Bridge. Also its not as cut and dry as this, I made my own shader in Mixer and exported to maya and I had to adjust settings further to achieve the same result even though it too was a 2x2m size shader.
https://www.facebook.com/groups/QuixelToolsGroup/permalink/2442090229246239/
My responses are under the name Indrajeet Sisodiya
Hope it helps!