Home Technical Talk

Break in the UV is causing a slight visual flaw

guitarguy00
polycounter lvl 6
Offline / Send Message
guitarguy00 polycounter lvl 6
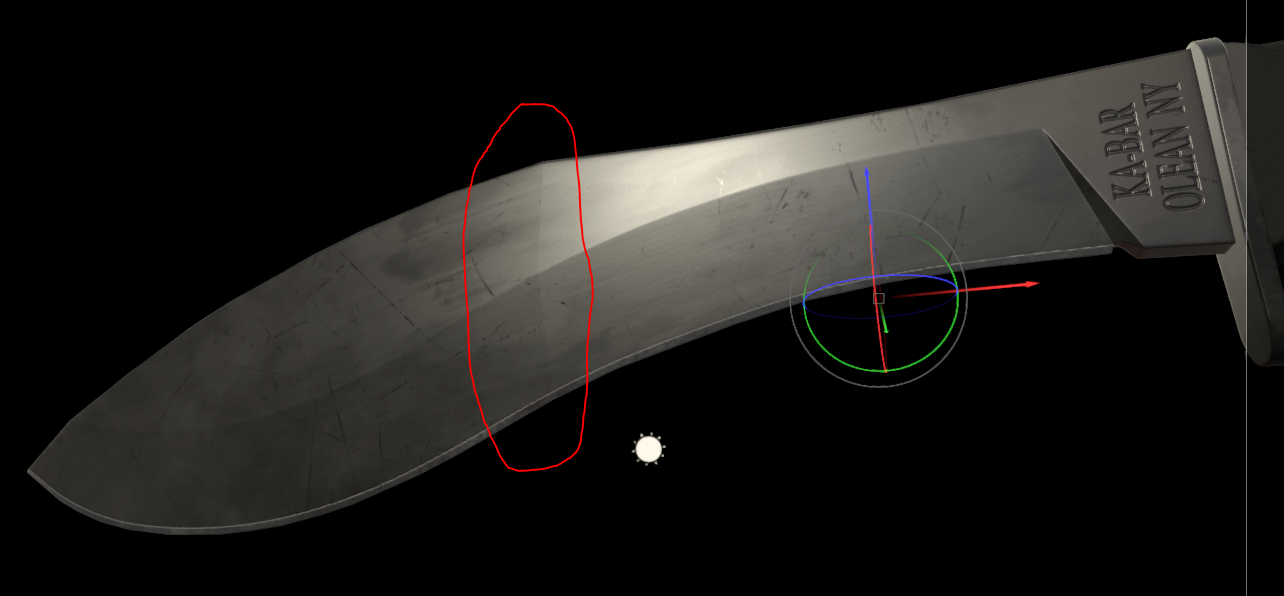
Hey guys, I have been working on a Ka-Bar combat knife which features a long blade. In order to get the most UV density I cut the Blade UV in half and would rely on tri-planar mapping in Substance Painter to get around the seam. I applied smoothing groups to UVs and baked. I don't get any visible seam with the textures but I do get a visible flaw where the UV shells were cut:


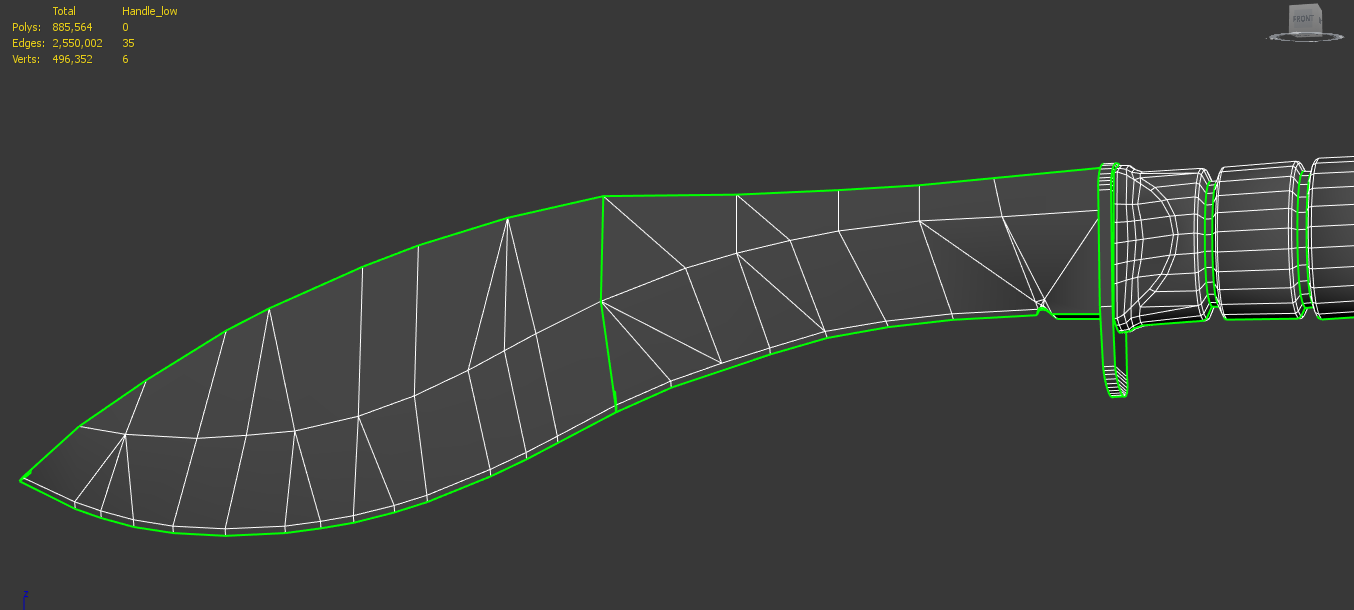
This is where I placed the UV seam:


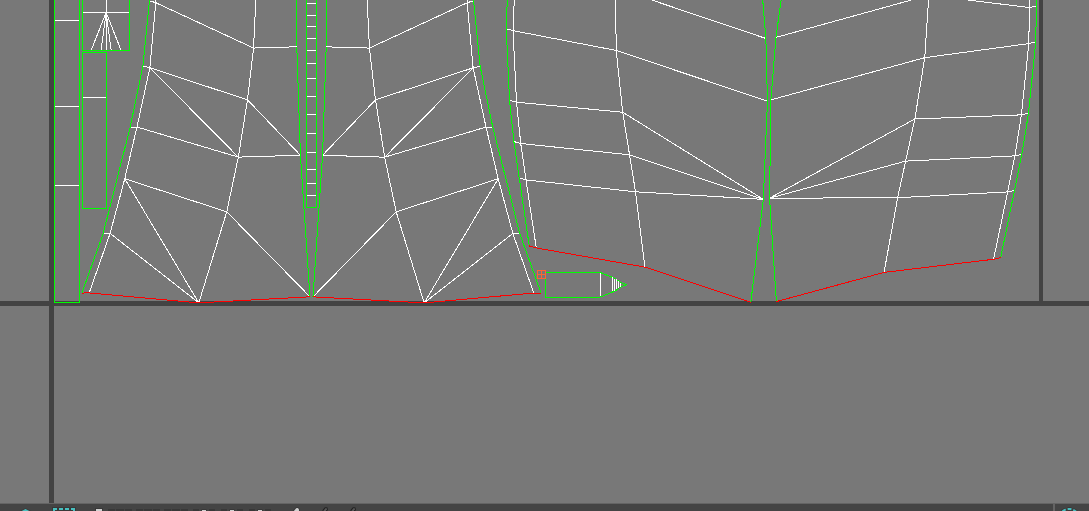
These are the UV seams on the UV map(red lines). I original tried straightening these edges but it ended up with even worse results:
It is a small flaw but was wondering if there was a work-around for this? I'm using Max if that helps. I did consider softening these edges but I don't think I can do that in Max as it only uses smoothing groups and I applied smoothing groups to each shell via TexTools. Any help would be greatly appreciated.

Replies

  • Obscura
    Options
    Offline / Send Message
    Obscura grand marshal polycounter
    How about manually smoothing that part?
  • guitarguy00
    Options
    Offline / Send Message
    guitarguy00 polycounter lvl 6
    Thanks for the reply. I'm going to try assigning one smoothing group manually to those two shells like you mentioned and re-bake. 
  • Kanni3d
    Options
    Offline / Send Message
    Kanni3d ngon master
    I'm going to try assigning one smoothing group manually to those two shells like you mentioned and re-bake. 
    That'll also do it. That split is mostly from the smoothing split, not so much the uv seam.

    One option is to split the long uv in half like you've done, or just bake in a non-square texture, like 4096x2048. You'll end uping having to squash that long UV into half the amount length wise. Same result, but no seam.
  • guitarguy00
    Options
    Offline / Send Message
    guitarguy00 polycounter lvl 6
    Kanni3d said:
    I'm going to try assigning one smoothing group manually to those two shells like you mentioned and re-bake. 
    That'll also do it. That split is mostly from the smoothing split, not so much the uv seam.

    One option is to split the long uv in half like you've done, or just bake in a non-square texture, like 4096x2048. You'll end uping having to squash that long UV into half the amount length wise. Same result, but no seam.
    Thanks for the reply. I'll try the smoothing group method first. Wish me luck hehe. I have used the non-square format before with the Tim Bergholz Kukri Knife tutorial but wanted to ask if Substance actually doubles the texture density at the export phase where we tell it to give us a 4096 by 204 resolution? Or does it simply stretch the square texture horizontally by 2x?
  • guitarguy00
    Options
    Offline / Send Message
    guitarguy00 polycounter lvl 6
    Sadly it didn't seem to work. I baked in Marmoset. Maybe I'm missing something in the setting whilst baking or exporting?
  • musashidan
    Options
    Offline / Send Message
    musashidan high dynamic range

    This is an issue in S Painter if shells share a planar seam but are not facing the same direction. It is purely a rendering error in SP though and the seam doesn't appear in UE4(maybe Toolbag has the same issue?)

  • EarthQuake
    Options
    Offline / Send Message
    It's bad practice to put a UV seam here. In addition to problems like you're seeing here (which you can probably solve), you may have mip-mapping issues in game. As the asset mip-maps or at lower texture quality settings, you may see a visible seam.

    As others have mentioned, go with a non 1:1 aspect ratio for the UV layout, like 1:2 or even 1:4 if you need to to get this laid out without a seam.

    It looks like you probably have way more seams on the grip than you need too. Unnecessary seams add extra vertexes to your mesh, causing them to perform worse. This sort of thing is not likely to make a massive difference on modern GPUs, but there is no reason to have this performance hit (no matter how small) if you don't need to.
  • guitarguy00
    Options
    Offline / Send Message
    guitarguy00 polycounter lvl 6
    It's bad practice to put a UV seam here. In addition to problems like you're seeing here (which you can probably solve), you may have mip-mapping issues in game. As the asset mip-maps or at lower texture quality settings, you may see a visible seam.

    As others have mentioned, go with a non 1:1 aspect ratio for the UV layout, like 1:2 or even 1:4 if you need to to get this laid out without a seam.

    It looks like you probably have way more seams on the grip than you need too. Unnecessary seams add extra vertexes to your mesh, causing them to perform worse. This sort of thing is not likely to make a massive difference on modern GPUs, but there is no reason to have this performance hit (no matter how small) if you don't need to.
    Thanks for the reply. I have used non-square textures once before when i followed the Tim Bergholz Kukri Knife tutorial but didn't understand how it worked on a technical level because it had to be baked at a square resolution and then output out of Substance Painter in 4096x2048. Does Substance Painter double the density on the horizontal this way or does it merely stretch the texture on the horizontal? 

    I will go back and reduce the seams on the handle although I might not be able to get it all in one seam without some major distortion?
  • guitarguy00
    Options
    Offline / Send Message
    guitarguy00 polycounter lvl 6

    This is an issue in S Painter if shells share a planar seam but are not facing the same direction. It is purely a rendering error in SP though and the seam doesn't appear in UE4(maybe Toolbag has the same issue?)

    It is pretty much identical to the example you have shown in the linked thread. I haven't tried it out in UE4/Unity yet, only Substance and Toolbag. Did you harden the seam in the middle on the cylinder or no need?
  • musashidan
    Options
    Offline / Send Message
    musashidan high dynamic range
    No, seams across continuous surfaces/smoothing groups should not be hardened.

    As you can see from that thread there is no issue in UE4, it is an SP rendering issue. Also note that this was just an example to illustrate the issue. I wouldn't put a uv seam there on an actual asset unless it was an extremely long island.
  • guitarguy00
    Options
    Offline / Send Message
    guitarguy00 polycounter lvl 6
    No, seams across continuous surfaces/smoothing groups should not be hardened.

    As you can see from that thread there is no issue in UE4, it is an SP rendering issue. Also note that this was just an example to illustrate the issue. I wouldn't put a uv seam there on an actual asset unless it was an extremely long island.
    I understand. Thanks for that. The error occurs in Toolbag also. I have since gone back and UV-Mapped with a non-square format in mind as it is a port folio piece primarily. Also took Earthquakes advice and reduced the seams on the handle while I was at it :D 
  • gnoop
    Options
    Offline / Send Message
    gnoop sublime tool
    Make sure there is no  hard edge there as musashidan mentioned (vertex normals along the seam are not split)  and make sure the normal map is in perfect 128,128,255 flat color and there is no gradients in blade part.  There are shouldn't be any based on your mesh.

    Ps. There is no perfectly flat normal color obviously since 128 is not encoding into perfect 0,5. We had same kind of thing 10 years ago  because of a normal map compression issue but now as what I am aware of  it's usually ok and  precise enough.


  • guitarguy00
    Options
    Offline / Send Message
    guitarguy00 polycounter lvl 6
    gnoop said:
    Make sure there is no  hard edge there as musashidan mentioned (vertex normals along the seam are not split)  and make sure the normal map is in perfect 128,128,255 flat color and there is no gradients in blade part.  There are shoudn't be any based on your mesh.

    Ps. There is no perfectly flat normal color obviously since 128 is not encoding into perfect 0,5. We had same kind of thing 10 years ago  because of a normal map compression issue but now as what I am aware of  it's usually ok and  precise enough

    Thanks for the advice. Any tips on how to make sure the normal map is in perfect 128,128,255 color? I just baked it out in Toolbag. 
  • gnoop
    Options
    Offline / Send Message
    gnoop sublime tool
     Any tips on how to make sure the normal map is in perfect 128,128,255 color? I just baked it out in Toolbag. 
    Just check it with color picker first.   It should be "flat" 127 maybe instead of 128. Should be compressed into same 0.5 value for an engine basically.  If it's all right and vertex normals are perfectly ok too without giving any gradient then it's nothing you could fix.

    One trick I used long ago when we had this compression issue  is adding a tiny bit amount of noise into the normal map. Sometimes it helped .

    Another solution is using non square textures  so the blade would fit.

    ps. well, I am not 100% correct . There might be a gradient across the blade just not longitudinal one.   You need to "face weight"/edit the vertex  normals  the way the gradient would go into that very tiny cutting edge.     Also try triangulate before baking
  • guitarguy00
    Options
    Offline / Send Message
    guitarguy00 polycounter lvl 6
    gnoop said:
     Any tips on how to make sure the normal map is in perfect 128,128,255 color? I just baked it out in Toolbag. 
    Just check it with color picker first.   It should be "flat" 127 maybe instead of 128. Should be compressed into same 0.5 value for an engine basically.  If it's all right and vertex normals are perfectly ok too without giving any gradient then it's nothing you could fix.

    One trick I used long ago when we had this compression issue  is adding a tiny bit amount of noise into the normal map. Sometimes it helped .

    Another solution is using non square textures  so the blade would fit.

    ps. well, I am not 100% correct . There might be a gradient across the blade just not longitudinal one.   You need to "face weight"/edit the vertex  normals  the way the gradient would go into that very tiny cutting edge.     Also try triangulate before baking
    Ahhh just saw your edit. I have read about face weighted normals before but have not used them at all. I ended up going the non-square texture route this time but need to look into face weighted normals more as I have heard they can help with gradients and such.
  • gnoop
    Options
    Offline / Send Message
    gnoop sublime tool
    Also make sure the blade have hard edges on both the cutting edge and blunt edge. They are necessary to make flat part of the blade having its vertex normals perfectly perpendicular to surface . It's what gives you no gradients on baking. 

    A good practice is visualization of vertex normals in 3d soft. They always give you an idea if something is wrong

    Those geometry things could also give you shading gradients in normal baking
  • guitarguy00
    Options
    Offline / Send Message
    guitarguy00 polycounter lvl 6
    gnoop said:
    Also make sure the blade have hard edges on both the cutting edge and blunt edge. They are necessary to make flat part of the blade having its vertex normals perfectly perpendicular to surface . It's what gives you no gradients on baking. 

    A good practice is visualization of vertex normals in 3d soft. They always give you an idea if something is wrong

    Those geometry things could also give you shading gradients in normal baking
    Thanks again for all the tips. Is there a thread or Youtube video that goes through all these potential problems?
  • gnoop
    Options
    Offline / Send Message
    gnoop sublime tool
    I don't know but its all is getting pretty clear once you realize that a normal map is just a non100% precise way to compensate the shading gradients vertex normals produce.    When  you see a subtle vertex normal inclination due to some mesh irregularity  there always would be a shading gradient accompanied  by  normal map gradient  trying to compensate the first one  and not always successfully because of 8 bit only + compression.   

     So a better solution is to cure the true origin of the issue first . By setting vertex normals  the way they would produce as few shading gradients as possible
Sign In or Register to comment.