Home 3D Art Showcase & Critiques

Monthly Environment Art Challenge - July & August 2018 (55)

134
greentooth
Offline / Send Message
kadeschui greentooth
Welcome, all! Believe it or not, it's already time for the Monthly Environment & Prop Challenge #55!

Incredible work by all! Due to my busy schedule this past month there wasn't time for a voting round. I will do my best to get one up and running for Challenge #56!

Remember if you don't finish in the time allotted, just keep plugging away and post when your work is finished. There's always some good progress that falls off the radar - we want to see your work! So keep going and finish those pieces!

 Without further ado, here are our options for Challenge 55!


HARD SURFACE CATEGORY:
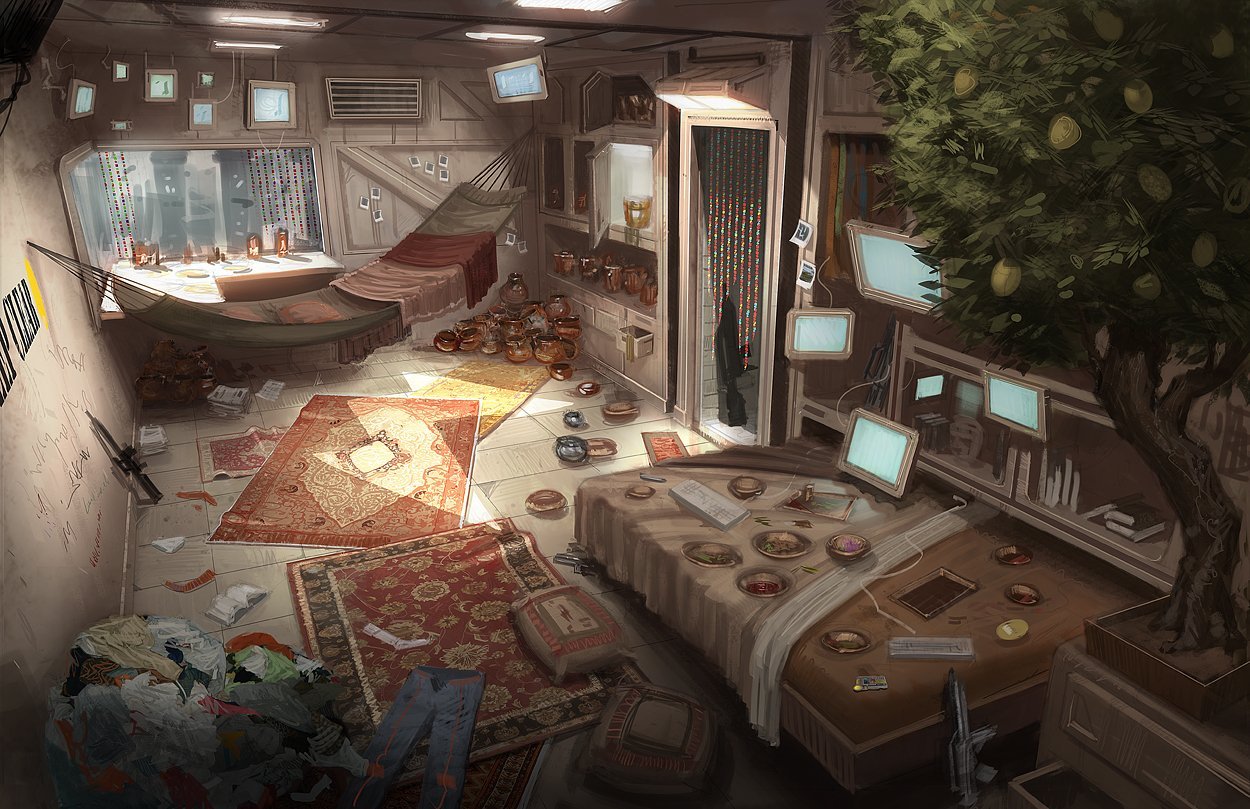
artist: Matt Tkocz

HAND PAINTED CATEGORY:
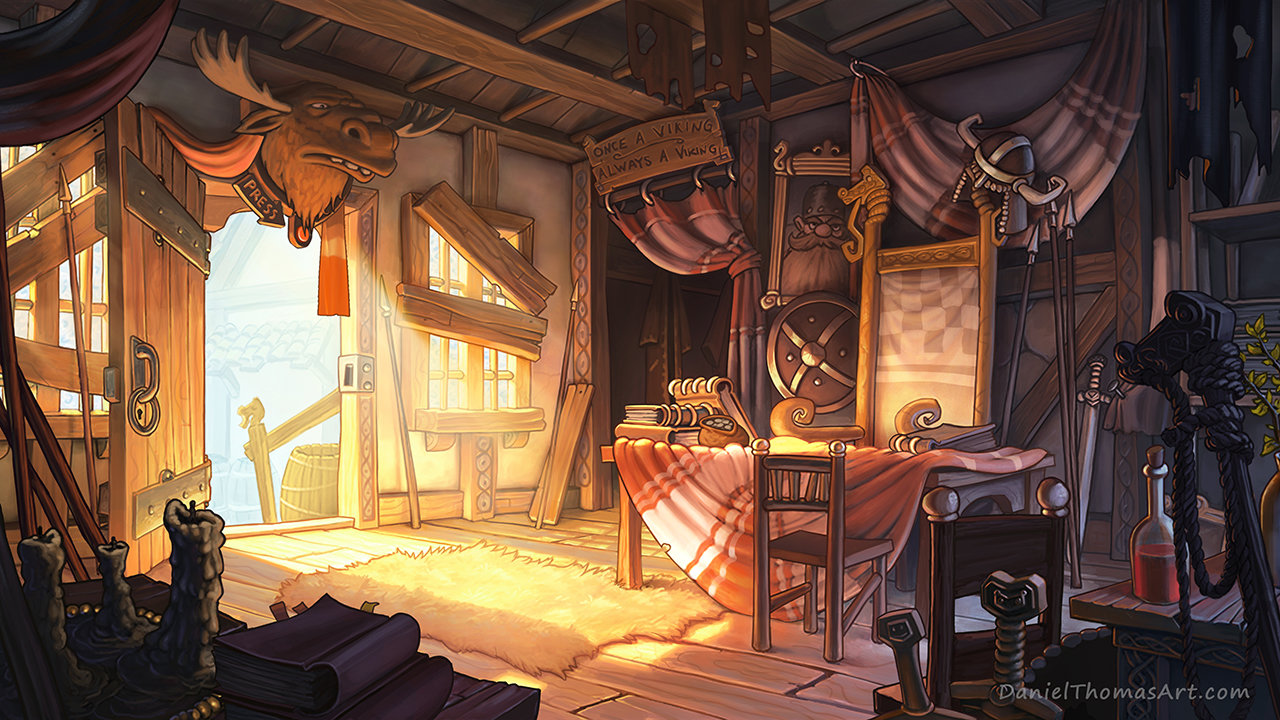
artist: Daniel Thomas


HAND PAINTED CATEGORY:
Annke Andrews
artist: Per_Versus

HARD SURFACE CATEGORY:
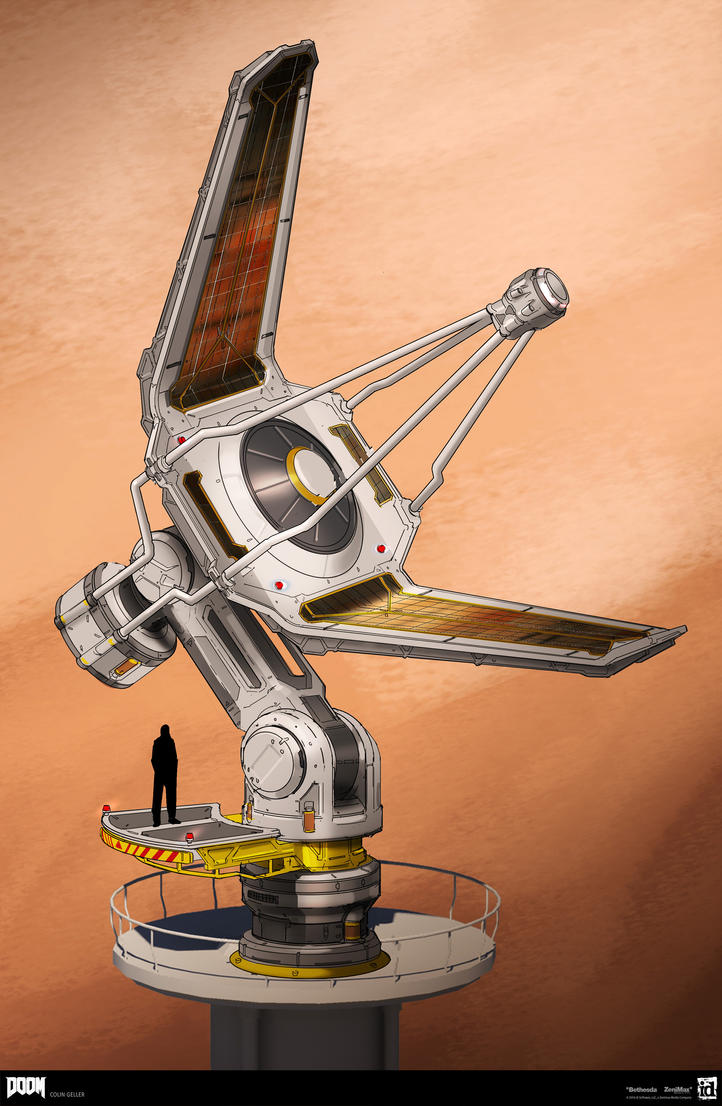
DOOM - Satellite Dish by MeckanicalMind
artist: MechanicalMind


If you want to change up either concept a bit, as some people wanted, then feel free. Interpret these concepts to your liking.


Please read all the rules before starting.

When you are just starting out making a scene, it can seem complicated or imposing, so take the time to break it down. 

Think about how you can re-use assets, re-use textures, break it down as simple as possible and plan it out. A lot of people will break it down in their own way when they start out their challenge. Gather some reference images as well for different parts of the scene, maybe gather some refs and make it your own.

Take your time planning and blocking out, it will set you up for success later on.

Here are some specifics.
  • Try to post one critique for every post that you make. This will make for a better learning environment and help us all grow as artists.
  • You must use a game engine to present your work. Unreal Engine and CryEngine are very common engines that can be used but feel free to use any alternatives that you want. (Marmoset Toolbag is allowed as well)
  • You must try your best and finish as much as you can in the time frame provided.
  • Post what you are working on in this thread so that way it's a more centralized place for advice and critique. We don't need to have 1000 disjointed threads littering the forums. 
  • I would strongly encourage you to go and look at other games and see how they make their assets as well   as get concept art to give it your own feel, but it must stay very close to the concept, if not super close. 
Well, that's about it. If you think that any rules should be changed, or there should be new additions to the rules, please let me know. As always, please feel free to provide feedback / suggestions in this thread or by messaging me directly.

All that matters is that you learn while being able to effectively critique others, as well as accept critiques on your own work. Remember to have fun. Cheers!

Replies

  • kwagner
    Offline / Send Message
    kwagner polycounter lvl 5
    I really like both props this time...I might end up doing both...
  • cameronthughes
    Offline / Send Message
    cameronthughes polycounter lvl 9
    The moose head speaks to me... Count me in!
  • Syrtax
    Offline / Send Message
    Syrtax polycounter lvl 3
    The satellite dish looks dope, this will be my pick!
  • Ryandec
    Offline / Send Message
    Ryandec polycounter lvl 8
    Going to do the dish, quite a step outa my comfort zone since Iv'e bascially done a lot of basic shapes and blocklyness as a now. lets see how it goes!
  • Skeee
    Offline / Send Message
    Skeee polycounter lvl 2
    This is going to be my first time doing one of these, but I think I'm going to do the hard surface environment category!
  • kadeschui
    Offline / Send Message
    kadeschui greentooth
    Glad to see ya'll are liking the concepts this round :) Good luck all can't wait to see what you talented bunch come up with :smiley:

    I'm going to try and tackle the satellite dish - let's see how crazy things get at work in the next few weeks :grimace:
  • alytlebird
    Offline / Send Message
    alytlebird interpolator
    Very tempting to go for either one of the Hard Surface concepts. The dish looks like a great practice in pushing beyond primitive modeling. I've also been learning Marvelous Designer recently, so the environment concept is a great chance to put those skills into practice specifically for environment work rather than clothing for characters.

    Gonna be my first time trying one of these, let's see how it goes. :)
  • TangDao
    Offline / Send Message
    TangDao polycounter lvl 6
    The dish looks like it has some challenging parts,I think I'll give it a try.
  • polypassion
    Offline / Send Message
    polypassion polycounter lvl 8
    Also started with a quick blockout.


  • Syrtax
    Offline / Send Message
    Syrtax polycounter lvl 3
    @polypassion
    wow, thats a nice blockout allready! nearly an exact fit :smile:

    Here is my blockout progress for the satellite dish. Starting from the bottom and working my way up.. 
    Goal is to get as much done in Fusion 360 as possible.

  • jewski-bot
    Offline / Send Message
    jewski-bot polycounter lvl 4
    These all look fun.  I have to get back in to the groove of things, but I think I'll try both props this time.  No guarantees that I'll have both finished, but if I'm lucky and can focus without interruptions, the modeling should go fairly quickly.  I'll probably attempt to post some breakdowns later this weekend for a visual aid as I want to focus on getting my pre-production game up.
  • kwagner
    Offline / Send Message
    kwagner polycounter lvl 5
    @polypassion How do you do that to get everything to line up like that? What is your process for that if you don't mind me asking? 


  • alytlebird
    Offline / Send Message
    alytlebird interpolator
    I decided to do the first environment concept, but I wanted to shift things around, primarily for storytelling purposes. Here's a quick overview of my plans:


    In short, I'm dividing the room in half to tell the story of two individuals forced to work together, despite their varying personalities and living conditions. I'm shuffling the tree over to the hammock side and making it more of a bonsai tree, and cleaning up that half so there's some actual organization. Then I'm moving most of the tech equipment to the bed side, and adding open books and paper piles to show some sort of intense, focused research, by the kind of guy who would look at a room like this and say, "it's controlled chaos".

    I also went ahead and made an asset list, looks like it'll be roughly 40 assets. So, not impossible! Block-out scene to follow.
  • polypassion
    Offline / Send Message
    polypassion polycounter lvl 8
    @kwagner, it's very simple, really. First I created the camera with image plane, then aligned it's perspective and fov with the image plane.


    Now I have two vieports. I model in the left perspective view and check the alignment in the right aligned view. Here's timelapse: 
  • kwagner
    Offline / Send Message
    kwagner polycounter lvl 5
    @polypassion Thank you!! That's always the part that I end up spending way too much time on after modeling, just getting everything sized and fitting correctly. I'll try this method next time!
  • Toku
    Offline / Send Message
    Toku polycounter lvl 6
    Great progress so far, and excellent concepts to work from! Ill try the satellite dish too! 
  • creepyhooman
    Offline / Send Message
    creepyhooman polycounter lvl 7
    It's been a while since I've participated in these challenges. The satellite, skipping the high poly and baking process, little test to see what kind of quality can I achieve with this kind of approach.


  • polypassion
    Offline / Send Message
    polypassion polycounter lvl 8
    There aren't many objects in the environment, so I figured if I make one or two objects a day I'll finish it in time.


  • Fogger
    Offline / Send Message
    Fogger polycounter lvl 4
    @kwagner, it's very simple, really. First I created the camera with image plane, then aligned it's perspective and fov with the image plane.

    Thank you for this, I also have been wondering myself how it was done.
    I really like the concepts this time around I think I'll try the hand painted environment or the hard surface prop.
  • AnimaJota
    Offline / Send Message
    AnimaJota polycounter lvl 8
    I think I will give it a try :) you guys have shown amazing stuff so far
  • alytlebird
    Offline / Send Message
    alytlebird interpolator
    What is the general best approach for blocking out foliage? I feel like this is definitely not how to do it.   :#


    I was trying to make sure there's at least some indication of transparency or non-solid-ness, but this just looks messy. Should I not bother with the gaps and just keep them as solid blobs?

    Blocking coming along nicely, should be done tomorrow.
  • prixster
    Offline / Send Message
    prixster polycounter lvl 6
    @alytlebird keep it w/ simple poly boxes and planes and moreover you can add a green color to them to differentiate.


  • AnimaJota
    Offline / Send Message
    AnimaJota polycounter lvl 8
    Hi! I'm doing the hard surface concept category, I started with a blockout of the scene.


    The meshes are really simple geometry, I add modifiers so it look better, and booleans for the holes. Really simple but know I can focus on making the high polys.


    Here is the geometry with the Subdivision Surface Modifier

    And here is without the modifier. You can see that are all just cute cubes.


    Tomorrow I will continue with the challenge :)
  • alytlebird
    Offline / Send Message
    alytlebird interpolator
    EDIT: @AnimaJota your take on the scene is looking great, very clean so far. :)

    Finished/approaching completion with the blocking phase. Shuffling stuff around is definitely going to make this tricky, but I think the result will be worth it. I'm already liking the separation happening between the halves.

    Messy Arnold render:

    Concept art overlay:

    Wireframe for good measure:


    Because I'm planning on making this a full real-time environment in Unreal, I wanted to include the back wall which is not included in the concept art. I saw the little grooves going through all of the shelves, and decided it looked like a system for shifting computer screens around on the walls, so I extended it onto the back wall.


    Herein lies my primary concern (right now); I need to fill space back here. I may add computer screens, I might try to think up an appliance or piece of furniture to plunk back there, but I'm drawing a blank right now. Could anyone help me out with some ideas?


    Same issue with this area. The tree was covering up a big chunk of the shelving, so I don't know what goes there. I was thinking a gun rack, but that conflicts with my narrative, as the security cameras on the ceiling indicate that these two individuals are being watched, and their work probably doesn't require guns. Again, any ideas about what I can put here?

    Added note: I shifted all the poloroids from the side walls to the front wall, and my plan is to further push the room division with these. The hammock side will have printed letter decals on the wall (i.e. "KEEP CLEAR" like in the concept art), and the bed side will have all the poloroids pinned on the wall, with lines and "conspiracy scribbles" drawn all around them, furthering the chaotic nature of that side of the room.

    Having lots of fun with this. :)
  • AnimaJota
    Offline / Send Message
    AnimaJota polycounter lvl 8
    EDIT: @AnimaJota your take on the scene is looking great, very clean so far. :)
    Thanks you ♥
    What you are doing is great and I really like that you are trying to make the concept your own! and you totally inspired me to add an extra layer of story for my concept :smile:

     Again, any ideas about what I can put here?
     Since you are playing with the polaroids you can add to the shelfs and the floor different types of photographic cameras and photographic rolls around the place. You can add too a strings with hanging polaroids so you have different ways of presenting the polaroids (and it will help you to fill the room too B) ) like this:


  • jakemoyo
    Offline / Send Message
    jakemoyo polycounter lvl 4
    Decided to step out of my comfort zone and stop lurking so much. I haven't been doing CG all that long but for the most part I've just been doing a lot of "normal" modeling i.e. chairs, buildings, so i think the sci-fi aesthetic should teach me a lot. Here's my blockout so far.


  • Ashervisalis
    Offline / Send Message
    Ashervisalis grand marshal polycounter
    @jakemoyo Looking good on the blockout! Hey, I'd suggest, the part which I've circled below, really try to achieve this shape. It took me a bit to figure out how I was going to do it, but the circular base of this part really helps the model flow, whereas you've got it squared.


  • Syrtax
    Offline / Send Message
    Syrtax polycounter lvl 3
    @jakemoyo
    great progress so far! 

    @alytlebird
    I like your take on the concept! 
    Maybe some Locker / Closet thing could fit in the back? could fill a wide area and is something thats not yet in the Room.

    ----

    Slowly chipping away on my blockout, definitely shows me where I still struggle in Fusion 360, but its a great learning experience so far.
    And thats whats important right? :smile:

  • Ashervisalis
    Offline / Send Message
    Ashervisalis grand marshal polycounter
    @Syrtax You're really nailing the blockout.
  • TangDao
    Offline / Send Message
    TangDao polycounter lvl 6
    @polypassion Nice quick blockout,nice blockouts everyone.@Syrtax Fusion is an interesting choice to use for a blockout I'm interested to see how you approach the next step.You might be a little narrow by the concept on the base platform and rails.I read that 4 meter diameter or so.
     I'm working on secondary shapes and some initial shading and smoothing as well.
  • Ashervisalis
    Offline / Send Message
    Ashervisalis grand marshal polycounter
    Blockout so far.

  • momomoonscar
    Offline / Send Message
    momomoonscar triangle
    You guys have done such wonderful work I decided to make an account and try out the hand painted prop as a warm-up! Will post later with my results :).

    @TangDao Your blockout looks so nice and clean! I love what you've done with the platform so far. The only thing I've noticed is that the two rectangular holes in the arms are a little small in terms of length and thick in terms of the width of the metal. I think the holes help make a nice balance between the head and arm of the satellite. 

    Same with yours @Ashervisalis, I think your holes are long enough, but the width of the metal is a little thick, too. 

    @jakemoyo I think the arm on your blocking could be a little longer to give the satellite head room to breathe. But other than that yours looks really good, as well!

    Take everything with a grain of salt! I'm still a total noob haha
  • Ashervisalis
    Offline / Send Message
    Ashervisalis grand marshal polycounter
    @momomoonscar I'll play around with it tonight and see what I can do about it :)
  • rel
    Offline / Send Message
    rel polycounter lvl 6
    I've never done one of these!! I'm working on my handpainting in general so I've decided to try out the handpainted prop :) Below is my plan and reference to get this puppy started! The references are for texture styles and material breakup more so than color palette. I'm really looking forward to starting this!


  • rel
    Offline / Send Message
    rel polycounter lvl 6
    @polypassionThere is a lot happening in there, your progress is awesome! How close are you planning on staying to the original concept? Are you going to be taking any liberties with the items in there or the texture style? I can't wait to see this one come together there are so many fun things in that room!
  • polypassion
    Offline / Send Message
    polypassion polycounter lvl 8
    I think we need to try to not only recreate concepts but also improve them where possible. So I will be changing things here and there.


    My personal goal with this project is to learn and get used to texture painting in Blender. I tried different programs, but texture painting in Blender, so far, satisfies me the most.
  • TangDao
    Offline / Send Message
    TangDao polycounter lvl 6
    @momomoonscar Oh yeah there's a lip on that cavity.Thanks :) 
  • jakemoyo
    Offline / Send Message
    jakemoyo polycounter lvl 4
    model@Ashervisalis Thanks for the feedback! Yeah I initially used a Cylinder as the base primitive for the blockout and then realized it wasn't really a cylinder, OR  a cube shape. It took me a  couple of tries to really nail down what the shape was comprised of. Your blockout is looking good. I might say that the panel parts of your satellite dish seem a bit too long. But maybe thats just my perception since they arent as folded up as in the reference.

    @momomoonscar Yeah I plan on modeling around them when the time comes, in the concept the seem to intersect with the dish itself. And i wasn't really tripping about that kind of detail in the blockout. Thank you for the feedback

    @polypassion Youre killing it dude! Are you modeling in Maya and texturing in Blender?

    Heres my High Poly progress so far. I've never done anything like this before so you can kind of see my "skill" level increase with each individual mesh from top to bottom Haha. Please be brutal with me especially about topology/edgeflow I'm a clown when it comes to that.


  • alytlebird
    Offline / Send Message
    alytlebird interpolator
    Been working on sorting out some kinks with baking normal maps, but that's all sorted and things are looking better now. Did a quick and dirty texturing job, planning on bringing the whole blockout scene into Unreal ASAP so I can get the lighting sorted out, and have a better setup for bringing future assets into the engine.


    Priority after that is to get the rest of the structural assets done, then move on to the fabric pieces so I can knock them out in Marvelous.
  • TripletDad
    Have been a long time lurker, and figure it's time to start trying to post some work to get some critique and hints on how i can improve.  Struggling with the basic's still so no chance this will ever make it into a game engine, but hopefully with be able to see some improvements.


  • momomoonscar
    Offline / Send Message
    momomoonscar triangle
    Hello all! Here is what I have so far, since the forms are relatively simple I moved straight into cleaning up the model. Probably going to start texturing soon since that seems to be the hardest part. 

    I was wondering if there was a way to reduce the polys I'm using on the vines. I just extruded a cylinder a bunch of times, but I feel like that's not the proper way to do it. 

    Also, do you think I should keep the mouth a separate polygon or should I extrude it?

    I really want to improve so please be as harsh as possible!
  • jakemoyo
    Offline / Send Message
    jakemoyo polycounter lvl 4
    @momomoonscar
     
    As far as reducing the poly count on those vines you could probably do just one of the top ones as actual 3D and then the rest as just part of the texture. I've seen that done before. With just one itd probably sell as all 3D.
  • TangDao
    Offline / Send Message
    TangDao polycounter lvl 6
    @momomoonscarOn the concept it looks like the head has a smooth transition to the mouth so I'd cut  in the geometry you have or extrude it and it will shade better.For things like the vines I usually start with a spline and profile as you can change the number of segments to balance polycount and smoothness.
  • BlakeBiehle
    Offline / Send Message
    BlakeBiehle polycounter lvl 2
    Hey everyone! First time doing one of these challenges. Due to timing, I've decided to do the hand painted prop. Here's what I got so far. Just about done with the low poly. All I have to do now is polish it up a bit and I'll be good to make the high poly and bake it. I guess I mostly want an opinion on my proportions and if my face looks close enough to the reference? That was certainly the most challenging part for me. 
  • BlakeBiehle
    Offline / Send Message
    BlakeBiehle polycounter lvl 2
    @momomoonscar
    What I did with the mouth is make it a separate object and configured the face in a way that it flowed well with the mouth, if that makes sense haha. I would find it hard to extrude from the mouth to make such a pristine shape! Hope this helps. 
  • LowerclassRiot
    Offline / Send Message
    LowerclassRiot triangle
    Here is what i have so far decided to go with the  statue type figure.

  • alytlebird
    Offline / Send Message
    alytlebird interpolator


    Finally brought the blockout into Unreal (along with some finished assets like the vent and wall/ceiling lights), going to fiddle with the lighting a lot going forward. Unreal lighting is always an area I struggle with, just so many variables and things to tweak, and lightmaps are a pain... Anyone have a magic secret for Unreal lighting?
  • prixster
    Offline / Send Message
    prixster polycounter lvl 6
    @alytlebird                              
    Few tips though: Find a decent HDRI map and baked the lights accordingly. You can tweak the basic cubemap in UE4. You can use God Rays near the left window and right door by keeping a light source on the North-West side. You can try it, if it looks good you can move forward or else you have to add some external lighting sources outside the room. It's just trial and error. :)
    Good luck!
  • Zedblade
    Offline / Send Message
    Zedblade polycounter lvl 10
    Here is what i have so far decided to go with the  statue type figure.

    Are you even trying to match it's proportions or just doing whatever? I'm sorry but this is nowhere near the concept and if I were you Id start over from scratch. Worry about the big shapes and their relative size to each other. 
  • Ashervisalis
    Offline / Send Message
    Ashervisalis grand marshal polycounter
    So guys, apparently Maya's Viewport 2.0 has anti-aliasing settings, which makes the modeling process much prettier. I wish I had known this ages ago. This makes Window's Snipping Tool look 10x greater. Anyways, here's my progress. I'm having loads of fun designing the parts of the dish which aren't visible in the concept.

134
Sign In or Register to comment.