Ryu - deconstruction of construction
polycounter lvl 14
Current state:

----------------------------------------------------------------------------------------------------------------------------------------
Hi,
I'm trying to...
Even though I'm not one of THE guys I want to share my process. Mostly posting one pic and asking 'hey guuyyzzz what should I fix?' doesn't work. It doesn't work for both sides. I won't get and help (which is totally understandable) and others won't get anything out of it. SInce it's a forum I belive that part is important.
So the idea is that this will be an in-depth WIP thread. I will analyse my own process. Its flaws and its perks. Hopefully you will be able to help me or learn something new. I'm far from being professional so don't be underwhelmed") Also take in consideration I have already spent a bit of time on this project and for now I will be describing things from the past. I will let you know when this thread will catch up with where I'm at currently.
Also take in consideration I have already spent a bit of time on this project and for now I will be describing things from the past. I will let you know when this thread will catch up with where I'm at currently.
So the idea is that this will be an in-depth WIP thread. I will analyse my own process. Its flaws and its perks. Hopefully you will be able to help me or learn something new. I'm far from being professional so don't be underwhelmed
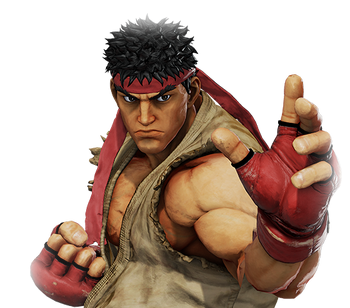
Ryu - Street Fighter V
Ok so the character I chose is Ryu from Street Fighter. Why this character:


- He is pretty simple. There is not a lot of accessories or clothes on him. I do find sculpting males easier - that might be because of the rougher form. You have to skilfully hide form under smooth female skin.
- He is a good character to practice anatomy. Clothes won't cover his muscles.
- His pose is important to his character - I want to render him properly (meaning dynamically, with a strong cool factor) posed.
- It's an achieveable goal...
THE GOAL:
- Make a skinned/rigged character with all of the typical for game developement maps.
- Don't go for character recreation, rather interpretation.
- Render it in Marmoset Toolbag 3 in a cool pose.
And I opened Zbrush too early...
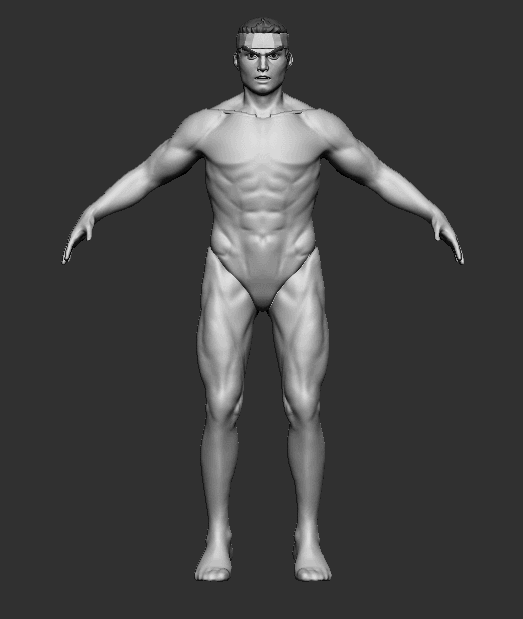
I opened Zbrush thinking only about the things I described above... Not a lot. No references <- big bummer. Oh well lets see how I did.I started as I always do. I blocked out the shapes using dynamesh. The earliest file I have in this project is a bit further than I would like to but I decided to make this thread too late to do anything about it. That's the result of the first sprint:
It's a start... The anatomy problems are numerous but I haven't spent enough time on it to be feel comfortable tearing it aparat now. For now I will focus on the workflow. First of all I often split the body into chunks:
I'm a bit suprised I didn't split the arms. I find working with the butt (...) a bit tiresome when the legs are connected to the torso. Also if you look at the picture showing his back you will see I try to recreate the form of the pelvic bone with legs mesh. At this point it's failing at its job but that's what I'm going for.
I also split the face a bit:

I don't think there is anything particularly suprising in having eyes, teeth, brows or hair as a separate mesh. I do however keep eyelids as separate meshes for a pretty long time. It helps with the eye socket - the skin overlap coming from the brow and laying on the eyelid is a bit tricky for me.
Another thing I did, which I usually don't do, is adding some bones as a subtools...:
Those were suppose to help me with bony landmarks. I think appending bones meshes isn't the best solution. First of all I have only added plevic bone and the shoulder girdle. That's not enough. I either should have go full ecorche - build the mass on a full skeleton or just mark all of the bony landmarks another way. Anyway I ignored the bony landmarks from this point on. I returned to it later, and I will write about it. That was a bad call. BONY LANDMARKS ARE IMPORTANT. That's something I knew/know. Yet I disregarded it. Proportions are crucial and bony landmarks are a great tool to make them better. Bad me.
Another bad call was doing this:

I saw someone sculpting character with the feet being posed like so. It makes for a more dynamic default pose if you do it correctly. I tried to do the same but I didn't actually wanted or needed it. My rig I use in Blender doesn't conform to this. I don't think it should conform to this. For my defense It was more of an exploration phase but I have kept this feet for too long. It wasn't a way to good for this specific project. Making feet firmly planted on the ground was a way to go.
Lessons:
- REFERENCES - why did I skip this stage? I know references are important yet I didn't prepare. I google some Ryu photos and never saved or analysed any. I should have gathered some style references too. Gather references!
- BONY LANDMARKS - those are a great helpers when it comes to working out the proportions. Even though Ryu's proportions are cartoonish, at this stage I should have made bony landmarks more apparent -> helpful.
- DEFAULT POSE - that's not that big of a deal because at the early stage you can fool around a bit. If you want to rig a character, a default/sculpt pose might be of importance. Just think about it a try not to make your life harder.
So for now that will be all... it's too hot to spend another minute in front of the computer... huh.
Oh also... a teaser where the project is now:

Replies
Hair
When it will be done...?
I the meantime I thought about the process itself. Even though I have started doing CG long time ago I have never worked as a full time cg artist. I always struggled to build a portfolio. Studying to become an engineer and working as one always got in the way. ATM I'm enjoying a little break so I would like to finish some pieces I can put in the portfolio.Eyes
Some time ago I tried to make a realistic eye. Here you can see the high poly:
Here are some screenshots. I worked on the legs a bit but since they will be hidden I don't prioritize them. Screenshots from Zbrush show the anatomy way clearer. It gets lost in Toolbag (partially because of the subsurface scattering - I might exaggerate some lines so it doesn't get lost that much).
Always love to see some streetfighter character being done.
What I find at the moment is while the character is dressed like Ryu, he doesn't currently look like him. Not sure if you are going for something less stylised but your sculpt currently doesn't have a ton of personnality or much of the characteristic that makes ryu recognizable aside from his clothing.
Anyway, Looking forward to see where you bring this
Eyelashes
Had to check if I'm making a progress... The brows might need the same treatment as lashes.
How do you approach this problem, guys and gals? Just sculpt folds that make sense in neutral until they look good?
I think I made a big mistake though. I never defined what style I'm going for. It's going more and more into realistic style and I'm not that happy with that. I don't think it will change much though. I want to finish him... but note to self GATHER STYLE REFERENCES.