Home Technical Talk

im reworking on a dumpster/rubbish bin I made in 2016, this time with better geometry for HP stuff..

polycounter lvl 7
Offline / Send Message
oraeles77 polycounter lvl 7
i made this object in 2016, for use as scenery in Unity. I decdied this time to make better geometry, and do a lot of more high poly detail so it could be used for baking etc.
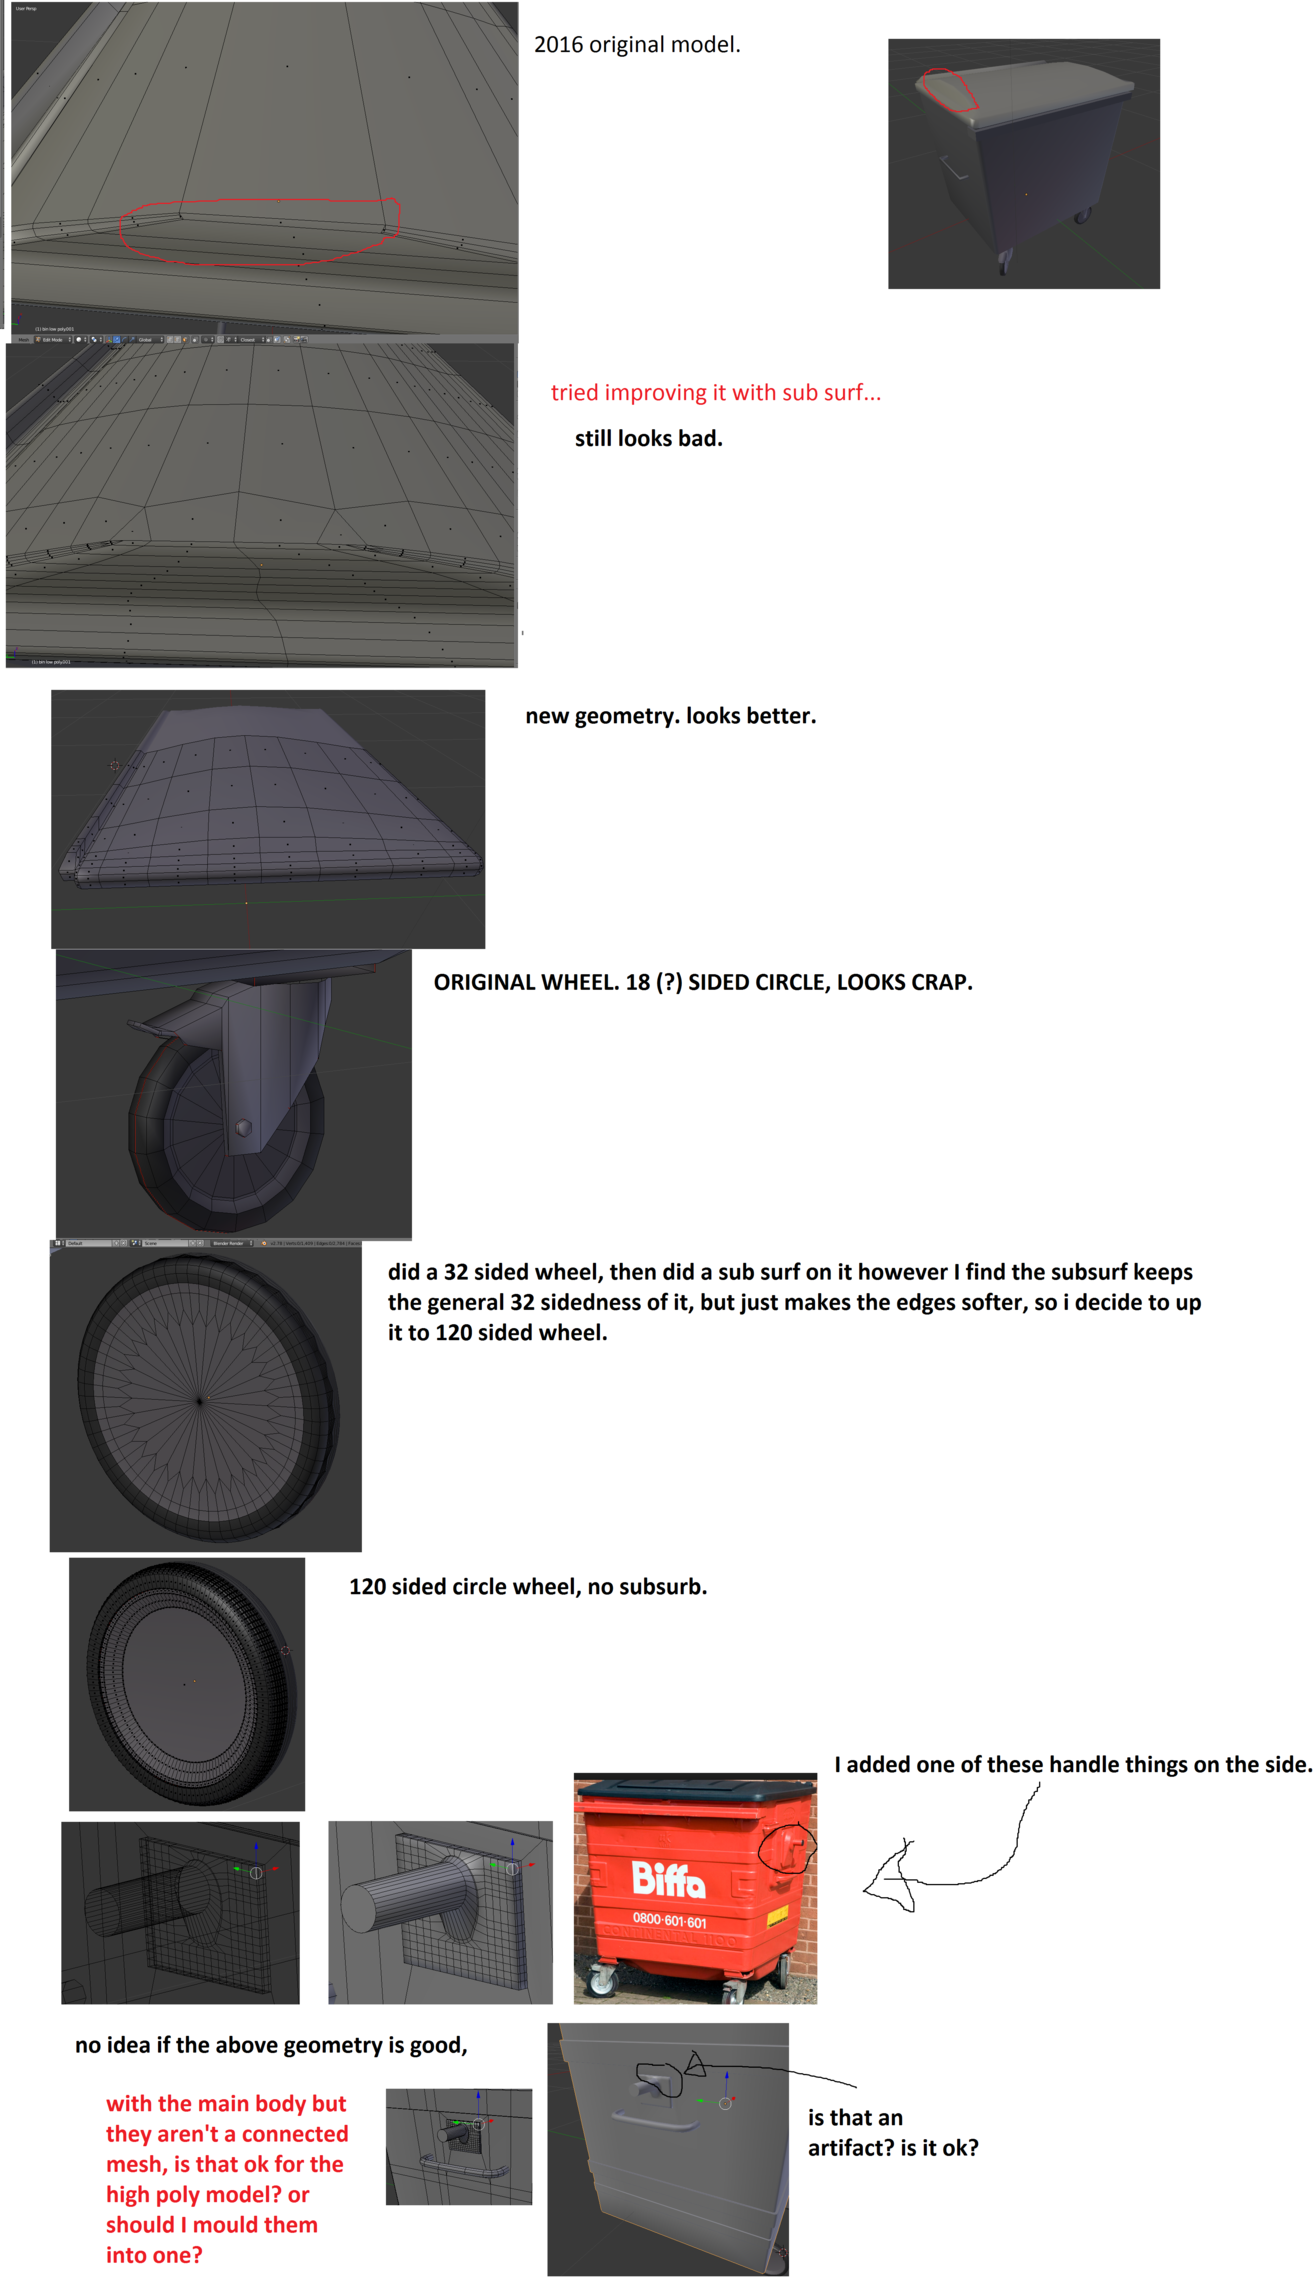


so anyway, my plan is make it all, unwrap it, then shove it in Substance Painter, (something I rarely use) paint the textures, then use Topogun to make a low poly version which I can bake the diffuse etc textures to? is that how it works? did I miss anything?

Replies

  • musashidan
    Options
    Offline / Send Message
    musashidan high dynamic range
    Retopologising the sub-d mesh is a redundant step. The low-poly cage mesh that you are sub-dividing will be your low. You can just make a few necessary changes, if needed, without disturbing the silhouette. The 120 sided wheel is also unnecessary. Just add enough segments that the silhouette looks good for the low and then sub-d that for the high.

    If the handle is molded in real life then blend it in on your model. Also, if you're trying to match the ref then the handle is completely different to what you've modeled.
  • oraeles77
    Options
    Offline / Send Message
    oraeles77 polycounter lvl 7

    If the handle is molded in real life then blend it in on your model. Also, if you're trying to match the ref then the handle is completely different to what you've modeled.


    nah, this is just one exmaple of the sort of rubbish bin im copying, so I should combine the handle mesh to the main body?
  • Kanni3d
    Options
    Offline / Send Message
    Kanni3d ngon master
    oraeles77 said:

    If the handle is molded in real life then blend it in on your model. Also, if you're trying to match the ref then the handle is completely different to what you've modeled.


    nah, this is just one exmaple of the sort of rubbish bin im copying, so I should combine the handle mesh to the main body?
    Combine it not only to match the ref, but to challenge yourself modeling wise :)
  • poopipe
    Options
    Offline / Send Message
    poopipe grand marshal polycounter
    A.  Don't paint the high res,  paint the final model. UVing your high res model is a waste of time unless you have very specific reasons - which you don't because you're asking these questions. 

    B. Don't fanny about merging high res models together unless it makes your bake look better.  Use every dirty hack at your disposal to make building the high res easier and quicker - it's a means to an end if you're making a game res mesh. 

    C.  Mesh density is determined by how big it's supposed to be on screen. You test this by blocking the low res out and looking at it (before you put work into the UVs)  - for modern hardware you want enough segments so you can't see facets, but no more than that. 


  • musashidan
    Options
    Offline / Send Message
    musashidan high dynamic range
    Like poopipe says you can hack the blending of the handle by floating it over the bin. If you flare out the open edgeloop at the base of the handle you can trick the baker into baking what it perceives is a continuous surface normal. Like a floater.

  • SonicBlue
    Options
    Offline / Send Message
    SonicBlue polycounter lvl 10
    You won't get much details out of a bake if you only add subdivisions without considering how the object will look after you subdivide it. High poly doesn't necessarily mean using a high amount of edges to represent and object, it only needs the right amount of edges to keep the shape when subdivided.

    As already said in this thread, the 18 sided wheel was already good, with the right supporting edge loops, it will subdivide just fine, and you can use the same model as a game asset, removing the excessive edge loop before backing the details.

    I took a look at the "Biffa" garbage bin, the handle you are trying to reproduce doesn't look anything like what you made, for a good Hard Surface artist, attention to details and a certain degree of precision, is very important.

    Making the basic shape is quite easy


    Then, you just need to add some supporting edges, move other edges around to optimize the edge flow, and you're done.


    You can find tutorials on Hard Surface modeling on Youtube, you don't necessarily need to search for Blender specific tutorials, the concepts are the same for every software.
  • oraeles77
    Options
    Offline / Send Message
    oraeles77 polycounter lvl 7
    Kanni3d said:
    oraeles77 said:

    If the handle is molded in real life then blend it in on your model. Also, if you're trying to match the ref then the handle is completely different to what you've modeled.


    nah, this is just one exmaple of the sort of rubbish bin im copying, so I should combine the handle mesh to the main body?
    Combine it not only to match the ref, but to challenge yourself modeling wise :)
    all in good time, some of the references Im using the brand's name is in relief on the bin, when I get better at scultping I will take that on, currently I can only commit to about 2 hours of 3d study a day.
  • oraeles77
    Options
    Offline / Send Message
    oraeles77 polycounter lvl 7
    poopipe said:


    B. Don't fanny about merging high res models together unless it makes your bake look better.  Use every dirty hack at your disposal to make building the high res easier and quicker - it's a means to an end if you're making a game res mesh. 


    regarding not merging stuff, a few times I've tried this in the past shit never worked with not correctly merged meshes/objects.

    for example, I'd make a flat poly, then I'd make some rivets, seperate objects and lay them over the surface, I'd make a second poly, low poly this time, UV map it, attempt to bake it, and I'd find the rivets dont show, perhaps on the normal you'd see pixel scars where the two objects intersects... if that makes sense, after that and that confusing answers I got on other blender forums, I assumed the only way would be to manually sculpt each one as using things like array modiffiers didnt work.

    I'd do this stuff on big maps too 4k sized ones so I can't work out why it would detect the rivets, the people on other forums kept saying I had to boolean intersect the bits and fill in the missing bits (is there a correct word to describe that?)
  • oraeles77
    Options
    Offline / Send Message
    oraeles77 polycounter lvl 7
    SonicBlue said:
    You won't get much details out of a bake if you only add subdivisions without considering how the object will look after you subdivide it. High poly doesn't necessarily mean using a high amount of edges to represent and object, it only needs the right amount of edges to keep the shape when subdivided.

    As already said in this thread, the 18 sided wheel was already good, with the right supporting edge loops, it will subdivide just fine, and you can use the same model as a game asset, removing the excessive edge loop before backing the details.

    I took a look at the "Biffa" garbage bin, the handle you are trying to reproduce doesn't look anything like what you made, for a good Hard Surface artist, attention to details and a certain degree of precision, is very important.

    Making the basic shape is quite easy


    Then, you just need to add some supporting edges, move other edges around to optimize the edge flow, and you're done.


    You can find tutorials on Hard Surface modeling on Youtube, you don't necessarily need to search for Blender specific tutorials, the concepts are the same for every software.


    thanks for sharing this here, for the last year I have been distracted away from my 3d work due to other commitments, and currently Im stuck with only being able to do 2 hours a day and Im trying to make a decent high poly object, a little more out of my comfort zone which could be used with Substance Painter, which is something I haven't used despite having it on my computer for a long time, so for this project I am honestly not fussed about the smaller details of the bin, I just want something with some interesting bumps I cant play about in substance painter with and learn how it does high poly/low poly stuff.

    i promise I will come back to this model a third time and do the stuff you have shown me as well as more details like the lock on the lid or the bolts at the back of the lid etc.

    anyway I guess now I need to make a low poly model in Topogun.
  • musashidan
    Options
    Offline / Send Message
    musashidan high dynamic range
    oraeles77 said:


    anyway I guess now I need to make a low poly model in Topogun.
    Did you not read my first post? Why are you wasting time retopologising the low-poly when you already have it created?
  • poopipe
    Options
    Offline / Send Message
    poopipe grand marshal polycounter
    oraeles77 said:
    poopipe said:


    B. Don't fanny about merging high res models together unless it makes your bake look better.  Use every dirty hack at your disposal to make building the high res easier and quicker - it's a means to an end if you're making a game res mesh. 


    regarding not merging stuff, a few times I've tried this in the past shit never worked with not correctly merged meshes/objects.

    for example, I'd make a flat poly, then I'd make some rivets, seperate objects and lay them over the surface, I'd make a second poly, low poly this time, UV map it, attempt to bake it, and I'd find the rivets dont show, perhaps on the normal you'd see pixel scars where the two objects intersects... if that makes sense, after that and that confusing answers I got on other blender forums, I assumed the only way would be to manually sculpt each one as using things like array modiffiers didnt work.

    I'd do this stuff on big maps too 4k sized ones so I can't work out why it would detect the rivets, the people on other forums kept saying I had to boolean intersect the bits and fill in the missing bits (is there a correct word to describe that?)
    That's just down to not setting the right projection distances. There's plenty of material online about how to work with floaters so it'll be easy to resolve.


    WRT things like text/screwheads/panel gaps - I recommend just bashing them into a height map in Painter, it's just not worth the trouble modelling them and then dealing with skewing etc in your bakes. 
  • oraeles77
    Options
    Offline / Send Message
    oraeles77 polycounter lvl 7
    oraeles77 said:


    anyway I guess now I need to make a low poly model in Topogun.
    Did you not read my first post? Why are you wasting time retopologising the low-poly when you already have it created?

    oraeles77 said:


    anyway I guess now I need to make a low poly model in Topogun.
    Did you not read my first post? Why are you wasting time retopologising the low-poly when you already have it created?


    because its been so long i'd just prefer to start again and refresh everything.
  • oraeles77
    Options
    Offline / Send Message
    oraeles77 polycounter lvl 7
    poopipe said:
    oraeles77 said:
    poopipe said:


    B. Don't fanny about merging high res models together unless it makes your bake look better.  Use every dirty hack at your disposal to make building the high res easier and quicker - it's a means to an end if you're making a game res mesh. 


    regarding not merging stuff, a few times I've tried this in the past shit never worked with not correctly merged meshes/objects.

    for example, I'd make a flat poly, then I'd make some rivets, seperate objects and lay them over the surface, I'd make a second poly, low poly this time, UV map it, attempt to bake it, and I'd find the rivets dont show, perhaps on the normal you'd see pixel scars where the two objects intersects... if that makes sense, after that and that confusing answers I got on other blender forums, I assumed the only way would be to manually sculpt each one as using things like array modiffiers didnt work.

    I'd do this stuff on big maps too 4k sized ones so I can't work out why it would detect the rivets, the people on other forums kept saying I had to boolean intersect the bits and fill in the missing bits (is there a correct word to describe that?)
    That's just down to not setting the right projection distances. There's plenty of material online about how to work with floaters so it'll be easy to resolve.


    WRT things like text/screwheads/panel gaps - I recommend just bashing them into a height map in Painter, it's just not worth the trouble modelling them and then dealing with skewing etc in your bakes. 
    right projection distances? I dont even understand what those words mean sorry.

  • poopipe
    Options
    Offline / Send Message
    poopipe grand marshal polycounter
    Projection distance is how far out along the normals of the low poly mesh the Baker searches for things to bake.  If you use a cage it'll search up to where the cage is,  if not it will usually use a set distance.

    Good settings to start with  for substance bakes are 0.01 forward and 0.5 back (in  Bounding box space) .  If you're using floaters you'll want to turn those up a bit. 
Sign In or Register to comment.