Updated thread : Critique topology designed for animation

grand marshal polycounter
****UPDATE: The original question has been answered, but now that the lo-poly mesh is 90% complete, I thought I shouldn't start another thread just to ask for critiques when this thread is already so similar. So, if you have the time and good nature, I'd appreciate any advice regarding the topology.
This is my first game character, and I've tried to design it as if it could be used as a hero character in a third person shooter game. We probably won't be doing cutscenes or anything like that, but I still want to treat it as such for my own training.
****
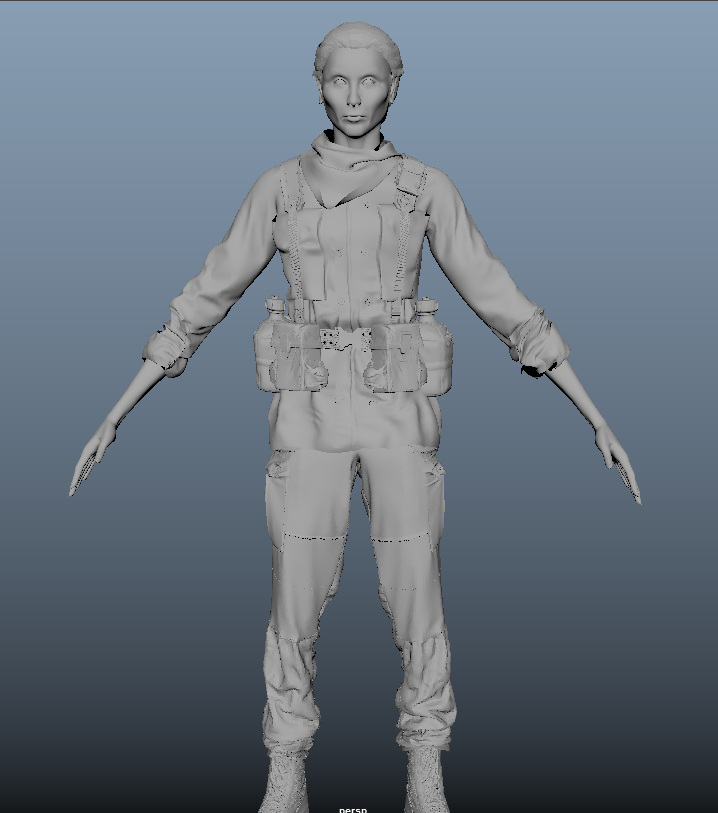
Below is my model to be retopo'd so it can go into Unity.
I have seen a few ways to do this, but as I am going over my model and also thinking about the UV's and map baking, I am uncertain if I should separate the model into pieces or not.
For instance, getting down into the area between the bandana and neck with quad draw will be difficult. Also, if I want to explode the mesh for normal map baking, I must have it in different pieces. But then, it needs to be one complete mesh for animation, right? So maybe after the map baking I should go back and weld all the edges?
Thanks in advance for any clarification.
This is my first game character, and I've tried to design it as if it could be used as a hero character in a third person shooter game. We probably won't be doing cutscenes or anything like that, but I still want to treat it as such for my own training.
****
Below is my model to be retopo'd so it can go into Unity.
I have seen a few ways to do this, but as I am going over my model and also thinking about the UV's and map baking, I am uncertain if I should separate the model into pieces or not.
For instance, getting down into the area between the bandana and neck with quad draw will be difficult. Also, if I want to explode the mesh for normal map baking, I must have it in different pieces. But then, it needs to be one complete mesh for animation, right? So maybe after the map baking I should go back and weld all the edges?
Thanks in advance for any clarification.
Replies
or is it for mobile and really lowpoly.?
It is for a pc game prototype, and this will be a playable 3rd person character. So I am going to try for 5-10k polygons for the retopo'd model. I hope that should be enough.
If those objects dont need to animate, you can optimize as aggressively as possible while aiming for the quality bar that you guys have set.
Which could mean a very low poly proxy mesh that is water tight. A watertight mesh, combining everything together and getting rid of polygons the player will never see, will result in less polygons, not more.
If it is supposed to be a high quality asset that you can come up to very close, you could retopo everything to be separate meshes, but a single asset. This way if your rigger needs to, he or she can easily add controls to those parts.
If it is a cinematic assets that needs to be animated, for example the strap can come loose or the ring can move around, then you definitely want it to be separate meshes.
Basically talk with your teammates and figure out what you need to be able to do with the mesh.
From there use your best judgement on how to approach it.
If you are not sure about something... and you have time... Just do it. Practice, test, see what works, see what doesn't.
While asking for advice is fine, you will learn best by just doing it and getting to understand it yourself.
Not judging here, but is this your retop you're showing? That could be cleaned up and made much more efficient for animation.
Ok, that makes sense. If you haven't noticed, I'm very new to this. In fact, this is my first game model so I'm kind of just winging it here.
But if even a thousand different meshes are combined in a group, they all transform/translate together. So the same should go for rigging? That is the problem, I don't know anything about rigging yet. The guy I am giving this to for the purpose uses blender, but I think these basic functions should be the same with that program.
But the lower body and upper body are separate meshes. The pants ride high and the top drapes low, and I don't really want to fuss with bring the loop from the bottom of the jacket all the way up to the top of the pants and tweak every vertex to make sure there is no clipping. So long as these are combined in a group, that shouldn't matter though?
Also, note the large breast pockets, which stuck out enough on the high res model that they effected the silhouette. Adding that extrusion to the low poly might be problematic? Same for the cargo pockets on the pants.
Otherwise, any critiques about the topology in general?
Inside the jacket. Highlight is the pants. Probably hard to see, but there is a good length of overlap between the two.
So the rigger could go in, place a joint, and paint the weights.
So even if the mesh is combined, they will be able to animate them separately.
That being said the weighting 'mask' doesnt need to be completely black and white.
In most cases for organic skinning it will have a falloff, which allows knees and elbows and what not to bend smoothly.
In this example I just wanted to show that a separate mesh, part of the same object can be animated separately.
Pretty soon I need to take a little time and get familiar with rigging a little, but this definitely eases my worries for now.
So really, all that time spent connecting hidden parts just isn't necessary because the rigger can more or less paint which vertices will be attached to a joint?
For example the jacket/pants that you have intersecting right now, if the weight painting isnt done correctly, they could 'break' during animation.
Its not a big deal if the intersecting parts are midway on a bone, for example the boots/pants area, if they were intersecting it would not be a huge deal,
However you always want to be carefull how you go about it.
Objects that are 'extruded' out should not be a problem, but it depends on placement really and how many bones affect a certain area.
In Maya there is a quick rig tool. Its usefull to quickly check how something will deform. (it can be a 1 click solution for quick testing.)
As for topology, think about where creases will appear when something bends, and place edgeloops there.
The obvious areas: elbows, knees, wrists, ankle, neck, shoulders, etc.
http://wiki.polycount.com/wiki/BodyTopology
http://wiki.polycount.com/wiki/FaceTopology
http://wiki.polycount.com/wiki/Limb_Topology
http://wiki.polycount.com/wiki/ShoulderTopology
Wow, what a fantastic tool.
Thanks so much, this really gives me the power to answer this subject on my own. Well, somewhat, haha.
But now I can see that in a sprinting pose (just did this real quick, don't judge me), that the elbows are pinching in too much. But even with the quick rig, the pants clipping through the jacket doesn't look like a problem, though I'll need to see how it works in a standing>prone animation. But hey, that's the animators job!
By default it is set to linear iirc, try setting it to dual quaternion, it should give you better results.
The axis on your mesh seems to be rotated weirdly.
Try freezing your lowpoly first so the transforms are reset.