Sketchbook: d4psa

polycounter lvl 2
Hello, and thanks for checking out my sketchbook!
I'm Tapio Terävä, and I'm an aspiring 3D artist from Finland. I'm about to graduate from the Kajaani University of Applied Sciences, after studying Game Graphics there for almost 5 years (not full time). I've just finished my thesis, called "Workflows for Creating 3D Game Characters", and it's published online - you can see links to it in my signature.
Currently I'm working on creating more content for my portfolio, so I can start applying for game companies. I'm hoping to be able to start working in one as soon as I finish my non-military service at Oulu Game LAB, at the end of this year.
I'm not especially looking for critique, but you're welcome to give it, as long as it stays constructive. Since most of the stuff I'll be posting here will be very much work-in-progress, I'd prefer if the critique was more along the lines of suggesting improvements and giving tips, rather than pointing out my mistakes and telling me what to do, or not to do. Maybe I'm sensitive like that, but hey, aren't we all. If I'm especially looking for critique or advice on a specific piece, I'll make it a separate thread on another forum category.
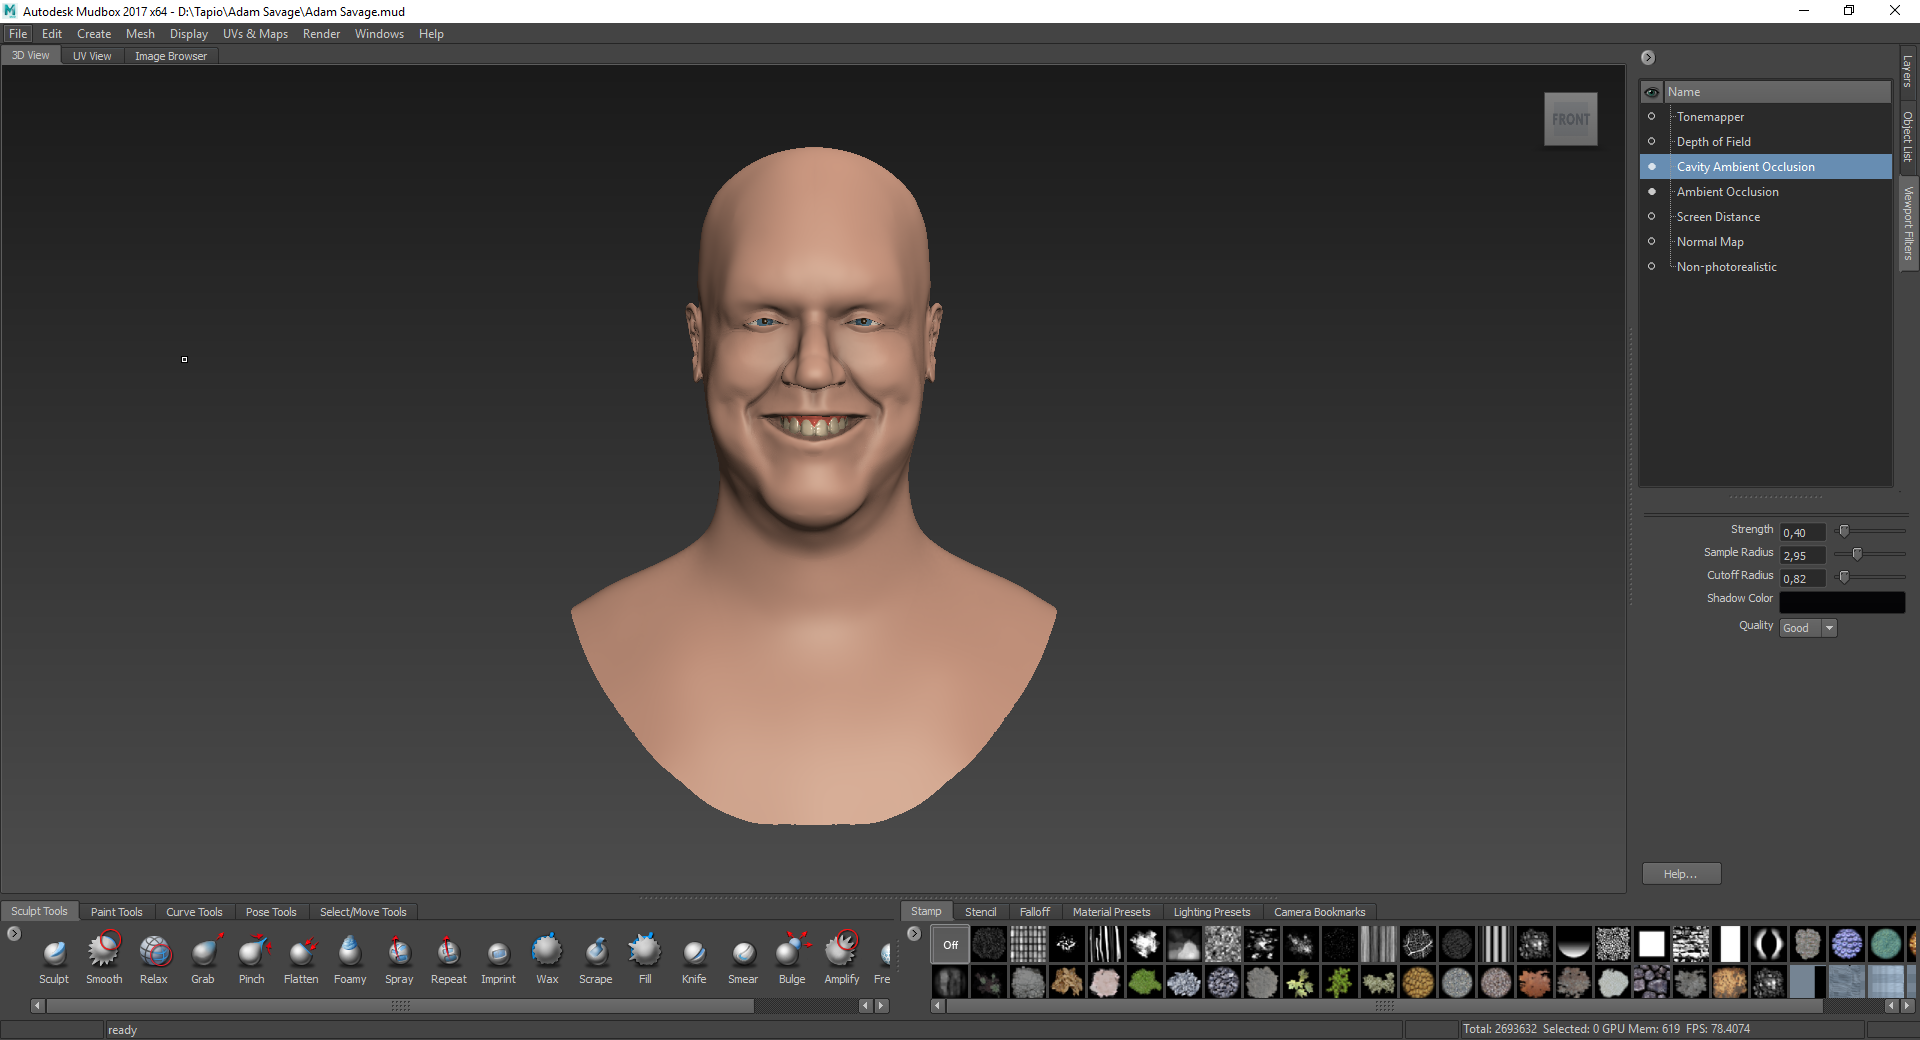
At the moment I'm working on a likeness study of Adam Savage using Mudbox, which I started on this Monday (13.6.2017), and have worked on for roughly a bit over 20 hours. Later I'll be continuing on a minotaur character I started a while back in ZBrush, as a case study for my thesis, but in the end didn't have the time to finish it before the deadline.
Here are some progression screenshots of the Adam Savage likeness study:

This is the state it is currently in. The detailing is currently in secondary forms, and I'll start working on tertiary forms (wrinkles etc.) after I've sculpted the hair and beard. I'm working mostly straight out of reference, looking at forms, proportions, and silhouette, rather than thinking too much about anatomy. Originally I wanted to work completely by eyeballing it, but at some point I was so far off of the reference, I caved in and took the reference images directly into Mudbox as stencils, and tried to align the model with them as best as I could - not an easy task by the way. The hair at this point is just a temporary one, I'm going to redo it completely, just wanted to see what he looks like if he's not bald. Same goes for glasses, eyes, and teeth. The final render will not be realistic, but instead I was thinking of making a clay/marble render.
Some earlier progression screenshots, in chronological order:


I'm Tapio Terävä, and I'm an aspiring 3D artist from Finland. I'm about to graduate from the Kajaani University of Applied Sciences, after studying Game Graphics there for almost 5 years (not full time). I've just finished my thesis, called "Workflows for Creating 3D Game Characters", and it's published online - you can see links to it in my signature.
Currently I'm working on creating more content for my portfolio, so I can start applying for game companies. I'm hoping to be able to start working in one as soon as I finish my non-military service at Oulu Game LAB, at the end of this year.
I'm not especially looking for critique, but you're welcome to give it, as long as it stays constructive. Since most of the stuff I'll be posting here will be very much work-in-progress, I'd prefer if the critique was more along the lines of suggesting improvements and giving tips, rather than pointing out my mistakes and telling me what to do, or not to do. Maybe I'm sensitive like that, but hey, aren't we all. If I'm especially looking for critique or advice on a specific piece, I'll make it a separate thread on another forum category.
At the moment I'm working on a likeness study of Adam Savage using Mudbox, which I started on this Monday (13.6.2017), and have worked on for roughly a bit over 20 hours. Later I'll be continuing on a minotaur character I started a while back in ZBrush, as a case study for my thesis, but in the end didn't have the time to finish it before the deadline.
Here are some progression screenshots of the Adam Savage likeness study:
This is the state it is currently in. The detailing is currently in secondary forms, and I'll start working on tertiary forms (wrinkles etc.) after I've sculpted the hair and beard. I'm working mostly straight out of reference, looking at forms, proportions, and silhouette, rather than thinking too much about anatomy. Originally I wanted to work completely by eyeballing it, but at some point I was so far off of the reference, I caved in and took the reference images directly into Mudbox as stencils, and tried to align the model with them as best as I could - not an easy task by the way. The hair at this point is just a temporary one, I'm going to redo it completely, just wanted to see what he looks like if he's not bald. Same goes for glasses, eyes, and teeth. The final render will not be realistic, but instead I was thinking of making a clay/marble render.
Some earlier progression screenshots, in chronological order:
Replies
I got the hair done, then made a white marble-ish material and added some better lighting in Mudbox, to get an idea of how the final render would look like, and then tweaked the facial forms some more, since I got some better reference from a recent Youtube video of Adam making a tape dispenser on Tested. I still haven't added the beard and moustache, or moved on to the finer details like small wrinkles.
Here are some progression screenshots, again in chronological order:
I added the beard, which I will need to re-do, it's way too crude and contrast-y, and I made some significant changes to the overall shape of the head, especially the jaw, which I made longer. I also sculpted the eyeballs, which now have the pupil, iris and a small glint sculpted into the geometry, since I plan on making this look more like a statue than a realistic rendering. And I finally started adding some tertiary details to the face, like the wrinkles in the eyes.
I think he's starting to look like Adam more and more, although he kind of looks angry now instead of happy. Might be because the Cavity AO effect emphasizes the small wrinkles, especially those around the eyes and on the forehead, but maybe the brow ridges are also a bit too aggressive looking...
Again, some progression shots, in chronological order:
I tweaked a lot of stuff, and added the wrinkles to the forehead. Also made the cavity AO effect less strong, so now he doesn't look quite as angry anymore. I showed the sculpt to a few people during the weekend, some of them recognized him straight away, some didn't. One comment from a couple of people was that his cheeks are a bit too round/fat - may have to tweak them a little.
I made the forehead wrinkles on a separate sculpt layer, so I could sculpt them really strong, and then dial the effect down with the "opacity" slider. The wrinkles are currently at 9% - thing is, Adam can have a completely smooth forehead when just casually smiling, but the wrinkles are kind of an essential part of his character and personality - so I didn't want him to have an extreme expression, but more of a calm smile, but I also wanted to include the wrinkles in to give the sculpt more personality and "Adam-ness". I also wanted there to be somewhat of a "memory wrinkle" effect, as in thin wrinkle lines that have been permanently stuck on the skin.
More progression shots:
I reworked the anatomy of the face a bit, especially the jaw and cheeks - previously they were too puffy and uniformly round, now there's a bit more definition to them. A friend of mine also suggested that I should make the eyes bigger, so I completely re-did them - Scaled the eyeballs up significantly, and spaced them about one eye-width apart, after which I re-sculpted the eye sockets and the eyelids, as well as the surrounding cheeks and nose, etc. There were some other small adjustments that I've done, but can't remember all of them. I still haven't added the eyebrows, and haven't re-done the beard or the teeth.
I've noticed Mudbox tends to create these tiny irregularities to the sculpt when switching between subdivision levels, or when I save the file. They almost look like skin pores, but not quite. But I definitely did not sculpt them myself, and it really bugs me, because I'll probably need to do a cleaning pass to the whole model at some point to get rid of them... Has anyone else noticed anything similar when sculpting in Mudbox? What causes it, and can it be prevented?
Anyway, here's some progression shots, again in chronological order:
Sculpting the beard took me way too long, probably not the best idea to sculpt each individual hair by hand... but then again, I kind of wanted the beard to be on the same detail level as the eyebrows, and once I had started, I didn't really want to scrap all the progress I'd done up until that point... I had to re-sculpt a lot of areas several times, because the hairs were too small or too big, or were going to the wrong direction. At one point I also lost about 5 hours of work because the file got corrupted - happily Google Drive has a rudimentary version history, so I could continue from an older version.
The beard is sculpted on several sculpt layers, with the individual hairs at the top, and some subtle medium details underneath them to break up the shape. I sculpted the hairs first, and then the underlying structure. In the future, If I ever end up sculpting a semi-realistic, yet stylized beard again, I definitely need to figure out a better way to do it.
Again, a couple of progression shots below:
Again, it took way too long, mostly because Mudbox constantly corrupted the base mesh of the teeth, and generally just forgot how to work properly, which resulted in me troubleshooting, importing and exporting meshes, and resetting the settings by deleting the Mudbox 2017 folder in Documents...
Last week I also played around with Mudbox materials, made a "Bronze" shader - partly because I wanted to see how it would look like with a simple bronze material, since I'm planning to texture the model to look like a traditional Greek/Roman bust, bronze or marble, maybe both. But mainly just for fun.
I re-did the sideburns completely, and fixed up the hair a bit, mainly just added more detail to the hairline.
I fixed up the ears again, then added some small details and asymmetry to the face - wrinkles, small bumps, etc. I also adjusted the nose a bit and made it a bit asymmetrical based on reference photos. After that I polished off the sub-d artifacts that Mudbox had built up...
I think I'm finally done with the sculpting, apart from adding some text to the label. After I figure out a good way to do that, I'll combine the whole thing into one solid mesh, maybe in Meshmixer. If the sculpt loses details during that, I may have to transfer some details back from the original in Mudbox. After that I'll need to retopo the mesh and UV map it, so I can bake and texture it in Substance Painter.
I also rendered a small turntable video in Mudbox:
https://drive.google.com/file/d/1Qr8Qih_-nLMeyMsYqknihJpmGbNtFxLh/preview
So now I've been retopologizing the model in 3ds Max. I'm using the Meshmixer mesh as the base geometry since it's relatively "low poly" compared to the actual Mudbox sculpt.
Here's a Sketchfab viewer, and there are more beauty shots in my portfolio: tapioterava.com
Progression story and screenshots below this.
model
Finished the retopology, and conformed the low-poly a bit closer to the final sculpt, since I was retopologizing on top of the Meshmixer model. UV mapped the model, and then used a script to weight the mesh normals based on polygon size, in order to get a cleaner normal bake. Made a cage model in 3ds Max (had to do a lot of tweaks still) and then baked the maps with Handplane 3D baker - for some reason the bake had some errors even though my test bakes in Max were just fine... So I had to fix them up a bit in Photoshop. The bake took forever by the way, since the high-poly mesh was so massive. I textured the model in Substance Painter, used some marble materials from Substance Source/Share as a base, then started weathering the model. Finally, exported the textures and uploaded to Sketchfab, and took some beauty shots.
So I'm working on this SciFi laser weapon thingy - Here's the concept I came up with originally, and where I'm currently at with the ZBrush modeling:
I'm deviating from the original concept a bit, as I'm figuring out the functionality of the weapon; how it's supposed to "work", what components it needs to have, and where everything should go, how it could be disassembled, etc. It's kind of a slow process, as I'm designing at the same time as I'm modeling, constantly having to Google for reference and doing random sketches on my notepad, and because I'm not quite used to the hard surface workflow in ZBrush yet. it's also been a couple of years since I last worked with ZBrush properly, so I've forgotten a lot of the UI and hotkeys etc.
But I think I'm starting to get the hang of it, the last parts I made are the pistol grip with the trigger and safety mechanism, and the "gas compressor" which is the big cylindrical block with those massive cooling fins, at the back of the weapon. Again, I'm adding some of the progression screenshots below:
The gas tank is supposed to provide a high pressure liquid gas mixture for the CO2 laser, and for cooling the weapon. The quick release valve is for easy disassembly on the field, and I'll make copies of it for multiple parts of the weapon. The gas is circulated and pressure controlled by the compressor which I mentioned in the previous post.
The most recent additions are a locking mechanism for the gas tank, and cold gas thrusters for stabilization and targeting, at the front of the weapon. Below some screenshots, the first two are from a design that I discarded and had to redo:
That is how the weapon looks like currently, more progression shots below:
I'm curious what color scheme / materials are you thinking on?
The original design was just me trying to find a silhouette that I thought looked cool, but now I kind of have a sense of how the weapon would actually "function", although it's probably not that clear just from the design alone. I will probably need to create some schematics and flavor text for presenting the final model, maybe even animations if I find the time...
Yeah, for the cable plugs I was trying to go for the look of DVI, SCART, or old printer cables for the big one, and HDMI or Display Port cables for the smaller one.
For base materials I'm thinking of mostly a mix of matte black or dark grey plastic/composite for the main body and the "butt" of the weapon, and either coated, or bare shiny aluminum for the thin parts, the compressor and other individual components, and maybe for the "barrel" of the weapon, and then steel or gunmetal for some of the smaller details, like screws and the scope mount, etc.
So in terms of the color scheme, a base of black & light greys, but I'd kind of like to give the weapon a slightly flashy paint job, thinking of having neon green and dark purple accent colors, like EVA-01 from NGE or Covenant weapons from the Halo series - maybe just a couple of straight and angled lines going across the weapon, like some of those custom weapon skins you see in games like CS:GO or Halo 5... And since the weapon will have some visible cables and indicator lights, those could also be neon green, to match the paint job.
model
model