Skew you buddy! Making sense of skewed normal map details.

mod
Of interest to most who will read this thread, I wrote an extensive
tutorial that covers this topic and many other common baking issues.
It's geared towards baking in Toolbag, but most of the Basics and Best
Results sections apply universally. Check it out on the Marmoset site: https://www.marmoset.co/posts/toolbag-baking-tutorial/
Toolbag 3's baker has real-time skew map painting, which can alleviate many of the issues described in this thread, so I would recommend using that in most cases. However, this is still a good read if you're looking to understand why skewing occurs, or if you're using a baker that can't account for skewing.
---
This is really a continuation of the waviness thread, but I figured i would start a new topic here as I feel this is essential information and a lot of people still struggle with the concept. If you don’t understand what a cage/averaged projection mesh is, be sure to read the waviness thread first.
First off, a normal map baked from plane.

As this is a simple plane, the vertex normals point in the same direction as the face normal, so the detail is projected without any skewing. Its important to talk about vertex normals and face normals separately here, because vertex normals are averaged between the adjacent faces, so even though your polygon is flat, your vertex normals almost certainly are not. Additionally, when I refer to vertex normals, I’m talking about the normals of the projection mesh/cage, which should be averaged and ignore the mesh normals of your lowpoly entirely (if not, you’ll get gaps, read the other thread if you’re confused at this point).

With a simple cube we can see the skewing problem in all its glory. The vertex normals shoot out at 45 degree angles from the face normal, which means that the ray projection direction is coming from that skewed angle as well. This is the root cause of skewing.
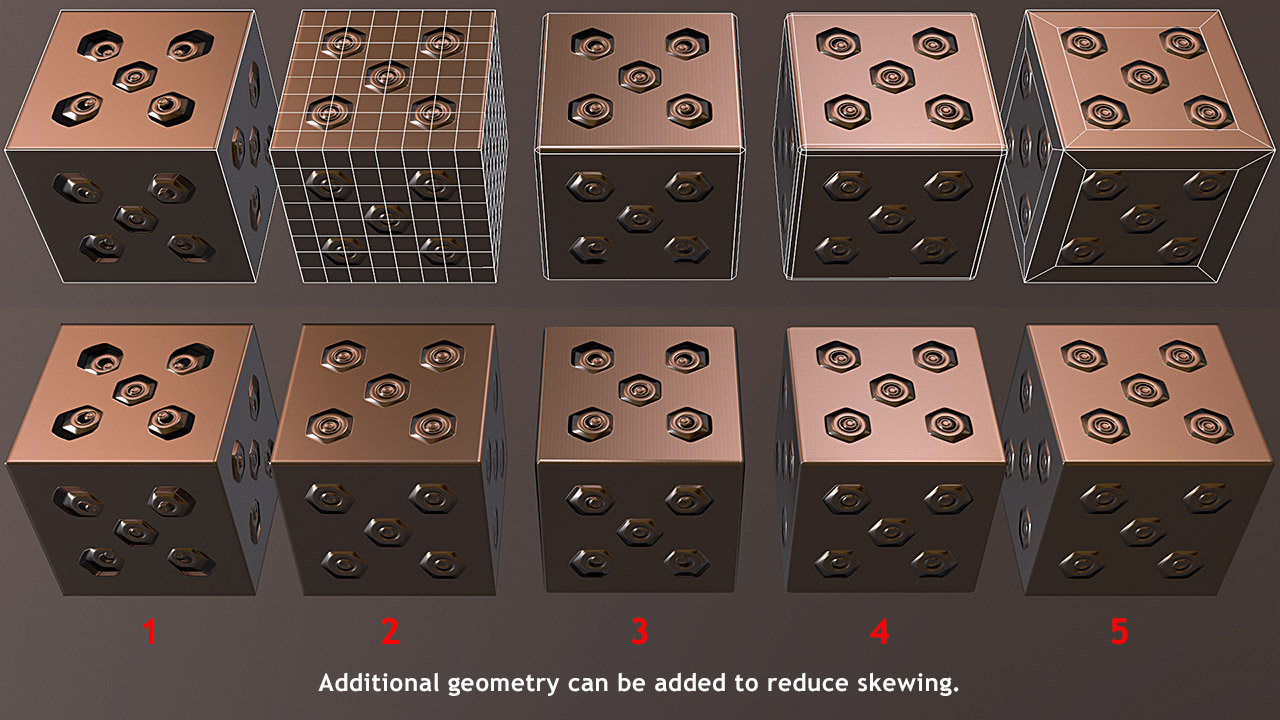
By adding more geometry, we alter the vertex normals. Additional geometry allows us to push the skewed normals closer to the edges of the planar shape, which means the majority of the flat area will have vertex normals pointing in a similar to the face normal. This is the primary cure for dealing with skewed details, making sure the vertex normals match up as well as possible to the face normals.
There are a variety of methods in which we can do this.
# 3 and 4 are great if if you have the polygon budget to leave them in the final low poly.
# 2 is handy trick but only helps with certain types of geometry (more on that later) so I don’t consider it a general purpose method. It also requires making a copy of the mesh, tessellating, baking to an object space map, and then finally converting back to tangent space using the original lowpoly, via Handplane or Xnormal.
# 5 is the method I’ve been using for years. My basic workflow is to get my base lowpoly created (while saving room in my poly budget), doing a test bake to check for problems, and then cutting in some extra verts where needed to deal with skewing. Yes, this method adds to the triangle count, but usually not so much that you would blow your budget. Even if you have a super strict budget, you can use the same duplicate, bake to object space and convert to tangent space trick that Peter explains in his thread.
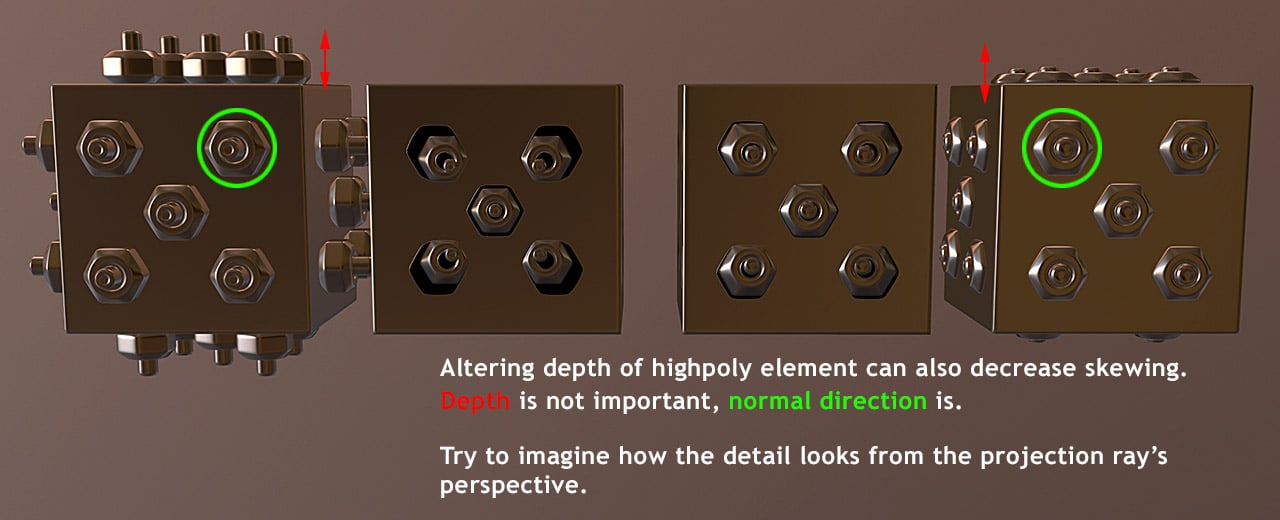
Most people assume skewing is solely an artifact of the bake settings, the low poly, or some combination of the two. This could not be further from the truth. The exact shape of your highpoly element plays a significant role as well.
This is a super common mistake that I see people make, they will model detail meant to be baked to a normal map with huge extrusions or indentations. The further the floating element is from the surface of the lowpoly mesh, the more extreme the skewing problems will be. The important thing to remember here is that we don’t care about depth at all*. What we want is the normal information, that is to say the direction each polygon on the highpoly element faces. A normal map baker can only see direction, it doesn’t care about depth.
Try to image yourself as a camera pointing along the vertex normal, what you see is what the baker will pick up. The more extreme the depth information, the larger the divergence will be between what you want to bake and what the baker actually records.
*Depth can be important for other map types, like AO and displacement maps, but that's a different topic.

Here is the same sets of meshes baked with the modified high poly. While # 3 and # 4 show small improvements, the worst case mesh (# 1) shows drastic change. What was completely unusable before is now borderline okay, simply from reducing the depth of the bolt. # 2 and # 5 remain the same as skewing was removed entirely with the added geometry.

Here is a more realistic use case, we’ve got some skewing problems, and another type of issue that is much less frequently talked about. When you have mis-matches in your highpoly and lowpoly geometry, (in this case clear indentations that are modeled into the high but not into the low) you can get some pretty nasty artifacts as well. Here, from the front or side view, the cylindrical detail set into the indentation doesn’t really come through at all.
Its important to consider how your highpoly model with transfer down to your lowpoly. Ideally, you should either model supporting geometry into the lowpoly for this shape, or model the high in a way that is more favorable to the low.
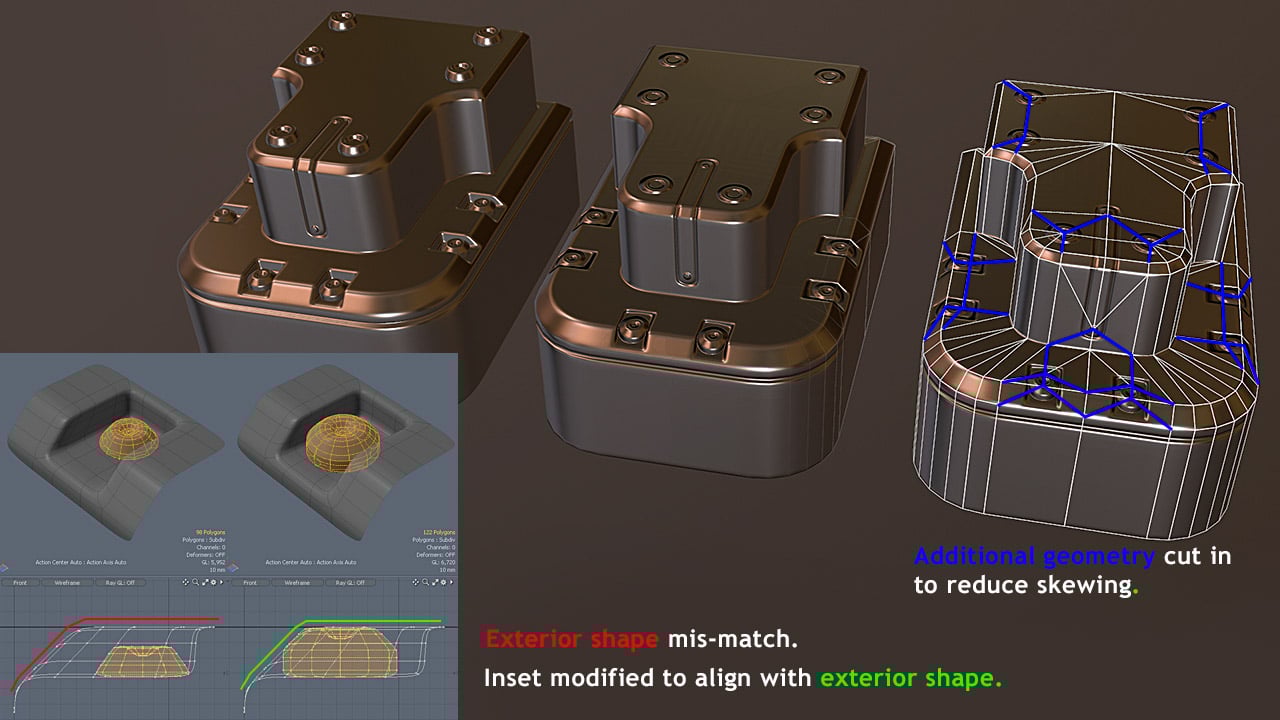
Here, I modified the shape of the inset cylinder to better match the exterior shape of the lowpoly. This is very important, as any shape mismatches between the high and low will compound skewing artifacts. I also cut in some additional verts in key places to further reduce skewing.
So, why would I cut in geometry manually when I can simply tessellate the mesh as Peter shows in his video? Its simple really, this method is more reliable and easier to control. When you start dealing with complex meshes, many areas will not benefit from tessellating the cage mesh, in fact, you may introduce errors by indiscriminately tessellating. Here is an image I put together a while back to test that method out.
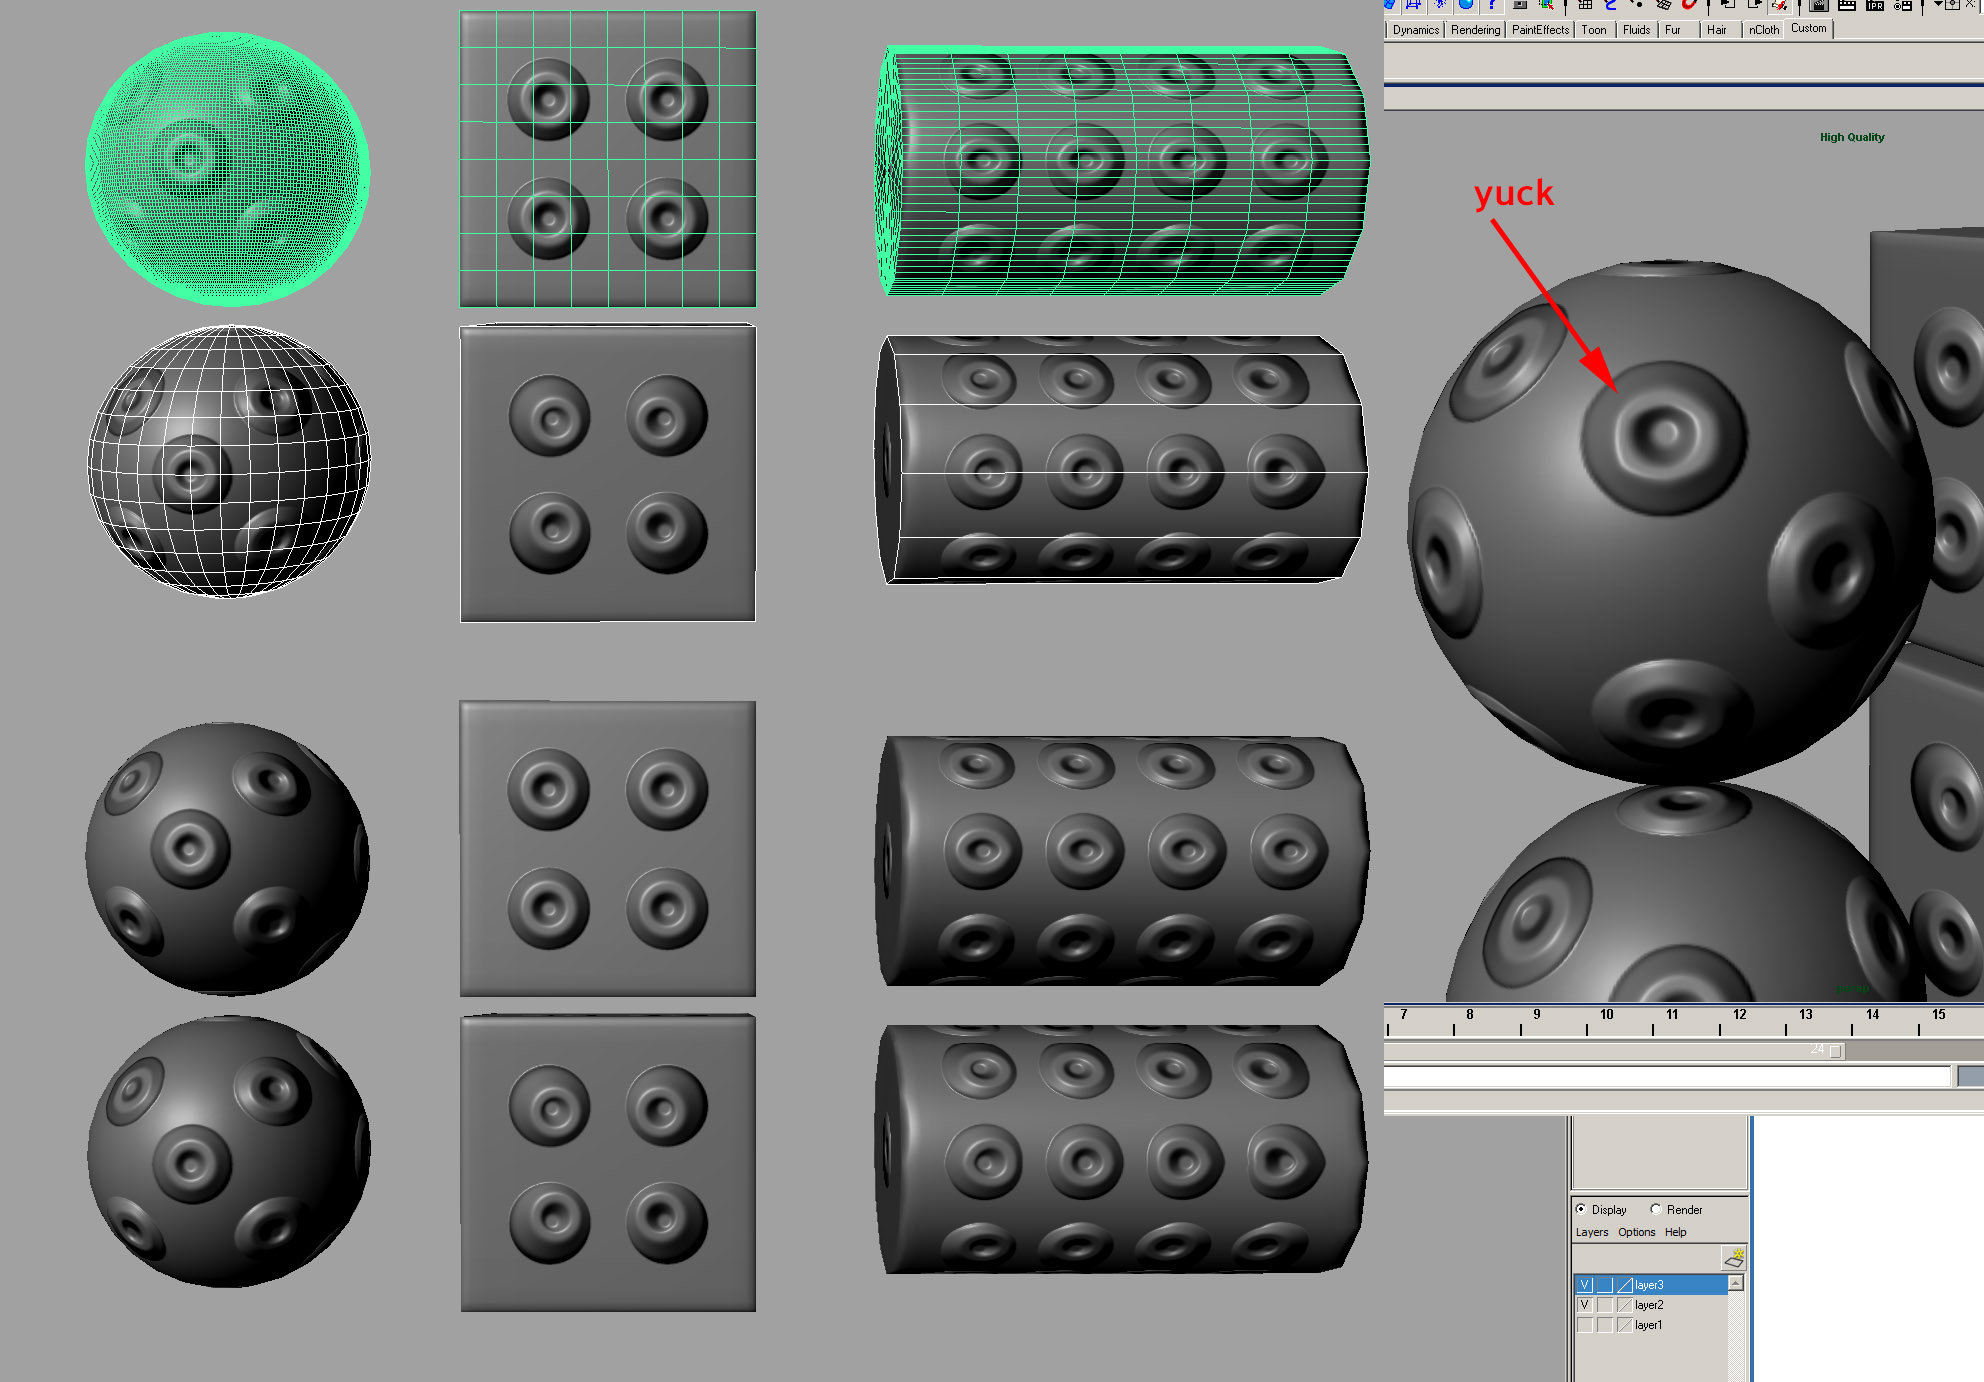
When it comes to shapes that should be round, tessellation does not help, and can actually hurt the end result. I would be very hesitant to use this method with complex assets that contain a variety of different geometry types, for instance hard edged flat surfaces along with cylinders, organic curves, etc.
Toolbag 3's baker has real-time skew map painting, which can alleviate many of the issues described in this thread, so I would recommend using that in most cases. However, this is still a good read if you're looking to understand why skewing occurs, or if you're using a baker that can't account for skewing.
---
This is really a continuation of the waviness thread, but I figured i would start a new topic here as I feel this is essential information and a lot of people still struggle with the concept. If you don’t understand what a cage/averaged projection mesh is, be sure to read the waviness thread first.
First off, a normal map baked from plane.
As this is a simple plane, the vertex normals point in the same direction as the face normal, so the detail is projected without any skewing. Its important to talk about vertex normals and face normals separately here, because vertex normals are averaged between the adjacent faces, so even though your polygon is flat, your vertex normals almost certainly are not. Additionally, when I refer to vertex normals, I’m talking about the normals of the projection mesh/cage, which should be averaged and ignore the mesh normals of your lowpoly entirely (if not, you’ll get gaps, read the other thread if you’re confused at this point).
With a simple cube we can see the skewing problem in all its glory. The vertex normals shoot out at 45 degree angles from the face normal, which means that the ray projection direction is coming from that skewed angle as well. This is the root cause of skewing.
By adding more geometry, we alter the vertex normals. Additional geometry allows us to push the skewed normals closer to the edges of the planar shape, which means the majority of the flat area will have vertex normals pointing in a similar to the face normal. This is the primary cure for dealing with skewed details, making sure the vertex normals match up as well as possible to the face normals.
There are a variety of methods in which we can do this.
- Original mesh, extreme skewing visible
- Tessellation, or “skewmesh”, skewing is removed entirely. Peter Kojesta explains this in more detail here: https://polycount.com/discussion/144715/skewmesh-tutorial
- Beveled edge, minor skewing visible
- Beveled edge with 2 support loops, there is a tiny bit of skewing here as well but it is essentially gone.
- My preferred method, cutting in the minimal amount of geometry to “spot fix” any issues. Skewing is removed entirely here as well.
# 3 and 4 are great if if you have the polygon budget to leave them in the final low poly.
# 2 is handy trick but only helps with certain types of geometry (more on that later) so I don’t consider it a general purpose method. It also requires making a copy of the mesh, tessellating, baking to an object space map, and then finally converting back to tangent space using the original lowpoly, via Handplane or Xnormal.
# 5 is the method I’ve been using for years. My basic workflow is to get my base lowpoly created (while saving room in my poly budget), doing a test bake to check for problems, and then cutting in some extra verts where needed to deal with skewing. Yes, this method adds to the triangle count, but usually not so much that you would blow your budget. Even if you have a super strict budget, you can use the same duplicate, bake to object space and convert to tangent space trick that Peter explains in his thread.
Most people assume skewing is solely an artifact of the bake settings, the low poly, or some combination of the two. This could not be further from the truth. The exact shape of your highpoly element plays a significant role as well.
This is a super common mistake that I see people make, they will model detail meant to be baked to a normal map with huge extrusions or indentations. The further the floating element is from the surface of the lowpoly mesh, the more extreme the skewing problems will be. The important thing to remember here is that we don’t care about depth at all*. What we want is the normal information, that is to say the direction each polygon on the highpoly element faces. A normal map baker can only see direction, it doesn’t care about depth.
Try to image yourself as a camera pointing along the vertex normal, what you see is what the baker will pick up. The more extreme the depth information, the larger the divergence will be between what you want to bake and what the baker actually records.
*Depth can be important for other map types, like AO and displacement maps, but that's a different topic.
Here is the same sets of meshes baked with the modified high poly. While # 3 and # 4 show small improvements, the worst case mesh (# 1) shows drastic change. What was completely unusable before is now borderline okay, simply from reducing the depth of the bolt. # 2 and # 5 remain the same as skewing was removed entirely with the added geometry.
Here is a more realistic use case, we’ve got some skewing problems, and another type of issue that is much less frequently talked about. When you have mis-matches in your highpoly and lowpoly geometry, (in this case clear indentations that are modeled into the high but not into the low) you can get some pretty nasty artifacts as well. Here, from the front or side view, the cylindrical detail set into the indentation doesn’t really come through at all.
Its important to consider how your highpoly model with transfer down to your lowpoly. Ideally, you should either model supporting geometry into the lowpoly for this shape, or model the high in a way that is more favorable to the low.
Here, I modified the shape of the inset cylinder to better match the exterior shape of the lowpoly. This is very important, as any shape mismatches between the high and low will compound skewing artifacts. I also cut in some additional verts in key places to further reduce skewing.
So, why would I cut in geometry manually when I can simply tessellate the mesh as Peter shows in his video? Its simple really, this method is more reliable and easier to control. When you start dealing with complex meshes, many areas will not benefit from tessellating the cage mesh, in fact, you may introduce errors by indiscriminately tessellating. Here is an image I put together a while back to test that method out.
When it comes to shapes that should be round, tessellation does not help, and can actually hurt the end result. I would be very hesitant to use this method with complex assets that contain a variety of different geometry types, for instance hard edged flat surfaces along with cylinders, organic curves, etc.
Replies
Float geometry baking can be tricky. Cages do not help when the detail from highpoly to the lowpoly surface is too different.. but around cylindrical object, cage does help.
Normal direction is really important. I mostly use sharp edges to keep the normal point towards a desired direction, so when it bakes, things will stay in place without being skewed. Skewed detail looks bad...
Thou in time when I have to keep the geometry simple, corners can be cut... and things can look skewed in the dark
The methods in this thread are intended to show how to avoid skewing without introducing other artifacts (but generally at the cost of triangle count, or time spent baking to OS and converting to TS).
You can also bake two maps, one with and one without a cage/averaged projection mesh, and then photoshop them together, but this is really hacky/messy and if anyone ever has to deal with your files and rebake it will be a PITA for them to know exactly what you did.
I've found out thou, a RAW 64 bit depth normal map can hide a lot of nasty details... but one would size at an effy 7MB, so yea. If it can't be perfect with tolerable effort, hiding it would be the easy way...
But I always love examples of modeling your highpoly to in a way to make it a better low poly, a lot of people starting out think they need to make the high poly as realistic or accurate as possible, when it's better to model based how the lowpoly will look.
Yeah, I would only use it for super lowpoly stuff. I've been manually cutting in geo where needed for years and its never really been a problem. I personally do not like any workflow that requires juggling multiple meshes and converting maps and all that. These days with higher and higher triangle counts, I can't see it making a big difference in most cases.
Of all the normal map "tricks" modeling for your low is probably the most important while simultaneously the least talked about and understood. I've been meaning to write specifically about it but its a more difficult concept to properly articulate.
I know it's not a tradeoff people like much, but I make stuff for DOTA and the poly budgets are as the fit of some spandex pants ten sizes too small, which is to say, tight.
Let me just shoehorn this in here.
http://dotahattery.com/workshop/ogre_magi/maharajahs_marvels/
The buckle thing in the middle of his belt has a hard edge around it, and it's less noticeable in the game than it is on the Hattery. If the geometry has a very acute angle, the artifacting can be negligible.
You can still use a cage, you just have to be sure to split the edge manually along a smoothing break or hard edge for you Mayans. Not perfect by any means, but when polies are in short supply, it's an efficient solution.
Though, I must admit, I've never cut in extra baking geometry. I must try it and see how it works. Thanks EarthQuake.
In all seriousness, great write up. The thing about aligning inset shapes with the exterior is something I haven't thought about, will definitely keep that in mind in the future.
I do a lot of modeling for mobile games where trianglecounts are still very relevant. As such, I was wondering if it is smart to remove the supporting geometry after baking. Depending on whether or not the normals change as a result of removing the supporting geometry it is indeed possible to remove it, thus saving a bit in trianglecount while keeping a good result. I created the following image to demonstrate the result.
http://i.imgur.com/LFysgTj.jpg
Guess it makes sense when you think about it, but who knows... maybe it's useful for someone.
That's technique #4 EQ discusses in his example. I personally feel like handplane is the quicker and better way to do that, because it doesn't only work on certain areas on a model, or with certain smoothing groups.
To be honest... if you are using hard edges to bake things, adding supporting geometry doesn't do anything if the detail is flat. Thus if you remove the supporting geometry, the result is the same. Because the normal direction never changed.
Have you ever tried to making a seamless tile texture to be able to tile along the UV island? so that the final object doesn't have a visible seam along all the textures?
I somehow succeeded bending the UV coordinates inside UE4's material editor, playing around with position maps and normal maps. Although the UV has been bent and the texture does line up on a sloped geometry, the quality of the bent material is very roughly pixelated. I should try something else
Right, if you're baking straight to tangent space, DO NOT REMOVE any geometry, as that changes the mesh normals and will cause all sorts of smoothing errors. Tangent space maps are baked in a relative space to account for the geometry of the target bake mesh.
You can however, bake to object space (which is baked in absolute space and ignores low poly mesh normals), and alter the geometry all you want, and then convert from OS to tangent space via Handplane or XN. This is what I would probably do if I had super low triangle count restrictions on mobile etc.
Have a nice day.
Thanks for your reply. I'm not sure that this is the case (in 3ds Max at least). The cube in the bottom-left of my image was baked with hard edges but without supporting geometry. You can clearly see the high-poly floaters being skewed. The reason for this is that the cage still has averaged normals I believe.
Most assets are going to be more complex than a cube with a smoothing group per side, so in production its rarely something that can be done without causing problems. Again baking to OS and converting to TS is pretty easy in this case.
I just wanted to chime in with a point that I didn't see anyone else making here - you can always just edit the vertex normals instead of using a cage or adding geometry / splitting edges etc.
This can actually work really well for situations where you have bevelled edges with flat surfaces on top - just align all the vertex normals to match the flat surface (since the default smoothing groups or soft edges in 3dsmax/Maya take the average face normal to create the vertex normal).
This means you don't have to change any UVs, you don't have to increase the triangle or vertex count, and you don't have to transfer anything between object/tangent space. We have some scripts that do this in Maya at work, although I believe XSI does this kind of "face-weighted" vertex normal averaging by default (or at least has a native option for it).
Obviously it means that the engine/program you're viewing your final results in will have to import and preserve the custom vertex normals, but to be honest I don't think there are many decent engines these days which don't allow that.
I have some better ideas about how to get around this stuff too, but that's for another day, in another tool...
If you want fewer layers you can merge them after you're done..
I thought about talking a bit about custom normals as I've used that workflow on previous projects as well. However, I have a number of reservations about editing normals as a sort of general use practice. For instance:
1. Both your exporter and game engine/importer need to support custom normals (most do these days but not all)
2. Custom normal information is finicky, and in my experience at least is easily lost or reset in both Max and Maya. Its one more thing that can go wrong or may need to be set up again after revisions. This can especially problematic if multiple people end up working on one asset.
3. You need very specific geometry for it to make sense, generally you need at least 1 supporting beveled edge. It won't help at all with the worst case cube mesh here. The situations where it is most helpful also tend to be the ones you need it the least, again with sensible floater depth and a beveled edge, you should get very little skewing.
Saying all that, It's certainly a valid sort of pro-moves method if you know exactly what you're doing and your pipeline supports it.
Do you happen to have a link to any freely available scripts for Max or Maya? I know there are some floating around but I can't seem to find them.
There are a variety of reasons why doing two bakes and combining them is a bad idea. Sure, at first glance it seems simple enough, however:
1. You have to bake all your maps twice, normal, cavity, and especially AO, this can take a considerable amount of time in production.
2. You have to edit not just the normal map, but all baked maps (though its easy enough to create a layer mask and copy/paste it to the other maps).
3. If you have any revision requests, you have to go back and redo the process entirely. What if you're working for a picky client? What if the design changes mid project and you need to make significant changes? Rework is the devil.
4. What if someone else has to work on your asset down the line. Worse yet, what if you're not there to explain to them the voodoo magic you did in photoshop to get a clean bake?
5. You have to complete the entire process before you can preview the end result. You can't do a quick testbake to make sure everything comes out properly without also running it through your photoshop process.
Now the kicker:
Combining two bakes is not always a cure. Depending on how your geometry and normals are set up, relying on hard edges + not using a cage to remove skewing will not always do the trick. You will run into some assets that you need to cut in some extra geometry anyway, so now you're doing the extra geometry thing and shooping your maps. Why not cut in a few extra verts where you need to and be done with it?
Generally, if we're talking personal work and you're in charge of the entire process, you're not going to get change requests and nobody else has to deal with your files, sure, do whatever you like.
In production on the other hand, having a clean and reliable workflow that bakes out correctly the first time and every time is an advantage.
Additionally, often when people do a lot of tweaking maps after the bake in photoshop, it isn't because it's the best or easiest way to do it. Instead, it comes from a fundamental misunderstanding of the process. If you understand the process fully and still want to break the rules, feel free, but the purpose of this thread is to explain the role of mesh normals and how they control the baking result, which is something a lot of people simply do not understand.
It is kind of like trying to manage UV distortion, you Rob Peter to pay Paul. You take from near by areas that don't matter that much to straighten out the areas that need it.
The top example will have quite a bit of skewing on the top. The bottom example reigns that in while skewing the sides pretty heavily.
As far as I know, the low poly normals are still averaged and not custom, but the cage projection is calculated into the normal map.
Of course this is an extreme example to illustrate a point. Most people would add more geometry to the low poly/cage if this was an actual model. Using both #5 and cage editing is a great way to minimize skewing.
I'm pretty sure you do this with xNormal or any other program that lets you use a cage, but the workflow is a little tedious if you're trying to iterate quickly between changes and baked results. It's easier in max because the projection modifier is built into the workflow.
As for managing the cage between bakes you can export/Import cages in the projection modifier, which is how a lot of people who use xNormal tend to get their cages in and out of max and go back and tweak them.
Some here
http://wiki.polycount.com/wiki/VertexNormal
Awesome thread EQ, many thanks.
Anyway here is my script for it: https://dl.dropboxusercontent.com/u/2904948/MaxScript/Modeling_FaceWeightedNormals.ms
Undo won't work with this script, simply remove the Edit Normals mod if you don't want it. Or use the Remove button if you collapsed the Edit Normals mod at any point. If you edit the geometry you'll have to run the script again, if you want normals to update.
This test model below only has one smoothing group, and I think it gives a very nice result.
regarding "#2 and 3 are great if if you have the polygon budget to leave them in the final low poly."
My method does not require you to leave any additional polys in the final piece. The skewmesh is deleted once you get your bake off of it.
Right, #5 can be performed in exactly the same way, as mentioned in the first post, provided you don't alter the uvs. Theoretically 2/3 could be be the same as well but its difficult to add bevels like that without changing the uvs.
The duplicate mesh, edit, bake to OS, convert to TS thing is a useful method.
Where I have problems with your skewmesh method is using simple tessellation to increase the geometry, there are a lot of cases where it won't really help. Its sort of like using a shotgun (tesselate) vs a sniper rifle (cutting in only where you need it). You might hit your target with a shotgun, but you might shoot your buddy in the face too. As shown in the final image in the OP, faces that are curved in nature rather than flat don't work well with tessellation.
Paul can correct me if I'm wrong, but I think he's referring to editing the normals of the lowpoly mesh. There are some scripts that allow you to select a face (or a group of faces), and then set the vertex normals to match the face normals. You need bevels along the primary planar faces, which you can sort of "push" the shading errors off to.
Face weighted normals is a similar thing, that weights the mesh normals more heavily towards the larger faces. Not exactly the same thing but a similar concept. Best of all, face weighted normals simply need to be turned on, you don't have to painstakingly set them up. Unfortunately with FWN being default in Maya now, Maya's realtime display of normal maps no longer matches up with its baker, which is a sort of ironic twist of fate here as Maya has long synced offered a synced preview while Max hasn't. Not sure if They've fixed the FWN issue in the latest versions of Maya though. But yes, Juan is correct, FWN should improve #3/4.
Manually editing the cage is an option as well, however, its one I've never been a fan of. First off, because like you say, you're improving one area while potentially making another worse. If you happen to have skewed details on different axes sharing the same border edge no amount of cage tweaking will fix it. Additionally, this is an app-specific thing. Cages, or envelopes as they are called in Maya, only control projection distance, not direction, so you can't make the same tweaks that you can in Max. Though I think XN allows the same workflow as max. In general, manually editing cages is a pain in the ass that needs to be redone once again if you get revision requests. While cutting in bevels or making spot cuts to fix skewing can be done once and forgotten about generally. Again the only real exception being if you have a real low triangle count to hit and need to duplicate the mesh and remove the corrective geometry later.
However, what i find hard to agree with is that adding extra geo has fewer downisdes than combining in Photoshop. I'll respond on a point by point basis:
True for normal and AO. This is indedd the major downside. For cavity, i usually find that generating it directly from the final normal is satisfactory.
Yes, copying masks is a quick fix for that
Judging from my experience, you almost never have to redo the process entirely - unless the object shape changes signifficantly, and if that happens you'd have to rebake regardless of what method you use. Depending on the shape of the object, significant changes would also mean re-creating those cuts.
Picky clients demand perfect bakes, but i've never met a picky client who accepted geometry cuts that did not contribute to the shape of the object (silhouette) - this is the major downside to using this method, in my opinion.
Well, this is really a non-issue. If whomever continues my work on an asset doesn't understand the process you've explained and why bakes get skewed, then those cuts on the geometry would seem useless to him anyway. He'd probably just remove them thinking i'm a poor modeller and get skewed bakes anyway. They would look like voodoo magic just like the photoshop process.
That's true i guess, though after a while, i find that you get to know how the bake will come out just by how the lowpoly overlaps the hipoly.
Because of client approval issues, as i've said above. They almost always point out cuts that don't "hold the shape", even if the asset is well under the poly budget.
I guess there are special cases where you'd benefit from cutting the geo, but i've never had a shape that came out with skewed detais when surface-normal baking in Maya.
Anyway, i'm just nit-picking. As you've said, it's important to be aware of what happens and why. After that, everyone chooses their preferred fix depending on context.
Cheers
Yep, pretty specific to max and only if you enable Projection mapping. It's one thing max got right, but then immediately faceplants when rendering AO, calculating edge padding and getting the normal map background color correct, heh. Oh max... sigh...
Fixer geometry can be disruptive to modeling revisions also. It can route loops in weird ways and make selections difficult, but you have to weigh your options and do what works for that problem. Instead of uniform distance away from the surface, you can customize that to your model.
So for example:
Those errors can be fixed by adjusting the cage to hug the surface a little tighter in certain areas and encapsulate others. You aren't caught having to use one universal distance that has to be pushed out really far, potentially introducing more skewing and clipping. Or adding more geometry, which could make the model heavier and harder to work on.
I totally agree, remembering to nudge a cage around could be a potential workflow pitfall, especially if you're working with other artists, but exporting the cage and hanging onto it will help you get the new cage into the same shape and it messages to other artists fairly easily what needs to be tweaked. You can also snap the new to the old and use the push/pull/conform brushes so transferring those changes isn't quite so tedious. If you have to re setup the cage constantly, it's probably because you have a client being a bigger pain in the ass, heh.
The cage helps you see a lot of those problems before you bake so you aren't staring at a borked normal map wondering what the heck went wrong.
Yep. It's just another arrow in the quiver that you can use to slay some skewing, or weaken it to acceptable levels, heh. It's not a one size fits all option but it can get you around some bumps without a lot of fuss.
Like all things it comes down to knowing it's limits and using a good fix for that particular problem.
In the original post you go a bit into the skewmesh tutorial posted a few weeks back. What do you see as negatives to that method, if any?
Hey, glad you found the post useful. I go into the skewmesh/tesselation stuff a bit in the final section of the OP (last image). Let me know if that clears it up if if you're curious about something specific.
What if a single edge loop was placed in the middle of that cylinder before you applied the skewmesh? While my knowledge of normal mapping is pretty low, it looks like it's skewing because of the long rectangular shapes. If a single edge loop was added throughout the model where that kind of shape appeared, would that be better or worse?
Maybe I should just try this out at some point..
Literally the next thing I baked had this issue haha. Thanks for the tips!
If you look closely at the last image you'll see 3 things:
1. The box shape is much improved. Tessellation can work well if your mesh is comprised of mostly box, planar shapes.
2. The cylinder looks... different, neither one looks good. You could significantly improve the cylinder by cutting in an edge loop at either side like you would for sub-d modeling. Again, well placed geometry would works better than uniform tessellation.
3. The sphere doesn't need any correction in the first place, so tessellation just makes matters worse.
As complex meshes tend to have all different sorts of geometry, tessellation isn't really a one-size-fits all solution. The most useful part (IMO at least) of the workflow Peter explains in his videos, is creating a proxy mesh, baking an OS map, and then converting it to TS with the original low poly.
That can be done whether you tessellate, add in support loops, or cut in verts manually. Hell, you might even want to do all of the above with different mesh chunks on a complex asset.
I personally prefer cage meshes, they are the cleanest solution in my opinion. It can be an additional pitfall, but I think you need it anyway. If you have an object with lots and lots of cylinders, adding in additional loops to fix skewing/wavyness can quickly add up to quite a lot of polys. As does splitting normals/using separate smoothing groups.
It may not matter much for a 1st person weapon that is rendered once, but for props that can have dozens or hundreds of instances on screen at once, I'd rather use cages for clean bakes than the extra geo.
I'm not sure what you mean by prefer cage meshes? All the example meshes here were baked with a cage.
Do you mean you prefer to tweak the cage manually to try to reduce skewing?
@EQ: Thanks a lot for the write up. I realize the examples for the problems of the tessellation method are just that: broken down examples and caveats to look out for. But I'd say that in many cases like the cylinder, you might have set up smoothing groups for the lowpoly anyway and could do a subdivision based on these smoothing groups. (The newly created topology will match the interpolated vertex normals of the lowpoly, so the normals should match). So tessellation is not just "tessellation" but we have different methods to choose from. But again, I get these are just example cases and basically I agree.
this takes some texture blending work..
extract the lowpoly mesh were the baked detail is skewed, also take the faces around the detail if possible, retain the UV and try to unfold the extracted geometry as "flat" as possible, and bring the highpoly details on top of these newly extracted lowpoly flat meshes. This way the bake will be done only using flat normal, which has absolutely no skew. Using Photoshop layers or substance designer to properly blend them with the base normal map together.
This works very well when the base geometry is relatively flat. And can get very tricky if the detail is sitting on a smooth surface.
This actually shares the same principle with using sharp edge to bake. In real, it's both average normal and sharp edges, and combine them at where it is necessary, which could conduct a better overall result.
It has more work inside it, but the topology is maintained. (Philosophy: When I can use one vertex less, I will use one less vertex) -- Scrap that.
Yes, I use the projection modifier in 3dsmax and tweak the cage manually. It is exported as one SBM file to xNormal.
Right, most of the time what we're talking about is a trivial amount of verts that need to be added to sort out projection issues. Maybe something like 100-200 verts on a complex asset, which on todays hardware is a non-issue.
There seems to be this mentality in the industry that all models must be obsessively optimized and no geometry can be "wasted" on areas that don't effect the silhouette, this stems from the old school days where geometry had a huge impact on performance. Today, hardcore optimizing is more of an exercise in OCD than something that will reap real world performance benefits. In my career I've seen countless models that are optimized for the sake of being optimized and often to the detriment of the end result. The worst is seeing some well intentioned artist deliver assets that are 20% under the triangle budget but with glaring flaws because of it. Nobody gets extra points for doing that, I would take an artist delivering an asset 5% over the budget but looking flawless every day over obsessively optimized content.
Its okay to use a little geometry to fix skewing, or to make sure your normal comes out clean. In all likelihood your game is not performance limited by the fractional difference in using a few extra verts to make your life easier. More likely draw calls, texture memory and shader complexity are your bottlenecks.
Recommended reading for anyone who thinks I'm talking nonsense: http://www.polycount.com/forum/showthread.php?t=50588
Also keep in mind this was written 7 years ago, geometry count is much less of a bottleneck now that it was then (unless we're talking mobile).
TL;DR:
Maybe I iterated it wrong.. LOL That post was all about float geometry baking. There is no change done to the original model, I'm not sure what you are refering to.
But anyway... If I add support geometry, do I need to do the same thing for the cage?
I have no idea how much verts can be handled by modern PC.
It's good reading the article. When I model I tend to use less triangles as possible, but I don't think I'm going really insane about it... Thou, thank you for letting me acknowledge that. In the end it is the application that dictates the way you do things.
Scrap what I said about that stupid philosophy. It was meant to be a line for laugh. LOL
There are threads here and there giving hints about that, but there's no solid confirmation like this thread and your other two threads about normal mapping.
I find its a good idea to bake anything in 16bit if you can.
Generally the maps will wind up being 8bit or lower in the game unless you disable texture compression.
The issue is that if you drop from 16bit down to 8 or less without dithering, you can wind up with that banding look because each pixels value is compressed to the nearest value without any influence from it's neighbours.
So generally you'll want to load the 16bit map in Photoshop and reduce it's bit depth in there then save it out for the game (or just save directly out for the game as an 8bit format), as it does a pretty good job of dithering images.
That said, this only really tends to apply for uncompressed textures (if you're showing off portfolio work or such). You'll probably find that in a real game context, texture compression artifacts are far worse than any banding you might get.