The BRAWL² Tournament Challenge has been announced!
It starts May 12, and ends Oct 17. Let's see what you got!
https://polycount.com/discussion/237047/the-brawl²-tournament
It starts May 12, and ends Oct 17. Let's see what you got!
https://polycount.com/discussion/237047/the-brawl²-tournament
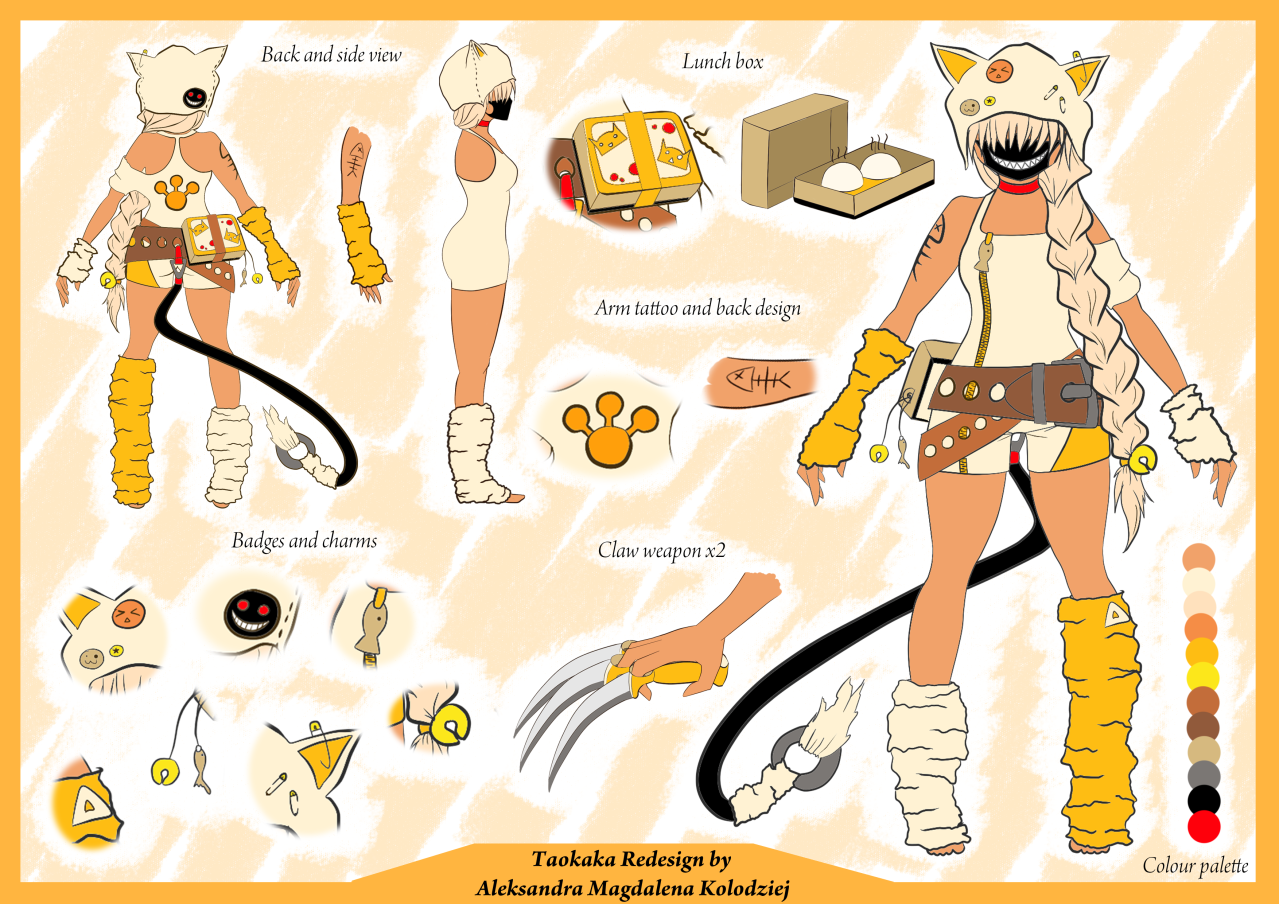
Redesign of a fighter character (TAOKAKA) - Uni project
Hi guys!
I am working on a project for my university right now. We were told to redesign an existing fighter character so I chose Taokaka from BlazBlue.
We have to redesign the character, model, sculpt and retop it as well, the usual process really.
Here's a concept I did for her:
I will be moving on to the modeling now, and I wanted to post my progress on here as I go along. I hope to get some feedback while I work on it to improve my skills.
I am planning on doing base mesh in 3Ds Max and then export it to Zbrush, I am however a bit lost what to do with the hair... Originaly I thought of sculpting the plat, adding planes with alpha map for the ends and the fringe, but I would like to have a nice beauty render of the sculpt in Zbrush... that leads me to a problem as I won't be actually sculpting all the details on her face as I don't want her face to be visible (wish to keep that aspect of the character from original Taokaka design), If I dont have the fringe in the sculpt, it will look very strange on the beauty render... therefore I need the fringe.
I was thinking of just adding a subtool in Zbrush and sculpt it like that, but I am not sure if I should sculpt the whole hair and then add the hat on top, or would it be ok just to sculpt the plat and the fringe seperately avoiding the area where her hat is? Is there any other way to do the hair? Platting the fiber mesh (if thats even possible) would be a nightmare I believe......
If anyone has any suggestions I would really apreciate it")
I also have only 2 weeks to do all this (without texturing it) and I am not an expert in Zbrush...
Also, the art style is set to realistic (I am aware that my art style of the concept doesn't show it... I am not good with realistic 2D art)
For now I will be starting on the body itself, I will post up progress later
I am working on a project for my university right now. We were told to redesign an existing fighter character so I chose Taokaka from BlazBlue.
We have to redesign the character, model, sculpt and retop it as well, the usual process really.
Here's a concept I did for her:
I will be moving on to the modeling now, and I wanted to post my progress on here as I go along. I hope to get some feedback while I work on it to improve my skills.
I am planning on doing base mesh in 3Ds Max and then export it to Zbrush, I am however a bit lost what to do with the hair... Originaly I thought of sculpting the plat, adding planes with alpha map for the ends and the fringe, but I would like to have a nice beauty render of the sculpt in Zbrush... that leads me to a problem as I won't be actually sculpting all the details on her face as I don't want her face to be visible (wish to keep that aspect of the character from original Taokaka design), If I dont have the fringe in the sculpt, it will look very strange on the beauty render... therefore I need the fringe.
I was thinking of just adding a subtool in Zbrush and sculpt it like that, but I am not sure if I should sculpt the whole hair and then add the hat on top, or would it be ok just to sculpt the plat and the fringe seperately avoiding the area where her hat is? Is there any other way to do the hair? Platting the fiber mesh (if thats even possible) would be a nightmare I believe......
If anyone has any suggestions I would really apreciate it
I also have only 2 weeks to do all this (without texturing it) and I am not an expert in Zbrush...
Also, the art style is set to realistic (I am aware that my art style of the concept doesn't show it... I am not good with realistic 2D art)
For now I will be starting on the body itself, I will post up progress later
Replies
I am thinking of creating the clothing in Zbrush using mesh extract or making a base mesh in 3Ds Max... not sure which one would be easier tho as i never did it in Zbrush before...
I did some quick painting over the sculpt to see what will be where, I am not great at muscles and anatomy overal so I hope this helps me later. I did use a reference but if you spot a major issue with it please let me know.
on the other hand not sure if its worth getting into details with areas that will be covered with clothes?
here's some screengrabs from the progress so far, haven't touched the hands or feet yet
if anyone sees any mistakes (there are probably plenty) feel free to point them out so i can fix those
sooo.... transpose tool in Zbrush is so confusing... but I did manage to shorten her a bit and I think it looks better now
the image on the left is from when I was designing her and it was a base for her body so yeh... I think it's more like it shuld be now. I am not entirely sure about the croch, if I should lift it up as on the drawing or leave it where it is now...
But overal i think the basic shape is nearly there so I might start on clothes soon. I will shape the hands and feet more when I have the clothes on I think as the warmers will cover quite a bit of those areas.
Nice concept, simple but effective and the character is very easily recognized. It could be cool to open the zip a bit and have some opening to the upper breast zone. Taokaka was kinda designed as both naive/child-like and sexy. I think it would fit.
Sculpt is starting well, although it's not really easy to see at that size. Don't hesitate to post some bigger picture, and to put perspective on in Zbrush. Maybe the breasts could be bigger to get some nice curve on the silhouette from the front camera. You got it on your design on the left, but not so much on the sculpt. It's not necessary to spend too much time sculpting things that will never be seen, unless you want to make multiple costumes.
Also, it could maybe help to know the kind of realism you want. I'm not a pro on this, but I imagine proportions will change depending of the degree of realism you need. Right now this looks to be heading toward a stylized character. I really like the idea and it could look awesome, but it may not be what you're required to do.
Anyway, I'll keep an eye on this, keep it up.
I agree with Madwish about proportions, though.
Right now your proportions are not realistic, assuming she is meant to be an adult / teenager. If you are going for pure realism, you might want to go back to square 1 and make sure your limbs and head are all the right size. I know you're going for 6 heads tall, but unless she is meant to be extremely young or extremely short, that won't look realistic. Here's a helpful image:
I would honestly suggest you find reference images of an actual person that looks like what you want, and model them. Once you've got the major stuff down you can go back to using your concept.
Realism is a harsh mistress.
Well, we have been told it has to be realistic, but we also have some sort of freedom to tweak it.... so it doesn't have to be dead on realistic. I did ask one of my tutors just to make sure if her proportions are fine and within the limit and he said it's fine
I did more work on the model, I lift her croch and also made her breasts bigger like Madwish sugested, it looks better
I also started extruding clothes as well
Sorry for lack of pictures, I will put them up as soon as I can, I can't open my files at home as my version of Zbrush is 4r4 and I was working on it at uni today and they have 4r42.... so i need to sort that out first
like I said before, I adjusted her body so it's more like the reference I drew while designing. And got most of the clothes, just need to sculpt all the deatils now....
did the face mask and I think it looks alright. Testing out some creases on the clothes and I am not sure if they look right, these ones show as the fabric is really thin (which I initially thought it woul be) but after making the creases...I don't think I am convinced that it should be a thin material... now it feels like it should be more thick, maybe like denim but cream coloured denim of course. It would make more sense actually as the top has a zipper and you don't really get many thin tops that have zippers, also the shorts bit would look better as more stif fabric I think. I wanted to test out denim like creases on it but I find it really hard to make creases anyway plus I seem to not find a lot of reference that would match it
Anyone knows any tips for making creases? or sugestions for the fabric?
I also seem to have a little problem with my layer... I did the creases on a new layer, I was switching between subdiv level 3 and 4 and it was fine all along. then I went to work on something else and came back to the clothes and clicked record and now it looks like this on subdiv level 4..... O_o
and on subdiv level 3 it looks fine:
never happened to me before...anyone knows how can I fix it?
apart from deleting the highest subdiv 4 and adding a new one....
P.s. the back doesnt have many creases as I was only testing those at the front
I also added the zipper and added some stitches (still need to play around with those tho)
I also tried to apply a denim texture to it using surface noise, but I am having some problems...
the noise stretches in some places, here's a screenshot
(left is the topology so it's not the topology that causes it)
If I undo the noise and move the model around and then apply it again, the stretching appears in different place but not on that side, is this a bug? O_o
I tried different settings but nothing seams to work...
making hard edges in Zbrush is hard.... >_>
personally I would make the edges of the belts sharper but I will leave that for the retop process as my deadline is comming up fast.
I still have to make the hat, which should't take too long, and also tail and warmers.
so here's a final sculpt, next I will be retopologising
You still have the option to stretch stuff a little in Zbrush so maybe try out some different things and see what people think before going forwards.
Other than that, it's looking good and I'm looking forward to more progress-shots
yeh, I was thinking about that sleve and if I should get rid of it completely or not, I know it would stretch the texture a lot :S
also, i wish I didn't have to rush it so much... but because we had a dedline on Friday for the sculpt and the retop I had to move on to retop by that stage
As for proportions I did look up for real life 6heads tall women/girls(such as Kristin Chenoweth, lucy Liu) I did notice some elements of the sculpt that are wrong, starting from that after changing the head slightly she actually is about 6,5 heads tall now and not 6
btw, here are some shots from the retop
The hair planes are bad...I know
I have to redo them, it is quite hard and time consuming to get the planes in the right places but I will work on fixing those next. If anyone notices anything else that needs fixing please let me know before i move on to texturing
also got rid of the side sleeve to see how it will look
Not sure about the uvs... I could have packed them closer together, but at the same time I should proabbly also think about padding... any advise on that?
Then create the belt going on the character, and "overlap" the UV of that belt on the texture that you baked. Easier retopo, better baking and straight UVs ^^ so more room for other stuff.
I also figured I could have only done one segment of each belt and then just have the texture tiled.... but it's also too late for that...
Well, I did change the UVs in the end, packed the elements with the same colour closer together and I saved a little bit of space.
I havent been undating a lot here, but I baked the normal map and got some base colour for diffuse done etc
I do however run into a problem in marmoset... I exported my mesh and everything seems ok but I have two weird artifacts going on on the mesh
I don't know what it is... it's not normal map issue or unwelded verts. It does get effected by light tho, in some light they are more visible than in the other...
also, I sterted texturing hair but I am not fully happy with the look of the alpha...
(the hair texture isn't done yet, needs more work)
It has those tiny little squares around the edges of the alpha. I have ticked both use alpha testing and use aplha-to-coverage. I tried to adjust the aplha threshold slider but it doesn't change it to much better than that...
Is anyone familiar with marmoset toolbag? .... any ideas on those little problems I'm having?
my texturing deadline was last friday so I had to finish texturing it.
apart from posing the character, i guess its pretty much done
No, I am not entirely happy with it... I had to really rush specular map which isn't great at all... altho I always have trouble with creating specular maps to begin with
If anyone have any critisism, ny advice on specular maps or how to fix those errors in Marmoset or ANYTHING else feel free to write a wall of text, it would help me a lot!
I know there is a LOT to improve but I would apreciate some profesional feedback
I did however roughly rigged the model (I am horrible at skinning so it took ages) The rig doesn't look the best but for a simple pose I think it's ok.
Here is some final construction render and a beauty render.
Rendered in Marmoset Toolbag
I'm still open to criticism if anyone have anything to say