Adding Jaw bone to biped in 3ds max
polycounter lvl 9
Hey guys ,
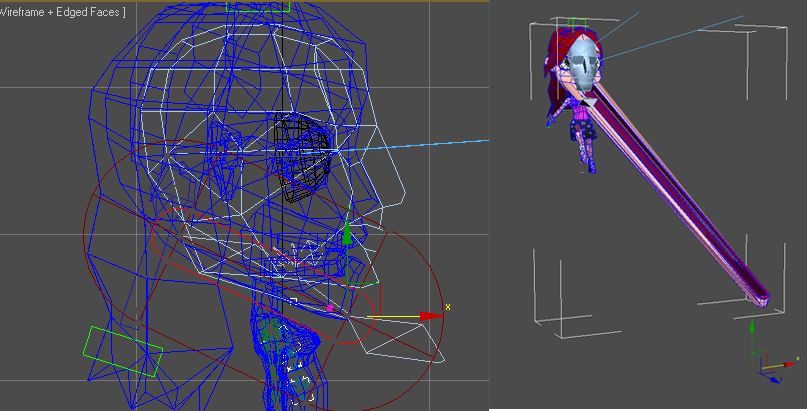
Here is a character that I have been rigging. It was decided to add a jaw bone but for some reason whenever I try and assign any weighting to the bone it goes all weird and stretches, as you can see in the pic. I have tried collapsing the stack and starting again but that makes it so that the envelopes etc don't line up and you end up getting a crazy effect on the rest of the character, although the jaw seems to work when that happens
Any help or suggestions on this would be greatly appreciated, thanks for reading")
Here is a character that I have been rigging. It was decided to add a jaw bone but for some reason whenever I try and assign any weighting to the bone it goes all weird and stretches, as you can see in the pic. I have tried collapsing the stack and starting again but that makes it so that the envelopes etc don't line up and you end up getting a crazy effect on the rest of the character, although the jaw seems to work when that happens
Any help or suggestions on this would be greatly appreciated, thanks for reading
Replies
Remove the bone from the skin modifier, delete it. Make a new bone, and don't ever scale it. (Instead of a bone object you can use a Biped Ponytail bone, or a Biped Xtra bone. That's what I would do to make transferring animations easier.)
Make sure the reference frame in the Advanced Parameters of the skin is set to frame 0, and that frame zero all the bones are in the correct bind pose positions.
That's a clever idea, never thought of this by myself...
On the other hand i never had problems using a headlinked hierarchy using standard bones for the facial rig in biped
Also before you apply skin to your mesh, select all of the bones/biped that you will be skinning to, hold alt, right click, and choose set skin pose. This will help skin and the bones/biped understand the basic reference pose. It helps smooth out other issues that are bound to pop up and leave you scratching your head.
It becomes a bit more complicated to save/load and mix animations when you start attaching non-biped systems. Biped can save and load things that are attached to it, but tries to replace them if they already exist in the scene and that often screws up skin. Instead you end up managing them seperately as a seperate object and tracks inside of Motion Mixer. It isn't impossible, just for something this simple it helps to keep it all in the biped system so you only load/save one system.
I'm not quite sure, but is'nt that the same as toggling the "always deform" checkbox in Skin's advanced rollout off and on again after bone adjustments, while the timeline is at the reference frame ? I have the suspection that the "set skin pose" command is just doing that internally
PS:
Out of curiosity i rechecked the Skin source code in the SDK samples.
( I already dealt with it in the past http://forums.cgsociety.org/showthread.php?f=6&t=1056953 ).
Funny thing is that skin does'nt contain a single reference to the whole SkinPose mechanism (which is a Node related thing). So i doubt that Skinpose does really anything for skin. Skin has the Reference frame setting in the advanced rollout, and i think it's there where it get's all the bone reference transforms from...
Also the docs are rather general, but it looks like Skinpose is only there to store a set of transforms (similar to "Freeze Transform") . Skin itself does nothing with Skinpose as it seems...
http://docs.autodesk.com/3DSMAX/15/ENU/MAXScript-Help/index.html?url=files/GUID-CF42632D-E10A-4C98-92F0-1FE949A80298.htm,topicNumber=d30e254215
The Skin modifier contains a Bone Bind Transform per bone (skinUtils.SetBoneBindTM) independent of the Skin Pose.
http://docs.autodesk.com/3DSMAX/15/ENU/MAXScript-Help/index.html?url=files/GUID-0820AA26-920F-434D-A6BC-E8B6B57F54AC.htm,topicNumber=d30e424689
Unchecking "Always Deform" lets you manipulate the Bone Bind Transform.
I make use of the "assume skin pose" while animating just to get pieces back to a clear starting place.
It also seemed to help keep the biped clavicles in place, where before I started doing that they would apply a universal rotation of 5-15% up or down to all animations, when toggling in and out of figure mode, it wouldn't happen every time but it happened enough to be annoying. I'm not sure if set skin pose was what fixed it or not or if they did something else to biped, but I haven't had it happen in 1-2 years. So I cross my chickens feet and refresh the salt circle around my desk before applying skin :poly131:
I REALLY wish biped had a mode like "bone edit mode" or like CAT when you're aligning joints where you can move the joint instead of having to scale and rotate it. For a while I was starting off with a CAT rig, then using a script that would create a biped around the CAT but it stopped working accurately when they introduced knuckle bones.
Strange thing is , Biped has it already something similar to that, but for Knee and Ellbow joints only ( Rubberband mode )
Here is the positioning of CAT, which is the same as any custom bone rig.
Biped rubberband mode has you select the joint higher up to move the position of the lower. If you want to move the elbow you select the bicep which has its pivot not in the elbow but at the end of the clavicle. Making snapping the elbow to a specific point (like above) impossible. If you grab the forearm you get the right pivot but it moves the whole hand around.
So the best you can do in biped rubberband mode is to kind of wrangle one point at the shoulder that never moves but causes the lower joint to slide around hopefully into roughly the right spot. You're left just kind of hunting around hoping it lines up, and the elbow and the knees are the only joints it works on?
Mind you I prefer biped to CAT when animating. FK/IK switching and managing two separate rigs with blending is completely retarded, so I stick to biped which handles it all very nicely but that doesn't mean that CAT doesn't have some other great features.
Two ways...
1) render a viewport preview to AVI, and import that as layers into photoshop, then the animate panel has a "make frames from layers" option. Some newer versions of photoshop might be missing this import option or do it through automate or open.
2) Screenshot, paste, screenshot, paste wash rinse repeat. "make frames from layers" (its in the options fly out just under the close X in the upper right of the animation panel).