Home 3D Art Showcase & Critiques

Looking to improve my techniques...

polycounter lvl 6
Offline / Send Message
ljsketch polycounter lvl 6
Hey everyone, I am working on this character to possibly include in my portfolio. One of the issues I have run into is on the tunic. The tunic is ripped and has holes here and there. On the model, however, you can see the geometry instead of the alpha from the targa file. I am not even sure if this is possible, but is there a way to make the parts of the geometry not textured invisible?

Also, feel free to critique any other noticeable issues. I'm here to learn more and won't take it personally as long as its constructive.
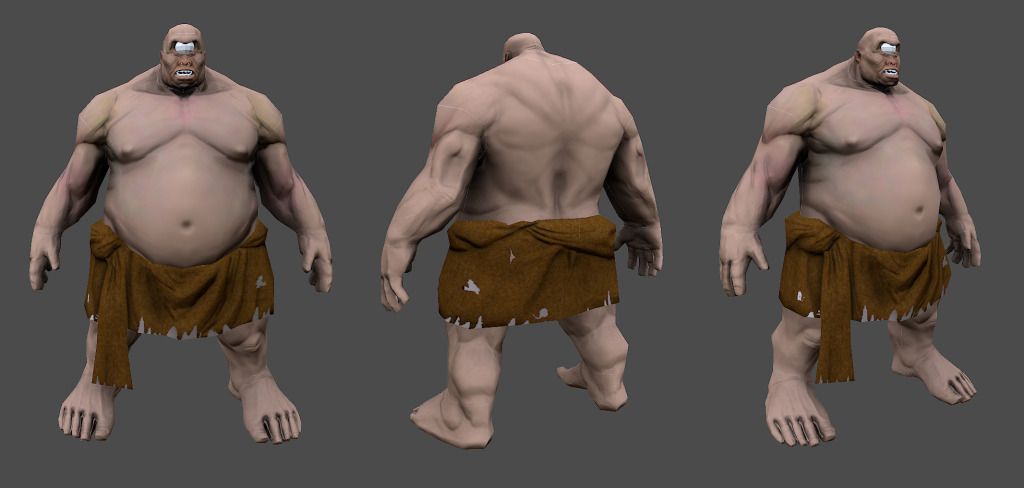
polyphemus_comp.jpg

Replies

  • Fingus
    Options
    Offline / Send Message
    Fingus polycounter lvl 11
    Not 100% sure what you mean. Do you have troubles making the alpha work, or do you want a way to have transparency without an alpha channel? For the first issue check that you have saved it as a 32 bit TGA, 24 bit doesn't contain the alpha channel. For the second issue you could have the transparent areas be a very unique color like bright pink or green (something you'd never use anywhere else) and then have the shader cutout the areas of that specific color. It's a very oldschool technique so it shouldn't be too hard to implement.
  • ljsketch
    Options
    Offline / Send Message
    ljsketch polycounter lvl 6
    The first issue is what I meant. And you hit the problem right on the head. I am using 24 bit. Thanks for the help! I'll post an update when I get home later.
  • sybrix
    Options
    Offline / Send Message
    sybrix polycounter lvl 13
    The most notable thing I picked up is the white seam running around the shoulder and down the whole model. I think it's the texture map? Might want to make sure you paint a little bit outside of the UV shells so there's a few pixels of "bleeding" texture, that should make it so you avoid the seams you can get if you stick too close to the UV shell borders.

    Looking good so far!
  • ljsketch
    Options
    Offline / Send Message
    ljsketch polycounter lvl 6
    I went back and saved my TGA files with 32 bit. Still did not fix the problem unfortunately. I have attached my diffuse map so you can see how I am saving it.

    @Fingus-you'll have to educate me a bit more on the second method you mentioned. I am using Marmoset to preview my models and do not know of a way to modify the shaders as you mentioned.


    @Sybrix-Good catch, albeit, all of my seams are showing that white line.

    cyclopscolormap.png

    polyphemus_070312.jpg
  • AlexCatMasterSupreme
    Options
    Offline / Send Message
    AlexCatMasterSupreme interpolator
    That tricep bump looks odd. Other than that not bad.
  • ljsketch
    Options
    Offline / Send Message
    ljsketch polycounter lvl 6
    @Alex-agreed. I'll have to fix that on the color map. Seems like the detail was stretched or skewed while transferring in xNormal.
  • odium
    Options
    Offline / Send Message
    odium polycounter lvl 18
    Might want to take another look at that unwrap, its a bit... Odd. A lot of wasted space, odd pixel density etc.
  • ljsketch
    Options
    Offline / Send Message
    ljsketch polycounter lvl 6
    @odium-yeah, I used 3D coat to unwrap. I checked for stretching and such but I am no pro at laying out UVs. If you can offer a good source of reference on where to put seams, etc. Im open for it.
  • odium
    Options
    Offline / Send Message
    odium polycounter lvl 18
    The general rule of thumb is that for seams, place them in the least obvious places you can, or places you can get away with mirroring. Occluded spots work best, under the arms for example.

    The main issue I see with this one is that all in all your texel density is all over the place (that is, island A shouldn't be any higher in resolution than island B). Use a checker mapped texture on your mesh, and make sure that all the squares are roughly the same resolution.

    You do have some weird splits, I mean, why do you have each finger and toe unwrapped away from the main hand/foot? You have to allow a little stretching, and to be honest in these areas, its hard to see as it is, so making it really stand out with a big huge seam righ above the finger/toe is poor choice. You may be able to get away with mapping the entire body in one single uv island, depending really, by stiching the front/back together at the top of the shoulders? The cloth around the mid point actually helps because it allows you to split the islands in easier ways there, but it may be a good idea to actually move the "cloth" to its own texture, because it uses alpha masking. That depends on the engine, and if a draw call is more performance hitting than the drawing of a fully alpha tested mesh.
  • s33th
    Options
    Offline / Send Message
    Never go to a flat black in your textures, and never leave the occlusion overlay on skin greyscale, it sucks the life out of the character.
    further reading on that topic here - http://androidarts.com/art_tut.htm

    There are some issues with the anatomy, the back muscles - especially the lower traps need to extend further down the back. The triceps could be reformed, there are a lot of places where the anatomy is mushy looking which could be due partially to the low resolution of the mesh and the bake, this is really evident on the back of his forearms. The elbow joint is bending at a strange angle. The toes are very straight and almost look like finger, adding some curl and adjusting their volumes will fix that.

    The alpha question - have you tried a .png with embedded alpha? I haven't used marmoset in a while and can't remember the file formats it likes.

    I'd recommend going back and fixing up the sculpt. Rebake the occlusion and fix up the occlusion 'seams' on the fingers, toes, and armpits. Also since he is so lowpoly you may want to not model each individual toe separately, maybe for the lowpoly just make a 'club' foot and bake all of the toes together.
  • Krizalide
    Options
    Offline / Send Message
    Don't use pure black for shadows, and use more colors. The skins have alot of purples, yellow, greens and other colors, using mostly one color makes it look a bit lifeless.
    Also if you get rid of that black background and extend the skin color outside of the UVs, the seems will blend better.
    And like previous people said, for the clothes, you'd need to use alphas to make it work.
  • ljsketch
    Options
    Offline / Send Message
    ljsketch polycounter lvl 6
    Thanks for all the feedback guys! Those links were very helpful! I made some changes based on what you all provided.

    @odium-good stuff. I went back and changed the seams on my model again. this time i left out all the seams on the hands and feet. The layout here is from 3D coat again, except this time I did not take the layout into maya to rearrange them. The reason I had all those seams before is because I had seen someone cut their model up that way on the hands/feet, which is why I treated my model the same way.

    @s33th-yeah, I fudged up the elbow/arm after projecting the high res onto the retopo mesh in brush. I thought I could get away with it but obviously not :). I went back and fixed the sculpt. The zbrush image is attached.

    alpha problem fixed :). I had to make a separate map for the cloth and the targa file worked just fine. Btw, png does not work in marmoset.

    I am going to go back and bake the ao and normal once i get the new uv layout fixed.

    @dustinbrown-i know about alphas, only for web though. Very new to creating alphas for game engines. I had the alpha channel in photoshop exactly the way you have it on that picture. The other alpha must have been causing the problem but moving the cloth to a separate map fixed the issue. That varga tut is awesome btw. i had it bookmarked but totally forgot about it. Thanks for the reminder.

    polyphemus_alpha_fixed.jpg
    uvlayout.png
    polyphemus_070312-1.jpg
  • Aga22
    Options
    Offline / Send Message
    Aga22 polycounter lvl 11
    Much better uv's now...however, i know that on screen the hand is same size as the head, but you could move the palm's uv's someplace else and make the head's uv twice the size , for more detail. make the uv's that are under his feet smaller, since they wont be getting any serious screen time, and use the space for something else.
  • ljsketch
    Options
    Offline / Send Message
    ljsketch polycounter lvl 6
    Made some changes to the UV layout and rebaked the ao and normal maps. So far, everything looks good in marmoset. Now I have to go back into photoshop and make the colors look "pretty" and modify the ao map from xNormal (getting rid of the black areas, etc.).


    polyphemus_075012_2.jpg

    polyphemus_075012_1.jpg

    color_map.png
  • ljsketch
    Options
    Offline / Send Message
    ljsketch polycounter lvl 6
    worked on the color maps for the body a bit more. Seams are still showing. I'm more than likely going to take this into Zbrush or similar to clean those up.

    polyphemus_070812.png
  • Jason Young
    Options
    Offline / Send Message
    Jason Young polycounter lvl 14
    Looks like the AO is grayscale and really making the skin feel dirty and lifeless. Colorize it! Or, you can take what you've got and throw a gradient map adjustment layer on top and play around with different colors to get something a bit more fleshy feeling.
  • sybrix
    Options
    Offline / Send Message
    sybrix polycounter lvl 13
    This is coming along well. I second what JMYoung is talking about with the skin AO, I think shadows on skin are rarely a desaturated gray. Same goes for the cloth shadows/AO, might help to make it less overly contrasty with the harsh black shadows.
  • ljsketch
    Options
    Offline / Send Message
    ljsketch polycounter lvl 6
    Thanks for the tip JMYoung. I went ahead and colorized the AO. I already had an adjustment layer on it but i did not add enough color to it. I also did the same for the cloth...thanks Sybrix. Here's a shot of the character and the current color map.

    polyphemus_070912.png

    colormap.png
  • mystichobo
    Options
    Offline / Send Message
    mystichobo polycounter lvl 12
    Uh, I think the seams are probably more caused by a lack of padding on your bakes.

    Also, are you going to have him move individual toes? If not, you might as well just combine all the toes into one object.
  • odium
    Options
    Offline / Send Message
    odium polycounter lvl 18
    Yup, you have no padding at all on those textures, so of course it will produce that, even worse at a distance when it starts to mip.

    The individual toes are something I would change to a lump foot, would look better mostly because this mesh is so low poly, it looks awkward. Its like for example, playing a game with really high quality art and then seeing a head with a point? Thats what it looks like, but the other way around here. The feet have toes modeled, but then, why is the polycount so low?

    This is the biggie... What target is this for? You know, target spec? ATM, you have everything mapped out, yet... The arms, head, body, feet, everything, its all clearly just mirrored? Theres no point, at least how it is now, having it like that. You could likely not only increase pixel density a bit, but also half the texture size, if you mirrored it. If you dont want to mirror thats perfectly fine, but then at least make use of it.
  • ljsketch
    Options
    Offline / Send Message
    ljsketch polycounter lvl 6
    I thought I fixed the seams in Zbrush but when I generated the map inside Zbrush the padding was gone. I'll go back check the settings to see if that is something I can't do within Zbrush.

    @odium- the problem is I do not have a target with this particular piece. I merely created this exercise for myself to take a character from a high res sculpt into "low poly" mesh. Most of my current work is all high poly so I thought I'd go as low as I possibly could just to prove I could do it. It would be nice to grab a hold of a design doc with specs, etc, that I can follow so i can optimize here and there, as you mentioned. I totally agree with you that certain areas of the character could be mirrored, but again, for this particular exercise, that was not the initial idea. In this case, I can add some asymmetrical attributes to the skin, bruises, etc. so that the space isn't wasted.
  • Aga22
    Options
    Offline / Send Message
    Aga22 polycounter lvl 11
    my advice? fix the dark AO that goes to light again between the toes that goes to light again and is very bad to the eye, and then put this model , on the shelf, on your portfolio, whatever. You learned a lot from this, it served it's purpose. Get on with the next project, like odium said, set some specs for it, polygon count, mirror or non mirrored textures, etc. It's a whole new thing getting to work after you ve sorted some stuff in your head. I'm in the same spot, though i've been doing 3D for 20 years, i'm new to (current spec) realtime models, so everything i work on is like school to me. if you get stuck on a model, sometimes it's best to start with a clean slate. Some people strive to perfect everything they start, i prefer to build on good foundations. That's my opinion and i may be wrong...but if you want to perfect this model, i would say start from topology again...don't get me wrong, the model is nice, but there's a lack of polygons that are both bad to the eye (especially shoulders) and in the arm and leg joints, which will be hard to animate (to bend properly)
  • ljsketch
    Options
    Offline / Send Message
    ljsketch polycounter lvl 6
    @Aga22-thanks for the advice! Yeah, I fixed a few things but ultimately I shelved it because this was just something to learn from as you stated. I noticed the shoulders also. They appear very edgy, and I'm sure I could add a few points here and there to fix the problem. I'll be sure to mind all the help I received on this thread for my next project.

    I'm going back to posting in my sketchbook again so stop by when you get chance. Feel free to leave any feed back. Thanks again everyone!

    Here's the final model...or where I stopped ;)

    polyphemus_character-sheet-071812.jpg
Sign In or Register to comment.