Need help in understanding Weight Distribution and modeling for animation [Maya]
Hello guys,
I am going to get straight to the point; I have made a human modal which I have also rigged, as well as modeling and rigging a 5-fingerd hand. While I have yet to encounter any major problems, a few oddities bug me:
1) Whenever I bend my characters knee (this is after adding/editing /painting the weights), the knee seems to be too thin. I tried to distribute the weight between the thigh joint and the knee joint numerous times, as well as changing the models knee design to that of a knee-pad, which I saw from models that are shown at this forum. Yet, nothing seems to work.

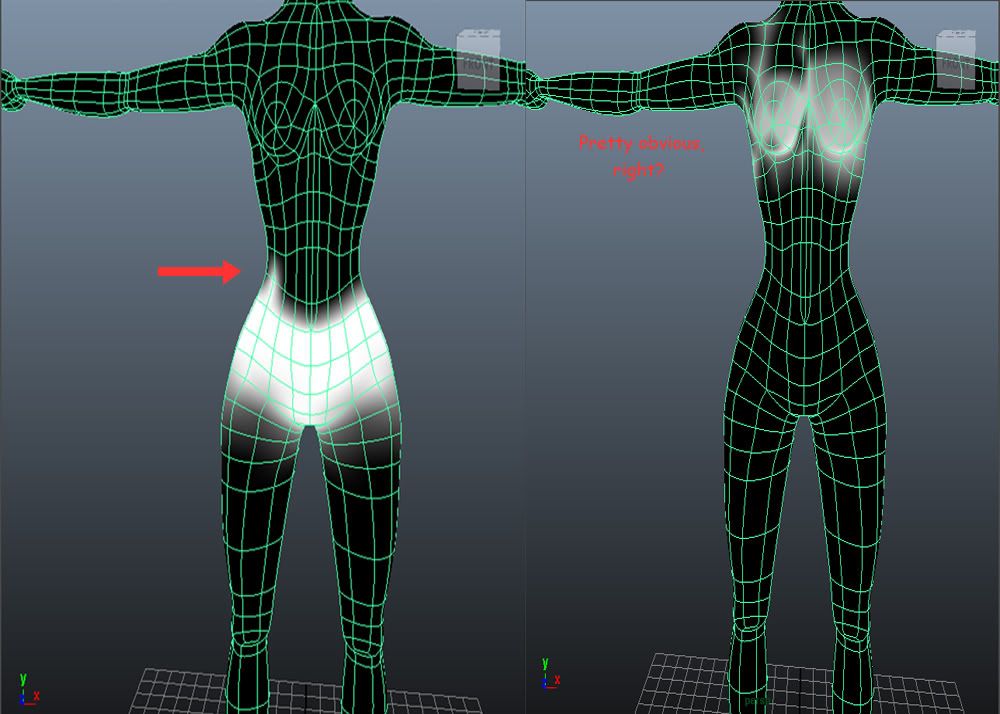
2) When painting the weight on my human model, I flooded the hip joint with a value of 1.00, and then proceeded to paint the weights on the rest of the joints, all while focusing on one side. Finally, I used the mirror weights tool, which seems to work perfectly. However, when I look at the weights on the joint I see that said weight is not fully symmetrical, which is weird because the model seems to act fine, and when I do try to fix the problem by hand, the model seems to act unsymmetrical when animating. So my question is, is this a bug in Maya? Is it a common one?
3) Finally, I have a general question. I have made a couple of hand models and I seem to have a problem with the thumbs. I cant seem to model them correctly, nor rig them. Could you point me to a good tutorial about hand modeling? Bear in mind that I need a hand that will function in animation.
I know that this is more of a modeling forum rather than a rigging one, but I will still appreciate your help, or at best, point me to an animation forum.
Thanks in advance guys!
P.S.: I really hope that you can see these images, because I can't. And if you need any more visual-aides, just ask.
I am going to get straight to the point; I have made a human modal which I have also rigged, as well as modeling and rigging a 5-fingerd hand. While I have yet to encounter any major problems, a few oddities bug me:
1) Whenever I bend my characters knee (this is after adding/editing /painting the weights), the knee seems to be too thin. I tried to distribute the weight between the thigh joint and the knee joint numerous times, as well as changing the models knee design to that of a knee-pad, which I saw from models that are shown at this forum. Yet, nothing seems to work.
2) When painting the weight on my human model, I flooded the hip joint with a value of 1.00, and then proceeded to paint the weights on the rest of the joints, all while focusing on one side. Finally, I used the mirror weights tool, which seems to work perfectly. However, when I look at the weights on the joint I see that said weight is not fully symmetrical, which is weird because the model seems to act fine, and when I do try to fix the problem by hand, the model seems to act unsymmetrical when animating. So my question is, is this a bug in Maya? Is it a common one?
3) Finally, I have a general question. I have made a couple of hand models and I seem to have a problem with the thumbs. I cant seem to model them correctly, nor rig them. Could you point me to a good tutorial about hand modeling? Bear in mind that I need a hand that will function in animation.
I know that this is more of a modeling forum rather than a rigging one, but I will still appreciate your help, or at best, point me to an animation forum.
Thanks in advance guys!
P.S.: I really hope that you can see these images, because I can't. And if you need any more visual-aides, just ask.
Replies
Not sure about the mirror weights question. I know a few versions of maya that I've used have been really buggy painting weights - especially before applying all the hotfixes/updates.
Hope that's somewhat helpful. Best of luck.
http://www.cgmascot.com/design/modeling-animation-test/
1. Is the model perfectly symmetrical? Slight variations in symmetry will cause mirroring issues.
2. Check in the Component Editor (Window--CE, after select verts, and click on smoothskin tab)--for small weights that you can use the Prune Small Weights tool to eradicate. You may have unintentionally created small values by smoothing or using replace (instead of add).
3. Do you have it set up to normalize weights (Skin menu)?
4. Where is the knee joint located? Is it on an edge loop? You may want to create three edge loops (close together at the knee), skin and test the deformation.
5. Did you set an animation up for the knee joint (bind pose at frame 1 and rotated at about frame 20) and then paint weights when it was in the rotated position? If you are painting in the bind pose position only that might be a factor.
Barbarian: 1) I am pretty sure it is, seeing as how I used the mirror geometry tool for the model.
2) I only used the Add function during the weights painting, because I have heard how unreliable Replace is.
3) Not sure, will have to check.
4) I will try to remodel a knee and skin it in the near future.
5) Yes, I did set an animation to the joint while painting.
Any-who, thanks you guys, I will try again with the knee as well as study the articulation and edgeloop as soon as I can, will also keep you posted.
Cheers!
Sorry for reviving this thread, but I need your opinion.
I have went through both sites, and have remodeled the leg, as well as added bones. I tried two different approaches. I would appreciate it if you were to tell which one looks better:
Thanks in advance.
Also, how can you use blend shapes for corrective purposes in this situation?
And for your question, as far as I am aware of, I used normal skinning while using the component editor.
There are a few ways to do corrective blend shapes, my method might be ancient by now (it's been several years).
I would bend the limb around 90○ duplicate the model, push it over to the side, remodel the duplicate until the limb is a satisfactory shape, add it to your skinned model as a blend shape and then attach the blend shape to the rotation of the bone. So when you move the bone from 0○ to 90○ the blend node will go from 0-1.
Heres a video going over it, just quickly googled corrective blend shape, didn't have time to watch the entire thing but he seems to know what he is doing. [ame="
And this explains Dual Quaternion skinning [ame="
Check this guys tutorials focused solely on why topology is important.
http://cgcookie.com/blender/2010/01/28/topology-overview-the-head/
There are other videos on the site that focus on other parts of the human body.You could use the topology for the fingers for elbows,knees.
I personally applaud how he explains topology with the face loops method rather than edge loops,when u think of deforming a mesh and maintaining volume,how many face loops will be needed to hold it.
Also check this site as well:
http://www.hippydrome.com/
I think for the knee,you need like a minimum of 3 face loops rather than 3 edge loops.when you model a part,try deforming it with your modeling tools and see how it looks and undo back to the previous pose,it helps u understand how the face loops should be spaced rather than waiting till u start painting weights,and then realize u need more loops or you need to move some vertices to maintain volume.