
Tutorial: Pre-Rendered Fur Tiles for Texturing
polycounter
Some friends asked me to write a tutorial for my fur technique. Figured I'd post it here. Hope you like!
In this tutorial, I'll teach you to make nifty fur tiles for use in texturing your models. You will see how having full control of the look and flow of your fur without painting can be incredibly useful, and how you can use the technique to achieve many different looks easily.


You can go about pre-rendering your fur in many ways, with many different packages. Since I am a Maya-user, I will use Maya Fur to explain this texturing method. If you've never used Maya Fur before, I'd suggest you go over the free introduction to Maya Fur videos at digital-tutors.com. They explain it better than I ever could. If you're already experienced with Fur, then go ahead and skip ahead to "Setting Up Your Tiles". Here are the videos I will refer to:
Digital-Tutors > Introduction and Project Overview
Digital-Tutors > Loading the Fur Plug-in and Overview
*pay special attention to combining fur descriptions and blending them at different percentages, and the difference between the two.
Digital-Tutors > Light Models, Fur Density and Global Scale
*pay special attention to the color attributes, and how to use them together. Below I will give you a tip on how to achieve more accurate colors by using ramps.
Digital-Tutors > Assigned Surfaces and Attaching Fur
*pay special attention to assigning the same fur descriptions to multiple surfaces
These short-but-informative videos will bring you up to speed and have you cooking-out quality fur in no time.

Obviously, it is incredibly important to do research on the kind of fur you want to use. How thick is the fur? Does the fur have lots of clumps and tangles? Where does the excess fur gather? How does the fur change lengths around the body? Gathering appropriate reference, and figuring this stuff out now is key.

There are a few things I've learned about getting better looking fur. I'm no expert by any means, and there are plenty more ways to improve the look of your fur, but here are some tips to start you off.
In the 2nd video [@7:10], you'll see that blending different fur presets at different percentages can allow you to mix-up the fur you want. The idea here is to minimize the time you spend changing attributes around and render testing. Time is money. Experimenting with all the presets, and how they mix together, can build up to become a vast library of Fur designs you have to choose from. Try to identify the characteristics of each fur preset that set them apart, and use those specifics to your advantage when blending.
FYI: The math I used when making fur for my Alpha Dog
The color channels you have by default can limit the depth of your fur, but by adding more variation with color ramps, you can add depth and personality to each channel. A ramp allows you to control the falloff between the colors which allows you to get much more accurate looks. I will now show you how to use a ramp for the "Base Color" of this squirrel description:

3-Layers of Fluffy
Each fur design will usually need three layers of descriptions per tile. The layers add depth and variety to the fur design. I'll briefly explain the layers and their differences here:

As you see, getting quality fur is a job in itself. The next section will teach you how to identify what kind of fur tiles you need, and how to go about producing texture-ready fur patches with embedded alpha channels.
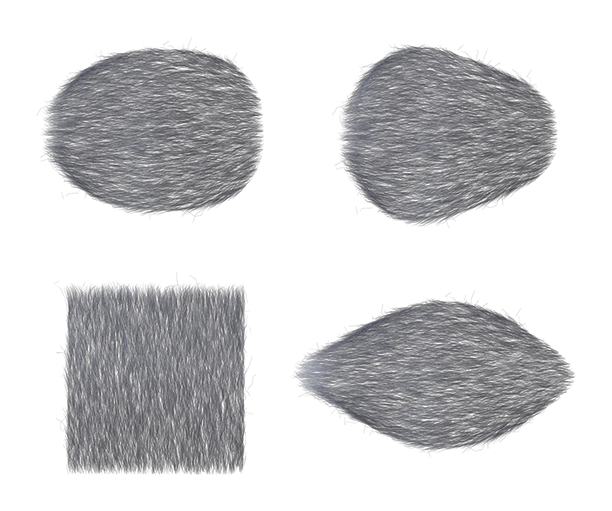
First, we'll need some good flat NURBS shapes to use as tiles. Go over your reference and attempt to pick out simple shapes in the fur's pattern. More than likely, you'll go with something like I have here:

In this picture, you see a basic lighting setup with two spotlights, and the fur tiles I used for my Alpha Dog spread out. Each shape was made from a NURBS plane with the CVs pushed around a bit. You may have to boost the divisions to get more complicated shapes, but most tiles will need only subtle adjustments. Moving these CVs will change how the hair gathers. The diamond and the spoon shapes will give you all of your frayed hairs on your texture.
Attach your fur descriptions to each of these shapes, then hide the NURBS surface to show only the fur. Fine tune your lighting, and render settings, then render from the top view. You may want render angles later with perspective, but keep it on a situational basis. You'll end up with something like this:
Feel free to just use these for practice if you like
Remember to save your alpha channel. You won't need to render huge tiles, you will be scaling them down when layering tiles anyways. Remember that you can always come back and make more tile shapes if you need them. Just assign the fur description(s) to the new shape, and you're ready to rock.

Okay, so you have fur all tiled up and ready. Now what?
I have my Photoshop texture file ready with the areas I'm planning to add fur to marked with a base color layer. The base color will vary on the design you're going for, but keep the color solid for now and you can make adjustments later, if needed.
Now we bring in our fur tiles and go to work. You probably already have a good idea what to do next, and you're exactly correct. Layer your tiles accordingly to create the fur design you need. Remember to never scale your fur with free transform as it will blur the tile, and you'll lose alot of intensity. You'll need to make several copies of each piece to create the fur texture, so blend the different tile layers by using an eraser with a speckled brush along the edges. It takes some getting used to, but once you get the hang of it, you can lay out huge sections of fur quickly.

You can use your eraser on a low opacity setting to basically change the flow and direction of the hair in addition to just blending. As you can see, the layer panel will get messy quick. You'll have to merge layers as you go, but be mindful of how you merge them. These same layers will be used in the spec map, and having certain layers merged could be handy...

Repeat the process for each section of the body (or whatever you're adding fur to). Be mindful of the size of the hairs in relation to your character, as well as the flow and direction of the fur. Different animals have unique hair directions, which can actually be quite complex. You'll see things around the furry areas on the texture getting a little nasty. No worries. Just use your base color as a selection area at the end (when the tile layers are merged) to cut out the stray hairs.

Okay, so I'm done laying out the fur. I even decided to add more depth to the fur by overlapping these beads with some sections of fur (Examples A and B. Use "over layers" wherever you can to add flavor to your design. Keeping the flow and length of your fur attractive and accurate (Example C) will add worlds to the look of your finished texture.

I hope you learned something, and possibly enjoyed yourself trying out this method. Feedback is welcome.
Based on a technique by Squirrely Jones
In this tutorial, I'll teach you to make nifty fur tiles for use in texturing your models. You will see how having full control of the look and flow of your fur without painting can be incredibly useful, and how you can use the technique to achieve many different looks easily.
You can go about pre-rendering your fur in many ways, with many different packages. Since I am a Maya-user, I will use Maya Fur to explain this texturing method. If you've never used Maya Fur before, I'd suggest you go over the free introduction to Maya Fur videos at digital-tutors.com. They explain it better than I ever could. If you're already experienced with Fur, then go ahead and skip ahead to "Setting Up Your Tiles". Here are the videos I will refer to:
Digital-Tutors > Introduction and Project Overview
Digital-Tutors > Loading the Fur Plug-in and Overview
*pay special attention to combining fur descriptions and blending them at different percentages, and the difference between the two.
Digital-Tutors > Light Models, Fur Density and Global Scale
*pay special attention to the color attributes, and how to use them together. Below I will give you a tip on how to achieve more accurate colors by using ramps.
Digital-Tutors > Assigned Surfaces and Attaching Fur
*pay special attention to assigning the same fur descriptions to multiple surfaces
These short-but-informative videos will bring you up to speed and have you cooking-out quality fur in no time.
Obviously, it is incredibly important to do research on the kind of fur you want to use. How thick is the fur? Does the fur have lots of clumps and tangles? Where does the excess fur gather? How does the fur change lengths around the body? Gathering appropriate reference, and figuring this stuff out now is key.
One pun down; nailed it
There are a few things I've learned about getting better looking fur. I'm no expert by any means, and there are plenty more ways to improve the look of your fur, but here are some tips to start you off.
Blending the Fur Presets
In the 2nd video [@7:10], you'll see that blending different fur presets at different percentages can allow you to mix-up the fur you want. The idea here is to minimize the time you spend changing attributes around and render testing. Time is money. Experimenting with all the presets, and how they mix together, can build up to become a vast library of Fur designs you have to choose from. Try to identify the characteristics of each fur preset that set them apart, and use those specifics to your advantage when blending.
FYI: The math I used when making fur for my Alpha Dog
- Squirrel + 50% Polar Bear + some adjustments = Bulk Layer
- Squirrel + 50% Polar Bear + 10% Punk + some adjustments = Scraggle Layer
Using Color Ramps
The color channels you have by default can limit the depth of your fur, but by adding more variation with color ramps, you can add depth and personality to each channel. A ramp allows you to control the falloff between the colors which allows you to get much more accurate looks. I will now show you how to use a ramp for the "Base Color" of this squirrel description:
3-Layers of Fluffy
Each fur design will usually need three layers of descriptions per tile. The layers add depth and variety to the fur design. I'll briefly explain the layers and their differences here:
- Base Layer - Provides coverage of the surface and makes the fur tiles less transparent. Keep the length real short with little to no baldness. *Use Reference
- Bulk Layer - The meat of the fur. Where the magic happens. Use all the settings to achieve the look you want *Use Reference
- Scraggle layer - The age and spice of your fur. How old is your character? How clean? Is it sick or injured? Show it here. Copy the bulk layer's description and boost the length by at least 20%. Turn the baldness and scraggle up, and adjust the direction and clumping to your taste. *Use Reference
As you see, getting quality fur is a job in itself. The next section will teach you how to identify what kind of fur tiles you need, and how to go about producing texture-ready fur patches with embedded alpha channels.
First, we'll need some good flat NURBS shapes to use as tiles. Go over your reference and attempt to pick out simple shapes in the fur's pattern. More than likely, you'll go with something like I have here:
In this picture, you see a basic lighting setup with two spotlights, and the fur tiles I used for my Alpha Dog spread out. Each shape was made from a NURBS plane with the CVs pushed around a bit. You may have to boost the divisions to get more complicated shapes, but most tiles will need only subtle adjustments. Moving these CVs will change how the hair gathers. The diamond and the spoon shapes will give you all of your frayed hairs on your texture.
Attach your fur descriptions to each of these shapes, then hide the NURBS surface to show only the fur. Fine tune your lighting, and render settings, then render from the top view. You may want render angles later with perspective, but keep it on a situational basis. You'll end up with something like this:
Feel free to just use these for practice if you like
Remember to save your alpha channel. You won't need to render huge tiles, you will be scaling them down when layering tiles anyways. Remember that you can always come back and make more tile shapes if you need them. Just assign the fur description(s) to the new shape, and you're ready to rock.
Booya; I'm pun-tastic
Okay, so you have fur all tiled up and ready. Now what?
I have my Photoshop texture file ready with the areas I'm planning to add fur to marked with a base color layer. The base color will vary on the design you're going for, but keep the color solid for now and you can make adjustments later, if needed.
Now we bring in our fur tiles and go to work. You probably already have a good idea what to do next, and you're exactly correct. Layer your tiles accordingly to create the fur design you need. Remember to never scale your fur with free transform as it will blur the tile, and you'll lose alot of intensity. You'll need to make several copies of each piece to create the fur texture, so blend the different tile layers by using an eraser with a speckled brush along the edges. It takes some getting used to, but once you get the hang of it, you can lay out huge sections of fur quickly.
You can use your eraser on a low opacity setting to basically change the flow and direction of the hair in addition to just blending. As you can see, the layer panel will get messy quick. You'll have to merge layers as you go, but be mindful of how you merge them. These same layers will be used in the spec map, and having certain layers merged could be handy...
Repeat the process for each section of the body (or whatever you're adding fur to). Be mindful of the size of the hairs in relation to your character, as well as the flow and direction of the fur. Different animals have unique hair directions, which can actually be quite complex. You'll see things around the furry areas on the texture getting a little nasty. No worries. Just use your base color as a selection area at the end (when the tile layers are merged) to cut out the stray hairs.
Okay, so I'm done laying out the fur. I even decided to add more depth to the fur by overlapping these beads with some sections of fur (Examples A and B. Use "over layers" wherever you can to add flavor to your design. Keeping the flow and length of your fur attractive and accurate (Example C) will add worlds to the look of your finished texture.
One for the road...
I hope you learned something, and possibly enjoyed yourself trying out this method. Feedback is welcome.
Based on a technique by Squirrely Jones
Replies
Nice!
thanks a lot anyway for your tutorial
was it done like this?
this is a very old whitepaper.
but this ist a common realtime approach.
the two techniques are fins and shells.
I've seen extruding fur done on black and white, not done as best as it could but it seems to look okay. They just made faces where they would like the fur to extrude (I'm not sure if their attached to the original mesh or not but it doesn't really matter) and gave it a partially transparent texture.
seems to work quite well, and in animating's case, the fur only needs to drag behind the model a bit to make it seem dynamic.
No real tut needed for it, basic stuff, cheap to draw and to good effect. hope this helped :P
@Fingus - Glad you found it helpful
@NAIMA - Thanks for your gratitude
@ZacD - Thanks for posting. I was curious how that colossus fur was done too. One of my favorite games :poly136: Some of your work?
@megalmn2000 - Your welcome, mate
just wondering - how you would incorporate this into a normal map? - just convert the texture through crazy bump or nDo?
Furtastic learning experience.
(I was following the dog on the "What Are You Working On?" Thread.) Great result.
Also the Panda guy you are thinking of, is Squirrely Jones and the tutorial you were looking for I am guessing is http://www.squirrelyjones.com/public/fur.pdf
He also has a nice feather tutorial too. (Just Google his name). Think it goes into Normal map stuff too.
@Nitewalkr - Your welcome, mate
@achmedthesnake - Thanks! Yeah, you have the right idea. Just keep in mind how you want to define the normals when you are merging your tile layers, so you can shift and blend heights of fur more naturally with multiple fur shells. Though I should mention, this will probably only look good on thicker parts of fur.
@jib1337 - No problem, bud!
@Oniram - Your welcome, FURiend!
on a side note, ugh looking at the sotc fur makes my eyes feel weird and almost makes me feel sick. geh!