Home Technical Talk

Zbrush and 3DS Max Texture Problem

1
Basically, I modeled low poly in 3ds max, and took my model into Zbrush to add in the details for a cool normal map.

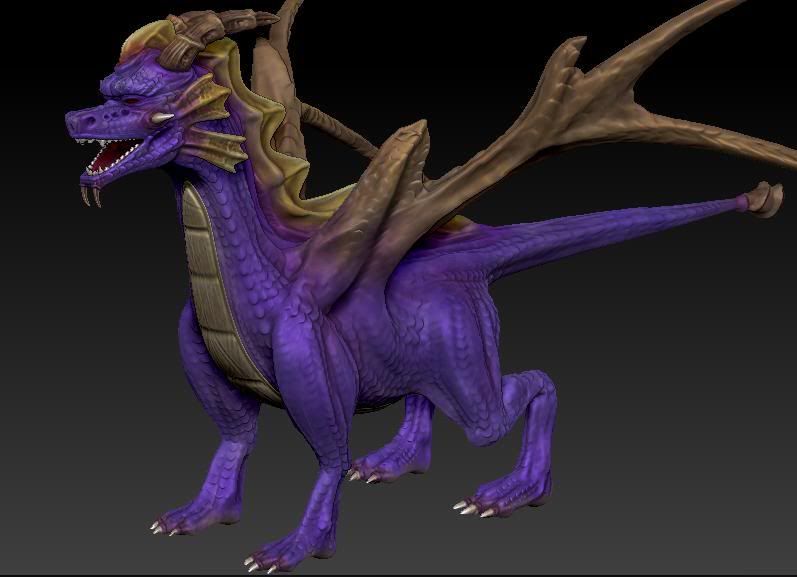
When I finally finished detailing in Zbrush, it looked like this:

spyrostage7.jpg


There's no problem here, it's exactly what I wanted, but when I brought it into 3ds max, there were ugly seams that showed themselves. These seams may have been created by the polygroups I made in zbrush, but I have since grouped everything together in zbrush, so the seams shouldn't exist, right?

Anyways, this is how the seems look in 3ds max:

spyro_problems1.jpg

spyro_problems2.jpg


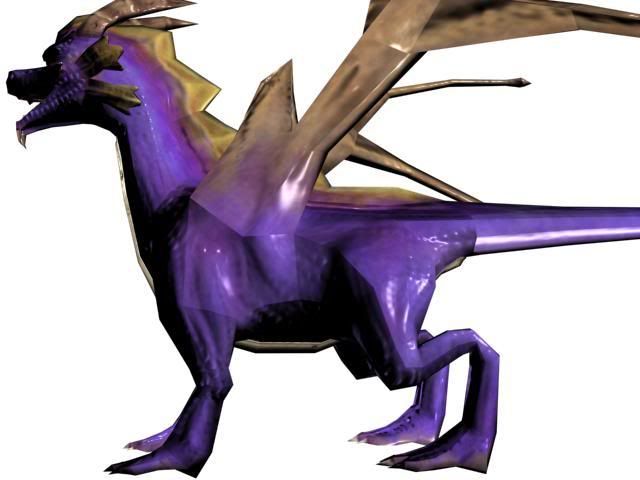
It doesn't take an artistic eye to spot those seams (even though I bumped things up to make it painfully obvious for you guys).

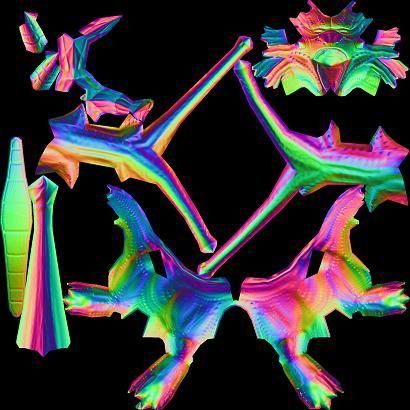
So how do I get rid of them? I only noticed them when my normal map looked like this:

spyro_badnormal.jpg

I don't remember seeing the problem when the normal maps looked (no pun intended, but "normal". This is the type I'm use to) like this:

spyro_goodnormal.jpg


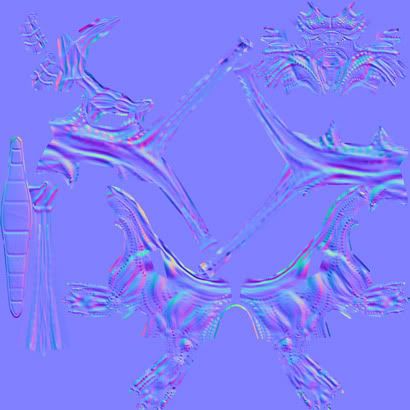
Does anyone at least know how to make the normal map export like the blue-covered one, while in Zbrush?

The reason I don't use that blue one is because it's not a detailed enough render. Any information is greatly appreciated!!

Replies

  • cryrid
    Options
    Offline / Send Message
    cryrid interpolator
    There should be no lost detail in a tangent-space normal map (the blue one). Creating it just consists of checking the 'tangent' icon on the normalmap subpallette.
  • TheUncutAngel
    Options
    Offline / Send Message
    Oh I know that the blue one doesn't lose detail, but I have since added another division to the holy poly version, and I wanted to take that detail with me... but ok, I'll try that and let you know how it goes. Thanks!
  • TheUncutAngel
    Options
    Offline / Send Message
    Here is the result:
    spyro_norma1.jpg

    The one with the red stroke is the old one, and as you can see it is smoother than the new version. It doesn't have those creases. Making it a tangent didn't work. Is there any other way to output a normal that doesn't have those creases in it?

    Both used polygroups, so that can't be the problem...
  • Ace-Angel
    Options
    Offline / Send Message
    Ace-Angel polycounter lvl 12
    Nice Spyro you got there...

    Did you flip the Y channel for Max? Are you using the Normal Bump inside the Bump channel? If your entire mesh composed of Autosmoothined groups or only 1?

    You could always try importing the model in XNormal and see if shows everything correctly?
  • TheUncutAngel
    Options
    Offline / Send Message
    I clicked "Smooth UV" in the spot where it also reads "tangent."

    I thought it would help, because it took those creases out of the normal, but I'm still seeing the seams... Could this just be because of the way it was unwrapped or?....
  • Ace-Angel
    Options
    Offline / Send Message
    Ace-Angel polycounter lvl 12
    Well, everything I just posted pretty much are your standard issues with normal maps, and if you tried everything I wrote then the only solution would be to try XNormal to bake and see if that helps.
  • TheUncutAngel
    Options
    Offline / Send Message
    Thanks Ace.

    I did flip it so that everything was correctly aligned in max. That wasn't the problem :(

    Yes, my entire mesh is composed of only 1 smooth group. I just tried to auto smooth and it made it worse lol

    Anyways, I'll google Xnormal and see what information there is about it.... I really think it's just because of the way I unwrapped in zrbush. I though it would be seamless because its all connected on the high res model, but I guess when u export the normal it doesn't matter @____@
  • TheUncutAngel
    Options
    Offline / Send Message
    It must be something with the way I unwrapped. These creases aren't on the model when I remove the normal. Why would it look ok in zbrush, but not in max, if I used the same normal?
  • Ace-Angel
    Options
    Offline / Send Message
    Ace-Angel polycounter lvl 12
    Could you post your UV's wireframes? Maybe they exploded, ZBrush in known for doing this sometimes...
  • TheUncutAngel
    Options
    Offline / Send Message
    spyro_UV.jpg
    screen shot from zbrush

    spyro_wire.jpg

    Saved out from 3ds max. Does that help?
  • Ace-Angel
    Options
    Offline / Send Message
    Ace-Angel polycounter lvl 12
    If you didn't change the color, then the the wireframe from Max shows that they exploded at one point. Open in the UV editor in Max select all the vertices, and weld them with a very low value (like 0.002 or so) and they should turn white.

    Import it back in ZB, and then simply bake the normal and see what you come up with.

    EDIT: Are you using GOZ or just importing stuff?
  • TheUncutAngel
    Options
    Offline / Send Message
    what does exploded mean and how can you tell? I'll try that in the mean time
  • Ace-Angel
    Options
    Offline / Send Message
    Ace-Angel polycounter lvl 12
    UV's are supposed to be only green at the seams and not everywhere (especially thick like that) so this could be the case, although your model did bake out the normals fine, so that confuses me.

    Honestly, I would suggest XNormal (it's a load and on click bake affair) or 3DS Max as dustin said. If you want, you could also load up your model in XNormal (the low poly one) and load up your normals and see.
  • cryrid
    Options
    Offline / Send Message
    cryrid interpolator
    ZBrush doesn't have smoothing groups as far as I know, so I wouldn't recommend baking your textures in ZBrush.
    It shouldn't make a difference as long as the mesh in max is in the same smoothing group?
  • TheUncutAngel
    Options
    Offline / Send Message
    @Dustinbrown, I baked everything using render to texture, but if the normal previously already showed creases "after" exporting from zbrush, then when its brought into 3ds max and shows them, baking would only keep the creases there. It doesn't eliminate the creases. At this point baking would look exactly like applying the normal (and whatever else) normally.

    @Ace, I didn't see an option box for welding my UVs. When I highlighted everything and (in the UV editor) went to "Tools" and "weld selected" there was no box appearing to alter the threshold of the weld.
  • TheUncutAngel
    Options
    Offline / Send Message
    PS ace, the UVs definitely have a problem. They are staked or something, because there are 2 verticies for every point. However when I welded them all (roughly. I couldn't figure out how to control the welding threshold), it didn't help the problem. The seams were still there :(
  • Ace-Angel
    Options
    Offline / Send Message
    Ace-Angel polycounter lvl 12
    Two ways to do it:

    unled1pa.jpg

    You can either go to Options > Preference and set the Weld-Threshold OR simply click on option down at the bottom and set the Threshold from there.
  • TheUncutAngel
    Options
    Offline / Send Message
    Alright I welded them all at .001 and it fixed it. They look normal now. Thanks for that. But the seams are still there. I really think its just my unwrap. The seems are in obvious places. Way too obvious. I thought it wasn't supposed to matter if they're painted on like that, though :(

    I did the texturing and normal in zbrush, so i don't understand.
  • cryrid
    Options
    Offline / Send Message
    cryrid interpolator
    While you usually want to hide UV seams, they should still not be that visible as long as the normal map and the mesh match up. What are your steps from creation to end, the import/export settings you used, and how you've set the shader up? Are you accommodating for zbrush flipping the uvs and texture around (like how your images don't match up).

    If you apply the same steps to a basic sphere for example, do you still end up with such seams?
  • TheUncutAngel
    Options
    Offline / Send Message
    I will try and work with a Z sphere and let you know if there's some kind of seam.

    Here's my steps:

    *Plane + shift (whatever that method is called) modeling in 3ds max. Modeled out the overall figure. 1500 polys

    spyrostage5.jpg


    *Took it into Z brush. added some details, subdivided. etc

    spyrostage6.jpg


    *When I started with the scales and finer details, I started up some polygroups

    spyrostage6_scales.jpg


    *Then I started texturing. I just learned how to poly paint so I went to town lol

    spyrostage7.jpg

    *Then I worked with unwrapping with UV master. Turned on "polygroups" and "symmetry."

    spyro_UV.jpg

    *they ended up looking like that, so I brought it into 3ds max to see how it worked out, and I saw the seams.

    When I was painting in zbrush I used the material "pearl" because it was white and made things pop the way I liked. Does the material you paint over top of matter? If you have any questions feel free. I still haven't been able to troubleshoot the seams.
  • TheUncutAngel
    Options
    Offline / Send Message
    oops the screenshot about polygroups is a mask... you know what I mean.
  • cryrid
    Options
    Offline / Send Message
    cryrid interpolator
    *they ended up looking like that, so I brought it into 3ds max to see how it worked out, and I saw the seams.

    In the Tools palette, expand the Export Subpalette and turn off Grp. Now export it and see if that makes a difference.
  • TheUncutAngel
    Options
    Offline / Send Message
    Tried it... that didn't work either..... Just to be clear, it IS odd that there are seams, right?
  • TheUncutAngel
  • cryrid
    Options
    Offline / Send Message
    cryrid interpolator
    Tried it... that didn't work either..... Just to be clear, it IS odd that there are seams, right?

    Yes. Again, did you try the same setup (UVs and Polygroups included) with a simple test object like a sphere, and was it giving the same results?
  • TheUncutAngel
    Options
    Offline / Send Message
    I will check that as soon as I get back home from school. Sorry, I overlooked that last night.
  • TheUncutAngel
    Options
    Offline / Send Message
    testresult.jpg


    PROCESS:

    - started with the standard sphere.

    - Bumped out the eyes nose, made the brush a little smaller, made some craptastic hair

    - Ran it through UV master, exported the normal and obj.

    - Brought he OBJ into 3ds max

    - went into the UV maps and welded all the verticies at .001

    - bumped up the spec and normal map to better see if there is a seam. There apparently is.

    I'm using 3ds max 2011. Are you getting this same result when you do that? This has happened with my low poly model (1500) and the high poly head example (8000+) which I just showed you. So its happening with both high and low poly. Are you getting this same issue when you do that process?
  • cryrid
    Options
    Offline / Send Message
    cryrid interpolator
    Can you share the .ztl file for that (one of the reasons I wanted a simpler test like this)? I'm thinking it's just a matter of adjusting the export settings (as there should be no reason to weld the UVs/verts afterwards - that might even end up changing the tangents which you wouldn't want).

    I don't use Max so I would be of no help if it is a Max-related problem, but for Softimage I don't get seams from zbrush.

    seamtest.jpg
  • TheUncutAngel
    Options
    Offline / Send Message
    testresult2.jpg


    I decided to use the same model, but render it with mental ray instead. I made a basic target light, and a plane below the model so that the light would bounce onto some of the darkest parts, and, though the seam is still noticeable, it's definitely not as obnoxious (same increase in specular setting and the bump [normal bump] map)

    It appears that the spec map MIGHT solve this, considering the seam is mostly noticeable because of how light is reacting at the seams, so if I had a spec map that excluded the creased parts of the model, would that solve the problem?
  • TheUncutAngel
    Options
    Offline / Send Message
    http://www.fileden.com/files/2006/7/9/118156//TEST.ZTL there is the ZTL. Let me know how things render out for you
  • TheUncutAngel
    Options
    Offline / Send Message
    scratch the idea for a specular map to come along and save the day. I just checked the normal, and the crease is the fault of the normal map. So it's not the inclusion or exclusion of a specular map, either

    btw what program are you rendering in, if not max?
  • cryrid
    Options
    Offline / Send Message
    cryrid interpolator
    noseam1.jpg
    noseam2.jpg

    Perhaps it is a Max-related issue afterall as this was with the default export settings (but if yours is separating the UVs to the point where you have to weld, maybe yours is different afterall. Are you using zbrush 4?). Have you tried a different viewport shader in Max, such as the 3-point one?
  • TheUncutAngel
    Options
    Offline / Send Message
    I JUST download 3-point shader lite, actually, and I can't figure out how to get it to work lol. When I apply it to my model, the geometry goes invisible and all there is is a red cage of the wireframe.

    What are you using to render?

    Also, did you have to weld any verticies, or were they already welded fine in the UV map editor?
  • TheUncutAngel
    Options
    Offline / Send Message
    also, did you apply the normal to it? or did you just render the model? Because the normal was the issue, not the models.. can you show me another render with the normal bumped up really high as well as the spec?
  • cryrid
    Options
    Offline / Send Message
    cryrid interpolator
    I imported into Softimage (and to Marmoset for the second one). I didn't have to do any welding, it came in as one single UV shell.
  • TheUncutAngel
    Options
    Offline / Send Message
    do you have skype or something?
  • TheUncutAngel
    Options
    Offline / Send Message
    btw I'm using zbrush 4. forgot to answer that
  • Razgriz
    Options
    Offline / Send Message
    Razgriz keyframe
    Yo Angel.

    I would encourage you to skim through the 3point sticky at the top of Technical Talk. I think Max has fixed a lot of their normal map problems by 2012, but using hardware renders is definitely taboo, get that thing into a game engine or viewport shader.

    The link you posted is a decent solution sometimes, but not for character type models where you can't really get the polygonal loop near your seams to overlap another UV cluster. It also might be worth baking in either Xnormal or max's render to texture, I would place a small bet that you still get the same issues when you render.

    I still say it's a max display problem, if you can't seem to get 3point working, then use this: http://www.laurenscorijn.com/viewportshader
  • TheUncutAngel
    Options
    Offline / Send Message
    I just installed something called 3pointshader, but I can't get that to work for the life of me..

    I rendered in mental ray and I brought it into unreal. The seams are still there. I'm definitely going to have to rework the seamed parts, and photoshop the normals. either that or slowly fade the normals out to nothing where the seams are :(
  • TheUncutAngel
    Options
    Offline / Send Message
    BREAK THROUGH EVERYONE!! BREAKTHROUGH!!!!!!!

    I was playing with the settings in the basic normal map options, and there's something called "switchRG" I clicked that and look at the difference!!

    Not switched RG
    switchRG_not.jpg


    SwitchRG enabled
    switchRG.jpg


    FUCK YEAH!
  • cryrid
    Options
    Offline / Send Message
    cryrid interpolator
    When Ace asked early on if you flipped the Y-channel and you replied saying you flipped it so that everything was correctly aligned in Max, were you referring to the UVs?
  • TheUncutAngel
    Options
    Offline / Send Message
    yeah that's what I thought he meant
  • cryrid
    Options
    Offline / Send Message
    cryrid interpolator
    Nah, he meant the color channel that represents the Y-value (typically this means the green channel). Try inverting that instead of switching the RG values.
  • TheUncutAngel
    Options
    Offline / Send Message
    flipping the G channel made it come out even better, thanks
  • TheUncutAngel
    Options
    Offline / Send Message
    however, I've been inspecting the model a lot more closely, and I'm noticing seams here and there... I'll post a picture in a second
  • TheUncutAngel
    Options
    Offline / Send Message
    seamfound3.jpg

    Where the wing comes up. I thought this might be because of my geometry, but after a turbo smooth it still had that crease. There's also one on the leg, but you can only notice it if you position it badly in the light.

    seamfound1.jpg

    On the horn tip


    seamfound2.jpg

    on the thigh, etc.


    Hmmmm..
  • iconoplast
    Options
    Offline / Send Message
    iconoplast polycounter lvl 13
    Those are almost certainly where the seams on your UVs are. Generally, you try to plan UVs so that they're in the least visible place you can get them or in a place where a seam would otherwise be in a real object (clothing seams, wood joins, etc.).
  • TheUncutAngel
    Options
    Offline / Send Message
    I'd be willing to share the ztl of this so that someone can see if they are running into the trouble
  • TheUncutAngel
    Options
    Offline / Send Message
    yeah they are seams from the UVs... :(
  • TheUncutAngel
1
Sign In or Register to comment.