Home Technical Talk

Texture unwrapping for tileable textures

polycounter lvl 11
Offline / Send Message
Progg polycounter lvl 11
So, I am obviously familiar with unwrapping models for unique textures, but honestly I have never even attempted to work with tileable textures on a major asset. I am trying to branch out and work on this, and I am curious how you guys go about planning a model for tileable textures, while still being able to get unique details on it and not make it seem bland. Maybe my idea of tileable is a bit different but I assume there is no major obvious details, busted out parts or destructions, etc that would make it stand out when tiled. (I'm also talking about a major asset and not a brick wall or flat area. Obviously that would be easy to tile)

Something similar to my tree from my Bait Shop. Is there a better way to lay the UV's for tileable textures as opposed to when I unwrapped for painting a unique texture?

uvexample.jpg

Do you go about it the same way as if you were to paint a specific texture for a model ( i.e layout out parts from the same object on the same UV sheet or is it acceptable to stack UV's all over the place on top of each other since the texture is tileable anyways? And how do you avoid the seams that would occur from the pieces/parts beings all over the place?

Thanks for any advice.

Replies

  • Lamont
    Options
    Offline / Send Message
    Lamont polycounter lvl 15
    Is there no way to hide the seam? What options are available for shading this tree? If I knew that tree was going to use a tile-able, then I'd have modeled and UV'd it different. Like putting a extra edge going up the length, so that I can use that to match UV borders. It's tricky.
  • Progg
    Options
    Offline / Send Message
    Progg polycounter lvl 11
    Lamont wrote: »
    Is there no way to hide the seam? What options are available for shading this tree? If I knew that tree was going to use a tile-able, then I'd have modeled and UV'd it different. Like putting a extra edge going up the length, so that I can use that to match UV borders. It's tricky.


    Well this was laid out for a unique texture. I only posted that image as an example, I'm not texturing that with a tileable one. It would be better to assume the branches would be separate meshes.

    Would you lay them out on the same UV sheet similar to how I have it now or would you stack the uv's on top of one another since the texture would be tileable anyways and it wouldn't matter. I guess my question stems because I have never seen the UV layout for a mesh that uses a tileable texture in a game engine. Besides.. BSP or a wall in Unreal.
  • Lamont
    Options
    Offline / Send Message
    Lamont polycounter lvl 15
    I'd stack shells, move them any way possible to get the flow of the bark to match up. You'd end up cutting in "useless" edges to get things to work.
  • michi.be
    Options
    Offline / Send Message
    michi.be polycounter lvl 17
    pelt mapping? With seams on top of the branches.
    No idea for the vertical seams of the stem. Maybe cover it up with some mossy decals. A tree always has moss to its north side.
  • leechdemon
    Options
    Offline / Send Message
    leechdemon polycounter lvl 11
    I'm running into this issue as well. A large part of our textures were designed to be tileable and reused throughout the scene, but some objects just NEED model-specific details, and at large scales, it screws with our texel density.

    We started planning for Mix materials; you could have a completely tilable texture, and then use a second map to break up the tiling, either with a secondary UV channel or by changing the map tiling. The problem I'm having with this though, is that since the textures were set up to tile initially they weren't unwrapped correctly for model-specific textures. Without redoing the UV's, I can't get the texture to both tile AND look like it works with the model.
  • Progg
    Options
    Offline / Send Message
    Progg polycounter lvl 11
    Well, to be honest I am doing this as part of a test. I would always unwrap the model for a specific unique texture if it was such a prominent asset like a tree or something. However, I was told to keep in mind most of the stuff done is with tileable textures. So that threw me off a bit since I had only ever used tileable for BSP and walls or fabrics and stuff that was relatively flat and unimportant.
  • Justin Meisse
    Options
    Offline / Send Message
    Justin Meisse polycounter lvl 18
    much like the interwebs, a tree is just a series of tubes, unwrap accordingly. By the way, that's the norm, you shouldn't unwrap trees uniquely, check out Adam's forest level.

    here's an example of a possible layout. Since the bark texture will repeat more vertically, dedicate more texture space vertically to hide repeating, most likely it won't even repeat on the horizontal. The bottom will have unique detail painted into it and will blend into, say, the bottom of the repeating trunk texture. You might want to do a rectangular texture instead of a square one. The bonus to this is the same texture can be used for multiple variations of this tree... small, medium, large etc...
    treelayout.jpg
  • leechdemon
    Options
    Offline / Send Message
    leechdemon polycounter lvl 11
    I've seen Justin's UV layout before in textures that both do and don't tile; the key is that one chunk (the Tiling bark) extends to both sides of the vertical UV space, meaning that the texture can allow for tiling without running into an inappropriate area, but since it only does it on one axis (vertical), you're allowing the room for both tiling in that space and different textures in other spaces.
  • Progg
    Options
    Offline / Send Message
    Progg polycounter lvl 11
    treelayout.jpg

    Nice Justin. That is exactly how I had imagined it. I guess my only question with that method is how would you go about blending/combining the unique bottom details in the bottom right (say moss or fungus) onto parts of the tree if the UVs of the tree were laid out on the left for the tiling part of the texture (the bark) ?

    Now that I think about it... I guess you could use masks and texture coords in the UDK?
  • leechdemon
    Options
    Offline / Send Message
    leechdemon polycounter lvl 11
    You'd basically set up the bark like this: http://poopinmymouth.com/process/tips/thirding.jpg

    You want the texture to tile, then you take the tiled part and draw the bottom onto it. That way it repeats forever, then you attach geometry to the end that uses the UV's in the unique section only. The seams meet, and it looks like it tiles forever, then stops.
  • Progg
    Options
    Offline / Send Message
    Progg polycounter lvl 11
    leechdemon wrote: »
    You'd basically set up the bark like this: http://poopinmymouth.com/process/tips/thirding.jpg

    You want the texture to tile, then you take the tiled part and draw the bottom onto it. That way it repeats forever, then you attach geometry to the end that uses the UV's in the unique section only. The seams meet, and it looks like it tiles forever, then stops.

    Great find. I like that. Although that could be pretty challenging for something more organic that a flat plane. I'll give it a shot, thanks
  • Progg
    Options
    Offline / Send Message
    Progg polycounter lvl 11
    So... I've unwrapped an object for a tileable texture, and to be honest it looks pretty good with no seams or anything. As far as cleanliness of the UV do you think it is more professional to just have the shells stacked in the same UV space or spread them out? example of what I mean below.

    uvlayout.jpg
  • leechdemon
    Options
    Offline / Send Message
    leechdemon polycounter lvl 11
    I usually stack mine. I'm not sure if it's "professional" or not, but it saves texture space, which is the name of the game. On top of which, if it's not important enough to get it's own Texturing, it's not usually important enough to get it's own UV's. The only exception I can think of is if you're tiling something over top of it that'll be unique, like a decal or so Something. but it that case, stack everything BUT the decaled piece.
  • Eric Chadwick
    Options
    Offline / Send Message
    Interesting, looks like you Relaxed all the shells, which gives you an even texel density across the model... but this creates a texture seam along every shell border, right? Also means the bark pattern is the same size on the trunk as it is on the smallest branch?

    I've traditionally done cylidrical UVs for trees, and scaled the UVs in whole unit increments. This means the trunk only has seams where it has a Y fork, or where the roots diverge from the trunk.
    http://ericchadwick.com/img/normalmapshader.html
    And the pattern gets smaller as the branches get smaller, more like a real tree.

    Opinions?
  • divi
    Options
    Offline / Send Message
    divi polycounter lvl 12
    i think he's just referring to moving overlapping things out of the 0-1 space so it looks less like a clusterfuck.
    doesn't hurt to spread them out, so why not? the screenshot isn't your thingie UVed for tiling though, is it?
  • Eric Chadwick
    Options
    Offline / Send Message
    Right, but he says it's setup for tiling. Except that all the shells are all less than 1 unit across, which means there's no tiling, unless he's tiling in the material instead.
  • Progg
    Options
    Offline / Send Message
    Progg polycounter lvl 11
    Divi is right I was just referring to spacing everything out. This was before some of the shells were scaled. I did relax the shells. The tree I'm working on is not the one from my baitshop. It is broken into a ton of different pieces for the top branches and such so I was able to scale most of the things independently. The top branches are UV'ed in the Y shape you are referring to Eric but they are separate from the trunk. So I can just reuse the bark texture that I need and scale them to match. I haven't run into any issues with seams on the trunk.

    I had to add moss to the bottom of the tree so I had to squeeze that in on part of the texture. so I can't use the texture in a 0-1 completely tileable fashion because the moss would be all over the trunk in weird places. It works, so I'm not complaining :P

    Also the tree has really smooth bark so there's not even that much surface detail to mess with.

    For future reference though, How would you have laid the UV's out Divi?
  • Eric Chadwick
    Options
    Offline / Send Message
    Would love to see the results, when you're done with the test (if you don't want to show before then).
  • Progg
    Options
    Offline / Send Message
    Progg polycounter lvl 11
    Would love to see the results, when you're done with the test (if you don't want to show before then).

    Sure. I can't post it now, but when I'm done and I ask them about it I will... if allowed.
  • Jessica Dinh
    Options
    Offline / Send Message
    Jessica Dinh polycounter lvl 10
    Hey Progg, I know this thread is like a year old haha, but here you asked all the same questions I have now. I learned a great deal from reading through the comments here, but just wondering if you could post that tree now? Or if you or anybody else has made another tree with a rougher, barkier (basically less smooth) texture, please post the results. Actually it doesn't have to be a tree, just anything more complex than a wall haha. I'd like to see some screenshots of complex models with a tileable texture like this, as well as their uv's if that's possible. You said your tree didn't really have any noticeable seams what with the relatively smooth texture you have, but I'd like to see if this method of willy-nilly stacking is consistently successful or not. Thanks! :D
  • Bunglo
    Options
    Offline / Send Message
    Bunglo polycounter lvl 13
    Assuming your texture is pretty straight forward, such as one sheet for bricks, bark, floor tile, etc. Creating something like a tree trunk is no more complex in regard to work flow than making a wall.

    If you need to get all of your materials into one sheet, such as the one Justin posted, the process doesn't change.

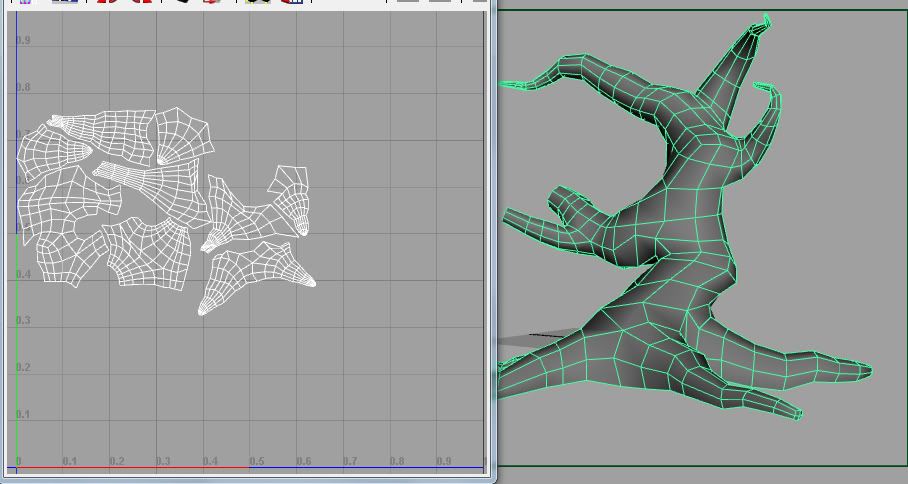
    Below I've posted UVs for a tree I did on a project awhile back. The layout showing the islands placed away from one another is what I used on the actual mesh. The other layout shows the islands stacked onto one another other for no other reason than to act as an example.

    uvsseperate.jpg

    uvsstacked.jpg

    Considering the texture will tile infinitely past your UV square, it really doesn't make a difference if you want to stack your islands or place them away from one another. Stacking your islands isn't going to give you any better results in hiding seams than not stacking. If you find an area that hides a seam and you're stacking, you could move that island over by 1 UV coordinate and you'd get the same result. There's no performance gain or drop that I'm aware of with either method and I don't see why there would be.

    For the mesh below, I used a 1024x512 texture as the tree is much taller than it is wide. Depending on your model and engine, your texture sheet should fall in-line with what makes the most sense but also what's going to perform the best. Some engines do better with square sheets (512x512) so you could throw two bark textures in there, or fill it with whatever.

    There's nothing fancy going on with the mesh, the trunk is one element, while the branches are separate, intersecting elements. I unwrap, scale, and rotate the UVs so they line up with the bark like they would in real life.

    Nothing else to it really.

    barkk.jpg

    treefv.jpg
  • Eric Chadwick
    Options
    Offline / Send Message
    I would like to see his results as well, could be instructive.

    I know that Justin's method does in fact look good, but I can't show any of our examples because our game's not ready for showing yet. :(

    It does however look excellent, and this technique allows a tree to be a single draw call because the whole tree uses a single shader with a single bitmap (or set, diffuse/normal/spec). Which in turn dramatically speeds up rendering the scene, because we have whole forests of these trees. If you have a single tree, alone in a scene, then it's not so important, but with a forest this is essential.
  • Jessica Dinh
    Options
    Offline / Send Message
    Jessica Dinh polycounter lvl 10
    Thanks Eric! Up until now, I've made a few trees, but every shell has its own unique texturing -__- It is very time consuming and everything looks kinda blurry because I was confined to really small texture sizes. So I'll take your word for it and try Justin's method on my next prop requiring tileables haha
  • Eric Chadwick
    Options
    Offline / Send Message
    Bunglo wrote: »
    If you need to get all of your materials into one sheet, such as the one Justin posted, the process doesn't change.
    IME the process does change, quite a bit. Your example shows a single tiling bark texture.

    But with a packed/atlas texture, I need to carefully lay out my UVs to isolate them, so the trunk mesh only uses the bark area in my texture, and doesn't overlap the leaves part.

    The non-repeated trunk-base texture also needs its own isolated section of the texture, with none of the rest of the trunk overlapping it.

    I also need to make sure there are no texture-bleed problems in the texture, and in the UVs. For example the trunk base UV needs to be shrunk a little, so the leaves area doesn't bleed into those triangles.

    It's kind of a different way of thinking about the UV space... compartmentalizing.

    Edit... also in your example, there's going to be a seam along one side of your trunk, because your UVs are not cylindrical. They're not rectangular. Becomes even more a problem with a low-frequency large-bark pattern, like pine trees have, and when you have a normal map for the bark.
  • Bunglo
    Options
    Offline / Send Message
    Bunglo polycounter lvl 13
    IME the process does change, quite a bit.

    My apologies, I was referring to the stacked or non-stacked UV question in regards to work flow. Though I suppose sayin the workflow doesn't change at all is wrong, my main point was that if you wanted to have a branch UV island 1 coordinate over, it's perfectly fine to do so, as far as I'm aware.
    Edit... also in your example, there's going to be a seam along one side of your trunk, because your UVs are not cylindrical. They're not rectangular. Becomes even more a problem with a low-frequency large-bark pattern, like pine trees have, and when you have a normal map for the bark.

    Interesting. It's been awhile since I've actually used cylindrical mapping, how well does the relax tool work with it? I only ask because in the method I used on my example, if I wanted to make more trees, I simply tweaked the mesh how ever I wanted and used relax to get everything square again. This way I never have to unwrap the mesh again unless I add more geometry.
  • Jessica Dinh
    Options
    Offline / Send Message
    Jessica Dinh polycounter lvl 10
    Thanks for sharing your images Bunglo! That was very helpful. I get what you are saying about relocating outside of the 0,0 space, although what I was concerned about was stacking shells (or not) within the 0,0 space. In which case Eric's recommendation to compartmentalize makes a lot of sense! :]
  • Bart
    Options
    Offline / Send Message
    Bunglo wrote: »
    Interesting. It's been awhile since I've actually used cylindrical mapping, how well does the relax tool work with it? I only ask because in the method I used on my example, if I wanted to make more trees, I simply tweaked the mesh how ever I wanted and used relax to get everything square again. This way I never have to unwrap the mesh again unless I add more geometry.

    Ye I agree with Eric. You would have some nasty seams with that. The way I do it is to create a seam on the lenght of one edge across the bark or branch then Pelt map it, hit Quick Peel and then straighten. But thats in 3ds max 2012. That straigthens the uv's very quicly so you can have proper tiling.
  • Eric Chadwick
    Options
    Offline / Send Message
    Relax doesn't work well with a rectangular layout, unfortunately. You can pin the outer verts and just relax the insides, but makes a mess sometimes. True for any rectangular layout. You can still tweak meshes though, most UVs do just fine, just have to tweak the few UVs that stretch.
Sign In or Register to comment.