Hedges and Topiary a quick tutorial
mod
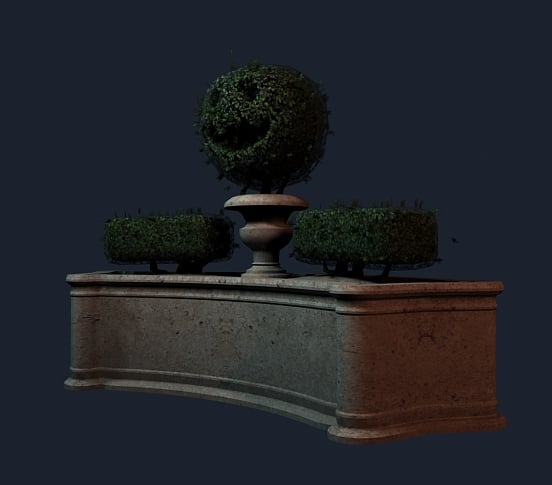
The hedge mesh:
- Create a box with a few segments in it, 3x2x2, relax it so it softens up and drop a noise modifier on it to twist it around a little. Don't collapse the stack just yet, you can change the noise parameters to alter the hedges slightly. You can do the odd shaping by hand, I'm just lazy and like automation.
- Apply a leafy hedge texture with no opacity map so its a solid mass of bush.
- Clone and scale your bush up a bit, a push modifier can work well for this. You can drop another noise modifier on this one (I copy/paste the original since it has settings close to what I use and just change the seed).

- Note: Careful how many times you do this engines have trouble sorting a lot of opacity maps so I normally stick to one or two.
"But wait doesn't it have a flat texture without opacity?" Yea we're getting there.
- It can be helpful to some engines if you break off the faces into separate objects but it depends on how the engine sorts.
- Know your tech, ask questions, don't be shy, they aren't all the same, preach preach preach...
Opacity Mask:
- Take your leafy hedge texture and make an opacity map for it.
- Copy the diffuse material plug in the opacity map and apply that to the outer hedge.
- Adjust the UV's on the outer so they aren't the same as the inner to avoid getting a weird zooming vertigo effect, its pretty trippy in real time and in some cases works to your advantage, but in this case, not.

Tips on making the opacity map:
- In this case I converted my diffuse to B/W bumped up the contrast a bit and did a select by color grabbing the black-ish dark areas.
- Then created a new layer and filled the selection with black.
- Created a white layer under it and merged them.
- Play with the contrast/brightness and levels to make it "alpha test" black and white no gray scale which also sorts better in most cases. Unreal does this by default I think but I prefer to have more control.
- Copied leafy hedge material plugged in the opacity map, then applied it to the slightly bigger outer hedge.
Leaf planes:
- Next up to help break up the silhouette I took a small plane and unwrapped it to a isolated leafy spot on the texture.
- I then moved the planes local pivot point so it was at the bottom center of the plane and that Z was looking up the height of the plane.
- Using Niel Blevins object painter script I scatter painted the plane onto the surface of the bushes. It has some nice randomize features and you can specify a few meshes to paint on as well as a few objects to paint. Super nice, has so many applications.
The branches:
I used polyboosts draw polys to make a strip and then branch feature on a few of the faces. No auto unwrap feature here, so I'm stuck doing it by hand Oh noes! heh.
The planter box:
- I created a profile spline (curvy height), and a path spline (top down shape) and applied sweep to the path picking the profile spline as the custom shape.
- Check on generate UV's so you're not stuck unwrapping it.
Created a plane to fit inside for the dirt, pushed and pulled a few verts here and there to get some uneven dirt and mounding around the branches.
- You can see that I ran symmetry on the planter box because my path spline was a little asymmetrical, probably should have handled that at the path spline stage but meh a little UV work never killed me.

Note about splines:
- A lot of people get frustrated with splines and claim they are broken, its because they expect the spline to use the world pivot system instead of its local pivot.
- If you create your splines in different viewports they have different local pivots and will react differently to each other. It can be helpful to realign the pivots to the world to get the desired effect.
- Hierarchy tab > affect pivot only > Align to world or nuke it from orbit and use reset xform, hopefully it collapses back to a spline... good luck with that...
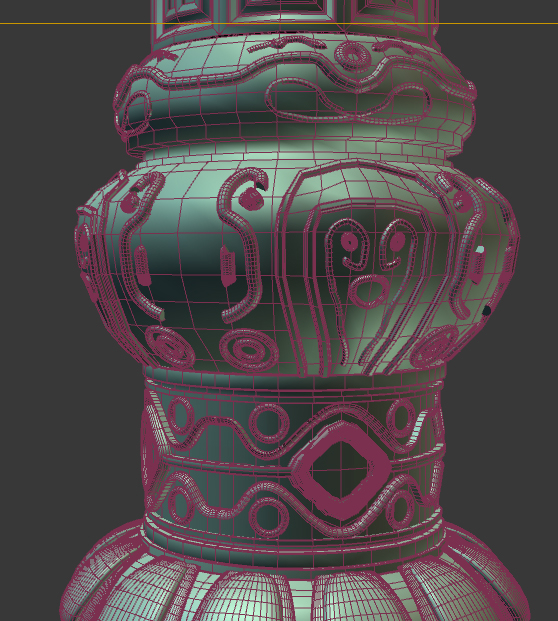
The concrete vase:
I created another profile spline, applied lathe to it, set it to generate UV's.
Final Textures:
- All of these have tiles applied to them they are unwrapped to channel 2 to take advantage of the tiles.
- I'll create a new layout (channel 1) that is optimized like you would see in real time games and then bake 2 to 1 and delete channel 2 when I'm finished.
- I'll paint unique details, water stains, dirt splatter, wear, maybe a crack or two, a little AO. Might even create some higher poly fancy details (spline painter script, like I did for the light post) and bake out a normal map.
BUT we're pressed for time and still have a lot to do so I might skip it...
Replies
I forgot to mention that the greentooth topiary was a quad sphere. I used a primitive shape plug-in I got from somewhere around here (Cholden?). But you can do the same thing by applying sphereify to a box that was turbo smoothed. It helps to unwrap the box before you turbo and sphereify.
Hehe, would it be cool it you show the wires... pweeeeaasssee!?
Wires
and UV layout
Note: This light post is also included in the UV layout (purple).
It's also packed a little tighter than I normally would, but the scene its for we're not concerned about mip-map edge bleeding.
Jason: I even broke apart the object and randomly colored the wires, now that's love!
OC: Cool, I'm glad it opened a few doors it really helps me work this way with quite a bit of stuff, especially when it comes to unwrapping.
and sweet! I had trouble making hedges a while back. I'll have to try eet again.