Home 3D Art Showcase & Critiques

Uni project; Dino WIP

1
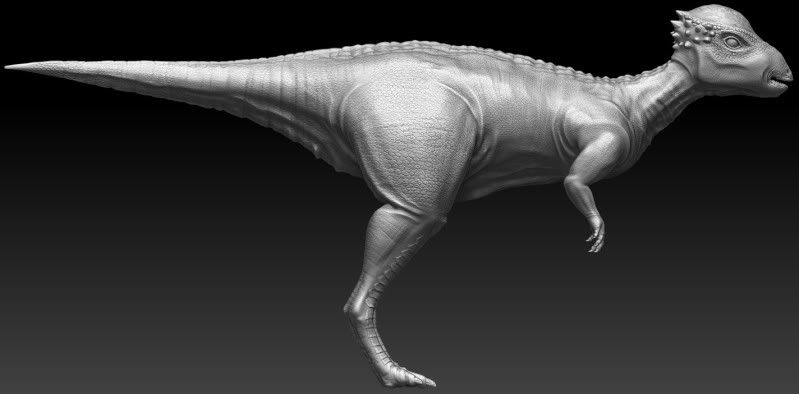
Hey guys, this is pretty much my first post on a forum like this ever so...let's get started. I'm in my final year of uni and for one of my modules I have to model a dinosaur, texture, rig it and get it running around in UDK. I finished the sculpt the other night and here it is. Please critique away, I get marked for taking your opinions on board!

I took some liberties with the design and took inspiration from other dinosaurs and animals like crocs. It's meant to be a pachycephalosaurus, or something from that family.

ScreenHunter_09Mar151949.jpg

ScreenHunter_08Mar151948.jpg

ScreenHunter_10Mar151952.jpg

ScreenHunter_11Mar15192.jpg

Replies

  • chakkrit
    Options
    Offline / Send Message
    Made the tail longer, think it looks a bit better now.

    tail.jpg
  • Dataday
    Options
    Offline / Send Message
    Dataday polycounter lvl 8
    I think you posted this on Game Artisians as well..

    Did you sculpt in the muscles and bone protrusions first? usually thats a good practice to getting anatomy for any creature to look believable.

    Showing some of the ribs (shape) along the skin would help understand its bone structure. I also feel like the thigh should be slanted a bit towards the tail to off set the weight of the entire body, kind of like what you did with the arm going towards the head.

    I guess the over all impression im getting is that I want to see or feel like theres bone and muscle under those scales.

    Just my opinion. Good luck with the sculpt!
  • chakkrit
    Options
    Offline / Send Message
    Yeah, I've got this same thread on here, CGSociety and GameArtisans. Sorry for the spamming, but this project counts towards my degree and I receive marks for taking on board critique from professional forums such as this, so I needed the thread to have maximum exposure.

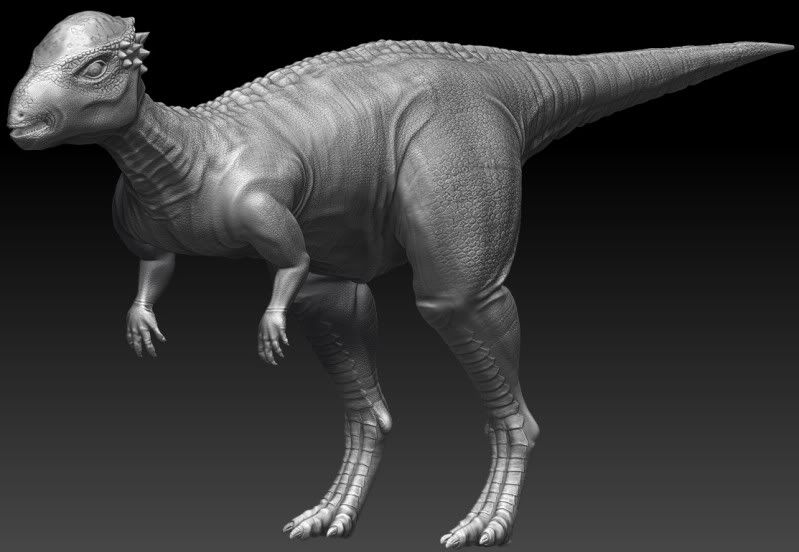
    Thank you very much for replying to me. I didn't start with bones, I made a base mesh in max using ref images, then I started forming out the muscles. The reference images I've managed to gather aren't a great deal of help and this dino isn't particularly muscular.

    I took a look to see what I could do though and tweaked it slightly. I shifted the rear leg back slightly, shaped out a bit of a rib cage and things like you said. I refined some of the creases etc. I think it looks better now. Thanks a lot for your observations :D

    Going to get the thumbs up from my tutor tomorrow and start retopping and texturing this.
    Just so you know the sort of images I was working from I've included them too.

    dinosplash-1.jpg

    comments.jpg
  • chakkrit
    Options
    Offline / Send Message
    This might be a better view of the torso/ribs.

    ScreenHunter_16Mar202317.jpg
  • Dataday
    Options
    Offline / Send Message
    Dataday polycounter lvl 8
    What I mean by angle the leg towards the tail is seen in the picture, you only made the thigh a big wider. Since you cannot really go off of a physical in the flesh dinosaur, you have to find the right balance between eye pleasing imagery and physical properties seen in other animals. There is a bit of a pattern in how animals look and are constructed via bones, muscle and tissue.

    I would really sell that muscle mass by giving it more contrast (depth and shape). The ribs dont need to be protruding as though its starving but it would make it look more interesting. The same thing can be done to other bone structures you think are below the skin...such as the spine and knee joints.

    I would also recommend curving the tail a bit to make it look less...mechanical and or stiff. Just a little bit would add some life to it.

    Of course this is just how I see it, so dont take my suggestions as something you absolutely have to do. At the end of the day its your art piece. =)

    aozsn.jpg
  • chakkrit
    Options
    Offline / Send Message
    Oh I see, thank you for pointing that out. What you said made a lot of sense and I've been told it before but just forgot, thanks for reminding me :) I spoke to my tutor this morning and he agreed with what you've said. I getting some rib cage form in the torso and bulked up the legs a little. I gave the tail a bit of a curve to make it seem more natural. I just went over some of the muscles and tried to emphasise them a little more. I tilted the front of the body up a little too to balance the model.

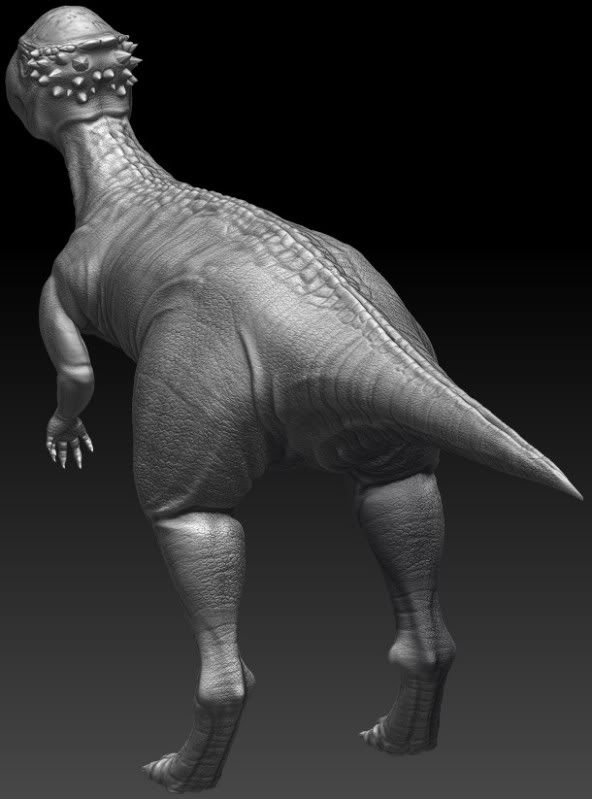
    I like the improvements I've made because it creates a more interesting model. I like the contrast between the muscular hind legs and the less built up torso and arms. I think this neutral pose looks more natural too, which should make rigging easier.

    Thank you very much for taking time to do a paint over and reply to my posts, it's very much appreciated.

    forumedits2.jpg

    ScreenHunter_06Mar211307.jpg
  • chakkrit
    Options
    Offline / Send Message
    I've started painting and I'm fairly happy with what I have so far. Just got a little stuck. I can't see what I can add to it or how to make it more interesting. I should probably get some variation in colours in there and some blends etc. Not 100% satisfied with how it looks so far - I know it can be better! Any suggestions or tips/hints would be massively appreciated. Maybe I've been staring at it too long -_-

    ScreenHunter_02Mar212249.jpg
  • chakkrit
    Options
    Offline / Send Message
    Done some more painting, it's coming along I think, nearly there now. Retop and unwrap soon :D

    ScreenHunter_05Mar222156.jpg

    newpaint.jpg
  • darthwilson
    Options
    Offline / Send Message
    Cool so far. You mentioned that he will be running around in UDK. One thing to worry about is that your polypaint result 'won't' look the same in UDK unless you have some amazing shader.

    I would advise testing a projection and testing in engine before doing anything else.

    Although like you said time to start unwrapping would mean you haven't tested a projection. What if it doesn't project?

    I try not to be mean honest :P but it's always a great idea to test these things early as possible so that you know your workflow does work.

    I'm sure projection will be fine touch wood and look forward to seeing him running around :P
  • darthwilson
    Options
    Offline / Send Message
    Also, as for the polypaint you could try put some dark spots on him like one of those conceptual images! The red on his face may be a bit too harsh in red! you could probably crank the red down on your layer.
  • chakkrit
    Options
    Offline / Send Message
    Thanks a lot, you raise really good points darth. I got a bit swept up in painting that I sort of forgot the overall goal. I will retop and unwrap ASAP and get it in engine to see how it looks, then crack on with making the other maps and rigging etc.

    I wanted the head to sort of look like a helmet, hence the extreme red round the eyes. I wanted it to look like a visor from head-on as this dino bashes its skull against others. I'll have to test it though, I know UDK tends to prefer desaturated textures. Will keep posting, thanks again :D
  • darthwilson
    Options
    Offline / Send Message
    If you enjoy painting in 3D space (like me) I recommend trying 3D coat. You can paint onto your game mesh with full layers and you can export the layers as a PSD which works nice with photoshop.

    I like it because it allows you to run DX mode and preview normal and specular maps as you paint.

    Also! It has some neat retop tools. I've tried the auto retop tool and it works really well with very little clean up

    http://www.youtube.com/watch?v=vEnwxnNMPk4
  • chakkrit
    Options
    Offline / Send Message
    Yeah I've seen 3D coat before, it looks really cool. Gonna have to scrape together some cash before I get hold of it, and it's a little too late in the game to learn a new program to get all my projects done, but definitely something to look at after. Thanks for your input :)

    I finished the retop and did a super quick unwrap in zbrush and then a quick projection in MAX to see how the normals are looking in UDK. Not too bad. Gotta question though, what would be the best way to unwrap the model. And how do I avoid bad seams like the ones shown in the images. Is there a way to boost the strength of the normal map in UDK so it looks a little deeper?

    The paint over shows my proposed unwrap, separating the limbs and unwrapping them and the body. Not sure if this is the best way. I included the UV Master unwrap and the normal map I made just to show what I was working with. Cheers.

    seams.jpg

    problemseams.jpg

    retop_unwrapNormalsMap.jpg
  • DillonBarba
    Options
    Offline / Send Message
    I would suggest checking out your smoothing groups and if that doesn't resolve the issue look at the afflicted areas and check to see if the vertices are even welded, what I usually do is grab a vertex and then pull it out a bit to see if its connected.
    Sometimes double-sided faces are the culprit if all else fails, I tend to get a lot of those if I extrude an edge improperly.
  • chakkrit
    Options
    Offline / Send Message
    Thanks for your reply :) I went over the mesh, checked there was no open faces, or floating verts. Made sure it was all smooth group 1, then made sure I had the right map parameter checked in UDK and the seams look like they've been fixed. So, just gonna optimise the unwrap, do the last little bits, then finish off the diffuse, get the spec done and get some rigging on the go. Here's how it's looking in engine now.

    ScreenHunter_02Mar281229.jpg

    ScreenHunter_01Mar281229.jpg
  • StuButler
    Options
    Offline / Send Message
    StuButler polycounter lvl 9
    please tell me your testing that as a skeletal mesh...
  • chakkrit
    Options
    Offline / Send Message
    It's just a static mesh. I only wanted to see how the normal map would look in engine. I tried importing it again as a skeletal mesh but it failed. The dino isn't rigged yet.
  • chakkrit
    Options
    Offline / Send Message
    The images before were just a quick unwrap using UV Master just to get an idea of what things looked like. I've just finished the retop fully, optimised the UVs and I dropped it in engine. Run in to a small problem in that the pivot isn't in the centre of the model. I'm absolutely certain and have done it multiple times to be safe that the pivot is centred to the model in max so I can't work out why it's not in the centre in UDK :\

    I probably wouldn't be too worried if it was in engine just for renders but I've got to rig and animate now and I think this off-centre pivot may become problematic. Hopefully the solution is simple enough, does anyone have any ideas what's wrong please? :)

    ScreenHunter_01Mar282142.jpg

    ScreenHunter_02Mar282144.jpg

    ScreenHunter_03Mar282145.jpg
  • chakkrit
    Options
    Offline / Send Message
    Sorted. It was to do with the scene settings in MAX. Just reset all. Job's a goujon.
  • StuButler
    Options
    Offline / Send Message
    StuButler polycounter lvl 9
    My point about the stat/skeletal mesh issue was that UDK lights statics and skeletals very differently and you have to set your texture up differently.

    To test your dino in engine, stick a single bone in the scene, weight the entire mesh to it, export to fbx, import as skeletal mesh.
  • chakkrit
    Options
    Offline / Send Message
    Unfinished texture. Single bone weighted to entire model, skeletal mesh in UDK. Diffuse and Normal maps applied. Gonna finish the diffuse, work on the spec and gloss. Then finish the rig I've started and animate...

    ScreenHunter_01Mar301715.jpg
  • darthwilson
    Options
    Offline / Send Message
    The unwrap seams you suggest are fine!

    I would advise not using the default day time/night time stuff that UDK give you as your stuff will look really washed out. I learnt the hard way.

    Also, nice hotkey. "Shift+N to select none" as this dino is bluuue

    ScreenHunter_03Mar282145.jpg
  • chakkrit
    Options
    Offline / Send Message
    Unwrap done, just finalising textures. I'll probably use the jungle map for some beauty shots because it seems really fitting. The dino is only selected to show the pivot is off centre, but I sorted that. Still, a useful hotkey nonetheless that I didn't know of - thanks! :D
  • darthwilson
    Options
    Offline / Send Message
    Bugger, I didn't notice the pivot point! make sure it's at the bottom centre of your mesh!
  • Skillmister
    Options
    Offline / Send Message
    Skillmister polycounter lvl 11
    Also, nice hotkey. "Shift+N to select none"

    Damnit so much time i've spent trying to click off stuff :poly117: :thumbup:
  • chakkrit
    Options
    Offline / Send Message
    Bugger, I didn't notice the pivot point! make sure it's at the bottom centre of your mesh!

    Bottom centre? Why can't the pivot just be in the middle of the mesh?

    Meanwhile, I've run in to some other problems. I've finished the diffuse, normal, spec and gloss, but it displays funny in UDK. I dunno if I've got the shaders set up wrong or the maps wrong or what. I've included images of my maps, the shader set up and model.

    I was under the impression that I should make my spec map an opposite colour to the model so the specular highlights are accurate. I was following guidelines from this site: http://www.manufato.com/?p=902

    Images; spec, gloss.

    Spec_col.jpg

    Gloss.jpg

    ScreenHunter_03Apr012320.jpg

    ScreenHunter_02Apr012318.jpg
  • NeoDement
    Options
    Offline / Send Message
    How does it look with just diffuse? Add one map at a time and see which one screws it up. I'd guess it's your Gloss (specular power) map though, you seem to have the level of detail you should have in your specular map in your gloss map, and vice versa. Also those are some pretty funky colours in your specular map. Did you test the textures in 3dsmax/Maya, does it look okay there? Read a little bit about how specular colour is meant to work here: http://www.manufato.com/?p=902

    edit: wow you linked to the same site in your post, oops. But yeah, never include your AO in your gloss map, it doesn't make sense, why would your model catch light from more angles (matte) in shadowed areas?

    editedit: Also about your pivot point, when you drag your model into a scene it will put the pivot point wherever you click, so your mesh would be about half way through the floor where it's pivot point currently is. Also models rotate around their pivot point.
  • chakkrit
    Options
    Offline / Send Message
    Thanks for the reply :) It looks absolutely fine with diffuse, normal and gloss. It's just the spec making it go crazy. What I took from the manufato site was that for a dielectric model like my dino, your spec map should be an opposing colour of your model so that the highlight is white. So I finished up the grey scale spec map then applied some filters to make it a sort of yellow orange. But UDK doesn't like that at all. Like I said, the model looks fine without it, image below. Looks fine in max with all 4 maps applied...

    ScreenHunter_04Apr020104.jpg

    max.jpg
  • NeoDement
    Options
    Offline / Send Message
    I think your specular colour map colours are too strong. Here's an example of a diff/spec/gloss I had kicking around that maybe of use:
    diffspecgloss.jpg
    Notice how my specular map is a more detailed, higher contrasting version of the diffuse map. So that when light catches it, interesting detail is revealed. According to that screenshot of the material editor you took, your spec map is pretty much flat colour.
    Notice how the blue tint some parts of my specular map have are very subtle. Yours has pure red which is totally blowing out the brown diffuse.
    Notice how my gloss map has been thought out - things which should have tighter highlights are brighter, bits which I want to catch the light more (broader highlights) are darker colours.

    It's also worth noting I usually have to multiply my spec/gloss maps in UDK a few times for them to work as I intend them to. I think that's just part of UDK. You can press M to quickly add a Multiply node, fix your gloss map (or remove it for now) and play around with multiplying your specular, I reckon.

    multiplyingyourspec.jpg

    edit: oh yeah and I'm pretty new to this stuff myself, so if anyone more pro could correct me where I'm wrong, that'd be cool :P
  • ArchieVision
    Options
    Offline / Send Message
    Great looking model keep it up. And, in the UDK Docs, is says to keep you diffuse desaturated when importing to keep from getting that type of error. You can always boost the diffuse in the material editor, but is is harder to desaturate it.
  • chakkrit
    Options
    Offline / Send Message
    Thank you both for your replies. Neo I completely get what you're saying, and I appreciate the images you posted. I'm gonna try and tweak the maps and tone them down a little. I think you're right in what you're saying.

    Archie, thanks for the positive feedback. I was aware that sometimes UDK likes to have desaturated diffuses so I have a filter in photoshop to make that so if I need to.

    Strangest thing, I woke up and tried to sort this problem again and everything seemed to work fine. I dunno what I did differently, maybe I was just tired. Either way, here it is working. Now I can rig and animate! The close up of the eye is to show the spec is working. The model is in a custom map, with 3 standard point lights, and is a skeletal mesh.

    ScreenHunter_01Apr021112.jpg

    ScreenHunter_02Apr021120.jpg
  • StuButler
    Options
    Offline / Send Message
    StuButler polycounter lvl 9
    The "horns" out of the back of his head could be improved, the textures looks weak and where they join the head would benefit from blending in, they look super-glued on at the moment as opposed to a natural growth through the flesh.
  • chakkrit
    Options
    Offline / Send Message
    Tried tweaking the sculpt and redoing the normal map so they don't look as bad. The naff horn texture was because of the normal map which I hadn't cleaned yet.

    ScreenHunter_02Apr021629.jpg
  • darthwilson
    Options
    Offline / Send Message
    It's specular power making it go crazy!

    As for the pivot stuff it makes sense as thats were his feet are and if you look at the examples in UT3 the pivot is usually at the bottom.
  • chakkrit
    Options
    Offline / Send Message
    The joys of rigging...

    ScreenHunter_01Apr050117.jpg
  • Cortes
    Options
    Offline / Send Message
    Cortes polycounter lvl 6
    Just read this whole thread and am learning a lot. Got some deja vu happening here... before I was busy with other work, I too was working on a dino, now I'm back again, working on another dinosaur!

    Sorry I was unable to provide any advice; you definitely know more about the texturing and game engine pipeline than myself. I'm certain I'm going to run into all the problems you've faced too, haha.
  • darthwilson
    Options
    Offline / Send Message
    Thats CAT! auto rig! :P

    Wheres your leg bones?
  • chakkrit
    Options
    Offline / Send Message
    Cortes - I wish you the best of luck with your work, I'll keep an eye out for the thread ;)

    Darth - you're always up so late, can't shake the uni routine? haha It's a custom CAT rig. I'm trying to tweak the stock 2 leg running anim and sometimes the model likes to do this. I got like a bajillion saves though, so I'm not annoyed. Finish this up in the morning, then off to engine. I have a dissertation to do...
  • chakkrit
    Options
    Offline / Send Message
    This is my idle anim. Ignore the quality, I think it's ok. It's hard to animate something that's still, if you know what I mean. Making anim sets in UDK, playing with some kismet and I'm just about done. Can't really spend too much more time on this project :(

    [ame="http://www.youtube.com/watch?v=YhhC0UaLVyg&context=C4965bffADvjVQa1PpcFP0VnWNLnN_RYTRtaI-RvoXvuDw_9iYMGc="]Idle_anim_test.avi - YouTube[/ame]
  • chakkrit
    Options
    Offline / Send Message
    Got a couple warnings when trying to export the mesh as an FBX. without animations. Not a clue what they mean :\

    Warning: Non-orthogonal matrix support (2) - One or more objects in the scene has local axes that are not perpendicular to each other (non-orthogonal).
    The FBX plug-in only supports orthogonal (or perpendicular) axes and will not correctly import or export any transformations that involve non-perpendicular local axes.
    This can create an inaccurate appearance with the affected objects:
    -StegoRigNeck2
    -StegoRigNeck3

    Warning: Unsupported controller (34) - The plug-in has detected one or more animation controllers that cannot be directly supported. Using the Bake Animation option may better address these limitations. The following nodes are affected:
    -StegoRigPelvisHub001
    -StegoRigSpine1
    -StegoRigSpine2
    -StegoRigSpine3
    -StegoRigSpine4
    -StegoRigShoulderHub002
    -StegoRigLArmCollarbone
    -StegoRigLArm1
    -StegoRigLArm2
    -StegoRigLArmPalm (this is half the list, it's pretty much every bone in the scene)

    Warning: material export failed (1) - Some materials in this scene may not be supported by certain applications and will import as standard gray materials instead. The following materials are affected:
    -02 - Default [LP_final]


    I don't think the last warning is an issue, its been about since I imported the model from zbrush, it's just about a material, so I'm not worried. But the other two...And UDK crashes when I try and import as skeletal mesh too.
  • chakkrit
    Options
    Offline / Send Message
    Ok...So the controller warning isn't coming up any more...? I've done some reading and I think I've come to a conclusion that there is an issue with the neck bones, I may have scaled them improperly which has caused skewing. I don't think I did, but if I have, I'm not sure what the solution is...
  • chakkrit
    Options
    Offline / Send Message
    I've found this, and I understand it, but how do I fix it..?

    “Orthogonal” is a term used to describe two vectors that are perpendicular (at 90 degrees) to each other. In 3D space, when the X, Y, or Z-Axes are not perpendicular, they are considered “non-orthogonal” and the FBX plug-in does not support their representation as a matrix. For example, a non-orthogonal set of axes can occur when you use rotation and scaling to skew an object.
    Because the FBX plug-in assumes that there is always a 90 degree angle between the X, Y, and Z axes, it can support only orthogonal matrices. Any transformed axes that have non-orthogonal TRS matrices are ignored by the FBX plug-in, so it does not import or export effects created when axes are not orthographic. Because of this, any non-orthogonal effect (such as skewing) is lost.
    This can cause problems even when you have transformation data that has been inherited from other objects, for example, scaling via a parent object where the result is a non-orthogonal local TRS matrix.


    I tried doing a really quick, simple fresh rig on a model, and when I try and export, I get the same warning about non-orthogonal matrix support but on a different bone. Can't work out what's wrong :(
  • darthwilson
    Options
    Offline / Send Message
    What version of the FBX exporter are you using? (Find this out when you are doing your exporter options at the bottom) I tend to use FBX 2011.

    Nice job on the idle animation! are you doing run forwards backwards etc?
  • chakkrit
    Options
    Offline / Send Message
    Cheers Darth. I'm using the most recent version (2012.2), assuming it would be the most reliable version. Is that not the case?

    Here's the run/charge anim.

    [ame="http://www.youtube.com/watch?v=1iExiG7XHhU&context=C4965bffADvjVQa1PpcFP0VnWNLnN_RYTRtaI-RvoXvuDw_9iYMGc="]run_anim_test__A.avi - YouTube[/ame]
  • chakkrit
    Options
    Offline / Send Message
    I've tried exporting a box with a single bone that exports with no errors, but still crashes UDK. Tried exporting the FBX with 2012.0 version, no luck. I tried UDK on another machine and the skeletal mesh still crashes it.
  • darthwilson
    Options
    Offline / Send Message
    Try fbx 2011 as its most reliable for me! I'm still more of a fan of using Max2010 with actorX!!

    If your doing more animations like the side steps, idle etc gimmie a shout if you like and I'll show you how to do animtrees so your character can blend from one anim to the other!
  • chakkrit
    Options
    Offline / Send Message
    Thanks a lot Darth, but I've got anim trees and sets down I think, using my lecture notes. Appreciate the offer though!

    Problem solved.
    I don't know why, or how, but I've managed to find a solution. I was using MAX 2012 SP2, with hotfix 1 & 2 installed. After getting some advice from a lecturer, I reinstalled MAX, but with SP1 and hot fix 1 & 2 only. The mesh exported from MAX with the same errors as before. But it didn't crash UDK on import. So I set up my shaders, anim sets, made an anim tree and I'm just trying to work out how to make a PhysAT and not have the model flip out. Then a bit of code and I'm done.

    physAT.jpg
  • darthwilson
    Options
    Offline / Send Message
    Pretty awesome link for physassets

    http://download.udk.com/tutorials/skeletal-mesh/Training_PhysicsAssets.zip

    Don't use cubes for him though! use "sphyls". Use boxes on the feet though!
  • chakkrit
    Options
    Offline / Send Message
    That's awesome! Cheers Darth! I won't be working on this dino for a while though. Not till May. I have to start/finish my dissertation. Will be making a new thread later.
  • darthwilson
1
Sign In or Register to comment.