Acey's Dump, V2 - The Dumpening
polycounter lvl 12
Heya peeps,
Decided to start a new thread where I can dump my stuff in, hit and quit it as they say for my old one.
Anyhow...cheers
==============
March-16-2012
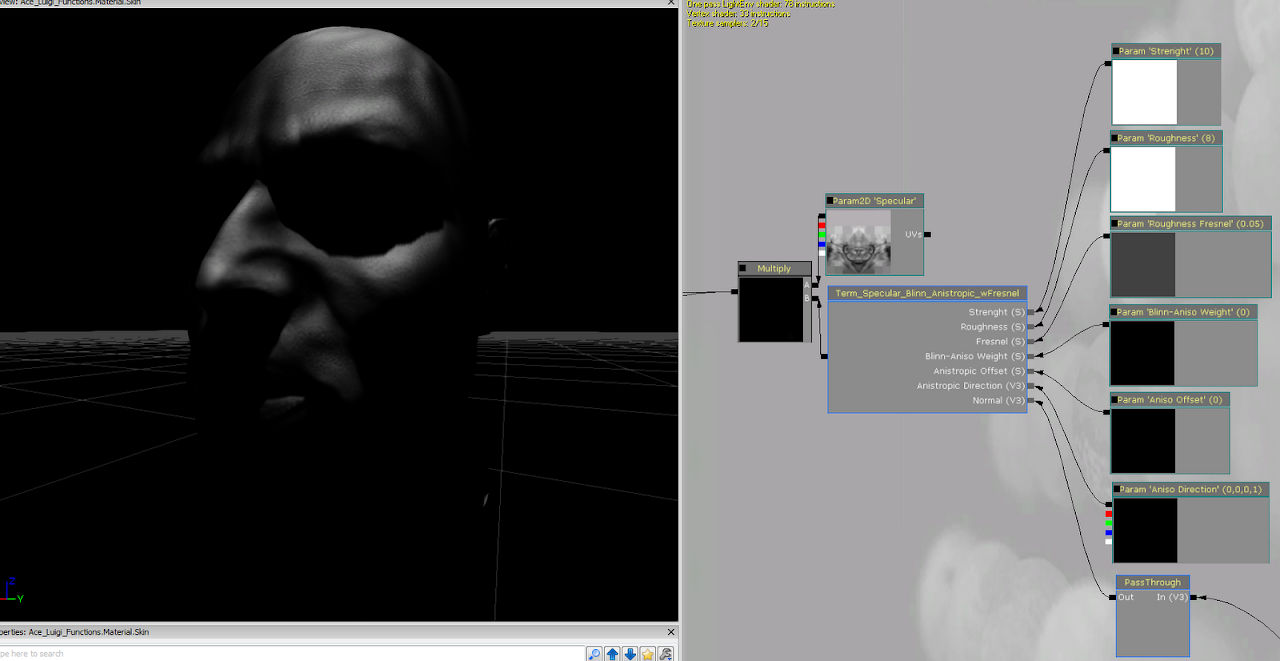
Created a specular term with Schlick's Fresnel. Implemented a Lerp which blends between a standard Blinn and Aniso setup. Aniso Tanget is controlled both by the Normal Map and Color Direction rotation.
Only issue is I need extremely low values for schlick to work properly (such as 0,01) but hey, it still works, guess I will divide the values for better workflow latter on. The closes I would describe this shader is CookTorrance with a Hint of Anisotropy? CookAnisoTor...
Model belongs to Miguel Santiago (http://www.digiteck3d.com/), using his model because it's has the most crisp and dented normals I have ever seen on a model, great way to test a whole slew of shaders to see the effect.
====
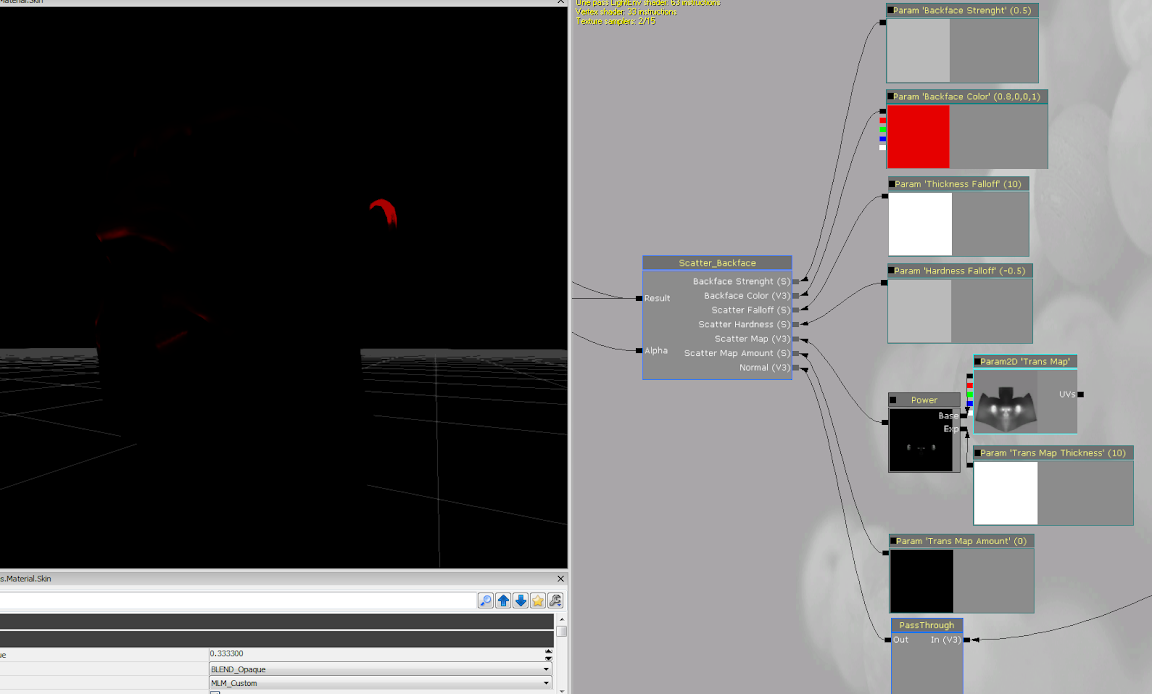
Update: Made a simple back-face setup, nothing special, based upon n.l setup with a gradient lerp control to position face and hardness.
Thanks goes to the guys at nVidia for their lambskin setup, while not the best (I hate Smooth-Step's :P), it enticed me to create something more malleable and easy to read.
====
EDIT: Finalized the blended normal shader. The original concept, while great, brought some issues (such as cyan suppression creates harsh contrast in certain areas). Compensated this by normalizing the entire shader and boosting the color values over 1).
Also, was able to light warp the entire setup, thanks goes to Gestalt (for one of his creative tinkering in one of my threads) and Miguel (aka DigiTeck3D, the guy who did the SSS shader for UDK) since his division formula solved a great deal many issues, with them two, light warped blended normals would have impossible to pull out without massive amount of texture calls and instruction re-write. Cheers guys!
====
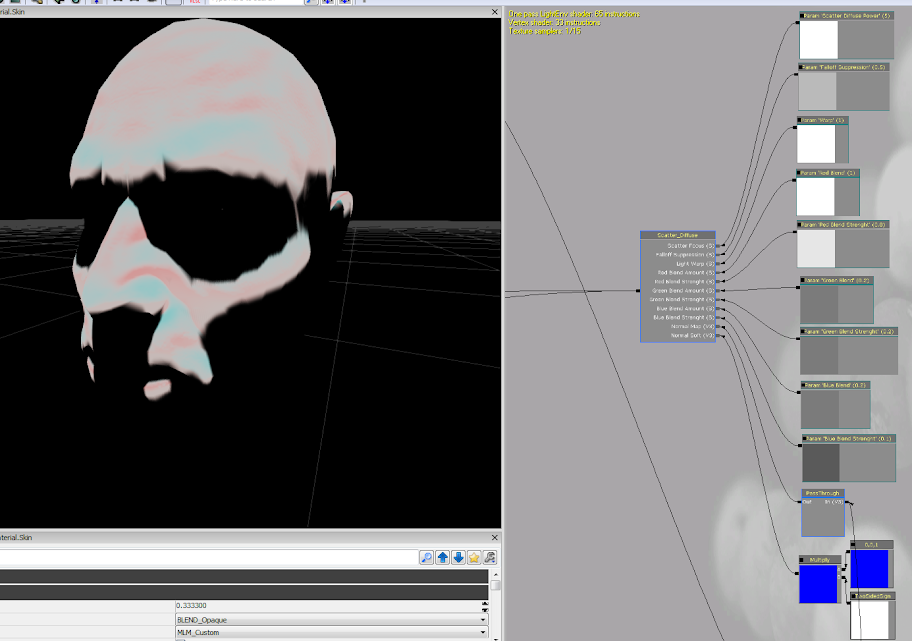
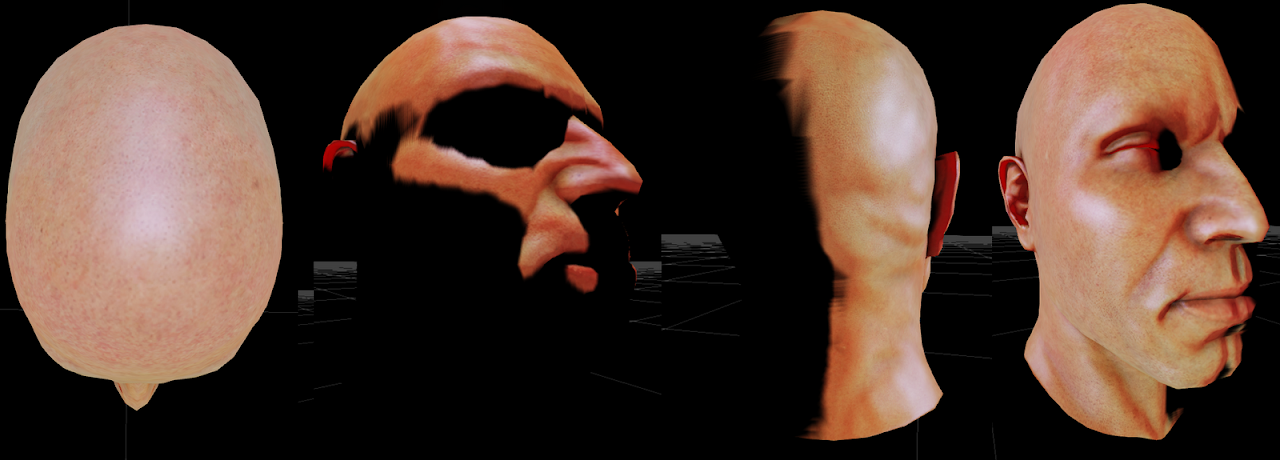
Implemented a surface based scatter formula to mimic light dispersion.
Based upon the studies of J.IStyles, BenCloward and Crytek. Implemented also some extra setups based upon shaders from NewTek, Blender and a few other communites from their links. Wanted to setup a precomputed color saturation formula to cut down on instruction and get White to Red values based upon a spherical lerp with a float dictating the values (0 = white, 1= Red, 1+ = Darkened Red 2 = Black) , but it would have been counter-intuitive, especially if you wanted green saturation's on your model VS. red only.
In the end, decided to setup a three pronged Lerp setup with each lerp node controlling the color formula based upon the color and math given to it.
====
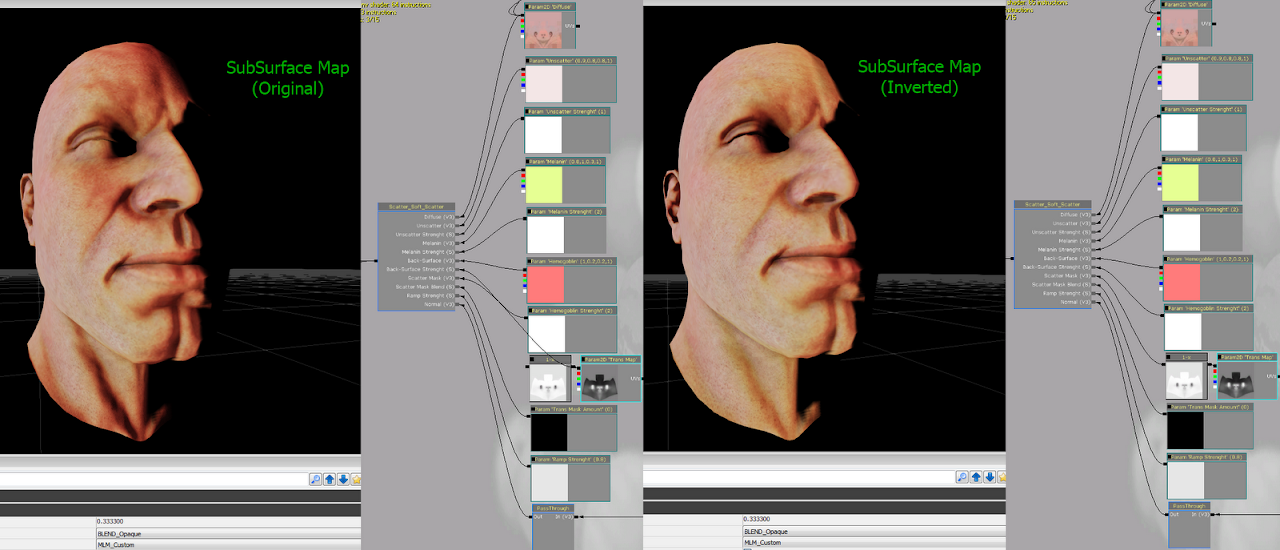
Final setup, all married together; and pretty cheap too! 100-160 instruction depending on if you want to add extra lerps for weight and/or to add/remove the Blended Normals.
Which reminds me, I need to make the n.l function optional incase an Oren-Nayar setup is required to be fed into the overall math of things, should make things...interesting to say the least. Although I'm not sure if I should ADD the Oren-Nayar to my diffuse to be calculated as an separate term or should I directly replace the N.L function so that it acts as an operate term instead. Oh well, time to experiment.

Added Lerp as weights to the whole setup. Diffuse is multiplied by Blended Normals and controlled on how much the it gets exposed to it via a Lerp, before being fed into the Soft Scatter setup. With a small amount of Cyan suppression (but not complete) we get something akin to green nerves in the look, a separate normal map could help generate said effect better with harsher details.
It respects the light intensities, this is modified through a power node to give a 'focus' looks from the light direction and how much.
Lastly, the Back-face is added to the final product, exaggerated the effect in the image, but it looks nice when controlled properly, however, it requires a STRICT VERY WELL DONE SCATTER MAP, not kidding, a simple inverted AO or Curvature Map is not good enough, it needs care.
With that done, I think I can say I have a decent setup for a Skin-esque shader, it's not a real skin shader since I cannot compare to the DX11 SSS from Epic, and Mental Ray takes forever to render something, so take it for what you will.
====
EDIT: Is there anything that Oren-Nayar can't do apart from cure cancer and kill Nazi's? Apparently not.
Thanks goes back to Vailias, Equil and TeckLee (as well all the other peeps) for helping me (some time ago) in implementing ON in UDK.
Rewrote part of my lighting term so it's open to an orgy buffet of lighting terms, only issue is, any inverted or 1-x terms are kept basic lambert since they don't read well from ON, but it seems like any standard terms read and compensate ON pretty well, loads of work avoided thanks to this...thank you ON for not being a dick.
I tried using a 'cheaper' version of ON, a simplified version, but it seems like light warping shaders don't like me playing with them in lite mode, since they somehow end up inverting themselves (no idea why this happens) so I had to use the FULL heavy ON, which resulted in a massive 256 instruction boost, this naturally also takes into consideration that I have 2 speculars going on in my shader as of now, trying for a cheap LaFontaine Blinn setup.
Not bad so far, setting my Diffuse Roughness to complete 1 makes it look like cheese/milk since it reacts my scatter to the Camera AND Light without breaking the rule of conservation (EI: it doesn't change too quickly when it comes to the camera moving) now I need to see how I can implement a totally different and cheap Fresnel function which takes into consideration light only, a sort of rim-lighting approach, but which compensates my colors rather then blowing them out and replacing them.
Guess addition is in order, or I could try a lerp, although lerp doesn't respect the border color mish mash from what I saw when it comes to light, bleh.
====
Decided to start a new thread where I can dump my stuff in, hit and quit it as they say for my old one.
Anyhow...cheers
==============
March-16-2012
Created a specular term with Schlick's Fresnel. Implemented a Lerp which blends between a standard Blinn and Aniso setup. Aniso Tanget is controlled both by the Normal Map and Color Direction rotation.
Only issue is I need extremely low values for schlick to work properly (such as 0,01) but hey, it still works, guess I will divide the values for better workflow latter on. The closes I would describe this shader is CookTorrance with a Hint of Anisotropy? CookAnisoTor...
Model belongs to Miguel Santiago (http://www.digiteck3d.com/), using his model because it's has the most crisp and dented normals I have ever seen on a model, great way to test a whole slew of shaders to see the effect.
====
Update: Made a simple back-face setup, nothing special, based upon n.l setup with a gradient lerp control to position face and hardness.
Thanks goes to the guys at nVidia for their lambskin setup, while not the best (I hate Smooth-Step's :P), it enticed me to create something more malleable and easy to read.
====
EDIT: Finalized the blended normal shader. The original concept, while great, brought some issues (such as cyan suppression creates harsh contrast in certain areas). Compensated this by normalizing the entire shader and boosting the color values over 1).
Also, was able to light warp the entire setup, thanks goes to Gestalt (for one of his creative tinkering in one of my threads) and Miguel (aka DigiTeck3D, the guy who did the SSS shader for UDK) since his division formula solved a great deal many issues, with them two, light warped blended normals would have impossible to pull out without massive amount of texture calls and instruction re-write. Cheers guys!
====
Implemented a surface based scatter formula to mimic light dispersion.
Based upon the studies of J.IStyles, BenCloward and Crytek. Implemented also some extra setups based upon shaders from NewTek, Blender and a few other communites from their links. Wanted to setup a precomputed color saturation formula to cut down on instruction and get White to Red values based upon a spherical lerp with a float dictating the values (0 = white, 1= Red, 1+ = Darkened Red 2 = Black) , but it would have been counter-intuitive, especially if you wanted green saturation's on your model VS. red only.
In the end, decided to setup a three pronged Lerp setup with each lerp node controlling the color formula based upon the color and math given to it.
====
Final setup, all married together; and pretty cheap too! 100-160 instruction depending on if you want to add extra lerps for weight and/or to add/remove the Blended Normals.
Which reminds me, I need to make the n.l function optional incase an Oren-Nayar setup is required to be fed into the overall math of things, should make things...interesting to say the least. Although I'm not sure if I should ADD the Oren-Nayar to my diffuse to be calculated as an separate term or should I directly replace the N.L function so that it acts as an operate term instead. Oh well, time to experiment.
Added Lerp as weights to the whole setup. Diffuse is multiplied by Blended Normals and controlled on how much the it gets exposed to it via a Lerp, before being fed into the Soft Scatter setup. With a small amount of Cyan suppression (but not complete) we get something akin to green nerves in the look, a separate normal map could help generate said effect better with harsher details.
It respects the light intensities, this is modified through a power node to give a 'focus' looks from the light direction and how much.
Lastly, the Back-face is added to the final product, exaggerated the effect in the image, but it looks nice when controlled properly, however, it requires a STRICT VERY WELL DONE SCATTER MAP, not kidding, a simple inverted AO or Curvature Map is not good enough, it needs care.
With that done, I think I can say I have a decent setup for a Skin-esque shader, it's not a real skin shader since I cannot compare to the DX11 SSS from Epic, and Mental Ray takes forever to render something, so take it for what you will.
====
EDIT: Is there anything that Oren-Nayar can't do apart from cure cancer and kill Nazi's? Apparently not.
Thanks goes back to Vailias, Equil and TeckLee (as well all the other peeps) for helping me (some time ago) in implementing ON in UDK.
Rewrote part of my lighting term so it's open to an orgy buffet of lighting terms, only issue is, any inverted or 1-x terms are kept basic lambert since they don't read well from ON, but it seems like any standard terms read and compensate ON pretty well, loads of work avoided thanks to this...thank you ON for not being a dick.
I tried using a 'cheaper' version of ON, a simplified version, but it seems like light warping shaders don't like me playing with them in lite mode, since they somehow end up inverting themselves (no idea why this happens) so I had to use the FULL heavy ON, which resulted in a massive 256 instruction boost, this naturally also takes into consideration that I have 2 speculars going on in my shader as of now, trying for a cheap LaFontaine Blinn setup.
Not bad so far, setting my Diffuse Roughness to complete 1 makes it look like cheese/milk since it reacts my scatter to the Camera AND Light without breaking the rule of conservation (EI: it doesn't change too quickly when it comes to the camera moving) now I need to see how I can implement a totally different and cheap Fresnel function which takes into consideration light only, a sort of rim-lighting approach, but which compensates my colors rather then blowing them out and replacing them.
Guess addition is in order, or I could try a lerp, although lerp doesn't respect the border color mish mash from what I saw when it comes to light, bleh.
====
Replies
======
March-22-2012
Added an Alpha Lerp mask for the diffuse, just incase you need to have a mirrored texture but would like to have color variations on a second channel, replaces color, isn't additive.
Not sure if I will keep the Switch for the Alpha, might as well keep a white texture in it and have the user replace it later on. Will see later on.
======
Ramp/Gradient mapping, nothing special really.
======
Ambient setup with Hemispheric, a fake anisotropic cubemap stretch (for a more convulated lookup).
The Occlusion Map and Cube are multiplied together before being multiplied by the Hemispheric for separate color and brightness tint, all added to the final diffuse.
The cube is simple setup, and doesn't have a fake HDRi function on it, since diffuse cubes aren't exactly trying to push back the environment to the viewer as the reflection would.
======
Simple reflection, however, instead of being added, it's multiplied by the end result of my specular math.
Reason is, for some oddity, UDK doesn't respect...certain constraints, especially when it comes to respecting the shadow/light direction so the Specular needs certain workaround to look good, hence the reason for said math.
======
Someone asked my what my specular looks like, currently, well here it is:
Two speculars, each sharing the same map or different maps, with the Alpha as a lookup for my Specular Fresnel.
Also, the great thing about it is since multi-layered materials tend to be additive, you can have one complete Fresnel Spec and One standard spec, and have a very natural falloff for the specular, especially at glancing angles, especially with a low roughness value.
I also tried setting up a more of a LaFortune specular, but the math is Phong, which I hate, so this is the best next thing I can imagine.
Fun-Fact: Max has a standard Multi-Layered material, which has all the bell and whistles one can wish.
======
Also, on the subject of Spec's and what they represent:
A world mask based specular a la HDRi studio kind of effect.
I originally was going for a much more complicated setup (with reflection nodes subtracting from each other, transforms transforming each other, brothers killing brothers, murdering, ravaging and pillaging).
Decided instead to make a simple multiply, mask and lerp setup instead, much easier for the user, and the results reflect all around for the lerp.
======
Step shadowing stepping is awesome, doesn't have the same amount of 'distance' most toon shaders give, but it's still pretty awesome.
Allows the user to 'step' the amount of shadows and hardness they need.
Will give the same setup for the specular for the highlights, should be nifty.
Computron : Nope, not yet, my old portfolio was pretty crappy by many standards, so I decided to take a year off, learn some extra stuff like shaders, and improve my work all around before putting up my new work.
I'll continue working on the shaders for now to get an Uber-Duper shader going so I can plonk in my models with half my work done in the shader department. Who knows, if later on, I finally get a decent job, I might feel generous enough to post up the shader as free-source.
=====
March-23-2012
Implemented a Power-Diffuse setup, with a layered toggle option. You have your lambert term (which is pretty basic by many standards) and a Power setup to 'focus' the diffuse.
While looking up Minneart and Blended Normals, I decided to cross stitch together semi-velvety setup for the Diffuse setup, why should Specular and Fresnel get all the fun?
As you can see, the focus get's added ontop of the lambert, while darkening the fall-off, great way to fake a light oriented velvet material.
I might included a straight up lerp for the amount of Layerd look, although I'm not sure how well that will look overall and if it will confuse a user, will see.
======
Rewrote my Schlick formula, the standard index was too weak, so squared it (although now I get slight gradient cuts, not too noticeable unless you specifically stare at the screen for hours looking for it).
Also, exposed my Blinn setup's Fresnel term so it's lighter in weight (user can insert their own Fresnel term at this point or leave it blank, both ways work).
Schlick's Fresnel has been multiplied by the World based Mask with a Lerp to control the fall-off amount, so either a World Mask or Full Fresnel only is multiplied by the Specular setup.
This is the cheapest solution I found vs. a Cook-Torrance setup, which would need instead a Gaussian/Beckmann lookup, both Texture or Math wise. Not to mention that I have a Anistropic setup included, so it could weight a pretty instruction is I decided to go full Cook-Torrance.
Instead, imagine this is the bastard child of Ward, Schlick and Arch-Design students in one setup ;P
Each specular term get it's own Fresnel, giving option of Gloss Mask or Mix and Match styles.
======
Added a Wet Glossy highlight variable. Originally tried a Round/Ciel setup, but I either got stepping (which I didn't want) or the values didn't reflect true values from my Blinn.
Went for a Smooth-Step setup instead (thanks goes to the peeps to nVidia for the shader example).
The lower value show the amount of Roughness exposure I get and the upper values determines how much get's sandwiched between the two values to create the tight highlights.
Should prove fancy for sexy-sweaty female skins and shiny-cars (although I'm not a fan of the latter).
Again, both speculars get their own values.
Added Rim Lighting, currently, in additive setup over my diffuse/spec setup, so it goes well with stuff, not sure if I want to change it to smooth-step, but will see if the extra Hermite math will have a use in the near future.
Added also an option to make the Rim either Emissive (EI: Doesn't take into account my Lambert term) or it does, since the peeps at Bioware have released their slides about their latest MMO and how they discussed the value of Fresnel.
Oh, also, my Rim takes into account my Lambert term, reason is, UDK doesn't have the nicest of self shadows going on, so Lambert solves alot of the cross-patching shadows I get with special options;
Currently don't have a control, but will mask it based upon RGB Gloss/Roughness channels, which I really need to get on ASAP.
=====
Enchaced my Reflection (woot, woot!) with extra correctness, fresnel build up and (gasp) refraction with...wait for it...Chromatic Aberration!
Image is pretty crap, but you should notice he edges having a rainbow fall off. 20% cooler I would say.
Completely finalized my fething Specular's, the formulas I had in them where reflectance based, which really didn't help in representing materials well, so took a few hints from Cook-Torrance for the sake of it in a liter version of things.
So from there, I multiply my 'raw' Speculars with my Reflection map, before another mul into my final output for the Spec (this helps it respect the conservation rule).
The reflection is pretty simple, lerp my reflection with my refraction, and Fresnel the Alpha with a FULL fresnel setup (Power, Bias, Scale, Hardness, etc). Refraction, which is also lerped to either being world based (EI: flipped upside down) or standard (EI: always camera view and looks like a nasty metallic Eye of Sauron following you).
Fun-Fact: Currently, UDK doesn't allow (through materials at least) for proper irridance and scene based sampling for refection, so I'm limited to using the cubemaps.
That's the bad news, the good news is, simply plugging in your distortion channel with a cubemap in your emissive/diffuse is enough to emulate the effect of chroma-abe correctly enough in the world.
Still not sure how I would go about chroma-aberatting the scene on a mesh without it being shot through a black-hole, so there is that (since UDK's scene sampler's are camera RG based and not RGB).
PS: Anyone knows of a good software that will take AVI videos and convert them to a nice gif? Almost all the software I tried ended up crashing on me for some odd reason and the images above are pretty crappy since they don't show the reactive quality of the materials.
Other then fixing a couple of things like my AO and...and SSS, I decided to take a look at Crysis1-2 and study their shaders.
Also, amazingly enough I wasn't too far away from their stuff, neato!
====
Implanted a 'fuzzy' setup for the shader, to give a velvet/soft/peach look to my models.
Originally, I was following the docs from nVidia and Crysis and how-what setup they had, and guessed most of it, however, it dawned on me that clothes and fabrics aren't the ONLY materials which exhibit fuzz, skin does too.
Add, add, lerp, add, lerp, and you get a nice fuzz effect. Usable both for your local brand of jeans supporting your assets, and as well the assets themselves.
Exaggerated naturally, no question about that, but seriously, with a nice mask, one could fake skin-light-surface scattering for fuzz and such, something which I haven't see being done since Atomspheric scattering for sky ambients a LONG time ago.
Kept everything else, found a way to fake 'blurred' transmission by using my Diffuse as my Melanin and etc by saturation methods with masks to jitter it.
Wish I could access Mip's much more dynamically and cheaply in UDK
Also, shadows suck, they artifact near the edges, bleh...
For example, the Fuzz/Fabric setup is based upon the method from Crysis 2.
@Dudealan: Well, why thank you
Hair shader as 3 Aniso terms; two highlights and one 'general' for hair scatter, which reminds me, I implemented a SS solution, but had to compensate alongside a basic HL term since UDK's shadows eat away at each other.
Eye shader is your basic eye stuff, made two terms for the iris, inverted reflection with chroma abberation and one basic, with normal offsetting and etc.