Normal Map Baking Issue- HELP Please
polycounter lvl 6
Hey Polycounters,
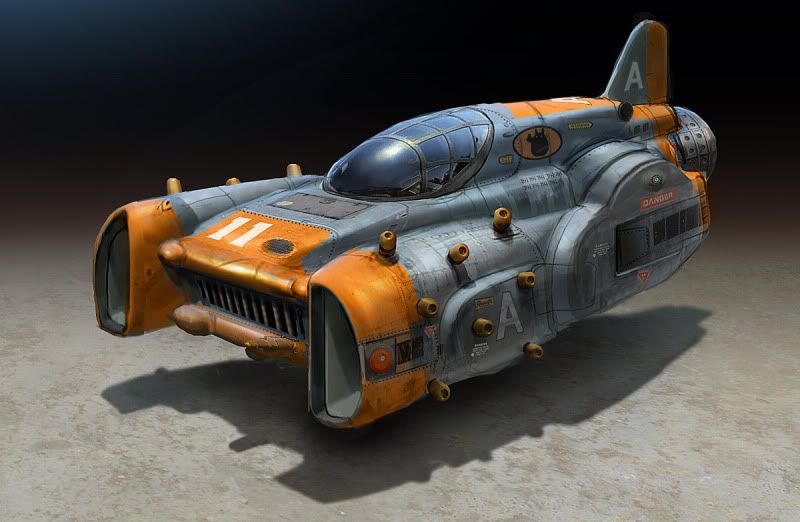
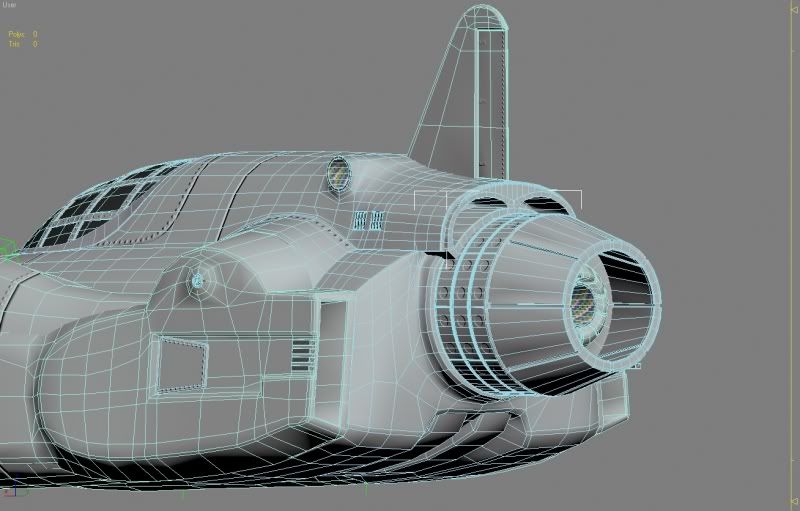
I am new to the community so this is officially my first post. I am currently working on a next gen model for my demo reel/portfolio. I have never really done a normal mapped full scale piece before from high poly to low poly. So, yep you got it I am having some issues with baking my normal maps. First off here is what I am making. It's like a hover speed space racer vehicle.
I didn't concept this, I have to give credit to the artist Ben Mauro.
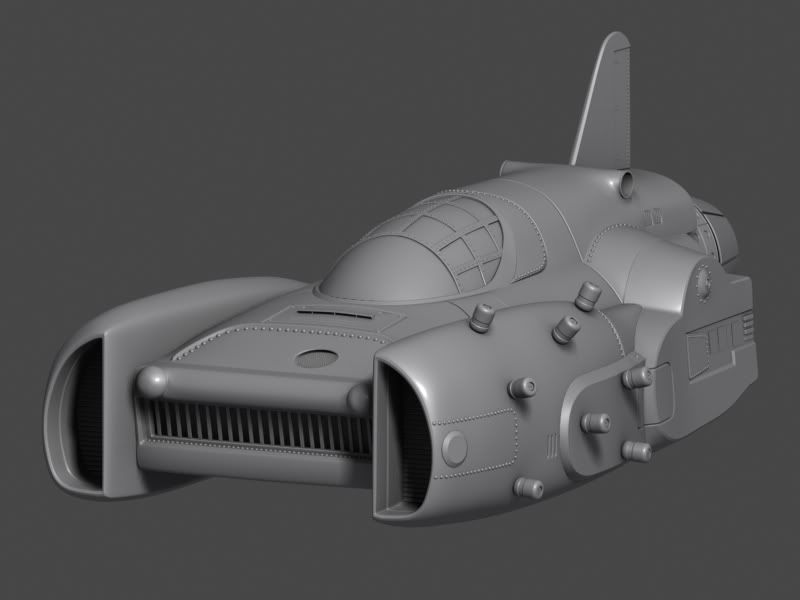
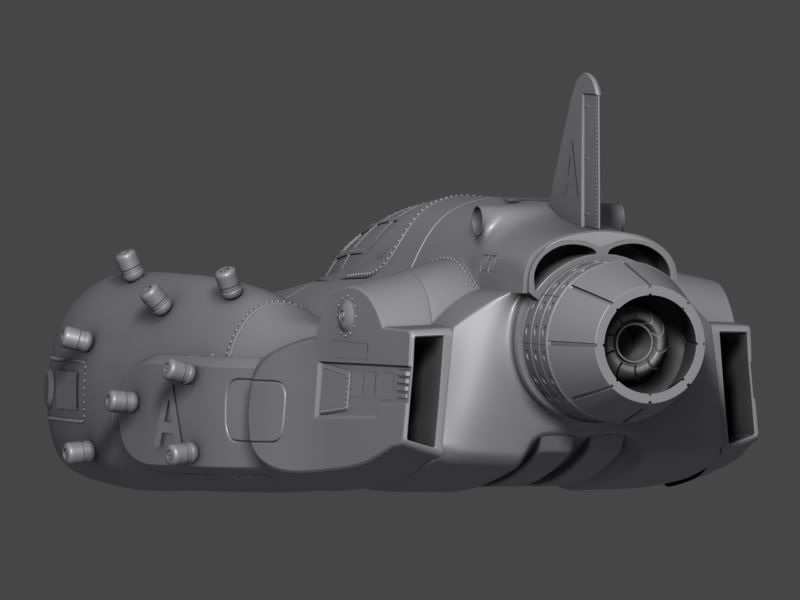
High Poly:
Front 3/4
Back 3/4
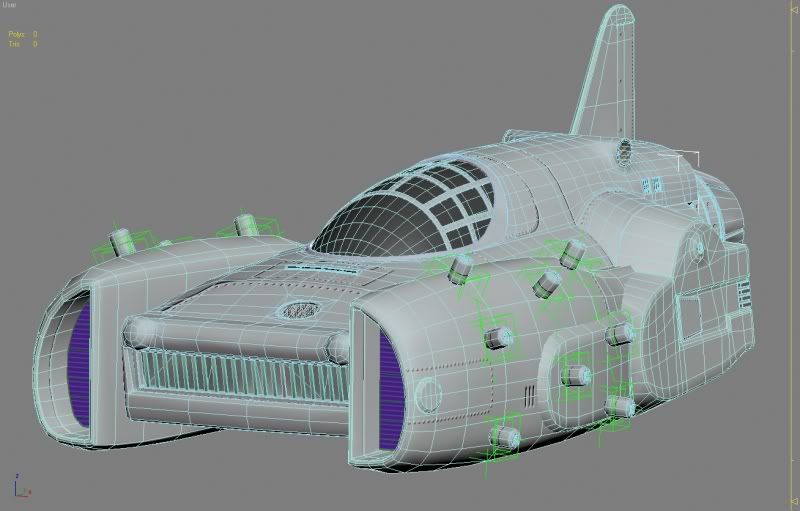
My low Poly model currently sits at 11,833 polygons ( don't know if that's to much).
Its already unwrapped, but I have it sectioned off into 3 maps one for the main body (middle part), one for the two side pieces, and then one for all the rest minor parts. Now I am not sure if in next gen does everything need to be in one map? I need to have alot of detail coming from my normals for the main body and sides for floating geo (bolts). If you guys could give me some advice on that, it would be much appreciated. Thank you.
Low Poly:
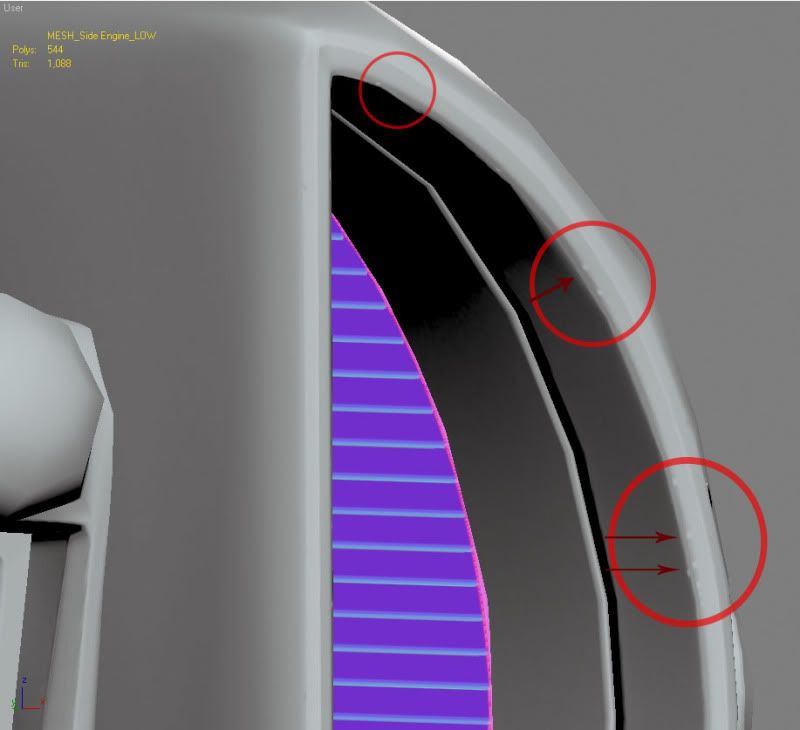
I've already started to do test bakes I am using 3ds Max 2008 with Xoliulshader 1.6_no shadows Direct X shader but I seem to come across these red dot artifacts in the normal as it bakes, which leaves these specks in the normal map. Its not intersecting any mesh because I have the cage hugging it on the outside. But it depends where i rotate in my viewport the red dots scatter in random areas in the map when I bake.
I reset the X-form, converted it to Editable Mesh and tried re-baking but still same results come out.
I am using one smoothing group on everything when I bake, could this be the reason why? I've also tried baking in Xnormal but I seem to get worse results overall when I view in back in 3ds max, the 3ds max normals bake looks alot better, minus the errors I get.
Normal map artifacts looks like this on mesh in viewport:
Sorry for this long post. I hope you guys can help me move along with this. Thanks a ton guys.
I am new to the community so this is officially my first post. I am currently working on a next gen model for my demo reel/portfolio. I have never really done a normal mapped full scale piece before from high poly to low poly. So, yep you got it I am having some issues with baking my normal maps. First off here is what I am making. It's like a hover speed space racer vehicle.
I didn't concept this, I have to give credit to the artist Ben Mauro.
High Poly:
Front 3/4
Back 3/4
My low Poly model currently sits at 11,833 polygons ( don't know if that's to much).
Its already unwrapped, but I have it sectioned off into 3 maps one for the main body (middle part), one for the two side pieces, and then one for all the rest minor parts. Now I am not sure if in next gen does everything need to be in one map? I need to have alot of detail coming from my normals for the main body and sides for floating geo (bolts). If you guys could give me some advice on that, it would be much appreciated. Thank you.
Low Poly:
I've already started to do test bakes I am using 3ds Max 2008 with Xoliulshader 1.6_no shadows Direct X shader but I seem to come across these red dot artifacts in the normal as it bakes, which leaves these specks in the normal map. Its not intersecting any mesh because I have the cage hugging it on the outside. But it depends where i rotate in my viewport the red dots scatter in random areas in the map when I bake.
I reset the X-form, converted it to Editable Mesh and tried re-baking but still same results come out.
I am using one smoothing group on everything when I bake, could this be the reason why? I've also tried baking in Xnormal but I seem to get worse results overall when I view in back in 3ds max, the 3ds max normals bake looks alot better, minus the errors I get.
Normal map artifacts looks like this on mesh in viewport:
Sorry for this long post. I hope you guys can help me move along with this. Thanks a ton guys.
Replies
so ive got some questions regarding this matter. are those red spots all over your mesh? or only on "cylindrical" areas? are you baking with scanline or mental ray?
now aside from all that what i would think is going on is a few things. your cage is ever so slightly too close to your high poly, and needs to be pushed out a bit further. using 1 smoothing group is fine. and editable mesh is.... just ew. lol.
are you going as far as custom tweaking your cage, or just pushing it along the normals.
no those spots arent all over my mesh in this specific part that I showed here, they seem to generally go around the curved lip area, but they do appear in other parts of the model too. On the main body they appear in front of the glass dome, which is a pretty flat area and other parts randomly around too.
I am baking with scanline, I tried baking in Mental Ray and I got some wacky errors. I have my cage a good distance away from the highpoly I could try pusing it out more, but actually ive tried pushing it out in the main body area i mentioned and i still got those artificats, and if I rotate my view in the viewport and render again those spots appear in different areas.
I am custom tweaking my cage, I do start off with a good amount of push and then i start to tweak areas that are poking through the shaded cage.
can you post up the normal map and uv wires? so we can see where your UV splits are and how it actually looks on the normal.
Heres the UV wire:
Normal Map: I cropped the problem area for this image. You have to zoom in to see the pink dots all the way down the curved part.
did uncheck the Ray miss?
I have tried that before but i still got those lil specs there, but actually I just tried it now after expanding my cage a bit more in that problem area and it worked, no specks. The only thing is on the main body when I tested it before I got those specs even after expanding cage out alot.
Jessica
Thats a good idea too I will try it if I still am not having success with the other parts, max 2.5 star seems to be okay for now.
Thank you again for your help everyone. I will post more info on how my baking process is going in this thread.
btw, if this is a game mesh, what engine are you planning to run it in because (if you are using UDK for example) 12k polygons is slightly too many for a vehicle of that size.
I know its alittle to much polys its just that I have alot of roundness to my model, but I def should go around and do some optimizing. 9 -10 k is good for this type of vehicle? There's no specific engine I am running it in, its for a demo reel piece. I will prob use unity (if I can get help or find tutorial of an easy setup) or marmoset toolbag.
There is no set size for a vehicle in UDK. In fact I would say for a large vehicle 12k or higher is just fine for a vehicle. There are no limits, you could have it be 200,000 triangles if you wanted it to be.
It isn't about how many triangles something is when it comes to portfolio work, it is about how efficiently you use those triangles.
@Parralax and Quack- I will go around and make some optimizing happen!
I have a question for a game piece like this would multiple texture sheets be good? Or should it all go on one? I currently am going for 3 texture sheets.
Also I cant really bake a proper Ambient Occulsion texutre map since i have 3 different UV maps, I would have to do each set of mesh on their own AO bake. Correct?
I feel like it might be too early to UV this. The shapes are all pretty off base when you look at it compared to the concept.
The edge the swooshes up from the hood, then runs along the bottom of the window- the nubs on the bumper- The thickness of the rims that run along the sides of the engine vents. The edge beveling on the side wheel hub looking things behind the window- *could all use some tightening- Modeling is all about spacial relationships, and observing your reference. As a result theres all kinds of subtlety in the concept, that isn't being reflected in model. Model what you see, not what you think you see.
The edge the swooshes up from the hood, then runs along the bottom of the window-
the nubs on the bumper-
The thickness of the rims that run along the sides of the engine vents.
The edge beveling on the side wheel hub looking things behind the window-
The window could use some tightening as far as its over all volume-
It doesn't seem to taper back at all, making it look bulky in the back end
The edge the swooshes up from the hood, then runs along the bottom of the window
I sorta already have that like in the concept here is a front view, maybe you can get a better view or show me what you mean.
Heres a top view and side view: never really included it before I think it could give a bit more perspective on the shape of the model I have compared to the concept art.
the nubs on the bumper
I decided to take them out there at the bottom one of them looks like some sorta weapon I just decided it just didn't work. Are the top ones alright?
The thickness of the rims that run along the sides of the engine vents.
You think they just need to be a bit thicker more of a lip
The edge beveling on the side wheel hub looking things behind the window
I do have it beveled on the outside, I guess I should make them a bit more of a bevel. I don't see much of a bevel in the concept on the inner part just looks like its intersecting
The window could use some tightening as far as its over all volume-
Do you think it needs to be wider and higher.
The number one offender I feel is trying to dial in the boxy-ness of the hood thats in the concept, which in your model is flat and soft.