The BRAWL² Tournament Challenge has been announced!
It starts May 12, and ends Oct 17. Let's see what you got!
https://polycount.com/discussion/237047/the-brawl²-tournament
It starts May 12, and ends Oct 17. Let's see what you got!
https://polycount.com/discussion/237047/the-brawl²-tournament
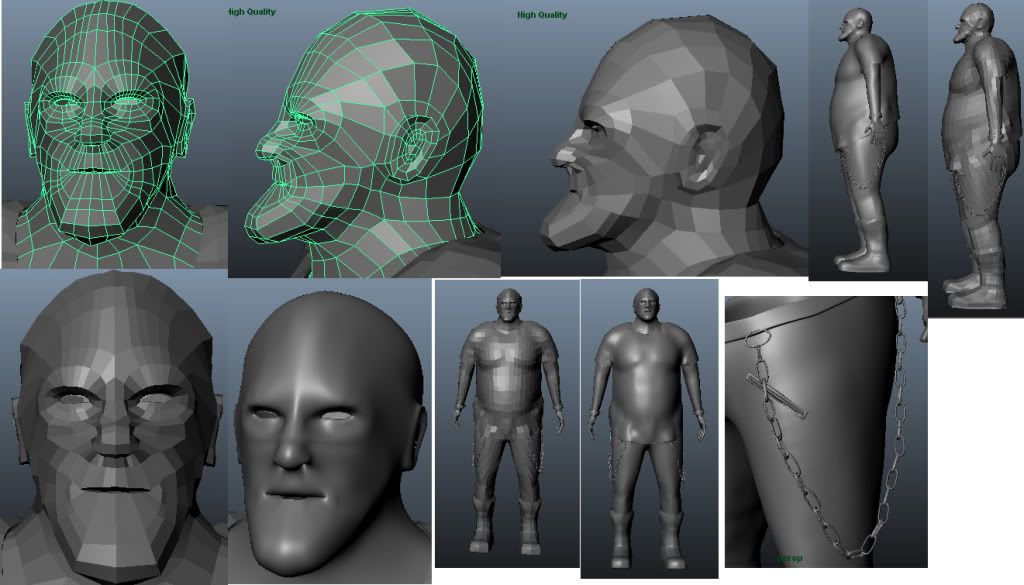
Punk Character
Hello PolyCount!
This is the character i'm currently working on for a college assignment,
I'm pretty new to the modelling scene, crits are very welcome, hoping to receive some useful information from this thread, been pretty reluctant to post here but i'm feeling particularly ballsy today :P.
Thanks!

The character is supposed to be a Fat punk,
Chin is stretched out because I plan on having a moustache/goatee there.
This is the character i'm currently working on for a college assignment,
I'm pretty new to the modelling scene, crits are very welcome, hoping to receive some useful information from this thread, been pretty reluctant to post here but i'm feeling particularly ballsy today :P.
Thanks!

The character is supposed to be a Fat punk,
Chin is stretched out because I plan on having a moustache/goatee there.
Replies
i think you need to take out the zips you've modelled so far, and either sculpt them in when you do the trouser creases or model them after the creases are done and match them to the surface. Can't really crit too much till you start sculpting details into this.
striking resemblance
This sketch over is a lil messy so sorry hopefully its legible....
1) The edgle loops on the top of the head are mashing near the center.. spread out all your geometry as evenly as possible. If you have zbrush it helps to redistribute the geometry but softens the forms.. I use morph targets for this (if you want an explanation I can go into this) If you dont then there is a handy tool in Maya called slide edge.. you select the edges and slide them over with the middle mouse click and drag (and I believe its Ctrl+MMB for a more finite movement.)
2) Never put 5 pointed stars in the center edge. Heres a lil better way of resplitting your topology here. Hope its clear. run the edges up and back then redistribute the edges... I know it might feel like your adding alot of topology and it will prolly run all the way around the back and it will be hard to end it some where but play around with it.
3) Move this brow ridge edgle loop down so its evenly distibuted... you want to try and make the geometry as square as possible.
4) circular edgeloops need to be done around the eyes like you have them and around the mouth. This mimics the musculature underneath the skin which is important for animation.
5) split the edge loop like shown here... you have a six pointed star here which you want to avoid at all costs if you can.
6) run the edgeloop back into the ear.
7) In my opinion pole areas like how you have the edgeloops running into the ear canal dont personally work for me. Its a personal preference.. as far as geometry goes it works just fine! Ears wont deform or animate on a humanoid usually so the ear canal is an ok place to run the polygons into should you have no where else to run them through. Ive provided two examples of how I usually do ears. The first is just extruding out the faces where the ear is and forming it roughly into an ear shape. Later on I go and sculpt in an ear. The second I've learned through a class to just look at the form of an ear and try n model out the form.
Toxix, I did all of those things and it just looks heaps more tidy now, gonna throw it into zbrush to do the details then i'll post up my progress.
Cheers
Here's the result: