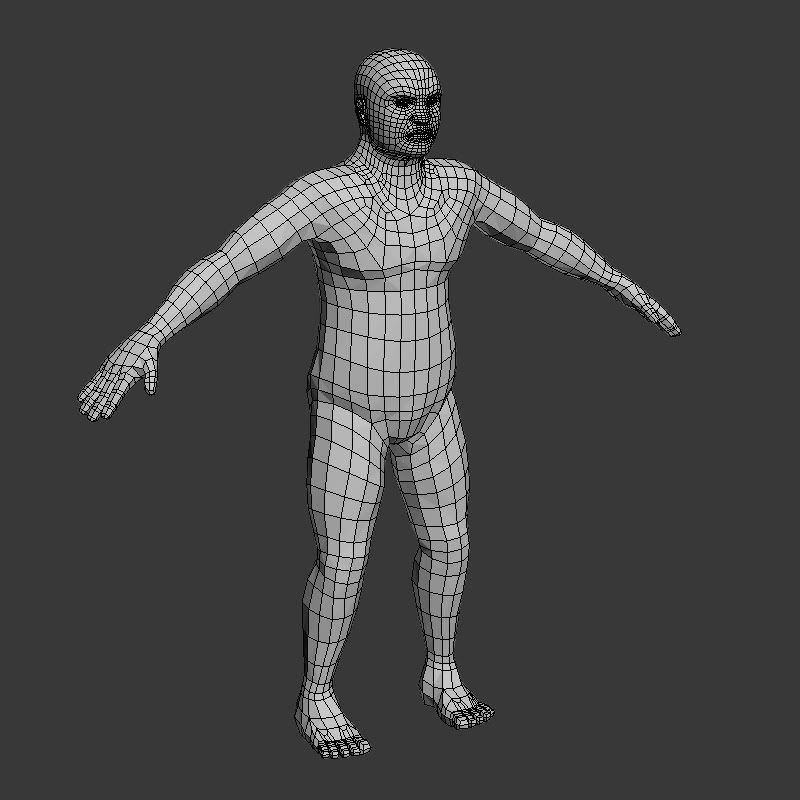
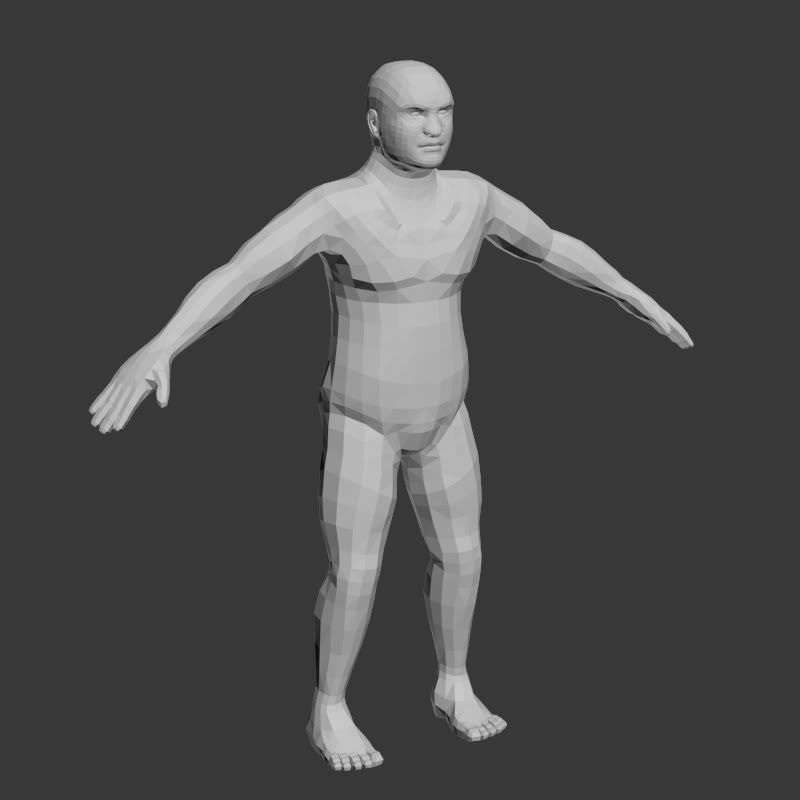
Hello Polycount Forum, like my fellow students I come in search of wisdom and advice for self improvement. The assignment is to create a human model suitable for an engine such as UDK, we're working on base meshes at the moment which we'll bring into Zbrush at a later date. The only real trouble I've ran into was the shoulder topology which is hopefully fixed at this point. I'm thinking perhaps the head is too dense compared to the body as I had to terminate quite a few edge loops coming down the side of the neck. Anyway, any advice large or small would be great.
Frankly, zbrush is powerful enough that you can start with a sphere, and still make a good looking human. It all comes down to how comfortable you are in zbrush. Not that comfortable? Set up your basemesh to have 90% of the shape you want when subdivided with no sculpting required. Very comfortable? Just make something quick and start working on it in zbrush.
You're going to want to retopologize to get your ingame mesh anyway, since your current one has edge loops in useless places (useless for deformation, not for sculpting).
Thx for the reply Dirigible, the thing is we get marked on this base mesh before we put it into Zbrush as a sort of milestone, although we're going to retopologize it after leaving Zbrush I am expected to have the correct sort of topology in place at this stage. What specific edge loops would you say are useless so I can keep those in mind when retopologizing?
Get marked before taking intoZbrush? WHY? That sounds like typical uni-stuff...
However.: just try to get clean quads- not many, but nice ones ; )
U can and you WILL retopo it later anyway!
I usually start directly in Zbrush, do some sculpting to get rough shapes right and THEN do a nice sculptable topology and still we all do our final realtime topo as a last modeling step (or as a first)
If you're being graded on the quality of your basemesh there are a few things you can fix pretty easily on here. Like that pole in the center where his clavicles meet and you have 6 edges coming to one vert - topology like that is a pain to sculpt evenly over and will usually result in a 'hot spot'.
You may want to reduce the geometry in the head as well. It will be easier to sculpt the neck area if you don't have that change in geometry density.
Even out the topology on his fingers and toes as well. Now it looks like you've added extra geometry for his joints this'll just give you more rectangular faces to try and sculpt over rather than really helping.
Check out the polycount wiki on basemeshes for examples and a few pointers. or even other tutorials out there http://www.pixologic.com/docs/index.php/Tutorial:_Pinup - your basemesh doesn't need to be super detailed before you bring it into a sculpting app.
Heres a few thoughts on the anatomy, I don't know if you'll be too bothered until ZBrush:
extend legs and neck or shorten arms and torso.
- push shoulders and head back into a more natural position, this should also help form the curve of the back
- smooth transition between back/side of thigh and lower back
- adjust edgeflow between outer pecks and upper torso & shoulders
- fix muscles on arms (the forearms look very lumpy)
- Work on transition between trapezius muscles and shoulder
Also if you are having trouble reducing topology around the head and neck, you should consider using a few well placed triangles. Your lecturer might have a hissy fit about this, but if the geometry is going to be brought into a sculpting program it will be subdivided anyway, turning all triangles into quads.
I'd just like to clarify something...
Triangles are bad for models that will be subdivided because when you subdivide a triangle it CREATES POLES. And poles cause pinching and pulling. This is in contrast to quads, which never CREATE poles when subdivided. So while SCB is correct that the triangles will become quads, that doesn't mean that the problem will disappear.
That said, zbrush has a smooth function specifically built in to smooth out topology. shift+draw is smooth. shift+draw+releaseshift is topology smooth.
Thank you for the advice guys, I've shortened the arms and torso a bit and removed poles around the chest area. I've fixed it so I've got less of a "hot spot" at the side of the neck too. It seems most of the loops in the face are key ones so I couldn't really remove many of them. I don't think it looks too bad now but if you can see any glaring issues, let me know.
Tar for the advice, I've pulled his stomach in just a little and have hopefully fixed the neck muscles. Also tried to put more definition into his leg muscles and various other improvements.
Why the hell would they mark you on the base mesh before taking it into zbrush? I can understand the technical side, all quad meshes, evenly spaced are ZB friendly, blah blah blah. However, at this stage its all about the art and creativity, the technical stuff can come later and shouldn't get in the way of getting your hands dirty and creating nice art.
(maybe Staffs uni needs some fresh lecturers
Keep at it, and remember your anatomy. What is the character for? Do you have a design brief outside of "getting a human body into UDK"?
I can only assume they do it to get us thinking about topology early.
The brief is pretty much just to get a human body model into UDK with diffuse, normal, specular, anymore than that is left up to us (and with that milestone mark of course). My own personal take on it was to take inspiration from Starcraft 2 terran units like the marine, siege tank driver and thor driver, plus Tycus Findlay. But that's not set in stone and doesn't really mean much considering I can't show armor/clothes. He's supposed to have muscle and look rough on the edges but not be the over the top Arnold Schwarzenegger type. I was thinking I could put some nice scars on him, body hair, tattoos.. ect, but that stuff is coming later. :poly121:
Have a look at people like Zack Petroc. He is a fantastic sculptor who really nails anatomy but not at the expense of style. I understand the urge to make something "badass" and "gamey" but you will be doing yourself a lot of favours by nailing the fundamentals of a nice looking, anatomically sound model first.
The whole idea of learning the rules is so you know when and how you can break them
Hey guys, I'm creating my normal map using render to texture like I've done plenty of times before. I have these issues on my seams, any idea what's causing this?
Looks like you have mixed smoothing groups and UV spaces without any bleed off.
In max check if there is different smoothing from each side of those seams. If that's not the issue check that when you produce that normal map its getting the smoothing group information correctly. I recommend using xNormal instead and remember to invert Y
As for anatomy, a lot of your forms are not defined enough and are looking too rectangular or too square. The feet for example and the toe arrangements are too lined up. His fat distribution is also weird, like its defying gravity. The fingers are a tad too long.
The sternocleidomastoid, neck muscles, are wrong. They do not bow out like they do on your model. Instead they originate from the sternum and attaches itself from the clavicle and then to the mastoid. Clavicle, collarbone, is missing as well.
I see you put abs in the too. the lowest pair are usually below the belly button, the top 2 pairs are above. And they are rarely seen on that kind of build.
His overall pose seems like he floating in space. Try to pose him grounded like MOST living models are to give it a sense of weight and character.
Overall, you are missing definitive forms that really shape the rest of the details of the body. I suggest some references and understand some of the purposes and functions of muscles and bone structure.
Hey guys, got the normal map fixed and tried to implement the advice given, cut out the six pack, added textures and got him into the engine plus rigged him. It's a bit late in the game to perform changes now but I just wanted to show what I ended up with instead of leaving the thread half complete. Thanks to all who gave advice :poly121:.
Replies
You're going to want to retopologize to get your ingame mesh anyway, since your current one has edge loops in useless places (useless for deformation, not for sculpting).
However.: just try to get clean quads- not many, but nice ones ; )
U can and you WILL retopo it later anyway!
I usually start directly in Zbrush, do some sculpting to get rough shapes right and THEN do a nice sculptable topology and still we all do our final realtime topo as a last modeling step (or as a first)
You may want to reduce the geometry in the head as well. It will be easier to sculpt the neck area if you don't have that change in geometry density.
Even out the topology on his fingers and toes as well. Now it looks like you've added extra geometry for his joints this'll just give you more rectangular faces to try and sculpt over rather than really helping.
Check out the polycount wiki on basemeshes for examples and a few pointers. or even other tutorials out there http://www.pixologic.com/docs/index.php/Tutorial:_Pinup - your basemesh doesn't need to be super detailed before you bring it into a sculpting app.
hope that helps.
extend legs and neck or shorten arms and torso.
- push shoulders and head back into a more natural position, this should also help form the curve of the back
- smooth transition between back/side of thigh and lower back
- adjust edgeflow between outer pecks and upper torso & shoulders
- fix muscles on arms (the forearms look very lumpy)
- Work on transition between trapezius muscles and shoulder
Also if you are having trouble reducing topology around the head and neck, you should consider using a few well placed triangles. Your lecturer might have a hissy fit about this, but if the geometry is going to be brought into a sculpting program it will be subdivided anyway, turning all triangles into quads.
I'd just like to clarify something...
Triangles are bad for models that will be subdivided because when you subdivide a triangle it CREATES POLES. And poles cause pinching and pulling. This is in contrast to quads, which never CREATE poles when subdivided. So while SCB is correct that the triangles will become quads, that doesn't mean that the problem will disappear.
That said, zbrush has a smooth function specifically built in to smooth out topology. shift+draw is smooth. shift+draw+releaseshift is topology smooth.
Getting there though! Keep at it!
(maybe Staffs uni needs some fresh lecturers
Keep at it, and remember your anatomy. What is the character for? Do you have a design brief outside of "getting a human body into UDK"?
The brief is pretty much just to get a human body model into UDK with diffuse, normal, specular, anymore than that is left up to us (and with that milestone mark of course). My own personal take on it was to take inspiration from Starcraft 2 terran units like the marine, siege tank driver and thor driver, plus Tycus Findlay. But that's not set in stone and doesn't really mean much considering I can't show armor/clothes. He's supposed to have muscle and look rough on the edges but not be the over the top Arnold Schwarzenegger type. I was thinking I could put some nice scars on him, body hair, tattoos.. ect, but that stuff is coming later. :poly121:
The whole idea of learning the rules is so you know when and how you can break them
You can also try going to Viewport Configurations and set your lighting and shadows to 1 light instead of 2 lights.
In max check if there is different smoothing from each side of those seams. If that's not the issue check that when you produce that normal map its getting the smoothing group information correctly. I recommend using xNormal instead and remember to invert Y
The sternocleidomastoid, neck muscles, are wrong. They do not bow out like they do on your model. Instead they originate from the sternum and attaches itself from the clavicle and then to the mastoid. Clavicle, collarbone, is missing as well.
I see you put abs in the too. the lowest pair are usually below the belly button, the top 2 pairs are above. And they are rarely seen on that kind of build.
His overall pose seems like he floating in space. Try to pose him grounded like MOST living models are to give it a sense of weight and character.
Overall, you are missing definitive forms that really shape the rest of the details of the body. I suggest some references and understand some of the purposes and functions of muscles and bone structure.
Good luck!
In Max:
In UDK: