Home 3D Art Showcase & Critiques

Tiling Brick Floor

polycounter lvl 7
Offline / Send Message
Assassin0323 polycounter lvl 7
This is my High Res sculpt of some warn down/weathered bricks for what would be an (Aztec/Mayan) temple. I am testing a new workflow. And if you are wonder there are 61 bricks that I hand sculpted haha yah I went a little crazy on the number but it should tile pretty nicely with not a lot of repeating. Not to mention when I get it in UDK and do some vertex blending it should look really good. Please C&C tear this piece apart.
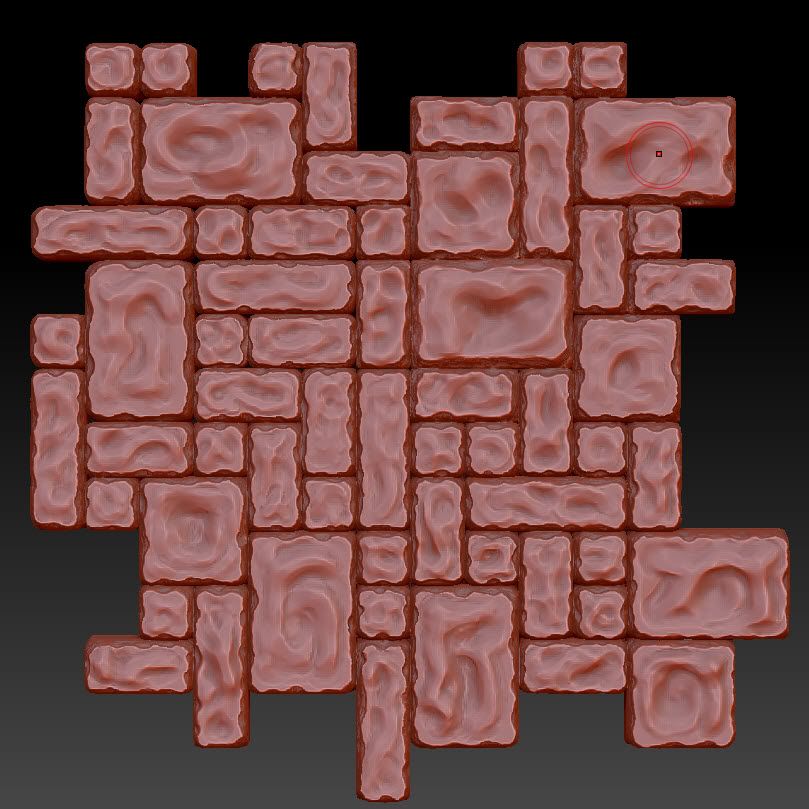
HighPolySculptFinished.jpg

Replies

  • Rurouni Strife
    Options
    Offline / Send Message
    Rurouni Strife polycounter lvl 10
    I think it looks great. I kind of feel that the edges around all of those bricks seem to uniformially worn, it all kind of looks the same to me. Should be a fantastic normal map .
  • Assassin0323
    Options
    Offline / Send Message
    Assassin0323 polycounter lvl 7
    Rurouni Strife,

    Thanks for the comments and the critique :), I do see what you are saying about all of the edges looking the same. I will go back in and create some more variation to it. Yah the goal is to make a nice looking normal map and height map I wanna mess around with the DirectX 11 Tesselation feature.

    Thanks again!

    Alex
  • Oniram
    Options
    Offline / Send Message
    Oniram polycounter lvl 17
    it wouldve been neat to see some of the edges a bit less undamaged. one thing you couldve done (or use this for the future) is make a morph target before you start sculpting and tearing the edges apart, then go back later with the morph brush on a low intensity and run over some of the edges. that way youll have a progressive damage look instead of the uniformly wearing that it has.

    a way to really take advantage of dx11 and vertex painting with unreal is to create a "clean" version that has minimal damage to it, and then a very harshly damaged version so that you can vertex blend in between.

    here's an example of something i did which uses that sort of method.

    the zsculpt
    http://2.bp.blogspot.com/_YJIZwmRNLAo/TTYxeYXweaI/AAAAAAAAACA/bgI-WIbhlRw/s1600/VBrick.jpg

    and the udk blend result with tessellation
    http://a8.sphotos.ak.fbcdn.net/hphotos-ak-snc6/188279_10150108061321090_512141089_7021025_5003532_n.jpg
  • Assassin0323
    Options
    Offline / Send Message
    Assassin0323 polycounter lvl 7
    Oniram,

    Thank you so much for the information, I actually thought of that with the vertex painting, but I really wanted to do a moss instead. But I may try to figure out a way of lerping the material so that I can have a clean, extreme damaged, and moss layer to blend between. I gotta do some research though. Thanks for the pictures I never thought of the morph target angle, I remember doing that back in school, but its been bit since using morph targets. I am going to be doing a lot of stone work on this project, so I will see what I can do for the next set with morph targets.

    I am going to be reworking a bit of the brick, I wanna dirty it up a along the sides as people on most of the sites have been saying. I will also be removing a lot of the deep divots in the bricks. I plan to post three variations for people to choose from tomorrow or the day after depending on how busy I get.

    Thanks for the comments and help!

    Alex
  • Assassin0323
    Options
    Offline / Send Message
    Assassin0323 polycounter lvl 7
    I took a screen capture of the reference that I am trying to match with this sculpt this is what I have been following and trying to match.

    Screenshot2011-11-08at124030AM.png
  • Assassin0323
    Options
    Offline / Send Message
    Assassin0323 polycounter lvl 7
    Made a quick update after review my reference image let me know what you think, I am trying to match my style with the reference from Ryan Smith and his floor. The reference image is above this post ^.

    UpdatedStone.gif
  • Assassin0323
    Options
    Offline / Send Message
    Assassin0323 polycounter lvl 7
    Haha well here is my failed attempt finished, with a new workflow definitely faster then my old workflow. Now I just have to make it look better. I will be doing a more realistic version of brick/stone next time which is what I usually do, cartoony is out of my usual figured I would give it a try though. Oh well haha.

    In UDK

    Shot4.jpg

    In Marmoset

    Shot2.jpg
  • Shogun3d
    Options
    Offline / Send Message
    Shogun3d polycounter lvl 12
    Very nice, imo!
  • Computron
    Options
    Offline / Send Message
    Computron polycounter lvl 7
    You placed your bricks in a way that makes the tiling very noticeable on the edges.
    I have never seen any bricks that look so smooth and eroded on the corners, so these look a little cartoony especially with the final texturing.
  • Assassin0323
    Options
    Offline / Send Message
    Assassin0323 polycounter lvl 7
    Kaburan: Thanks haha

    Computron: Yah I noticed that tiling problem after the fact. You live and learn, I am doing a realistic sculpted floor tile tomorrow. Going to work on the tiling layout, work on better crisper edges, a better damaged feel, and hoping to pump out a bunch of variations. This was mainly a test of a new workflow which did speed up my texturing but I also learned a bunch of mistakes not to make in the future.

    Thank you both for the comments and critiques, as well as taking the time to look at my work it is much appreciated! :)

    Alex
  • Ryan Smith
    Options
    Offline / Send Message
    Ryan Smith polycounter lvl 11
    Looks good! seeing people learn new techniques and get satisfying results is exactly why i enjoy making those training DVDs.

    When i saw the screens in this thread i was like, oh sweet! someone must be watching my tut!" :D

    Anyways, yea Computron got it right, just try to avoid placing objects that make the edges of the texture noticeable! But that's what practice is for, and now you know, and you'll never make that mistake twice :)

    Cheers!
  • Assassin0323
    Options
    Offline / Send Message
    Assassin0323 polycounter lvl 7
    Virtuosic,

    Great tutorials man, I have learned so much! Funny thing is that is not the edge of the texture its actually close to the middle haha thats why I didn't notice it. :) I will post the textures tomorrow morning to show where it was. I was focusing so much on the outer edges that I didn't see the obvious line right through the center haha. Live and learn haha.

    Regards!

    Alex
  • Assassin0323
    Options
    Offline / Send Message
    Assassin0323 polycounter lvl 7
    Well here is the final texture going to move onto the next version, much more realistic looking.

    TileBrickFloorTextureDemo.jpg
  • Ryan Smith
    Options
    Offline / Send Message
    Ryan Smith polycounter lvl 11
    Thanks man :D But it looks like you've got the idea down right. Try to avoid straight lines in your texture or they'll show up for sure later on! Good work though, the texture looks great.
Sign In or Register to comment.