The BRAWL² Tournament Challenge has been announced!
It starts May 12, and ends Oct 17. Let's see what you got!
https://polycount.com/discussion/237047/the-brawl²-tournament
It starts May 12, and ends Oct 17. Let's see what you got!
https://polycount.com/discussion/237047/the-brawl²-tournament
BRINK Nerf gun
Hey guys, I normally wouldn't create a topic for this, but I remember a few people mentioning they like seeing real life projects on here, like Flaagan's car and so, so here goes... some real-life texturing 

here's the original for reference.
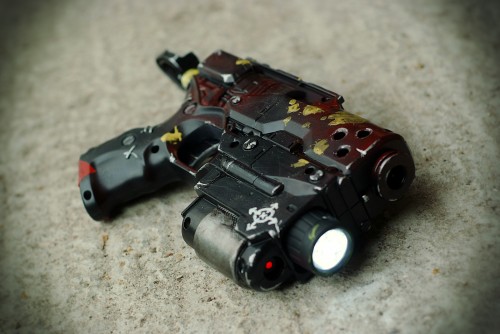
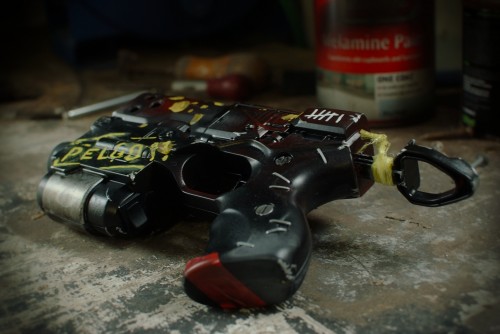
I've been wanting to do prop building for a while, and this was the perfect way to get started. I picked Brink guns because I work at SD, they look amazing and it allows for mistakes (my first try, right) + it's more interesting than clean ones.
I spent a few weeks sanding, drilling, spraying and soldering in my garage to get this done. Waiting for each coat to dry can take long
stuff:
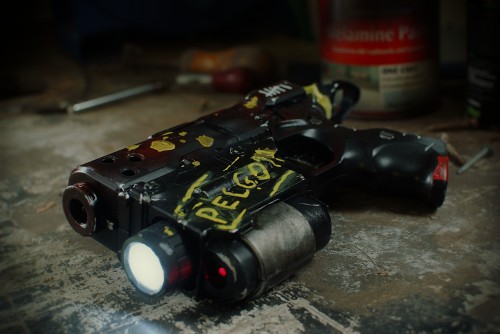
-The LED flashlight and laser are functioning and have separate switches. Changing batteries requires it to be taken apart though. The electronics are by far the most expensive part of it haha.
-It shoots quite a bit harder than the stock gun because I took out the air restrictors
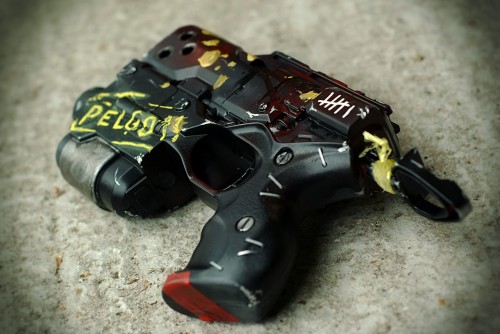
-There's about 10 kinds of paint on it. Really interesting to do the process you try to fake digitally when texturing, in real life. Some things are harder (like tweaking the specmap, requires different clearcoats), some easier.
-Looking at the unreleased conceptart at work helped me with ideas.
-This was a first test project, I've got some way bigger guns to do next.
more pics:


Thanks for looking!

here's the original for reference.
I've been wanting to do prop building for a while, and this was the perfect way to get started. I picked Brink guns because I work at SD, they look amazing and it allows for mistakes (my first try, right) + it's more interesting than clean ones.
I spent a few weeks sanding, drilling, spraying and soldering in my garage to get this done. Waiting for each coat to dry can take long
stuff:
-The LED flashlight and laser are functioning and have separate switches. Changing batteries requires it to be taken apart though. The electronics are by far the most expensive part of it haha.
-It shoots quite a bit harder than the stock gun because I took out the air restrictors
-There's about 10 kinds of paint on it. Really interesting to do the process you try to fake digitally when texturing, in real life. Some things are harder (like tweaking the specmap, requires different clearcoats), some easier.
-Looking at the unreleased conceptart at work helped me with ideas.
-This was a first test project, I've got some way bigger guns to do next.
more pics:


Thanks for looking!
Replies
Just wondering how big is it, cause it seams really small with the heavy dof in the pictures.
And at my first look I am not a big fan of the yellow paint, but I might change opinion about that, and the white "kill count" stripes I think could do with some more wear seams really clean right now.
Hope you will make more weapon props, the bigger the better
Thanks for sharing.
It's like big pistol really, not exactly small. The yellow paint is for contrast really, I agree about the white killcount stripes, might smudge them a bit more.
Stinger, that's exactly why I do it, just working with my hands in the garage, away from the computer.
Pedro: yessir! next ones will have more haha! Got an assault rifle and sniper lying around for that.
Just finished my first, kinda rubbish but I was practicing mostly, next one should be better
also, a friend did this to his raider nerfgun, looks badass:
I never posted my second one, it got onto Kotaku even:
I want to start some other ones but it's so damn cold out here I can't work properly in my garage. I guess that's not an issue in SoCal though haha
How did you do the red/brownish tints? Airbursh ?
those Krylon sprays stink, no shit!
tried to get rust effect with airbrush, but mixed the wrong paints so it doesn't look right, I'll try something different next time.
Also, I tried to fake chipped paint effect, like real chipped paint over metal base, but failed, top layer fused with metallic coat and it was impossible to sand it without damaging the base. Know any good tricks?
Also for some really nice shiny stuff this stuff here works wonders... Paint as you normally would and then small light coats of this stuff and buffed out with a nice smooth rag and boom!!
also if you are into more Nerf stuff check out
http://nerfhaven.com/forums/
yeah just test it out on small pieces so you can learn how much or how little to use... I've destroyed a lot of work because of new techniques...
After the paint is dry on the bottom layer (i always use a harder drying paint (enamal type stuff)) and then when it's completely dry you can wet the area a little (wipe it down with a wet paper towel and sprinkle some salt on the area you want the chips... let it dry and the salt will stick to the surface and you can paint over with a softer paint (acrylics, etc) and when its dry you can gently wipe off the salted areas and it should chip right off... This can be done for smaller chipped areas and the mustard method I mentioned above for larger areas like along the edges of things.
Let me know what works for you and what doesn't...
Tully: Thank you, very nice to see you drop by! There was talk about getting clearance from Bethesda to release some stuff, so it might happen in the future.