[WIP] Freelance Art Test Bus
Hey all. Was recently given an art test in response to a posting in the freelance forum. The prompt was an AEC Regent bus that will eventually become my first seriously Low-Poly project (I was given 1000 Tris and a 1024 diffuse map to work with).
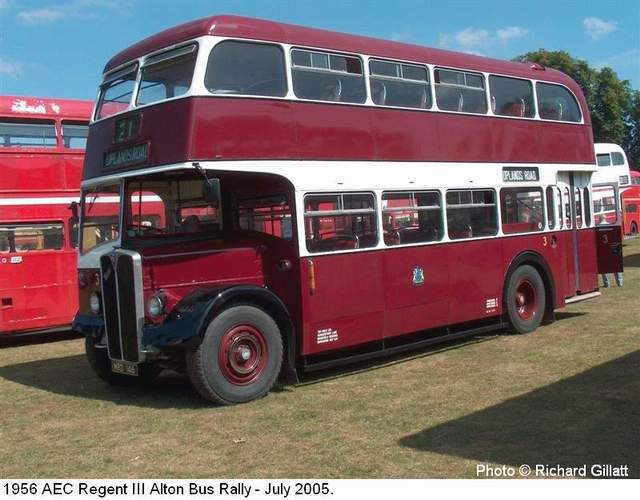
My main reference. Barring any more specific directions, I'm going to keep pushing ahead with the 1940's model, the Regent III because I couldn't find any good orthographic views of the Regent V from the '50's.
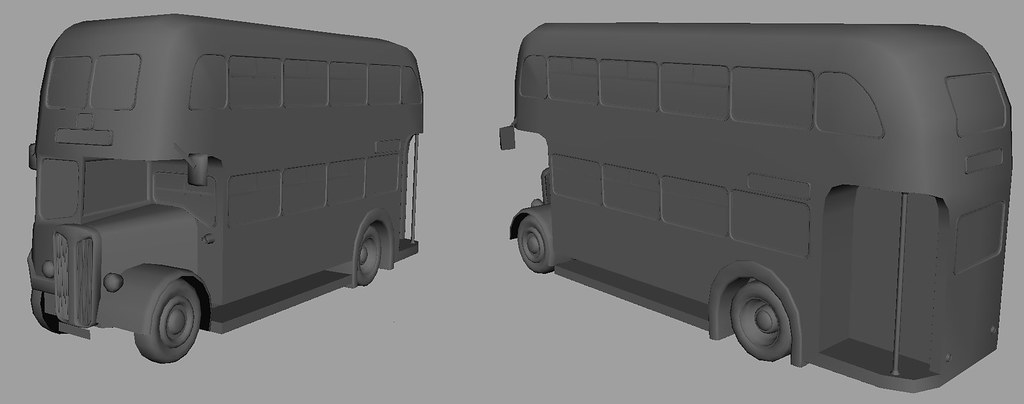
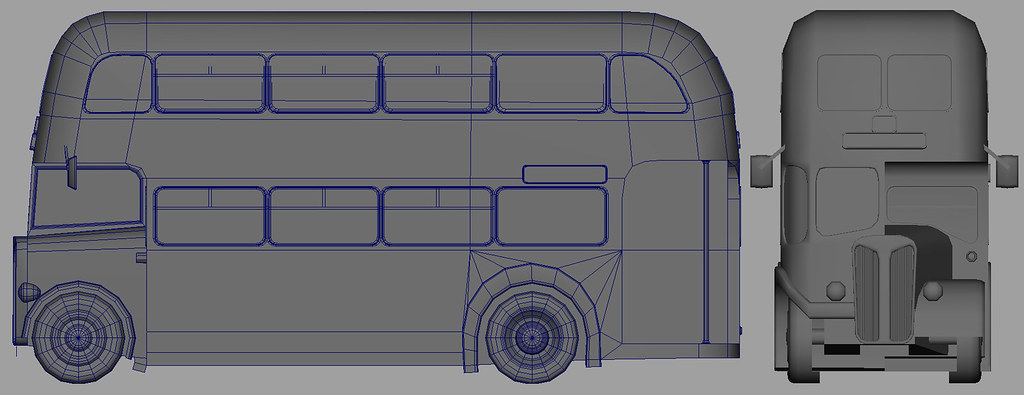
Currently in the process of detailing out the Hi-Res model that I'll use to generate my AO. The windows have a little more detail, but it's hidden behind the faces of the body because I haven't gone in and done the paneling details yet. I think I may have to cheat to save tris and actually put doors in the back even though all the reference I've found of this model is a doorway for passengers to enter without any actual doors.
Feedback would be appreciated.
Edit: Frak, I suppose I should have asked before doing this, but it slipped my mind. There was nothing in the actual PM about keeping this private. Is posting looking for crit like this acceptable, vj_box?
Edit 2: Also, I feel like I should mention, I started building this Hi-Res in Maya before being told that the final product was going to be in Max, so I figured I would finish the Hi-Res in Maya and then switch over for the Lo-Res and UVs. Just want to pre-empt any confusion when I switch over to Max in the near future.

My main reference. Barring any more specific directions, I'm going to keep pushing ahead with the 1940's model, the Regent III because I couldn't find any good orthographic views of the Regent V from the '50's.


Currently in the process of detailing out the Hi-Res model that I'll use to generate my AO. The windows have a little more detail, but it's hidden behind the faces of the body because I haven't gone in and done the paneling details yet. I think I may have to cheat to save tris and actually put doors in the back even though all the reference I've found of this model is a doorway for passengers to enter without any actual doors.
Feedback would be appreciated.
Edit: Frak, I suppose I should have asked before doing this, but it slipped my mind. There was nothing in the actual PM about keeping this private. Is posting looking for crit like this acceptable, vj_box?
Edit 2: Also, I feel like I should mention, I started building this Hi-Res in Maya before being told that the final product was going to be in Max, so I figured I would finish the Hi-Res in Maya and then switch over for the Lo-Res and UVs. Just want to pre-empt any confusion when I switch over to Max in the near future.
Replies
Further progress. Added in the side panels and some of the smaller decorative details (fuel cap, vents etc.). Maya, for some reason, won't let me boolean out the shapes of the windows so the frames are still partially obscured by the main shape of the body. Gonna putz with a little bit more Hi-Res detail tomorrow and then start reducing like crazy to hit that 1000 Polygon mark...
I have to agree with Jessica. The details could use a little more attention, especially if you're using it for an AO pass only. To me the first other thing that seemed a bit off are the side mirrors, which seem a tad on the big side. Also the way you modeled the headlights (connected to the grill) isn't accurate I think. They should be part of the front body.
Here's a quick paintover for a few other areas. Nothing major but perhaps it can aid you:
Also you mention 1000 tris at the beginning and 1000 polygons at the end, be careful not to mix them up. I'm sure you know, but just a friendly warning
I mixed that up in the initial post. It's definitely 1000 polys, not 1000 Tris.
Here's the prompts I have been given:
Given that a mostly quaded model can be up to twice the polycount in tris, that's not a mistake you want to make. Mind you, it's still possible your client doesn't know much about realtime 3d and means quads, but if there's any reason to suspect that I'd ask just to be certain.
After my dinner break, I'm going to fix up the upper windows and try to figure out how I can add a little more interest to the rear end, and then I'm going to call the Hi-Res finished so I can get started on the massive poly-reduction task I've got ahead of me.
Added a bit more detail, tweaked the size and position of that lower step. I know the Hi-Res could probably use a bit more polish, but, barring any glaring fixes anyone (including a well-rested me who hasn't been staring at it all day) notices, I still think I ought to start cranking out the Lo-Res tomorrow. I've got a lot of tris to cut out...
Get rid of one or both of the chamfers on the wheels and maybe even a few sides of the cylinder it's made of.
Get rid of chamfers and edge loops on the bumper gaurds.
Get rid of the top and bottom sections of the poles.
Not sure how low that will take you, but it should get you close to being at budget. Most of those chamfers I told you to remove could be done through the normal map and things like the top/bottom of the pole and the headlights can be done through the texture. Removing sides on the cylinders and bumper guards is just a sacrifice you need to make with such a low budget.
994 Tris.
For a real model, there should be more padding on your UVs if you will be seeing mipmaps in game. Everything is super tight so any filtering might overlap to other shells, just keep an eye on that.
Good luck!
I finally got a response from my contact that the polycount is actually 1000 Quads, not 1000 Tris, so I'll be rebuilding the Low-Res tomorrow with that in mind rather than trying to salvage the 1000 Tri version with the severely reduced bevels.
Edit: Thanks for the UVing tip, cw. I'll keep that in mind when I re-UV the new Low-Res.
I'll definitely go back and smooth out easily extracted chunks like the wheel wells, but at this point, it seems like smoothing everything will create a lot more problems than it will fix. I don't doubt that I'm doing a lot wrong, but I have a hard time believing that going back and redoing everything "right" is the best fix.
Please watch this tutorial! You will thank me later
High Poly Modeling 101! (an awesome tutorial by Don Ott)
I think I'm starting to get it; still feels extremely awkward, but I can already see an improvement in the lack of jaggedness.
Thanks for the tutorial, Jessica. Between that and Racer255's, this is definitely making a lot more sense.
Other progress, the model's in pieces right now because it made more sense to me to deal with small chunks while trying to wrap my head around subdivisions rather than also worrying about what all the new loops I was adding and editing were doing to the overall mesh. Hence the gaping holes where a couple of the chunks don't quite line up with Smooth Mesh Preview on:
That's the worst offender in terms of sharp corners where round ones are the intent. I guess I can probably figure it out now that I know no tri's or n-gons is more of a guideline than a rule.
Wheels are still the ones from the old mesh because I was happy with them even if they were still a little blocky, but I'll go back and smooth them out eventually.
Hopefully I'll have more to show after a long walk and the inevitable purchase of even more insane sources of caffeine...
Started adding in more details. Windows are mostly roughed in, but since I haven’t finalized the geometry behind them (i.e.extruded it in). Started to place some of the other details like the grille, the vents, the headlights and the doors.
Modeled out the lower panels, started adding little details like the mirrors, fuel tank, license plate. Finally bit the bullet and carved out the hollows for the main lower windows so they can actually sit correctly.
Wheels still need work. Upper half still needs a lot of love (placing the windows properly, figuring out panels etc.) The main body still needs to be recombined (or at least have everything line up properly to get rid of gaps). Little details like the lights need polish, and the headlights aren’t really attached yet.
Painstakingly cut out the geometry behind the windows and little gaps in the panels like the fuel cap, license plate and… thing that looks sorta like a foostep… I don’t know, but it’s in all the reference. Hopefully this’ll get easier as I get more used to subdivision work. I’ve been at this way, way too long, so I think I’m probably going to need to start the low-res, if not because the hi-res is “done”, then at least because I’ll probably go insane/procrastinate even more if I have to putz anymore with the little details of the hi-res.
Highres modeling in old school modelling apps like max maya softimage modo silo etc all require you to have knowledge of subdivisional modelling, the concepts of edges, control edges etc. No body can say they're perfect at subD modelling, but it comes with practice.
You should check out different tutorials on this topic to understand how to control your model with control edges. Theres a great tutorial by Grant i believe. Theres also the MEGAAAAAA awesome thread here at PC in the technical subforum "How to model dem shapes" headede by the crazy Earthquake, a PC veteran. You should definitely check them out.
Good luck!
Went back in and remodeled the wheel wells and tires. Hopefully they’re less bubbly now. I don’t know why, but for some reason I had started with a cube on those wheel wells instead of the infinitely more straightforward option of a cylinder. Started re-tweaking some of the smaller details like the curved bit in front of the left-side windows. It needed more detail and the curve was all wonky.
]
Added the ridges. Troubleshooting the “bubbliness” around the upper windows. Tweaked some of the other curves that weren’t curvy enough for my tastes.Attempted to work around some scaling issues (specifically, the top is too wide because of the position of the windows and the ridges).
And now, it's time to take a break and use my birthday as an excuse to sink an unforgivable number of hours into Skyrim...
And as for not needing a hi-poly, I haven't really done anything really, really Lo-res like this, and baking is just the only way I know to generate that sort of detail, even if it was only going to be on a low-res AO map with no normals. I suppose the smart option would've been to look for some low-poly tutorials, but then it might've been even longer before I got the "Learn subdivision" crit. I've got a lot of stuff to go back and fix now that I'm somewhat familiar with these techniques, and I wouldn't know if I hadn't started out doing this test wrong.
I'm not even really trying to make a living freelancing. I submitted a couple applications hoping to build my portfolio and resume, and maybe get a little extra spending money, with some outsource work while I work a crappy part-time job, live with my parents, and make some dents in my student loans.