Unity: textures looking bad vs maya
polycounter lvl 6
I'm new to unity, troubleshooting my 3d prop modeling process.
I'm having trouble getting my nice diffuse and normal textures to look good in unity

using the same 1024 x 1024 jpg images , one for color and one for normal map.
In Unity i'm using a bumped diffuse material
It looks much better in Maya (top).
In unity the pixels are being re-sampled or something?
Is this a material parameter(s) I must control? If so which?
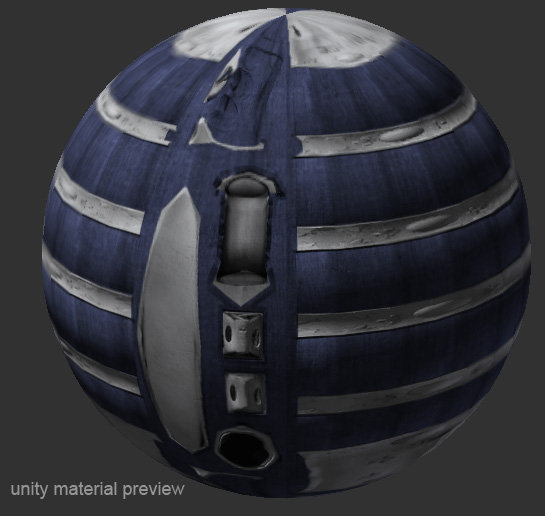
oddly, the jpgs seem to hold up fine in Unity's material preview:
I'm having trouble getting my nice diffuse and normal textures to look good in unity
using the same 1024 x 1024 jpg images , one for color and one for normal map.
In Unity i'm using a bumped diffuse material
It looks much better in Maya (top).
In unity the pixels are being re-sampled or something?
Is this a material parameter(s) I must control? If so which?
oddly, the jpgs seem to hold up fine in Unity's material preview:
Replies
Also
Have this set to Full Res for your current preset
pngs look marginally better but still something is hosing the texture.
where do I do this? what must I select in the project tab in order to access these parameters in the inspector?
same question for MadnessImport...can't seem to find that inspector page you screengrabbed by selecting the objet, material or texture in the project tab.
Does it matter that I don't use unity pro?
Make sure the texture type is set to normal map while you're at it ^^
And the settings posted above are from Edit/Project Settings/Quality, not from a single tex/mat
Texture Type: texture (normal map for normal map png)
Max Size: 1024(matches png)
Format: True color
I set the Project Quality dispaly as shown above.
I am beginning to suspect that there is some aggressive mip-mapping going on.
when I zoom in very close, the texture appears to approach the actual png resolution, which I can see at any zoom in maya.
But in unity I have to soom in too close to see the whole prop... so It's no good for reviewing purposes.
can I adjust the mip mapping so I leaves the textures nice?...or is it even wise/part of standard workflow to be doing this?
I just want to be sure it looks good in unity, and be able to get a decent screen grab.
I cant remove this post
so you use a different PSD file for each map (texture & normal) ?
isn't PSD huge compared to a png? won't that bloat your project directory?
even tho it looks smashing in Maya, maybe unity uses the UVs to decide how to mipmap/filter stuff?
Horrible, bad, bad, bad, notice how the texture looks blurred in one direction? but looks okay-ish at the handle and butt?
Change the texture type from texture to advanced.
There, you have access to mip map options. Turn it on or off, adjust the strength and type (Kaiser/Box, I think). Also make sure the resolution is right. At the bottom, maybe change from DXT1 to something else; sometimes DXT1 can mess up a texture because of it's compression type (bright or dark textures with large smooth gradients or small detail can get messed up a bit). Make sure your texture filtering is bilinear or trilinear (whichever you can afford) and set the aniso to something reasonable.
Then go through your normal map texture, change that from texture or normal map to advanced. Then have a look at your normal map settings - make sure it's marked as a normal map, but not generating a normal map (if you hit generate it does the same thing as the nVidia Nm filter in PS).
you need to keep a psd somewhere, why not in the Assets directory and bypass a huge time sink of exporting a useless flattened tga. All you have to do it pres ctrl+s and you can see your texture changes ingame instantly. PSD's have a flattened version of the image in the file so importers can simply load that while ignoring the layers, which is what Unity does.
On the other hand Max and Maya files should not be put directly in the Assets folder because they require their respective software to import. That causes problems if you try to load the project on a computer without the software, or with an older or newer version of the software. For a larger production you would probably want some Max or Maya tool for quickly exporting to the correct Assets/ path with a hotkey to bypass the manual export process.