Female Character
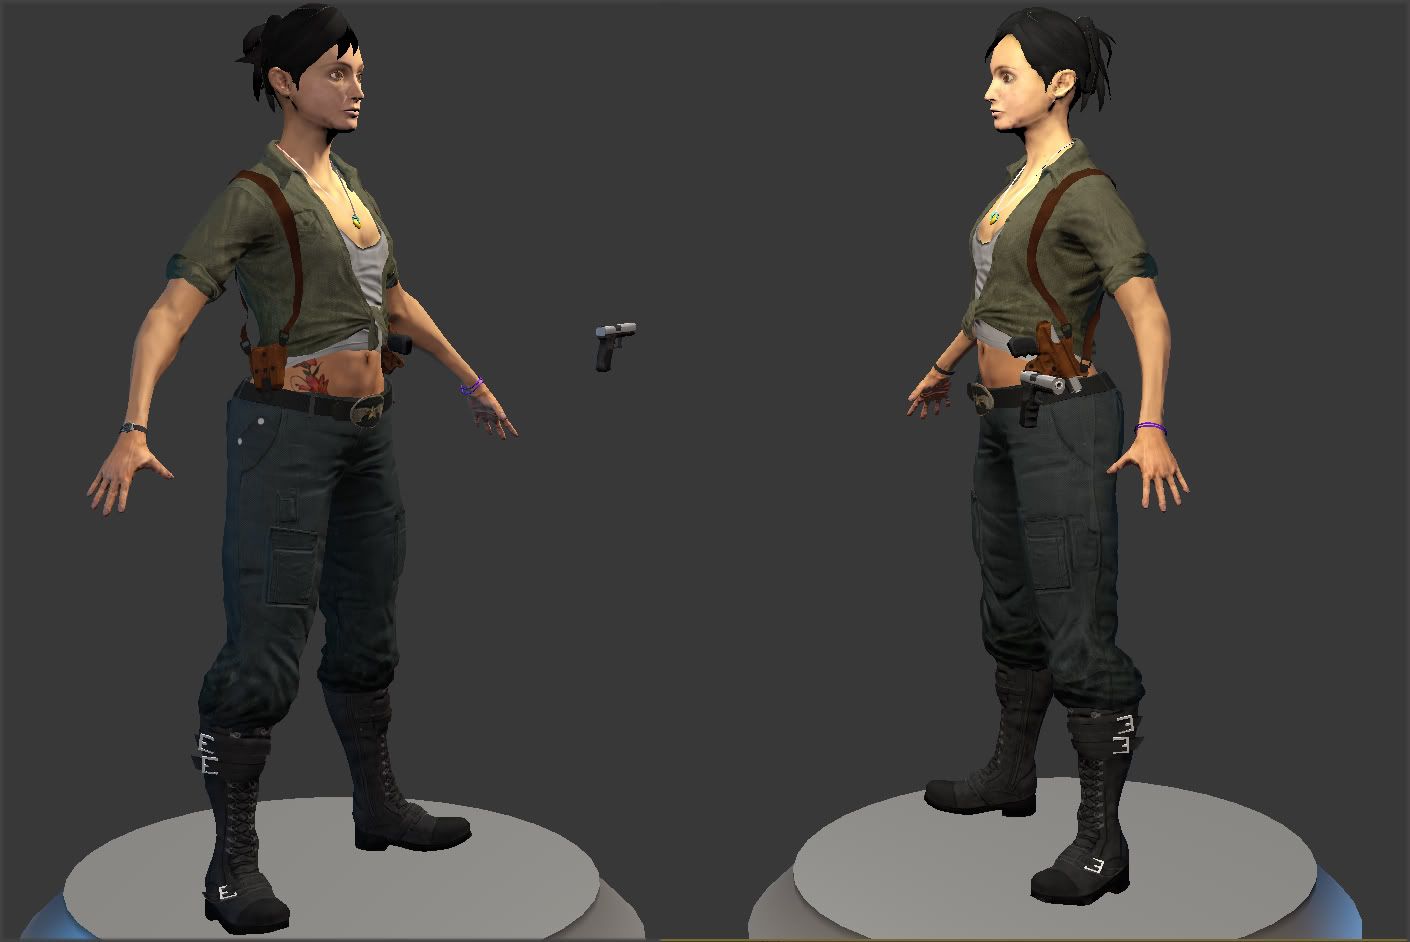
Hey guys, here is a female character that I have been working on and off for longer than I dare to remember. She was originally based on Natalie Portman , but I then took allot of inspiration and infuence from Uncharted's Chloe character. I have been really trying to push the outdoor , active, adventurous , girl next door feel with this character.
(The screenies are taken from Max's viewport with the Xoliul 2 shader)
I hope you like her!


At the moment I am deciding if a hair clip would benifit the character and further push the girl next door look. (if i have the uv space)
There is still much work that needs doing in terms of texturing and adding some wear and tear to the clothing etc
I will try to keep you guys updated
Thanks
(The screenies are taken from Max's viewport with the Xoliul 2 shader)
I hope you like her!


At the moment I am deciding if a hair clip would benifit the character and further push the girl next door look. (if i have the uv space)
There is still much work that needs doing in terms of texturing and adding some wear and tear to the clothing etc
I will try to keep you guys updated
Thanks
Replies
The pockets on the front of the pants could use a low poly box shape to pop them out. The chest looks really flat, a wireframe would help, It just looks like a flat chest with a boob crease baked into the texture.
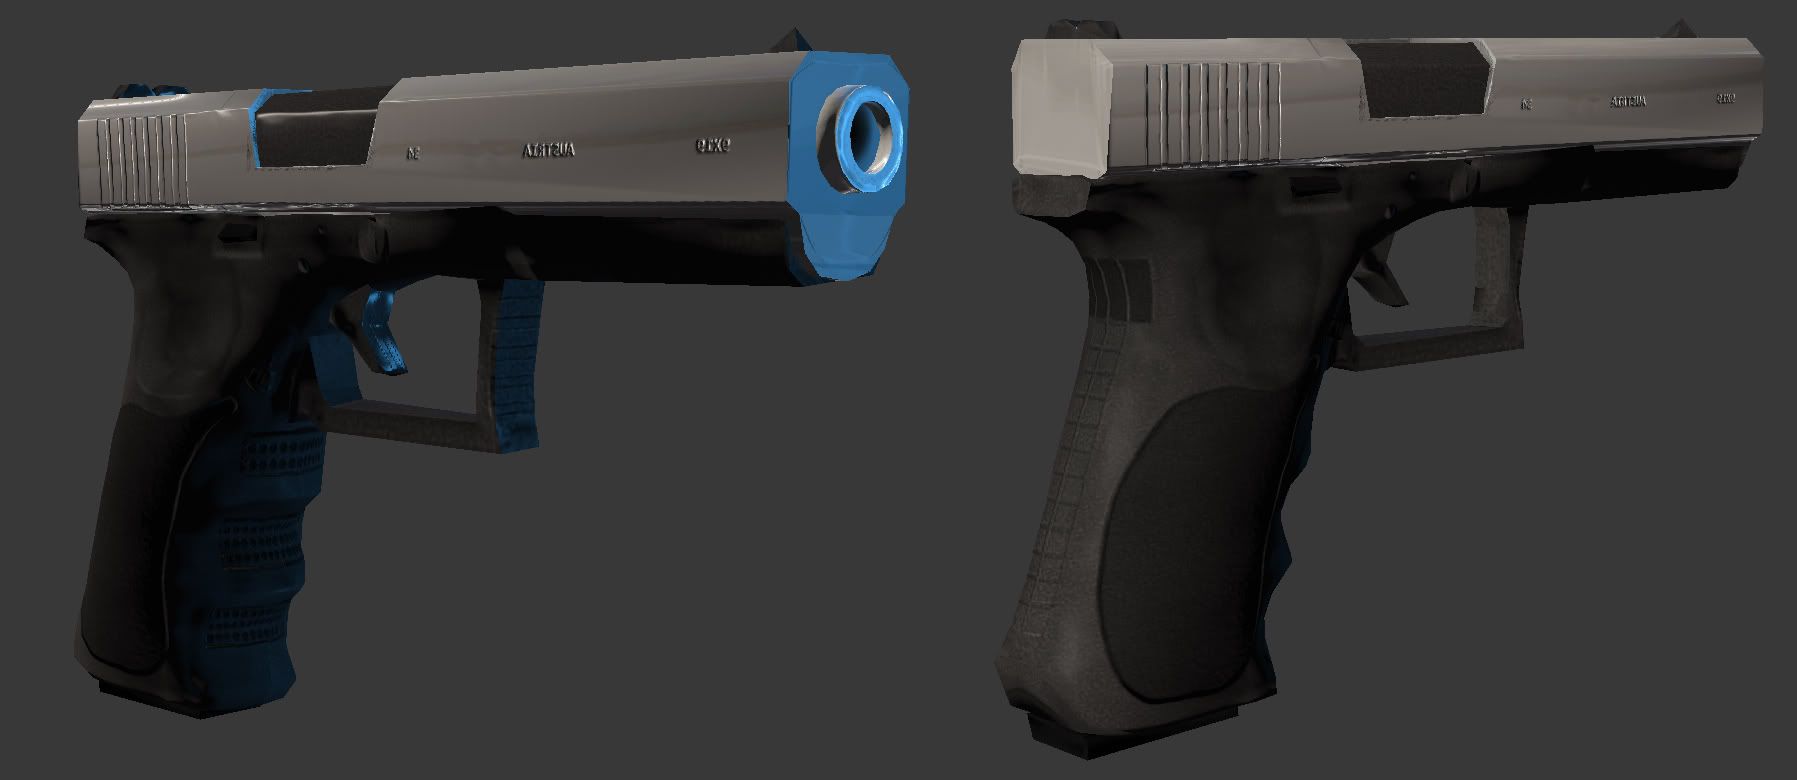
@Dagon - I know what you mean about the size of the Glock. I found that there are so many variations of it when I wa looking at refernce images. I decided to go with the samller version as I think it is more pocket/ girl like. I am thinking about rigging her so that I can test it out and try some cool poses etc.
@Alex3d - Thanks man
@Dpadam450 - You were right about the boobs, I think that the shape must have also been lost in the retop. I have played around with the geo and added the shape, it looks allot more believable in my opinion , I hope that I havent made them too big though. I have also made the pockets stick out more so that it makes a better silhoette.
Here is the Wire framres that you requested
@Tenchi - Thanks, those boots took ages lol I think I got very lucky with the laces in the bake. As for the jaw and elbows it is the lighing setup that I have put together, it needs some changing.
Yeah the arms are pretty bendy its almost as if the brachioradialis muscles in the forearm terminate too quickly. Ill see what I can do.
@Fred2303 - Thanks for the feedback! I originally aimed to have the distance from the chin to the base of the shoulders around half a head long. But after looking at Scott Spencers Humana Anatomy book I realised that it should be only a 3rd of a heads length. I have changed it slightly. I didn't want to alter it too much as it would throw off the shoulder anatomy. What do you think?
I have also adjusted the forearm, now it isn't anywhere near as bendy.
The pocket on the trousers looks as though it's just an emboss filter, with no real depth
The belt is a just a thin strip of polys, how about making a proper belt( with thickness) then baking it down, same with the gunbelt.
The normal baking in general looks very scruffy and not convincing, try improving the high poly version.
Even subdividing the head a few times sand baking from that would be better than what you have got now.
Sorry to be harsh , but I think you need to go back and look at the way you generate your normals.
The mesh seems really dense for a model with such a small amount of detail also
As for the normal maps , they are in the correct orientation, if they are flipped the seams in the trousers etc stick out instead of in. I agree with the box like pockets. I might look into creating geo for the top pocket segment and chamfering the edges.
The belt actially has thickness but I guess I could bevel them so that they are visible becse I agree it does look pretty flat, you can only really see it in the silhouette.
The holster and clips are planes because I didnt really think that adding thickness would be worth all of the extra polys. But I could always add them as she is 13.000 with the weapon, so theres still more polys to play with.
The highpoly sculpt if fine imo , this is a newish version of it without the back pockets, seperate collar and cuffs etc
[Edit - The forearms and lower trouser parts still need to be adjusted in the UV's so they are pretty distorted at the moment]
Also maybe some of the creases midway down the legs could do with a small bit of work, they look like the creases you get if you wrap plastic round an object, rather than the combat pants creases that are working really well on the other areas.
Other than that, its pretty sweet
@Alex3d - Thanks, I never would have thought that tweaking afew verts would make such a difference to the legs!
Heres another update.
Since the last update I have managed to get a rough texture setup for the hair as I was dying a little inside with the flat mock up. I have also manged to create a rough spec map and redflection mask for the body and head , as it was far too flat before. I have also began defining the pockets in the trousers because as Ruz stated , they looked like an emboss filter!
I need to actually play around with the texture space so that the pockets are unique as at the moment they are overlapped.
Theres still allot of work to do , I was contemplating rigging her ( I even setup the biped!) but I think I will leave that until all the extra little bits of geo have been added for the pockets etc.
I still need to clean up allot of seams on the hands and add some detail to the vest as it is just a flat grey color at the moment. Once this is done I can begin adding some grunge and funk to the rest of the textures.
Heres another update. I mangaed to spend some more time ficing things today.
I ha have managed tobake the high poly belt, trouser hoop and sculpt the holster for a better bake. I still need to rebake the cuffs , collar and holster clip.
Also scupt the heart necklace and get some textures on there as they are all unwrapped now.
I have also began adding some colour variation to the clothing and boots. Still allot of work to do but I think its getting there
I managed to spend some time texturing the gun and holster yesterday. I also managed to play arouns with the normal map for the body, as it needed adjusting and inverting. I have also managed to do a fair bit of optimization throught the character. I wil post more images of the ful character and wireframes when I can spare more time
I stirll need to cleanup some of the normals on the gun as it was scupted entirely in ZBrush so theres some soft edges etc kicking about.
Its my first human character and attempt at modelling a weapon so allot of it is pretty new to me at this stage
Changes made:
-Heart necklace textured
-Hair updated
-Color values changed
-Normal maps toned down for fabric
-Vest textured
-Cloth shadows added
Theres still lots of work to do but I am slowly chipping away at it
Making sure you have a more relaxed and solid pose from the get go will help you identify proportion problems early on.
I think her spine is way too short (the ribcage is about to collapse right into the hips), the hips are a bit too wide and the shoulders are too narrow. I also believe you need to invert the green channel on your normal map.
It may be a bit too late with this model but make sure you study and work on your anatomy. For instance the neck/chest area is getting a bit too vague, it's hard to make out the clavicle and the actual neck forms and so the placement and forms of the breasts are getting lost.
Female anatomy and form can be very difficult to learn. The forms are subtle and implied and that makes it impossible to cover up with simple muscle mass. So brush up on the references and pump out a few studies before jumping into a full character
Keep it up!
It has been a huge learning curve so far and theres so many things that I have learnt from making this character that I will do differently next time. One of which would be to plan out the elements that would be scupted and the elelnts that would be generated via normal map filters. It has been a nightmare alloting parts such as the pockets with unique texture space
I agree with the comment about the stiffness, she looks like a rag doll at the moment, I was going to rig her afew posts ago but I decided I would work on the texturing and add any extra bits and bobs. Once I have her posed I should have a better idea of what changes need to be made to the anatomy. I think that the baggy clothes really dont help to suggest her major forms aswell. The breasts also seem really flat despite defining them with the actual geomety. I am going to play around with the lighitng setup becasue I think that might be a big factor in the loss of definition around the neck area.
Im not quite sure what is going on about the normal map because people were suggesting that I should flip it earlier , so I did
It's easy to get caught up in the little details and miss the big picture. It's a recurring theme where beginners get too caught up in the highpoly sculpting with tools that are easily accessible and forget to build a solid understanding before jumping into the microdetails way too early. A good rule of thumb is to make sure your forms are well established before going up the next subdivision level, that will prevent your forms from getting muddy and vague.
I would suggest to take a step back next time. Forget the props and the clothes and the little details that distract you from the basics. Use reference, there is elegance and subtlety to the female form that's missing here. What we see instead is a somewhat naive interpretation that skips right over the fundamentals. Take it slow, study the forms. The web is full of good examples from others that should not only inspire you but teach you better than any tutorial.
Once the basic forums are in, then the details like clothes fall better into place. Don't underestimate the value of reference. Cloth folds don't lay haphazardly, using reference will help you understand how different materials and their weight affect their appearance on the body.
Sometimes I think it would be beneficial if beginners would avoid going into highres sculpting and practicing low resolution modeling first. That may help you build the foundations before jumping into more complex geometry.
Remember, you are your own best critic. Keep at it !
I took Fuse's advice and I have spent some time adjusting the verts to the mid-poly scupt as much of the form was lost in the retop. I don't know if it's new drivers , 2012 or the fact that I adjusted the contrast in the normal maps but I the forms are coming back
I still need to adjust some verts on the legs the holster.
As for the texturing I need to add a faint grunge pass on the clothing and some skin colour variation as her cleavage looks very flat at the moment. I might even make it smaller, but I don't want to fall into the massive super tight boob trap!
I am also thinking about rigging her soon, as I am fed up of looking at that pose now xD
[Edit - oooops!!! I just noticed that I forgot to make each of the materials double sided so half of the hair id non existant!]
I have managed to setup a rig and a quick pose,both still need work as there is allot of distortion and clipping at the moment. I still have allot of texturing to do just to polish her up. Then it begin making some sort of pedestal for her
If you have any suggestions for a different pose etc , please shoot! thanks
I'm not a very good artist but here is my paintover.
achillesian@ Thanks for the feedback. I must disagree with "tired of seeing this character, and seeing it never change" comment though.
It may seem that way because I started this thread with a half textured character so most of the creation process had been completed. However I have took most of the critique that I have received on board and made adjustments accordingly. They might not have been massive adjustments such as inverting a green channel on moving some verts, but they have all added up. (just look at the first post , there's practically no normals or colour variation)
I do agree with your comments about the cleavage and using a good reference etc as it is still something that I need to fix, but I think you have used the wrong example. You cant really compare a woman in a silky dress with no bra to a woman with a bra , vest and shirt. 3 layers would really push them together. I think some colour variation and abit of ribcage would help.
Thanks for the paint over, I think it really brings out the sharpness/boniness of the shoulders that my character is missing, oh , and the curve in the lower back. I'm not quite sure about the rest of it. The massive lips/hips boobs and droopy eyes make her look like a manga character, which is not the direction that I was taking this project.
If you look at the anatomy of this random pic I found , the proportions are not that far off bar the different poses, I wouldn't say it was worryingly close to needing a complete redo.
As for the head, the major forms were based on Natalie Portman and not a manga character or a lip augmentation patient. Perhaps that is why they seem pretty boring and dull.
As you can see from the comparison I think some make up and eyelash extensions are in order.
As for the character, I can't tell if it was really improved much since the original post. This is a problem of trying to replicate a photo reference literally. Instead of trying to copy what you see from a photo angle, what you need to do is study the photo and understand the forms within.
There are some glaring proportion and form issues when compared to your references and you kind of missed the mark with the face.
You need to take a step back, forget high poly and forget normal mapping. Start with the basics of modeling and study anatomy reference closely.
I am sure that the longer I am away from uni , the personal attachment and frustration levels will lower.
I will be sure to create a series of both male and female anatomy studies before my next major project.
One observation I would make is, did you sculpt with your perspective turned on in zbrush? It has an orthographic look in the grabs, which can really throw your proportions off when you are working on figures and using photo ref.
Keep at it
Not sure what that has anything to do with anything but anyway, a good way to learn would be to study other people's work as well. Good luck.
Ikosan - I got taught similar weird and wonderful things. Although that chair example is pretty impressive haha
I guess I should have spent more time on the high poly sculpt and posted it on here before moving on to the next step to avoid all of the anatomical problems that I have been getting. I shall have a play , and see what I can do.
Fuse - That comment was explaining how being awarded marks for defending my work from other students critique can rub off on here as well. I will get less attached with my work now that I am not being awarded marks for trying to justify every design choice, as this is a personal project.
Looking at other peoples work does help , there's so many awesome characters on here to go in the inspiration folder \o/
without the eyes too. Without the eyes I think the likeness is actually pretty close.
I need to sort out the cuffs for the shirt as It look like it has the old texture on there or something , also the bracelets need texturing.
I have created a morph target for the facial expression but I am in need of advice as to which type of facial expression to go for as at the moment I have only altered the eyebrows slightly.
I want her to seem cute , cunning and wise but to me she just looks like shes posing for a myspace photo at the moment.
Unfortunately I can't see your facial edgeflow (topology) so I don't know how I'd be able to help you.
Personally, if you really like this model, I'd go back and redo the base body mesh. There are several tutorials on here. You could post your progress on here and we could help you out.
Due to the long time span of this project I found that I had overlooked certain stages of the project, and as my skill increased, I could have saved allot of time without having to go back and redo parts of the high poly etc.
Here is the HD video turntable.
[ame="
I hope you like her
I have also increased the size of the gun and hand but I am not sure if it throws the other proportions off, the bigger hands are in the image below.
I have also changed the spec of the lips removed the blue stubble shadows , changed the hair line and made some other small adjustments to the legs etc.
I haven't really got the time to do much more to her, but any tiny adjustments you think will help , please shout
Thanks