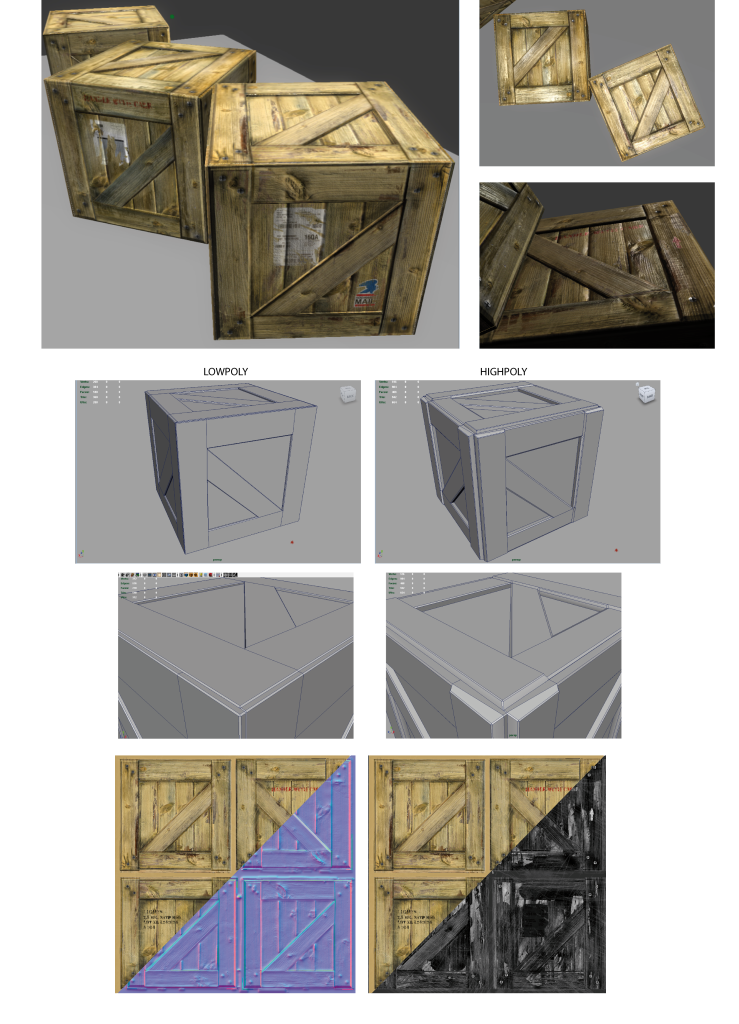
Hey there, looking pretty good, but here are my opinions: where the white sticker is on your normal map, it's like the sticker is following the curvature of the wood planks, causing an intense indent in the sticker. I don't think this would be the case with a real sticker, it would be ontop of the indent, rather than indented itself. I would make it a lot more subtle, so it looks indented just a little, you can do this by painting the neutral blue over top it with some opacity. I also think you can push the depth alittle behind the diagonal wood planks, right now the diagonal pieces don't have much thickness, which makes modeling it kinda pointless, normal map on a flat surface would look almost identical. You have this tiny extrusion on the top of your crate, if you're going to extrude, do it more so it follows the form of the highpoly. The case you have now could just be normal mapped on a flat surface and look fine without that added geometry, but if you use more polygons, make them count and add to the model rather than a tiny change barely seen. I'm not sure about those micro bevels on the edges of your low poly, I don't they they are necessary. Your textures are looking pretty solid though.
Like what coots7 is saying, you could probably get away with a box that's chamfered once. Everything else would be from the high poly.
If you could for the high poly, make a single plank (a long, thin box - chamfered, maybe a little bit of detail) and "assemble" the crate that way. You might get a better outcome then having the whole high poly be one mesh. If you don't know what I mean, then try to break apart the mesh a little more into what the real object would be made of (crates are made of planks!)
I'm not sure how you got normals for each face, excluding the border, because it's flat in your high poly, but however your getting them, you might want to sharpen the edge more, it's making the normals curve it, like it's an inflated crate, instead of the harsher edge transition of wood.
Your texturing looks good, you don't seem to have difficulty there. Also, that's a nice idea doing four of the six, instead of six or any other number, very efficient, I like that.
If you have zBrush, Sculptris, Mudbox or something else that let's you make and sculpt hiRes detail, try that out. All you would need to do is make one plank look really good, then build the crate. You could still do the texturing in Fotoshoppe, but for the normal detail, it might be easier.
ah yes, i think the sticker looks much more convincing. one other thing I noticed, is your screws are all oriented the same way, rotate them around a bit add some variation. Did you change the low poly at all?
Hey there, looking pretty good, but here are my opinions: where the white sticker is on your normal map, it's like the sticker is following the curvature of the wood planks, causing an intense indent in the sticker. I don't think this would be the case with a real sticker, it would be ontop of the indent, rather than indented itself. I would make it a lot more subtle, so it looks indented just a little, you can do this by painting the neutral blue over top it with some opacity. I also think you can push the depth alittle behind the diagonal wood planks, right now the diagonal pieces don't have much thickness, which makes modeling it kinda pointless, normal map on a flat surface would look almost identical. You have this tiny extrusion on the top of your crate, if you're going to extrude, do it more so it follows the form of the highpoly. The case you have now could just be normal mapped on a flat surface and look fine without that added geometry, but if you use more polygons, make them count and add to the model rather than a tiny change barely seen. I'm not sure about those micro bevels on the edges of your low poly, I don't they they are necessary. Your textures are looking pretty solid though.
Thank you!
Now I have extruded the faces a bit inside, but not too much. i did this in order that it's not much different from the volume generated by the normalmap.
Concerning the sticker, I think that now it's ok. Probably it leaks of a bit of dirt texturing.
Like what coots7 is saying, you could probably get away with a box that's chamfered once. Everything else would be from the high poly.
If you could for the high poly, make a single plank (a long, thin box - chamfered, maybe a little bit of detail) and "assemble" the crate that way. You might get a better outcome then having the whole high poly be one mesh. If you don't know what I mean, then try to break apart the mesh a little more into what the real object would be made of (crates are made of planks!)
I'm not sure how you got normals for each face, excluding the border, because it's flat in your high poly, but however your getting them, you might want to sharpen the edge more, it's making the normals curve it, like it's an inflated crate, instead of the harsher edge transition of wood.
Your texturing looks good, you don't seem to have difficulty there. Also, that's a nice idea doing four of the six, instead of six or any other number, very efficient, I like that.
If you have zBrush, Sculptris, Mudbox or something else that let's you make and sculpt hiRes detail, try that out. All you would need to do is make one plank look really good, then build the crate. You could still do the texturing in Fotoshoppe, but for the normal detail, it might be easier.
Thank you for the advices! I will apply your suggestions in my future projects.
The normalmap you see there, is obtained by summing the normal map i already had from Maya(the one from the geometry) and the one i made in photoshop+Crazybump (the one from the wood).
ah yes, i think the sticker looks much more convincing. one other thing I noticed, is your screws are all oriented the same way, rotate them around a bit add some variation. Did you change the low poly at all?
Hey man, great start! Very nice textures! As said above, add more polygons, but also make it believable! You have 6 Identical sides, you need at least 2 (top and bottom) to hold the other 4 together...
Good luck!
Nice light setup for this crate, I'd like to know a little how it's done! :P
I prefer UDK over Unity, so I can't tell you much there... But by the looks of it, he just uses 2 point lights set up, 1 warm/1 cool. Here check out his page, he got loooooots of awesome stuff http://orbart.free.fr/index.php?Gallery=105
Hey man, great start! Very nice textures! As said above, add more polygons, but also make it believable! You have 6 Identical sides, you need at least 2 (top and bottom) to hold the other 4 together...
Replies
I agree about adding more polygons: make them count!
Nice texturing!
If you could for the high poly, make a single plank (a long, thin box - chamfered, maybe a little bit of detail) and "assemble" the crate that way. You might get a better outcome then having the whole high poly be one mesh. If you don't know what I mean, then try to break apart the mesh a little more into what the real object would be made of (crates are made of planks!)
I'm not sure how you got normals for each face, excluding the border, because it's flat in your high poly, but however your getting them, you might want to sharpen the edge more, it's making the normals curve it, like it's an inflated crate, instead of the harsher edge transition of wood.
Your texturing looks good, you don't seem to have difficulty there. Also, that's a nice idea doing four of the six, instead of six or any other number, very efficient, I like that.
If you have zBrush, Sculptris, Mudbox or something else that let's you make and sculpt hiRes detail, try that out. All you would need to do is make one plank look really good, then build the crate. You could still do the texturing in Fotoshoppe, but for the normal detail, it might be easier.
Thank you!
Now I have extruded the faces a bit inside, but not too much. i did this in order that it's not much different from the volume generated by the normalmap.
Concerning the sticker, I think that now it's ok. Probably it leaks of a bit of dirt texturing.
Thank you for the advices! I will apply your suggestions in my future projects.
The normalmap you see there, is obtained by summing the normal map i already had from Maya(the one from the geometry) and the one i made in photoshop+Crazybump (the one from the wood).
I know but I have realized too late. XD
THANKS LODSME! I will apply it in the next projects.
:=
Good luck!
I like very much the style
Thank you for the example, it's excellent!!
Michael Vicente's*
Nice light setup for this crate, I'd like to know a little how it's done! :P
legendary crate