Vietnam Zombie

polycounter lvl 7
Sup dudes! I'm here to share my process with ya'll, get some feedback, answer any questions you may have, and hopefully contribute something positive to Polycount.
I also want to thank all the people in the WAYWO thread that gave me some encouraging comments") thanks dudes!
thanks dudes!
My process is kinda still in a pre-mature state. I play around with shit a lot, experiment and test things, When working on personal prjects I find it hard to stick with something until the end, because my head fills up with all kinds of new shit I want to pursue, what I do to combat this, is I try to save the things I would have the most fun doing for last, if I can get through the boring stuff first (as long is it doesn't interrupt a sound workflow) I figure there's a better chance I'll finish the project.
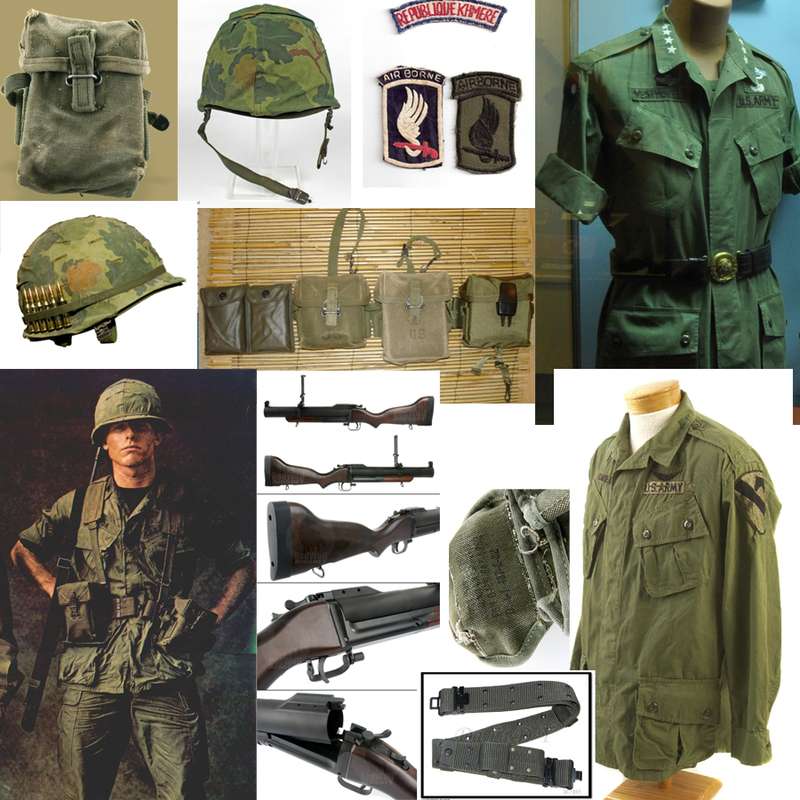
I'd always suggest (and I'm sure other professionals will too) to do as much research as you can before you start a new project. I usually have a reference folder in my project folder with a ton of images in them, but I've compiled a few of the most important ones here.
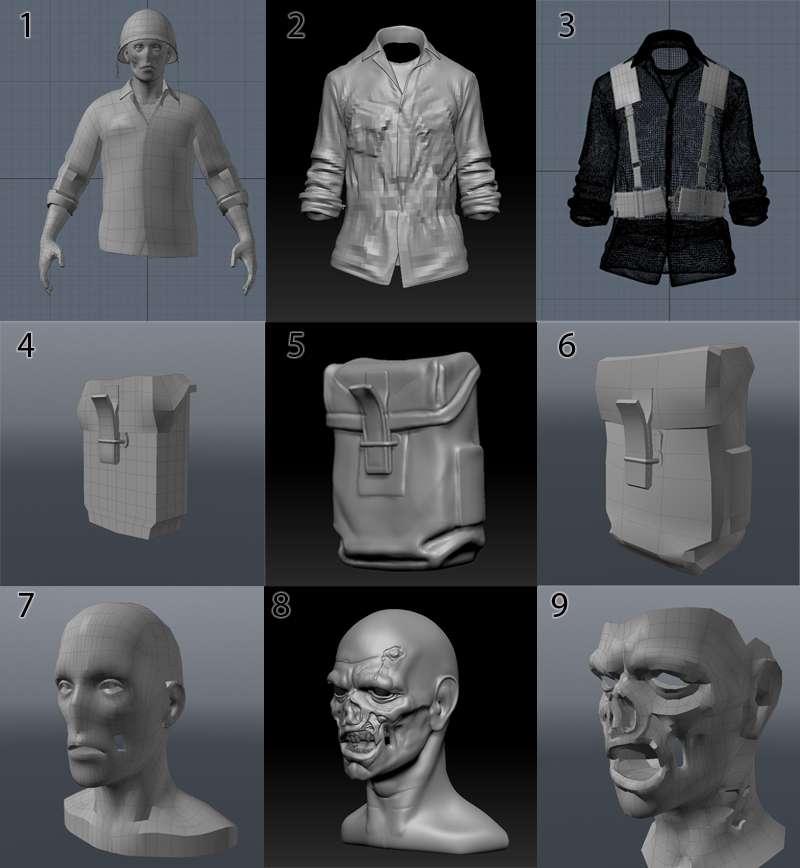
Now onto the modeling, as most of you will know, if your using normal maps there are 3 stages to the modeling process. The mesh you bring into zbrush or mudbox, the sculpted mesh, and the arbitrary mesh that will be used in game.
1. This is the basic mesh I brought into zbrush, it looks damn aweful, but really all it needs to have is the proper geometry in the proper place. I'm not too concerned about shape or proportion at this point, those I'll tweak in zbrush. There are no belts or straps in this mesh yet, since their position and size will much depend on the shapes and details of the shirt.
2. Sculpting cloth... eh... it's difficult. MM has some lovely videos of him sculpting cloth on his website, I'd suggest everyone check it out. I wish I had earlier stages of this mesh, most of this process was checking references, not getting caught up in details, and even completely starting over in some parts that just weren't working. Once I got it somewhat close, I know I need to add a harness and straps so I held off on details for now.
3. With a mid res version of the shirt in the background, I started to lay on the harness and straps. Constraining geometry creation to a reference mesh is really helpful during this stage.
4. Example of the pouch, and evenly distributed geometry for subdivision and sculpting of folds/wrinkles. I also made the straps/metal bits separate geo.
5. Spent maybe 15 minutes sculpting this, really not concerned with too much detail on these things since they're not the focus of the character.
6. The retopologized (is that even a word?) mesh. These last 3 steps pretty much sum up what was done with every object on the character.
7. The base mesh for the head. Note, the holes in the cheeks, and lack of defining features on the nose. Even if he HAD a nose, I would recommend leaving the mesh this way for sculpting, the eyes don't reflect this idea very well, and probably have too many edge loops.
8. The sculpted head mesh, I referenced a lot of Schell studios work, lots of awesome undead zombie sculpts. I mostly use 3 brushes in zbrush, the clay buildup with no alpha, and move brush, and the dam standard brush. It's also good when doing this sort of genre, to reference human skulls. Didn't spend any time really on the ear, or top of the head since, you weren't going to see it.
9. The in-game mesh, with unseen polygons deleted. Proper edge looping is important. Check out the polycount wiki if your new to this concept.
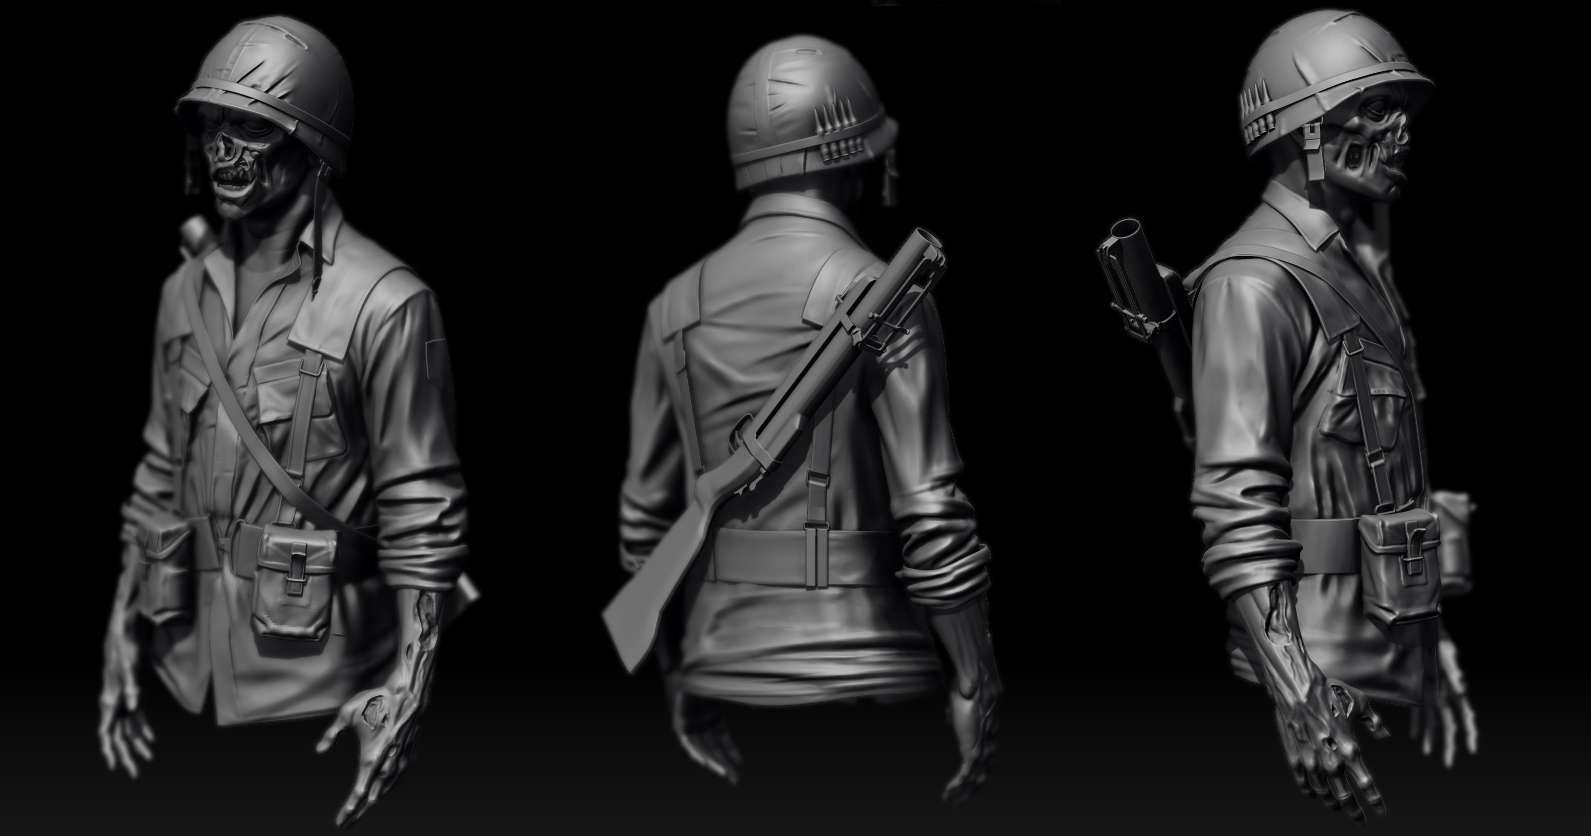
And heres an image of the final sculpt
After I went through the sculpting and retopologizing process, oh, and UV's, I moved onto the baking process. I used Xnormal to bake the normal maps, and Modo to bake the ambient occlusion. While I texture, I like to light as well. For some people this can be distracting from the texturing process. Every so often while I'm doing this I'm checking the color values in a flat shaded mode, with no normal or spec maps to get in the way. Heres an example of the different rendering types I'll view while I'm texturing:

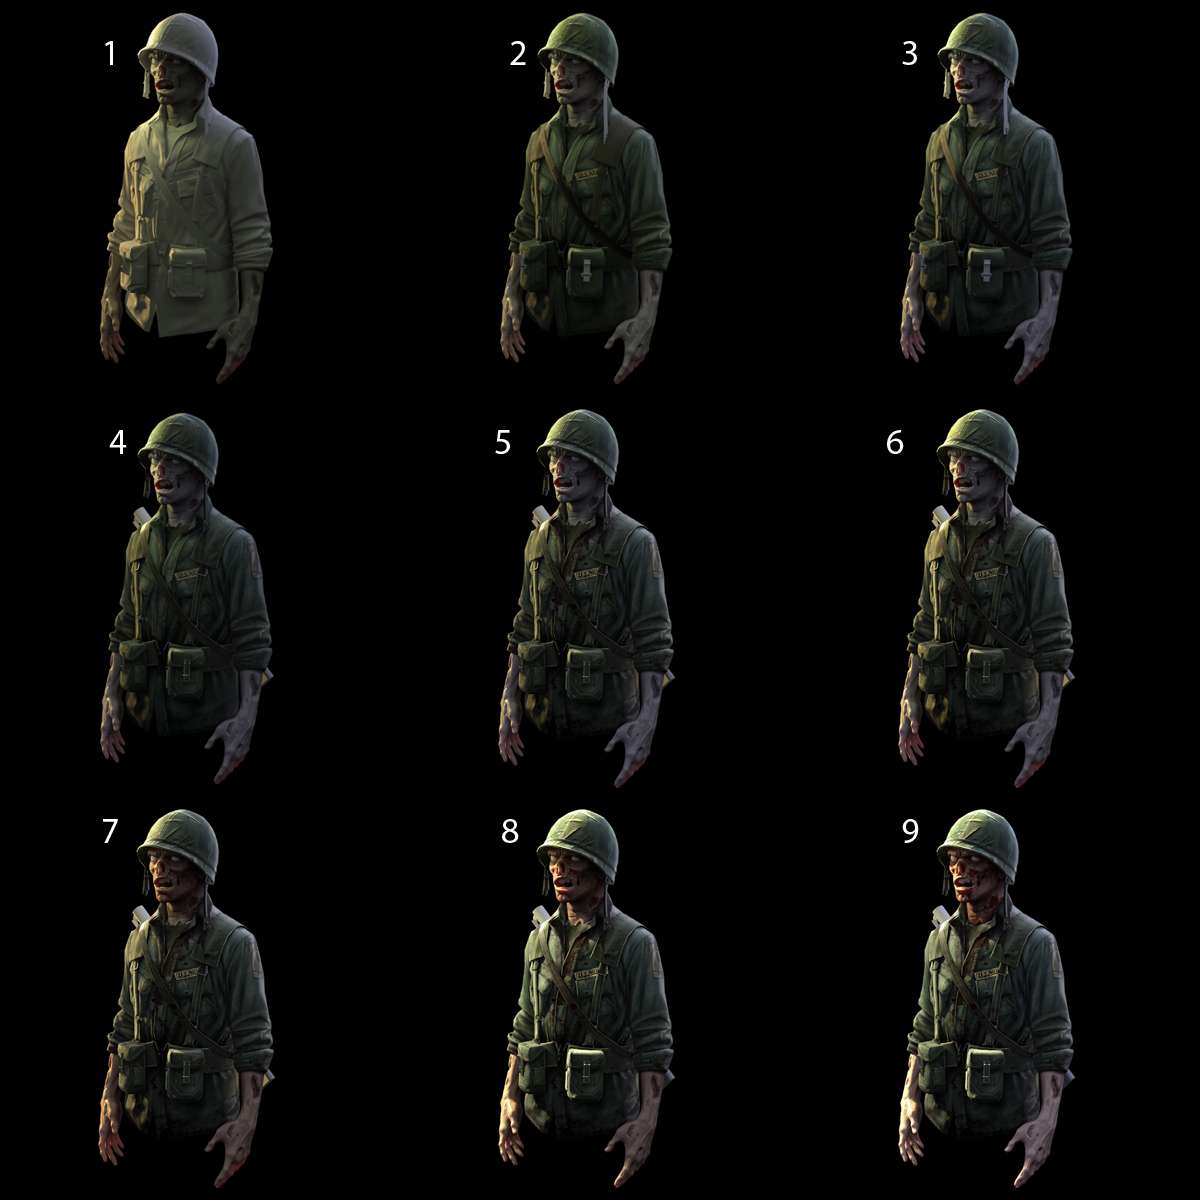
The first image is just to check the AO, In my texture, I will apply a gradient map to this so it isn't just black and white. This tends to give me more of a saturated look to the colors, and less "washed out" by the blacks you would traditionally get from not adding color. The second image is just diffuse only, I'll view the model in this state to get a clear picture as to exactly what the diffuse map is doing, no normals, no spec, no lighting. Remember while I'm texturing, I'm also lighting the scene. I want to see how the colors play with a more realistic environment, it may be an uncommon approach, but it tends to work for me. Final polycount is around 11k, a little steep for just half a character but not far off from some current hero meshes. Heres an example of my lighting and textuing process...
1. No images in this render, just lighting, and a standard three point lighting at that. I use GI but VERY low intensity, to substitute a fill light. The rim light has a tint of blue to it, along with the GI. I specify this as a single color environment, no HDRI images were used. I'm also applying SSS to the skin parts, later I'll tune this effect down somewhat, I felt it was a little overbearing.
2. Basic colors and texture to the shirt.
3. More definition and less saturation to the shirt. I'll often times grab my color palates from my reference images, and paint in "hard light" mode as described in Jason Sallenbach's tutorial in the polycount wiki.
4. Added the arm patch, and some grunge to the shirt.
5. WTF I forgot the blood! ...hmmmm... still looks like it could use some more.
6. Some lighting intensity and angle adjustments
7. The skin, I saved for last, cause it's my favorite fucking part! Started with the head and ignored the arms for a bit, I use photo ref to establish skin tones, then paint over areas that need to be decayed, or wrinkled, etc. A lot of people don't believe in using photo ref, my opinion is, it really depends on what your getting out of it. If you depend on it to be your diffuse map, then you'll never learn how to really paint. For me, it ends up being about 20% of my diffuse map, and helps me establish a color palate.
8. Adding more detail to the face, some blood into the cavities etc.
9. Lot of droopy blood and close to final detail. I apply the blood in it's own layer set to "multiply"
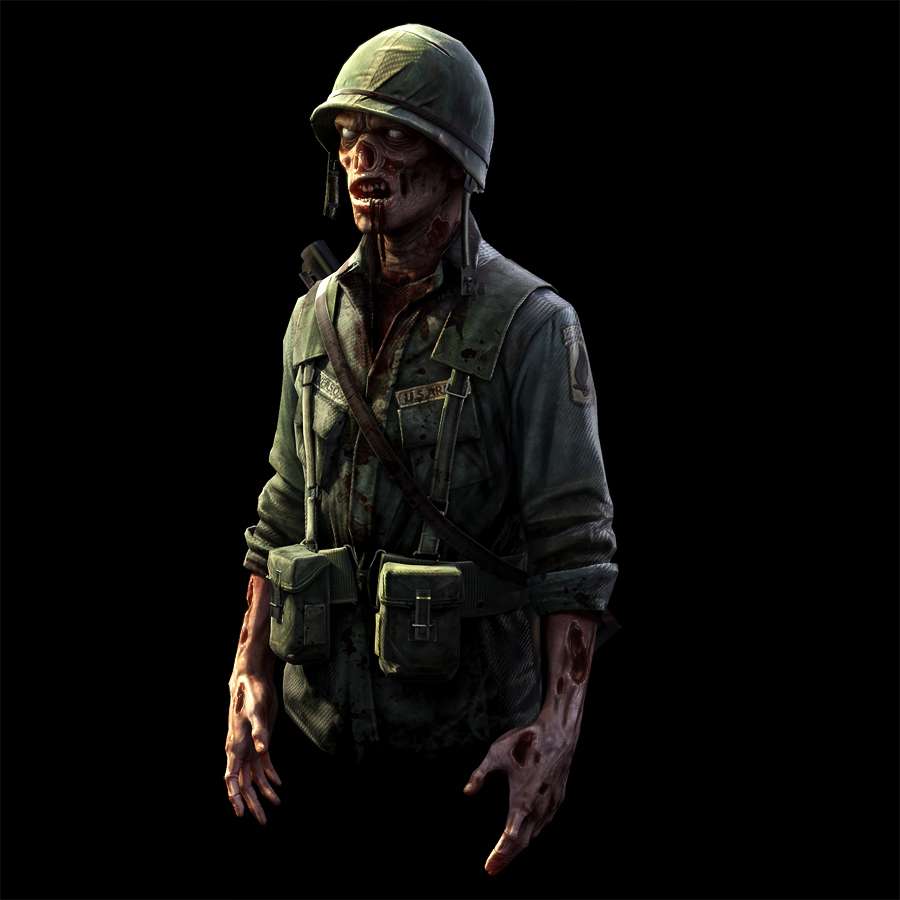
the final result:

Black in the Skin diffuse map is not a very good example of how it should be finished, while it's okay to work with textures like this, generally you'll want to fill the BG pixels with a mid to dark color from your palette. (sorry for the bad example on this one.)

And thats that! Hard to say how much time I put into it, it's been off and on for a while now, there was some crunching at work, and with a family it can be difficult to find extra hours, I hope you guys enjoy, and comments/suggestions are very welcome
Thanks again dudes for the encouragement and comments in the WAYWO thread! And yes Gusti, he was inspired by Iron Maiden
I also want to thank all the people in the WAYWO thread that gave me some encouraging comments
My process is kinda still in a pre-mature state. I play around with shit a lot, experiment and test things, When working on personal prjects I find it hard to stick with something until the end, because my head fills up with all kinds of new shit I want to pursue, what I do to combat this, is I try to save the things I would have the most fun doing for last, if I can get through the boring stuff first (as long is it doesn't interrupt a sound workflow) I figure there's a better chance I'll finish the project.
I'd always suggest (and I'm sure other professionals will too) to do as much research as you can before you start a new project. I usually have a reference folder in my project folder with a ton of images in them, but I've compiled a few of the most important ones here.
Now onto the modeling, as most of you will know, if your using normal maps there are 3 stages to the modeling process. The mesh you bring into zbrush or mudbox, the sculpted mesh, and the arbitrary mesh that will be used in game.
1. This is the basic mesh I brought into zbrush, it looks damn aweful, but really all it needs to have is the proper geometry in the proper place. I'm not too concerned about shape or proportion at this point, those I'll tweak in zbrush. There are no belts or straps in this mesh yet, since their position and size will much depend on the shapes and details of the shirt.
2. Sculpting cloth... eh... it's difficult. MM has some lovely videos of him sculpting cloth on his website, I'd suggest everyone check it out. I wish I had earlier stages of this mesh, most of this process was checking references, not getting caught up in details, and even completely starting over in some parts that just weren't working. Once I got it somewhat close, I know I need to add a harness and straps so I held off on details for now.
3. With a mid res version of the shirt in the background, I started to lay on the harness and straps. Constraining geometry creation to a reference mesh is really helpful during this stage.
4. Example of the pouch, and evenly distributed geometry for subdivision and sculpting of folds/wrinkles. I also made the straps/metal bits separate geo.
5. Spent maybe 15 minutes sculpting this, really not concerned with too much detail on these things since they're not the focus of the character.
6. The retopologized (is that even a word?) mesh. These last 3 steps pretty much sum up what was done with every object on the character.
7. The base mesh for the head. Note, the holes in the cheeks, and lack of defining features on the nose. Even if he HAD a nose, I would recommend leaving the mesh this way for sculpting, the eyes don't reflect this idea very well, and probably have too many edge loops.
8. The sculpted head mesh, I referenced a lot of Schell studios work, lots of awesome undead zombie sculpts. I mostly use 3 brushes in zbrush, the clay buildup with no alpha, and move brush, and the dam standard brush. It's also good when doing this sort of genre, to reference human skulls. Didn't spend any time really on the ear, or top of the head since, you weren't going to see it.
9. The in-game mesh, with unseen polygons deleted. Proper edge looping is important. Check out the polycount wiki if your new to this concept.
And heres an image of the final sculpt
After I went through the sculpting and retopologizing process, oh, and UV's, I moved onto the baking process. I used Xnormal to bake the normal maps, and Modo to bake the ambient occlusion. While I texture, I like to light as well. For some people this can be distracting from the texturing process. Every so often while I'm doing this I'm checking the color values in a flat shaded mode, with no normal or spec maps to get in the way. Heres an example of the different rendering types I'll view while I'm texturing:
The first image is just to check the AO, In my texture, I will apply a gradient map to this so it isn't just black and white. This tends to give me more of a saturated look to the colors, and less "washed out" by the blacks you would traditionally get from not adding color. The second image is just diffuse only, I'll view the model in this state to get a clear picture as to exactly what the diffuse map is doing, no normals, no spec, no lighting. Remember while I'm texturing, I'm also lighting the scene. I want to see how the colors play with a more realistic environment, it may be an uncommon approach, but it tends to work for me. Final polycount is around 11k, a little steep for just half a character but not far off from some current hero meshes.
1. No images in this render, just lighting, and a standard three point lighting at that. I use GI but VERY low intensity, to substitute a fill light. The rim light has a tint of blue to it, along with the GI. I specify this as a single color environment, no HDRI images were used. I'm also applying SSS to the skin parts, later I'll tune this effect down somewhat, I felt it was a little overbearing.
2. Basic colors and texture to the shirt.
3. More definition and less saturation to the shirt. I'll often times grab my color palates from my reference images, and paint in "hard light" mode as described in Jason Sallenbach's tutorial in the polycount wiki.
4. Added the arm patch, and some grunge to the shirt.
5. WTF I forgot the blood! ...hmmmm... still looks like it could use some more.
6. Some lighting intensity and angle adjustments
7. The skin, I saved for last, cause it's my favorite fucking part! Started with the head and ignored the arms for a bit, I use photo ref to establish skin tones, then paint over areas that need to be decayed, or wrinkled, etc. A lot of people don't believe in using photo ref, my opinion is, it really depends on what your getting out of it. If you depend on it to be your diffuse map, then you'll never learn how to really paint. For me, it ends up being about 20% of my diffuse map, and helps me establish a color palate.
8. Adding more detail to the face, some blood into the cavities etc.
9. Lot of droopy blood and close to final detail. I apply the blood in it's own layer set to "multiply"
the final result:
Black in the Skin diffuse map is not a very good example of how it should be finished, while it's okay to work with textures like this, generally you'll want to fill the BG pixels with a mid to dark color from your palette. (sorry for the bad example on this one.)
And thats that! Hard to say how much time I put into it, it's been off and on for a while now, there was some crunching at work, and with a family it can be difficult to find extra hours, I hope you guys enjoy, and comments/suggestions are very welcome
Thanks again dudes for the encouragement and comments in the WAYWO thread! And yes Gusti, he was inspired by Iron Maiden
Replies
Bbob, your correct, I'm not too happy with it either, I was probably thinking to scale it up and make it intense otherwise it wouldn't be seen, but I think that is conflicting with the size of the final output. It's my PSP Vita habits showing here I think
thank you for the comments!
And thanks for the breakdown
Thanks man
my only thought- that color map could take less lighting information and keep that
for normal and specular.
nice work man
Yeah, you know a buddy of mine mentioned that too, and it started out as a bust, then I was like, well... why not do the torso and arms?
but yeah would have been cool, just ran out of time on this one.
heres a more detailed wire for ya LRoy,
Thanks for the comments dudes! I've got some Deus Ex to catch up on
This is the worst piece of crap I ever seen. You just single-handedly destroyed video-game art. This piece is so bad, that it's offensive to our very art form. Really can't imagine anything worse than this. It's offensive to the senses. The Hindenburg wasn't as much as a disaster as this is. Only 35 people died in that one, but I predict mass suicides over this. I know I'll be quitting game art and switching to photography after this.
Way to completely trivialize 20 years of game art.
cept for yours john, yours sucked. :P
this could be pretty awesome
I'll put some thought into that, thanks!
I know I know, I was simply being lazy with that, thinking "oh well the business end of the character is the face" but looking back I should have taken the extra time to do it.
I have this bad habit with my own projects, if something is taking to long to do, there's a chance I'll never finish it. While I was re modeling the arbitrary mesh I almost said, fuck it.
shinobix; It's fucking tempting man! if I still want to do it after I'm done with my current project, I'll most likely tackle it.
Thanks again for all the positive comments dudes!
greets
Roepetoepa: It's Modo's standard SSS, one of the things I really like about their renderer is it's insanely fast both in the rendering process, and the setup. They have something like a master shader with everything built in, just need to turn it on.
Vietnombie, lol, clever