Home 3D Art Showcase & Critiques

1995 London Underground Tube Stock

Hello all, here's my current WIP for a London Underground tube carriage, more specifically the 1995 Stock which serves the Northern Line. Working on the high poly model at the moment, just thought i'd make a thread for it as i'm planning on documenting my progress here and asking for some critiques. Anyways, here we go:

11-4.jpg

Any advice, thoughts or crits would be greatly appreciated.

Thanks for looking! :)

Replies

  • MikeF
    Options
    Offline / Send Message
    MikeF polycounter lvl 19
    Hey man, looking very nice so far, clean lines and it looks like it'l all translate to LP nicely. could you post your ref?
  • terrybuchan
    Options
    Offline / Send Message
    Thanks MikeF. Here's some of the ref i have been using:

    504px-Northern_line_cab.jpg

    2077063548_ce8f2a67de.jpg

    P7140022b.jpg

    800px-1995_stock_driver_car.png

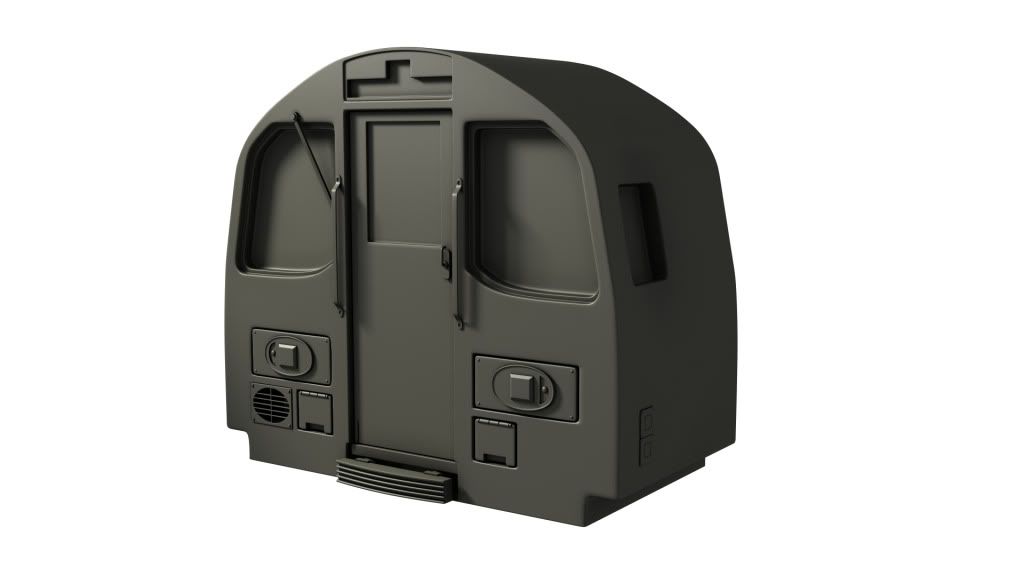
    And here's my latest progress shot:

    17-3.jpg

    Some windows need fine tuning to get the exact shape i can see. But any comments or advice would be really appreciated.

    Thanks to anyone who looks and comments.
  • Bruno Afonseca
    Looking pretty solid! But the lights are way off the reference. The elipse should be shorter in height and wider, and deeper. That stuff needs to look like it's embedded to the train body, but it's sticking out like a door knob.
  • terrybuchan
    Options
    Offline / Send Message
    Thanks alot for the crit Fonfa. Will take that on board and improve it for the next update. :)
  • terrybuchan
    Options
    Offline / Send Message
    Here's a small update, added some colours to the model to visualise it a bit better. Got a long way to go. Still working on getting the headlights right. Any comments and suggestions welcome.

    32.jpg

    Thank you.
  • Impala88
    Options
    Offline / Send Message
    head lights looking good now, just need to have the actual headlight light indended not extruded out, and the orange square lights still extruded but a bit flatter.
  • terrybuchan
    Options
    Offline / Send Message
    Thanks alot for the good crit everyone. Here's my latest work in progress shot:

    36.jpg
  • Alex3d
    Options
    Offline / Send Message
    Alex3d polycounter lvl 9
    Looks really cool dude! Are you working from blueprints?
  • terrybuchan
    Options
    Offline / Send Message
    Alex3d wrote: »
    Looks really cool dude! Are you working from blueprints?

    Thanks mate!! I've found a few images that are similar to blueprints, but they arn't great. My friend's Father-In-Law drives the same train for a living, and he took tons of reference pics for me! So i've been working from those, as well as alot of other internet reference.
  • terrybuchan
    Options
    Offline / Send Message
    Here's some more progress, im working on the bogeys (wheels) at the moment, at least that's what i think they are called.

    41.jpg

    Any thoughts, crit, comments always welcome.
  • cdevens
    Options
    Offline / Send Message
    cdevens polycounter lvl 7
    Very nice work. The only thing I see that really looks off is the bottom curve on the front windows. In your ref, there is a hard bevel there and yours has more of a smooth curve.
  • terrybuchan
    Options
    Offline / Send Message
    Thanks alot cdevens!! I completely overlooked that, thanks for bringing that for my attention :) Will fix that for the next update.
  • sneakymcfox
    Options
    Offline / Send Message
    This is pretty cool just wanted to say that in your ref it looks like above the windows there is a flat portion then a curve, where as on your model the top of the window is the start of the curve. Other than that can't find any major errors, though if you're looking to bake, softer edges on the small details may be advisable for example the two little square things just in front and above of the front wheel.
  • terrybuchan
    Options
    Offline / Send Message
    Here's my latest progress shot, fixed the windows as suggested, and did some more work on the wheel bogies.

    44.jpg

    Thanks for everyone's input so far.
  • Jessica Dinh
    Options
    Offline / Send Message
    Jessica Dinh polycounter lvl 10
    That's looking really great!
  • EarthQuake
    Options
    Offline / Send Message
    The end curves out in your reference, but you've modeled it flat here, loses a bit of interest.
  • cdevens
    Options
    Offline / Send Message
    cdevens polycounter lvl 7
    Nice update, looking good!
  • terrybuchan
    Options
    Offline / Send Message
    Thanks alot guys.

    You are right Earthquake, that's another thing i've overlooked. That's next on my agenda! Thanks for spotting that. :)
  • terrybuchan
    Options
    Offline / Send Message
    I've changed the front so it curves out like in my reference. Was a bit of a challenge but i got there in the end. This is where i'm at now:

    47.jpg
  • Alex3d
    Options
    Offline / Send Message
    Alex3d polycounter lvl 9
    Would be an amazing prop for a game! Damn, now I want to make one of my own :P...
  • terrybuchan
    Options
    Offline / Send Message
    Haha thanks Alex3d.

    I've got a question to ask everyone on here, since im starting the low poly now. How would you go about doing the windows? Because i plan on making an interior for the model, and the windows will need to be semi-transparent/glass looking so we can see into the tube.

    I know how to do this in mental ray and other renderers, but not real time. I plan on presenting the final model in Marmoset, is there some way of doing it in there? Thanks.
  • Zpanzer
    Options
    Offline / Send Message
    Zpanzer polycounter lvl 8
    Haha thanks Alex3d.

    I've got a question to ask everyone on here, since im starting the low poly now. How would you go about doing the windows? Because i plan on making an interior for the model, and the windows will need to be semi-transparent/glass looking so we can see into the tube.

    I know how to do this in mental ray and other renderers, but not real time. I plan on presenting the final model in Marmoset, is there some way of doing it in there? Thanks.

    Make a plane in the windows and when you start texturing, use an alphamap to determine what parts of your model will be transulent(in this case, the windows)
  • terrybuchan
    Options
    Offline / Send Message
    Cheers Zpanzer, thanks a lot :) I'm currently in the process of making my low poly, so should post some updates soon. Thanks for everyone's help and advice so far. :)
  • wirrexx
    Options
    Online / Send Message
    wirrexx ngon master
    Noob question: Did you start with a Plane or Box to do that ?

    Awsome work!
  • terrybuchan
    Options
    Offline / Send Message
    Thank you wirrexx! The first thing i actually made was the door at the front of the train. I then made the rest of the driver's area out of a plane. The doors were made from edge extruding the shape of the driver's are and slightly tweaking them. But most small things like the headlights and bogies were made out of boxes. So a combination of both :)
  • terrybuchan
    Options
    Offline / Send Message
    Here's my low poly progress so far, still alot of uneeded polys. Just blocking it out at the moment. If anyone spots anything, any feedback would be great. I want to really push myself with this project. Thanks again.

    lp7.jpg

    lp6.jpg
  • cdevens
    Options
    Offline / Send Message
    cdevens polycounter lvl 7
    Looks good, still a lot of geometry to shave off. All of the small details under the windows in the front (maybe with the exception of the extruded squares, depending on your budget) could be baked in. The little compartments could just be a flat plane on the low poly and just be baked into the normal. Same goes for the window in the door. It won't effect the silhouette, so it could be baked in too.
  • Alex3d
    Options
    Offline / Send Message
    Alex3d polycounter lvl 9
    cdevens is right. Also might wish to reduce the amount of edges in those pipes near the wheels. Otherwise looks great!
  • terrybuchan
    Options
    Offline / Send Message
    Thanks alot for the advice guys. Yeah alot of that can be shown in the normal map. I'll take that on board and improve it for the next update :)
  • terrybuchan
    Options
    Offline / Send Message
    Hey guys, i have a question to ask everyone. Whilst trying to cut down polys one of the main compartments and trying to think of the best way to add the windows, i've tried different methods but im wondering which one is the correct one.

    lp9.jpg

    The one on the left has had the window frames within the carriage detached as a seperate element, and the window filled in with polys.

    The one on the right still has the window frames attached, but a plane has been added over the window and vertex snapped into position to represent the glass.

    I was wondering which one is correct? The one on the right obviously has less polys but the window isnt flowing well with the contour of the train because of smoothing groups.

    Its vital that i retain a smooth transition over the contour of the carriage.

    Im more leaning towards the one on the left being the correct way, but wondering how to cut the loops out without creating jagged edges where elements split.

    Thanks to anyone who can help me out.
  • terrybuchan
    Options
    Offline / Send Message
    Well i've decided to go with the thinking i did in the left hand image in the above post, and i think everything is looking better because of it. Here's my latest low poly shot. Any thoughts on my wireframe? Thanks.

    lp14.jpg

    lp13.jpg
  • Alex3d
    Options
    Offline / Send Message
    Alex3d polycounter lvl 9
    Ok, I'll go ahead and say that you got carried away lol.

    Windows-Keep the frame! You still need volume in it and it will help border the window plane in place. You are right, the glass goes over the internal frame, but not external, it's embedded.

    Doors-They were fine before, why did you make them a single piece? Change them back to doubles and apply the same frame technique.

    Geometry-This is not a character or a wireframe-dependant mesh. You don't have to have edgeloops running over every single detail that would be a separate part in the real world anyway. If you have a part that needs some extra geometry and have another one next to it that doesn't, just detach it as element... Geometry is not such a big issue as to go minimalist, now textures are. Its better to have an extra 1k tris than an extra 1k pixels in your texture. To optimize the performance, you will be tiling similar surface UV's on top of each other, build your lowpoly mesh intelligently, increase polycount where necessary. Good luck!
  • terrybuchan
    Options
    Offline / Send Message
    Thanks alot for the advice there Alex3d. But i still have the window frames! It was a bit silly of me not to say but they are floating underneath the windows as elements. The idea was to map the window area with a translucency map so the window frame geometry shows through.

    I'm a bit unsure what you mean about external window frames. The whole outside of the train is a smooth shape from what i can see:

    3925978018_153146aa6a.jpg

    But yeah, there's still alot of geo i can shave off. Just gotta keep going :)
  • terrybuchan
    Options
    Offline / Send Message
    Here's my latest low poly shot, currently its just over around 8k polys. The wheels are the most heavy, at 888 polys each. Still need to optimize them better. Hows it looking so far?

    lp17.jpg

    lp19.jpg
  • Alex3d
    Options
    Offline / Send Message
    Alex3d polycounter lvl 9
    A picture is worth a thousand words...
    trainFix.jpg

    Edit: The alpha was inverted to show the general blockout
  • E4sY
    Options
    Offline / Send Message
    E4sY polycounter lvl 11
    Coming along nicely. Keep it up!
  • terrybuchan
    Options
    Offline / Send Message
    Alex3d, thanks for taking the time to do a paintover. So are you suggesting that i should have the windows as floating planes like i had before? The reason i turned my back on that was becuase it was creating a smoothing issue that the real train shouldn't have. (post27)

    I don't see why i'll need to keep the gap of the double doors, since they're not going to be opening in any way and the gap will be made with texture detail and normals.

    But your paintover reminds me, i've forgotten about the door handle and window wipers! lol. Thanks mate.
  • Alex3d
    Options
    Offline / Send Message
    Alex3d polycounter lvl 9
    Well I wouldn't really call it a smoothing issue, since its a separate plane and the smoothing group of the body does not effect it. That won't be visible when you'll have your opacity map running... As for the doors, a simple gap is not too hard to make and it might save you time later on if you ever wish to re-use the asset. No need to cut out functionality just for a few polygons... Again, don't worry so much about polycount, you are doing fine.
  • terrybuchan
    Options
    Offline / Send Message
    I've started the texturing process after a few days unwrapping and finishing off the low poly. All basic at the mo, just blocking stuff out. Any thoughts/advice so far would be great.

    texturingstarted.jpg
  • Alex3d
    Options
    Offline / Send Message
    Alex3d polycounter lvl 9
    Hey, good start on blockout!
    Watch out for smoothing issues, better fix them while you are still blocking stuff out :P
    trainFix2.jpg

    If your normal map seems fine, check out your smoothing groups. Good luck!
  • terrybuchan
    Options
    Offline / Send Message
    Cheers Alex. I don't think they are smoothing or normal errors. It's because i've turned the specular right up in sharpness to try and recreate the material. It's tricky because the diffuse is mainly flat colour and i need to make a good specular map to show the shininess of the real thing. I'm not sure if i can make the material reflect a skydome or something in marmoset, so this is the cloest ive come to recreating the same shader.

    Although, the errors you've pointed out on the window of the door were indeed the normal map.
  • Alex3d
    Options
    Offline / Send Message
    Alex3d polycounter lvl 9
    Post your normal map, we`ll check it out
  • terrybuchan
    Options
    Offline / Send Message
    Sure thing. Here it is:

    Section_1_Normals.jpg
  • Alex3d
    Options
    Offline / Send Message
    Alex3d polycounter lvl 9
    Yeah looks pretty clean. You can also mirror and tile identical sides on top of each other, but that depends how far you wish to go with optimization :P
  • terrybuchan
    Options
    Offline / Send Message
    Here's my latest progress shots, looking for tons of crit so i can push this far. The interior will come soon, once i've got more time from my other univerisity projects.

    LP_Textured_P.jpg

    LP_Wireframe_P.jpg
  • cdevens
    Options
    Offline / Send Message
    cdevens polycounter lvl 7
    This bake is looking great. The paint chip on the side of the front section bothers me a little(up and to the right of the small side window near the front corner). It doesn't look very natural. Do you have a spec map on there yet or is it one flat value? I ask because the windows don't look shiny or reflective. Overall, very nice work!
  • terrybuchan
    Options
    Offline / Send Message
    Defo mate. I've had a few comments about that one. I'll improve that or take it out. Thanks for the feedback. :)
  • terrybuchan
    Options
    Offline / Send Message
    Done alot of work since the last update, but still got a long way to go. Here's my latest progress shot, any thoughts and crits would be great.

    lp25.jpg
Sign In or Register to comment.