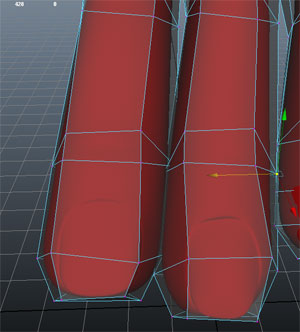
The cages will likely intersect causing baking issues. When creating your LP you should try and conjoin as many meshes as possible, unless A: Needs to be animated or B: its at a very strange complex angle. Conjoining LP meshes will reduce the amount of UV seams and allow for greater texel resolution and make the texturing process easier.
EDIT: Just realized the screenshot was showing fingers. I am not a character guy perhaps someone else should chime in.
I usually keep a good distance between the fingers so that it looks like a natural relaxed state and not overly stretched (like this picture http://3.bp.blogspot.com/-7LlQDo1Z2hI/ThHnBa5-UaI/AAAAAAAACBE/mSx_BXrZ-M0/s1600/hand-texture.jpg)
This keeps a good distance between the fingers so the cage "tubes" around the fingers are not colliding with each other.
I think it's a good practice and should make animating easier too imho.
for future reference though.
If theres an area with really tight spaces, I will sometimes detatch my highpoly into separate bakes, so that later in photoshop you can combine the areas of the UVs that have legitimate normal information.
thanks again -i'll go back and add some edges between fingers.
one thing I have noticed: whether or not the hipoly mesh "pokes through" the cage seems to depend on camera distance in maya. If I zoom out, I see many areas of poke-through, but when I zoom in to fix,they go away... Is it safe to assume that if It looks good zoomed in, than the baking process will "know" the geometry fits?
go into your camera and reduce the you far clip distance. when the range is too stretched you loose accuracy, and get Z fighting (the way things clip through)
sometimes its at silly figures like 10,000 units when your scene only encompasses a 1000 unit area.
By the way, when using xNormal, you can define ray blockers to stop intersecting cage segments from rendering funky maps. Haven't used them and they won't help with intersecting geometry i'm sure.. just feeling talkative today or something ;-)
xNormal has been a challenge to get to work, but it seems to be the preferred tool in games so I want to! perhaps my workflow is off...right now when I hit 'generate maps' it hangs on the hi poly OBJ.
1.) which is more typical : a single mesh for both hi and low poly characters, or separated hi poly meshes + single lo poly, OR separated meshes for each body part, for both hi and low?
2.) there are some artifacts that seem to occur only on the terminating edges of polygons -the cuffs of pants, the eye sockets and inner lips etc...is this an issue?
3.)also, once I have normal map I wish to review, what's the preferred way to review a normal map?
To me it looks like those border edges are treated as hard by default, or the cage goes over the edge. Does it display some artifacts on the mesh itself?
If that is a problem, I'd personally extrude one more loop from those for baking purposes only, and remove it once everything is baked properly. It's generally a bad idea to make eyesockets and inside of the mouth a border edge due to this stuff happening, consider filling the holes with some triangles if you can afford that in terms of hardware and the problem should solve itself.
There is no "typical" setup, it depends on your workflow and the mesh itself. While it is a good idea to separate things into as many meshes as possible because it makes baking and rigging easier (or your game has some fancy stuff like dismembering the enemies), many times it's not an option (for example a consistent organic mesh such as an animal, a monster without any clothing, or a plant - there would almost certainly be visible seams on these)
Ouija, I tried filling in the eyesockets with some tris and that did indeed help.
Is previewing in Maya sufficient for reviewing normal maps? or is there a superior option?
here's the result so far:
better than I expected, actually. but still issues where the fingers have borders with the palms:
how are these seams typically handled on the UV map?
for learning purposes, I'm moving on to an ambient occlusion map, but any critique would be appreciated.
This is my first real attempt at a current gen Character. I may have bitten off too much to begin with, I'm considering switching to props for a while until I can get some portfolio worthy results...
one final question. again following the making of varga I now have an ambient occlusion map.
how do ambient occlusion maps typically get used in a game?
Is it combined with the basic color texture?
or does it connect with in-game shaders like a normal map?
I believe recall Unity supports ambient occlusion maps...
and again, what is the best way to preview these maps?
Maya's hardware viewport is good enough of a normal map preview (just set the texture resolution right in viewport settings) - it is recommended that you just import the mesh into whatever engine you're working in, though. (remember to flip the Y axis/green in engines that need it) That normalmap artifact on the seam might be a result of packing UVs too tightly, but generally you almost always get wonky normals near the seams to some extent. I could probably tell more if you took a more clear pic of that hand. Ambient occlusion is usually blended into the diffuse to fake some more depth, not by much though. Some engines might support AO directly, some might not. (it's hardware consuming so it's rarely used)
Replies
EDIT: Just realized the screenshot was showing fingers. I am not a character guy perhaps someone else should chime in.
This keeps a good distance between the fingers so the cage "tubes" around the fingers are not colliding with each other.
I think it's a good practice and should make animating easier too imho.
thanks for the input, everyone.
at r_fletch_r's suggestion I posed the fingers more spread out, so none of the cage edges overlap. Now onto the head!
If theres an area with really tight spaces, I will sometimes detatch my highpoly into separate bakes, so that later in photoshop you can combine the areas of the UVs that have legitimate normal information.
Not that I'm saying that workflow doesnt have its advantages in certain situations.
mambo: i would spend a couple of extra polys and tighten up the 'webbing' between the thumb and fingers so it follows the high more closely.
Just lock your normals before splitting meshes and you'll be fine.
one thing I have noticed: whether or not the hipoly mesh "pokes through" the cage seems to depend on camera distance in maya. If I zoom out, I see many areas of poke-through, but when I zoom in to fix,they go away... Is it safe to assume that if It looks good zoomed in, than the baking process will "know" the geometry fits?
sometimes its at silly figures like 10,000 units when your scene only encompasses a 1000 unit area.
and yeah if it looks fine up close your good.
bugo: cheers didnt think of that.
updated hand cage with more webbing detail...
xNormal has been a challenge to get to work, but it seems to be the preferred tool in games so I want to! perhaps my workflow is off...right now when I hit 'generate maps' it hangs on the hi poly OBJ.
1.) which is more typical : a single mesh for both hi and low poly characters, or separated hi poly meshes + single lo poly, OR separated meshes for each body part, for both hi and low?
I am basically following the making of Varga tutorial, so I in the meawhile have Maya generated Normal maps:
2.) there are some artifacts that seem to occur only on the terminating edges of polygons -the cuffs of pants, the eye sockets and inner lips etc...is this an issue?
3.)also, once I have normal map I wish to review, what's the preferred way to review a normal map?
If that is a problem, I'd personally extrude one more loop from those for baking purposes only, and remove it once everything is baked properly. It's generally a bad idea to make eyesockets and inside of the mouth a border edge due to this stuff happening, consider filling the holes with some triangles if you can afford that in terms of hardware and the problem should solve itself.
There is no "typical" setup, it depends on your workflow and the mesh itself. While it is a good idea to separate things into as many meshes as possible because it makes baking and rigging easier (or your game has some fancy stuff like dismembering the enemies), many times it's not an option (for example a consistent organic mesh such as an animal, a monster without any clothing, or a plant - there would almost certainly be visible seams on these)
Is previewing in Maya sufficient for reviewing normal maps? or is there a superior option?
here's the result so far:
better than I expected, actually. but still issues where the fingers have borders with the palms:
how are these seams typically handled on the UV map?
for learning purposes, I'm moving on to an ambient occlusion map, but any critique would be appreciated.
This is my first real attempt at a current gen Character. I may have bitten off too much to begin with, I'm considering switching to props for a while until I can get some portfolio worthy results...
how do ambient occlusion maps typically get used in a game?
Is it combined with the basic color texture?
or does it connect with in-game shaders like a normal map?
I believe recall Unity supports ambient occlusion maps...
and again, what is the best way to preview these maps?