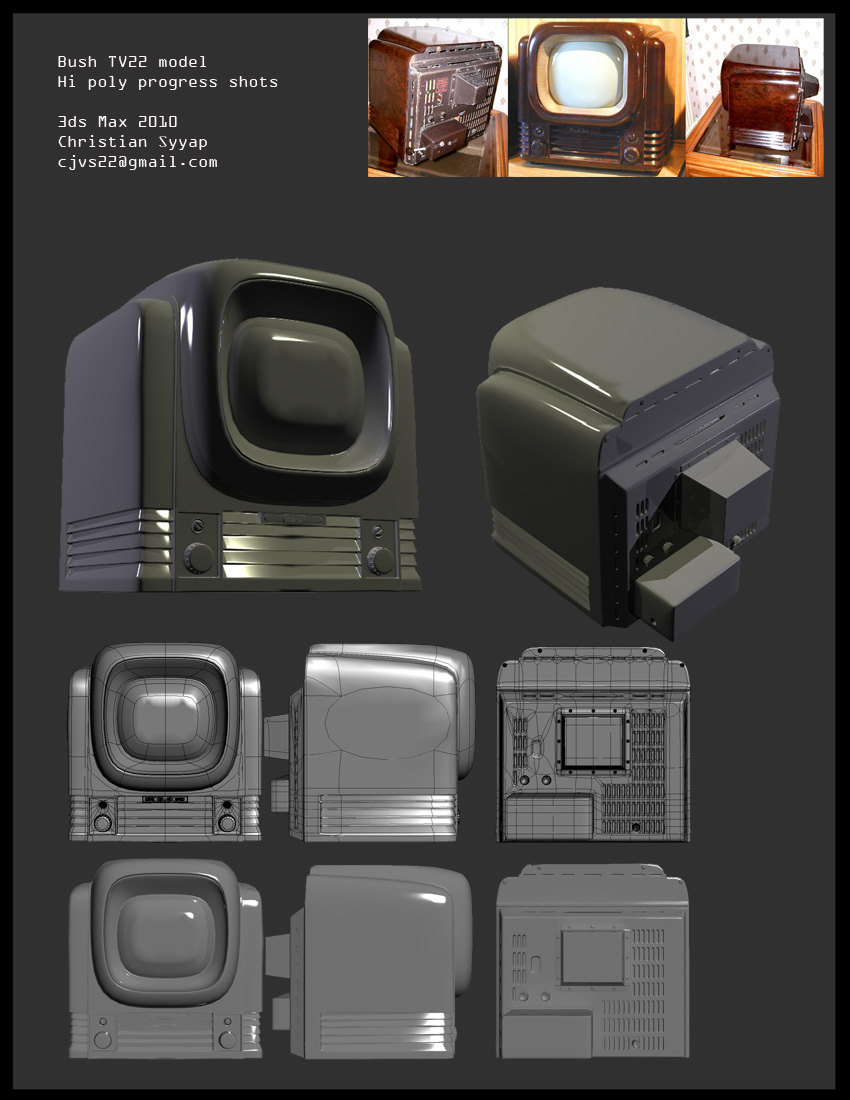
Looks like a good start. The shape of your screen looks weird. The surface should be more rounded, right now it looks like it plateaus. Also, for the boxes that stick out from the back...the edges are too hard. Bevel that a little more and make the corners a little softer. If you plan on baking this, keep in mind that over exaggerating details like those edges will help the normals read better.
Also, the "frame" around the TV screen still has some jaggy edges to it...Add some more loops or do another smoothing iteration or whatever to remove that.
That is a very cool, yet odd tv. Your model's topology needs a tad more work. Right now it looks so forced in. the wires are competing with each other to generate the shapes. In the end ends, all the tris and quads you have in there do create the shape you need. Yet, they dont have a solid feel to them. It looks so nice, yet so messy when wires show up. Good wires means that you are fast and efficient.
If you are planing to bake this into the normal map. All the little indents in the back could be floaters. Make sure they are not sunk into the geometry when its turbo smoothed.
The yellow indicates where u could have used floaters. The greens are some hints as to how to get rid of those weird wires you have. And the reds are things that i think could use a little love.
Also, you already have a lot of detail going on. Yet, you missed the text behind the tv. Taking the time to get that in there, will make your high poly piece pop a lot more.
gsokol: yea the screen was flattening. So i fixed it. I'll def try your suggestions thanks.
Raul:yea I do need to practice more on getting better topology. It was time consuming making all those holes in the back. is there a faster way in making them? What I did was made the general shape placed them where they needed to be and used boolean. and re-cut through the mesh to make sure the lines where somewhat uniformed.
as far as your question. Sure. Model one hole out of a cube. Bevel it, make it look pretty. Then just duplicate that and "float it" where it needs to go. There may be times that it looks cleaner doing the geometry. But i think its a matter of how fast your prop needs to get done. Using too many floaters ( speacially for big things) could look sloppy, in my opinion.
Dido on everything Raul has said and showed you how to do... Something I noticed that he didn't mention, is notice the glass and the box are separate. There is a seem all along the edges. So either make the glass piece separate from the box and extrude those edges more in... or take that seem you got and extrude that inward to separate that screen from the frame. Keep at it though!
if you are doing a render to texture from a generic wood material for your diffuse map. I suggest u just make the uvs a little more pretty ( since that corner seems distorted) and then just do the wood inside of photoshop. Save yourself a few headaches. It seems like the texture is not tiling right.
Yea, the texture is just generic (just too see if color was correct). i'll unwrap that area again. Issue also is that the wood texture is alot darker that it's rendering out to be. I think it's stemming back to the issue with the material editor. above. i'll try that . Thanks Raul
I dig the lamp. There are a few funky edge loops in the inset parts, but you're getting a a lot of cool details in there.
For the TV: If you're looking to push things a little further, you could break with the reference and change the coloring of some of the details on the front. The logo plate and knobs might look good as brass or steel and break up all the brown.
Goat Justice.: Thanks. How goes it? Yeah the TV still will go back and put more love into the texture. I'll try your suggestion with adding some brass it would def add more points of interest. I'll give that a try. I'm going to post regularly.
I say the volume and tone nobs on the bottom of the guitar poke out a little far and there are some kinda-noticable creases, but pretty good other than that.
You're doing some very confusing stuff with the uv layout, why so many seams on the cylindrical peices? Its ok to have a little distortion to avoid these major seams. Your uv layout looks like directions for building one of those paper-cut-out models.
Replies
Also, the "frame" around the TV screen still has some jaggy edges to it...Add some more loops or do another smoothing iteration or whatever to remove that.
If you are planing to bake this into the normal map. All the little indents in the back could be floaters. Make sure they are not sunk into the geometry when its turbo smoothed.
The yellow indicates where u could have used floaters. The greens are some hints as to how to get rid of those weird wires you have. And the reds are things that i think could use a little love.
Also, you already have a lot of detail going on. Yet, you missed the text behind the tv. Taking the time to get that in there, will make your high poly piece pop a lot more.
Your renders could also use some work. Here is a link to a really nice rendering tutorial.
http://www.artemstudios.com/08Portfolio/Tutorial/MaterialRenderingTut.htm
Hope this helps! keep it up!
Raul:yea I do need to practice more on getting better topology. It was time consuming making all those holes in the back. is there a faster way in making them? What I did was made the general shape placed them where they needed to be and used boolean. and re-cut through the mesh to make sure the lines where somewhat uniformed.
as far as your question. Sure. Model one hole out of a cube. Bevel it, make it look pretty. Then just duplicate that and "float it" where it needs to go. There may be times that it looks cleaner doing the geometry. But i think its a matter of how fast your prop needs to get done. Using too many floaters ( speacially for big things) could look sloppy, in my opinion.
For the TV: If you're looking to push things a little further, you could break with the reference and change the coloring of some of the details on the front. The logo plate and knobs might look good as brass or steel and break up all the brown.
It's cool to see you posting new work.
You're doing some very confusing stuff with the uv layout, why so many seams on the cylindrical peices? Its ok to have a little distortion to avoid these major seams. Your uv layout looks like directions for building one of those paper-cut-out models.
Strange choices in regards to detail density, some edges seem randomly collapsed/optimized while other details have an excessive amount of geometry
Get your prop work up, first. Then do a character. Nice work on stepping up the work! now is all a matter of fine tweaking.