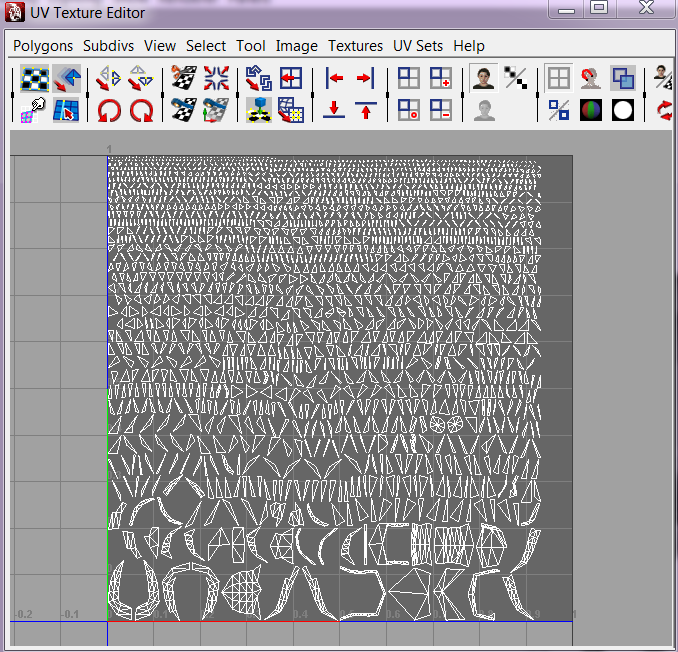
maya UV layout issue :[
why does it look like this :'(

all those squares at the top show up instead of his head. what could i have done wrong? i had some issues early on with building the head, a lot of the vertices were not merged even though i tried to merge them several times. when i fixed that problem, extra faces started popping up everywhere. i cleaned up geometry to find the extra faces and deleted them, then my vertices were not merged again? is this beyond repair? any idea why this is happening

all those squares at the top show up instead of his head. what could i have done wrong? i had some issues early on with building the head, a lot of the vertices were not merged even though i tried to merge them several times. when i fixed that problem, extra faces started popping up everywhere. i cleaned up geometry to find the extra faces and deleted them, then my vertices were not merged again? is this beyond repair? any idea why this is happening
Replies
Also, there is a way back if you haven't deleted history, just delete the polyAutoProj node (or whatever it's called) in the object's history, and you should get your previous UVs back.
sounds like you have something going on that is a lot deeper than an accidental auto map. could you post some images of the mesh itself?
also, before you do, in open 3d space, hold down Shift+RMB > Polygon Display All > Backface Culling on
my guess is that you modeled this out in chunks (which isn't bad) and your normals are reversed on some pieces and not on others.
if you see some of your polys disappear when you turn on backface culling, then you have normal issues.
MoP: isn't deleting history kinda tricky at times? i've had problems with it in the past going through the Hierarchy Connections and being able to reconnect the chain. Have you come across something that makes it easier? (i.e. like deleting a modifier in Max?)
Stuff on top can be deleted as you want and everything will be fine, and my guess is the node that's changing the UVs here will be one of the more recent ones.
Max's modifier stack will also suffer from this if you have a bunch of modifiers doing mesh edits in the middle of the stack. However Max's modifier stack is inherently more stable because the majority of the modifiers people use are purely parametric and don't rely on specific topology.
As soon as you start shoving Edit Poly modifiers into the mix, though, all bets are off - delete one of those from under something like an Unwrap UVW modifier and you're going to have a hell of a mess on your hands.
Anything that's non-generic and non-parametric is going to suffer in any scheme like this (history, modifier stack or whatever).
Still can't Right Click in the channel box and select delete node though. Doesn't even show up for me. Just looks like right clicking over the node itself or in the transformation info above it.
Still, I feel like a complete idiot sometimes with this program i've used for several years . For example... I don't know why I never knew this, but up until early last year, I had no idea you could hold down CTRL over a scale handle to constrain the opposing axis. That one made me feel like a caveman for about a month. Still does actually.
firebert: i did what you suggested, and some of my polys did disappear. i'm trying to fix them but i'm not sure what to do. am i too far gone? should i start over and try again
select all your verts and perform a merge vertices operation. dial back the threshold so it doesn't weld everything into one vert, but don't make it too small of a value that you don't weld the verts that need to be welded to eachother.
from there, you gotta make a new UV map.
this is something that can happen if you are not aware of how you are modeling something. always be aware of where your normals are facing on your model. a good example of what has happened is if you were you take a box with 3 veritcal divisions. delete the middle division. select the faces on the right hand side and go to Normal > Reverse. no go back into Object Mode and try to fill the gap between the left and right hand side with the Append Poly tool. You'll see a new polygon drawn by the tool to connect them, only it will look like someone twisted it in half. The same thing is happening when you went to try and weld your verts together on the existing model. The verts couldn't determine which way to go because it was working with conflicting normals, and thus, never welded, giving you individual polys for the projection to break apart when you did your auto UV map. It wasn't creating a new polygon like the Append Tool would, I just used that as an illustration so you could understand. Verts won't weld if the normals are conflicting.
one more question if you don't mind: what does it mean if i merge all of my vertices then do a cleanup and select "non-manifold geometry" under the remove geometry option. then i delete the faces that are selected after the cleanup, and find that my vertices are no longer merged? anyone know what this means? if i merge the vertices again after doing this, i start finding extra faces on my model???
you shouldn't delete the geo... cleanup is supposed to be fixing this for you. you probably have some crazy history debacle going on.
have you deleted all your history and made sure that the mesh is one single mesh in the outliner? a quick way to get to outliner is to click the icon that has what looks like a list beside the perspective view. on the left hand toolbar.
i would locate the mesh in the outliner and make sure it is NOT part of a hierarchy chain (parenting, grouping, history dependent, etc.). if it is, select everything in the scene, make sure all the history is deleted, and then with the head mesh selected in outliner, MMB drag the mesh to the top and delete everything else you don't need that wasn't deleted by a history deletion.
make sure backface culling is on, and from there, do the steps you tried, but don't go deleted what the cleanup selects. it only selects it to tell you "hey, this is what i fixed for you." this is a very handle tool for finding n-gons on what you would want to be a fully tri/quad or quad only mesh.
i get in the habbit of deleting my history often. history can destroy your model.
it may be beyond repair, but fiddle with it some more. i don't know about the extra faces part though. that seems somewhat strange and leads me to believe that history may have caused some issues.
this is what it looks like now when i do cleanup:
http://i11.photobucket.com/albums/a168/crowbargirl/monster.jpg
i went into the outliner to make sure the mesh was all one piece, i ungrouped and unparented everything in the scene and re-did the steps from your last post (normals->set to face, merged vertices) i then went back into the UV layout editor and tried to re-map everything, and the head is still a million little squares.
i hadn't deleted the history at all until now because i thought i wasn't supposed to until i was sure i wouldn't need to go back and change anything, so it is very possible that's what is wrong like you said. i'll make sure in the future to keep everything clean, i don't want this happening again :rolleyes: