Home 3D Art Showcase & Critiques

My First Max

Heya! I'm making the jump from Maya to Max, so this is kind of my "test" model. I'm mostly trying to get it from hi poly to lo poly to Marmoset successfully, and will use that learning curve to make a "real" model on the next iteration. Today I am learning the UV layout process in Max 2011. Here's where I am:
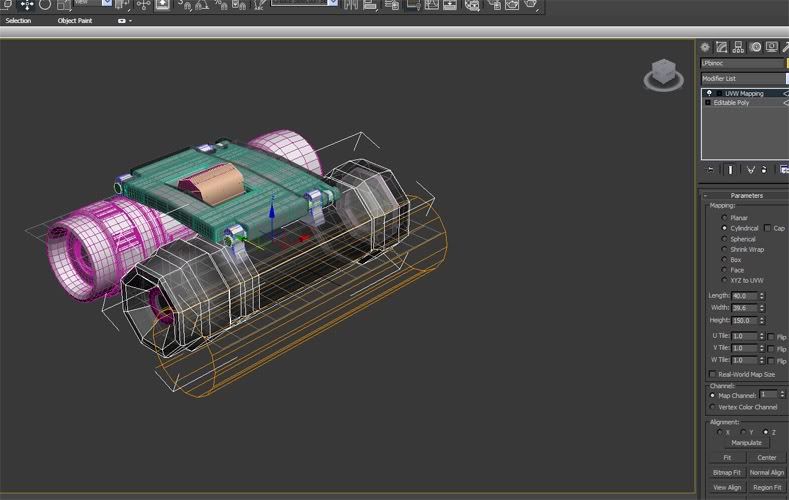
UVmap.jpg

Replies

  • raul
    Offline / Send Message
    raul polycounter lvl 11
    hey gail! Welcome to polycount!.

    The hp, is looking ok. The geometry is somewhat funky. If u could post some close up of your wires that would be awesome. We could help you better that way.

    The shape for your lp, is too squared. You may want to start from scratch again and this time use a rounder cylinder and take out what you dont need later on.

    Keep up the good work! :)
  • gellison
    Yup! Well, I'm wading through the Max 2011 GUI and for this first one, kinda just trying to git er done because I know I'll see what I need to do after I get a render in Marmoset. However, the geometry and UV layout for the first one offended my aesthetic senses too much! Here's where I am with rev 03 LP:

    SmoothGroups.jpg

    I'm trying to figure out the Smooth Group feature. I somehow, in my n00bness, had multiple SG'S on the binocular body. To my delight, when I cleared it, my UV's unwrapped with no unsightly seams. I have a lot to learn about Max. Do I need to go in and set this to get a smooth look? I think that will not effect poly count/smoothing. Is it like normal soften? Well, back to weork for me!
  • n88tr
    looks like you applied a smooth modifier to the piece that holds the two lense cylinders together. Try to get one on each lense... each major piece should have a smooth modifier
  • Mark Dygert
    This might help to understand smoothing groups.
    SmoothingGroups.jpg
    You pick some polys and put them in a smoothing group. If polys are in different smoothing groups you get a hard edge.

    Here is a handy little script that treats smoothing like maya does hard/soft edges. Even long time max users who have never used Maya, tend to favor this script at least the ones I work with.
    http://www.scriptspot.com/3ds-max/scripts/hard-soft-edge

    Also check out his other script "outliner", love them both...
    http://www.scriptspot.com/3ds-max/scripts/outliner
  • gellison
    Thanks for confirming what I had suspected--- the smooth groups are like normal soften in maya. I will try to go back and set the binocular body to soften the edges. For now, if anyone happens upon my thread, I need to know if this what was supposed to happen when I generated the normal map and then did the unwrap. I obviously have overlaying pieces that I need to fix. I was under the impression it would all lay out like it's supposed to be.

    Unwrap.jpg
  • gellison
    I revisited Render to Texture after ungrouping and using the Attach feature. Still not getting the desired result. I began testing it a piece at a time, starting with the little cylinder in the center piece. Actually that works. So then I began adding pieces. Have not progressed beyond the binocular eyepieces, at which point everything = fail.

    ThatsNotRite.jpg
  • raul
    Offline / Send Message
    raul polycounter lvl 11
    failure? no!! no such thing, only results! keep on banging it!
  • gellison
    Hey, Buddy! I'm OCD with 3D. Of course I'll keep at it till I've finally hit the right sequence of buttons! Not to sure I can pull it together to get through the learning cycle in time for class tho! I have luck (unless the geometry is not right) with the separate objects. But when I combine them to render to texture all luck evaporates! Anyway, it's not over till the fat lady sings! :)
  • MatthewS
    Are you separating the uvs after combining the elements? It also looks like you still haven't gotten the smoothing groups right on the low poly.

    Also often times if you are baking normals with a cage like that it helps to separate the objects physically so that they don't interfere with each other.
  • gellison
    I was thinking my workflow was to do cast first then UV's. I'll try reversing. Thanks!
  • PeterK
    Offline / Send Message
    PeterK greentooth
    You don't cast without UV's, what information is the bake algo suppose to use if there are no UV's to lay out the bake image?

    Uv unwrap your model properly, then do your baking again. You don't bake before you do UV's.
  • raul
    Offline / Send Message
    raul polycounter lvl 11
    gail, double check your notes. I think you got confused on that you need to do a quick "crap cast" to check if the normal map is working. what that means is that you apply a plannar mapping to your lp. and then cast. Once u know that the normal map works with your geometry then you go ahead and work on your final and clean uvs.

    You need uvs to cast. But u dont need perfect uvs to check your normals.

    Also, your lp, should have a smoothing group of 1. otherwise u will see the hardness on the normal map after it bakes.

    Just keep up the hard work.
Sign In or Register to comment.