Maya - Working with the pivot point
I'm taking a Maya class this quarter for reference after having only ever using Max.
The project I'm working on is an abandoned missile silo and I'm wanting to set up a series of panels on the interior wall, so going in a circle. So far I built a template by dividing up a cylinder and deleting unwanted polys leaving me with a cylinder of floating square planes. Now the plan was to make 5 or 6 panels, some with cut outs for light fixtures and vents and stuff, and then I would use Modify > Replace Objects to place the built panels where they belong along the wall. Seemed simple enough. However, I have yet to get Replace Objects to work the way I expect. I've gotten all kinds of results, none satisfactory, but I am getting close. Most of the problems I'm having are related to the pivot point. Panels were appearing all over the place and I've stopped that, but now I can't get them to rotate properly.

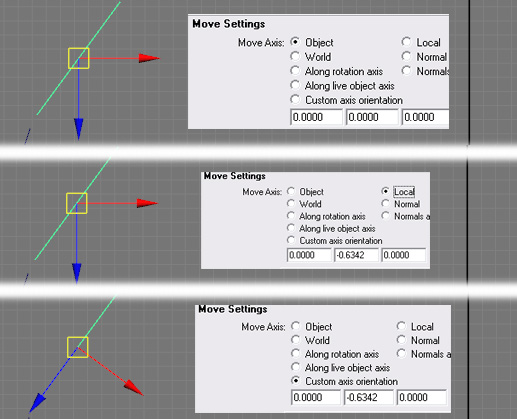
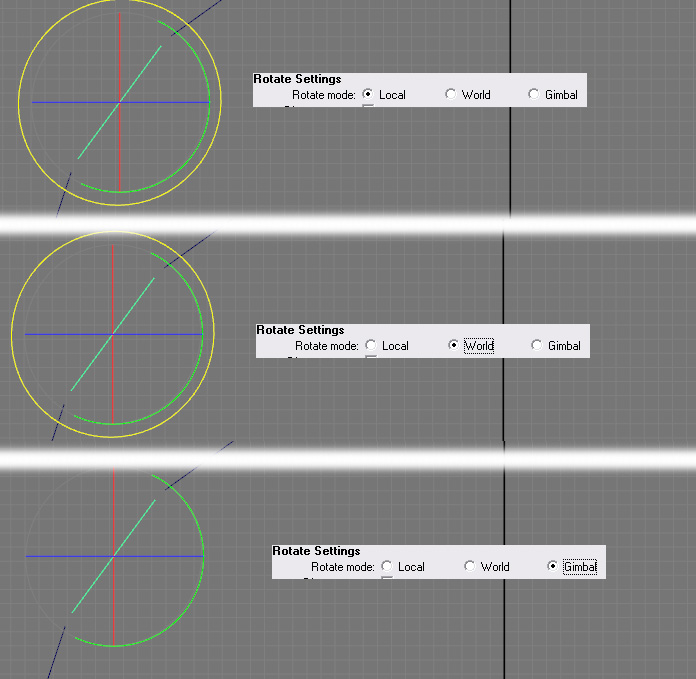
So if I am moving a plane the pivot is in line with the grid regardless of whether it's on World or Local. I was able to move the pivot point to where I wanted using Set to Face and assumed it would affect the rotation pivot as well. However, the rotate pivot continues to stay in line with the grid regardless of whether I have it set to Local, World, or Gimbal and there seems to be no Set to Face option for Rotation. I'm aware you can hit the insert key to move the pivot but this seems to only allow me to change the position and not the rotation.


I realize I could manually fix the panels, but that defeats the purpose of using Replace Objects to make the process quick and easy. Also, my teacher wasn't able to help me with the problem and is going to expect me to have figured it out myself (I love paying $1000s to teach myself). So what I need to know is how to get my rotate pivot to match the custom position of my movement pivot.

In the meantime I am going to work on some other pieces, but I really need to get these panels in place today so any help you guys can give me would be outstanding and greatly appreciated.
The project I'm working on is an abandoned missile silo and I'm wanting to set up a series of panels on the interior wall, so going in a circle. So far I built a template by dividing up a cylinder and deleting unwanted polys leaving me with a cylinder of floating square planes. Now the plan was to make 5 or 6 panels, some with cut outs for light fixtures and vents and stuff, and then I would use Modify > Replace Objects to place the built panels where they belong along the wall. Seemed simple enough. However, I have yet to get Replace Objects to work the way I expect. I've gotten all kinds of results, none satisfactory, but I am getting close. Most of the problems I'm having are related to the pivot point. Panels were appearing all over the place and I've stopped that, but now I can't get them to rotate properly.

So if I am moving a plane the pivot is in line with the grid regardless of whether it's on World or Local. I was able to move the pivot point to where I wanted using Set to Face and assumed it would affect the rotation pivot as well. However, the rotate pivot continues to stay in line with the grid regardless of whether I have it set to Local, World, or Gimbal and there seems to be no Set to Face option for Rotation. I'm aware you can hit the insert key to move the pivot but this seems to only allow me to change the position and not the rotation.


I realize I could manually fix the panels, but that defeats the purpose of using Replace Objects to make the process quick and easy. Also, my teacher wasn't able to help me with the problem and is going to expect me to have figured it out myself (I love paying $1000s to teach myself). So what I need to know is how to get my rotate pivot to match the custom position of my movement pivot.

In the meantime I am going to work on some other pieces, but I really need to get these panels in place today so any help you guys can give me would be outstanding and greatly appreciated.
Replies
Rotate it how you want it where it only needs to rotate on a single axis such like for one panel centered on the front view.
Move the pivot point to the bottom corner via vert snap, then snap that corner to the matching corner of the bland panel.
Freeze Transforms.
Reset Transforms.
Now Duplicate with transfrom d, rotate it to where you the next panel is.
Once in place press g to replicate the action to as many panels as you want.
At least that seems like the easiest solution for how I understood the description.
Edit: if you want the final rotate placement to be exact just figure out the degree to which you need to rotate in order to place things exactly.
Hexagon, angles are at 30*. Just type it in your appropriate rotate transform for the first duplicate w transform d then just click on one of the rotate axis and press g (maya wont replicate a typed in variable for transform d so you have to activate the control handle, you don't have to move it just make it active)
I still use Maya 8 so I don't have access to Replace objects, nor have I used it but if it behaves like special duplication it looks as though you may have some amount of rotation that the objects are inheriting. Try moving the objects to the center of world space and freezing their transformations first. Also see if you have anything entered in a rotation value of the Replace and maybe disable the rotate? If you are simply trying to rotate all of the objects you can select them all and just rotate, and they will each spin independently around their own pivot. However it looks like your objects are exponentially getting more rotated the further around the cylinder they go so that probably wont work
+EDIT..... Grimm beat me too it. Freeze Transformations solve most problems. Read what we suggested and maybe try to reword the question if this is not what you were getting at?
If you want to rotate something in a circle around the same pivot [i.e: you have a circular room and want to place windows every so often or you're modelling a tire] -
1) Set the first object in place
2) Move the pivot to the center point you want to rotate around
3) Duplicate the object and rotate the copy into place
4) Hit "shift+D" and Maya will create a duplicate of the object and rotate it the same amount as the previous object.
Just pressing "g" after duplicating and rotating the object doesn't do the same thing for me - but I am using a previous version (8.5). Plus, Grimm and I might be talking about two different things actually.
Note: there's some kinks in the method, for example, if you rotate and object forward too far in one direction and rotate it back - then the shift+D won't work (I don't think). So try to rotate it the correct distance in one direction.
I'm not sure I'm fully understanding your problem, but maybe this might help.
You can change the pivot on any object and have the rotation pivot follow along as you require, by setting the move tool Move Axis to OBJECT, now, this only works if you haven't frozen your transforms, if you have frozen, then rotation ( and move ) will appear as the standard world rotation, even in Object mode, because maya treats it as having no rotation in the viewport.
Replace Object Not Working.
Ok, you mentioned you had created a cylinder and deleted faces that left you with the polys that you required, fair enough, but doing it this way would essentially leave you with 1 object. Let's assume you've broken each of the polys on that 1 object down into seperate objects ( 1 poly ( face ) per object ), when you have done this, there will be no rotation on your polys, only a point in space as far as Replace Object is concerned, so that when you use Replace Object, all that happens is your high res Panel objects are merely moved in space to the correct location, minus the rotation ( because there isn't any for it to inherit ).
So, is there a better way of doing this ? Well, yes, probably a few different ways. If your wanting to utilise the Replace Object, I would try creating a cylinder with the amount of sides you require and the height at the origin, now, delete all the faces, bar one that you can work with ( ideally flat front facing ), snap the pivot for that one poly to the grid at 0,0,0. Now duplicate and rotate the amount of sides you require,
Cylinder - 360 degrees
As an an example you have 1 face, and your cylinder was 10 sides, so
360 / 10 = 36
That's the increments your need to duplicate and rotate by, so do this 9 times ( you already have 1 face ) using duplicate with transform, and you will have your cylinder shape back and you will also have all your translation and rotation information intact for the Replace Objects function to work correctly.
Remember to have your pivots set up correctly on your high res panels also as you require, the pivot of your high res panels are what is essentially being translated, so if the pivots of those are offset somewhere in space, then you will not get what you want.
Modify > Centre Pivot is your friend.
If you have the Bonus Games Tools installed, I would highly recommend the function : -
Bonus Tools > Modelling > Move Object Pivot To Component Centre
It's invaluable for pivot work, I have it set up on my modelling shelf, and use it all the time, you can move a pivot to basically any component part you have selected (verts, edges, faces, etc ) or the centre of multiple selections, very handy.
Anyway, hope this helps.
Regards.
Summary
So to summarize this long winded explanation (sorry guys, felt I didn't explain well enough before) what I want to know is a way to take my pivot point seen in B. and align my rotation pivot seen in C. to it. Also, I need to be able to do it without having to move the template panels themselves and I need to be able to do it for each template panel individually. If I can do that then everything else will fall into place and I will save myself the time and chance of inaccuracy. Again, thanks for the help guys!
First of all Progg, I'm not sure we are talking about the same "Set to Face". If you look at A. in the image below, you can see one of my template panels and it's pivots current position. The pivot is set to Local, which I assumed from my Max experience, was what I would need. However as you can see that's not the case. By clicking Set to Face (highlighted in red) I get the result shown in B. which is what I would expect from Local. Yet if you look at C. the rotation pivot is still aligned the same as the movement pivot is in A, which is to say it also aligns with my grid. I would expect (again from Max experience) that if I set the rotation pivot to Local I would have what I want but as you can see it's already set to Local and that is not the case.
To make sure I wasn't going crazy, I fired up Max real quick and tested my memory. I made a cube, rotated it 45 degrees, and centered the pivot to recreate what I have going on in Maya. This can be seen in D. In E. I've set the pivot to local and received the result I expected to get in Maya, the same result I had to click Set to Face to get. Now when I switch to Rotation, the pivot defaults aligning to the world as you can see in F. but all I have to do is change it to Local and I get the result I'm looking for. Why this isn't the case in Maya I don't know. It seems that setting things to Local in Maya does nothing.
Grimm and Krypteia
From my work in Max, I'm aware of the general workflow with placing objects in a circle around a center pivot point. In fact, it's the method I've been using to place lights and vents in the shaft. The reason I couldn't just do the panels the same way is that I was unsure exactly what the layout of lights/vents/ect so I wanted to place those. How many panels I had to make and what shape they were could then be decided (see example below) and I expected it to be simple to use Replace Objects to plug in the necessary panels in the necessary locations. I was also thinking that it would make putting in more details (supports for the missile for example) relatively simple and I wouldn't have to worry about positions of the panels as I did it.
As it is, I COULD go in and individually rotate each panel when I replace it. But that adds time and doesn't give me an answer to the questions I'm going to have to answer in class tomorrow.
Below in H. you can see the settings I'm using when I'm replacing objects as well as the panel I'm using as my source object. It's centered in the world and it's pivot is aligned to the grid, just as the template panel's pivot is in C. which is why when I use Replace Objects I get a panel in the right location, but aligned to the grid instead of at an angle.
I actually just noticed that in the setting it is checked to copy the Rotation (for whatever reason I thought it was Attributes to Match instead of copy) so if I did get the rotation pivot to move it would have been copying rotation of the source panel and I would have gotten the same result. Should I get my template panel pivot to rotate, I'll have to make sure that is unchecked when I used Replace Object.
Well the reason your pivot point manipulator is in the direction it is in is because the transformations aren't frozen.. atleast that is usually the first sign. Select all the panels and try Modify > freeze transformations and the individual rotation manipulators should match your Max screenshot E. and G. ... otherwise I've never seen that problem unless it is something weird with the Replace tool
So now I'm going to take sunchirps suggestion and re layout the panels. If anybody has anything else to add, please do so as I'll probably be referencing this thread in class tomorrow.
Thanks again guys!