Head UV Layout
Hello,
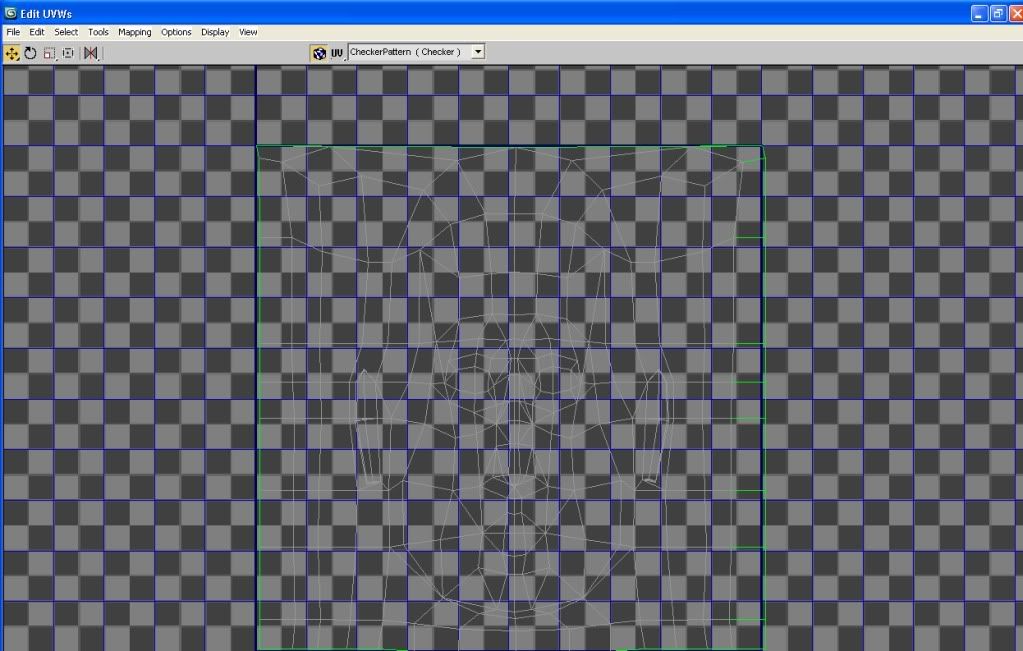
Is this a good UV Layout for a head?
The character is a low poly real time model, so he won't have any facial animation.
Thanks for any tips or comments!
Is this a good UV Layout for a head?
The character is a low poly real time model, so he won't have any facial animation.
Thanks for any tips or comments!
Replies
Two things I'd suggest, firstly, did you use pelt mapping? If not, try it and you should get a better result along the centre seam, and secondly, if your character is gonna have a symmetrical face texture then you could split that layout down the middle and mirror it.
People with more experience will be able to offer better advice but those're my two cents.
I'll give pelt mapping a shot, but I haven't used it much before.
Thanks!
Kidding aside:
The areas that are sucking up the most texture space are the least important areas. It can be helpful to relax the important areas, and minimize/stretch the unimportant areas giving you room for the face and other stuff, like eyes, teeth, mouth, tongue. Also keep in mind that since this isn't animated you could probably stuff this on the body sheet, maybe even mirroring the face...
Cut the head in the back (create UV seams that is) all the way up towards the top of the head pretty much like you did.
Use Pelt mapping to get a more natural and even spread of the head surface.
this is an old but still valid tutorial.
[ame]
cheers!
I've heard about that, but for some reason when I relax the face it crumples up horribly and causes heavy distortion...would using a really small value in the relax dialog fix this?
Sadly, this fellow doesn't have anything in his mouth.
Thanks a ton, yiannisk, I'll give that tutorial a try!
Here's the head if you're interested (remember though, this is meant to be low poly and for real time games, and the topology is not as important as it would be if the head were to be animated; I probably won't be making any changes to it except little tweaks):
Thanks
The mesh could be inverted.
In face/poly mode in the UV editor go Select > Select Inverted. It will highlight whatever needs to be flipped (using the Mirror tool in the UV editor).
Also try relaxing by face angles instead of edge angles. The soft select trick PoroXum mentioned works great too.
Yeah, I know where you're coming from...sorry, next time I'll make it much more visible.
It only highlights the ears, so I'd be surprised if that caused the whole head to crumble, but I'll fix that anyway.
Okay, I'll use that. Could I get a little more info on this "soft selection?" I've used soft selection before, but only on the actual model, not the UVs.
It didn't look good until I relaxed it, but I had to relax it carefully, in separate sections.
I have yet to mirror it, but I have a small question: how do you clone UVs? If you look at the screenshot, the ear on the left side is unwrapped properly, but the one on the left side isn't unwrapped yet. Instead of doing the exact same thing for the other ear, I thought that there was a way to copy a UV. I tried selecting copy under the edit menu, and then paste, but for some reason that didn't do anything. I use 3ds Max 2009.
Does this UV layout look good, and does anyone have any ideas about how to copy that UV for the ear?
Have a great weekend,
Mr. B
As for the ear.. It's an extremely simple shape, so it shouldn't take too many seconds to do a planar map, make a few edge splits, and pull some of the UVs into the right place..
The checkers look pretty good; I'll post a picture later. The reason there's so much space in that area is probably because I relaxed it so much; it took a lot of relaxing to fix the checkers from being too stretched. But I will take your advice and look into it...
Well, I wasn't concerned about how much time it took. Since this is a game model I'll be mirroring one half of the UVs over the other. So if I did the other ear manually, I thought it wouldn't align properly (since they wouldn't be perfectly the same) when I place one half over the other and weld the verts.
Thanks Vig, now I see it. That could be a pretty powerful tool, so I'm looking forward to giving it a try. I'm actually surprised that I never saw that before...maybe all this head modeling is starting to affect my mind
I want it to be a 512X256 map, since the UVs aren't square and leave a lot of room in the "blue square" in the UVW edit window. But when I render the UVW template, it squashes the UVs. I want the template to be the same shape as the UV layout, not the other way around.
Any ideas?
Thanks.
Then set the Use Custom Bitmap Size (under soft select in the options panel) to be the dimensions you want or change the upper right texture select drop down box to be your 512x256 texture instead of the default checker pattern.