WIP - Urban Neighborhood/Modular Asset Practice
polycounter lvl 14
Hey everybody,
I just started working on this scene. This is partially meant to be a practice in creating and using modular assets. Not sure yet, but may end up putting this in UDK or something.
So I started out with this layout:
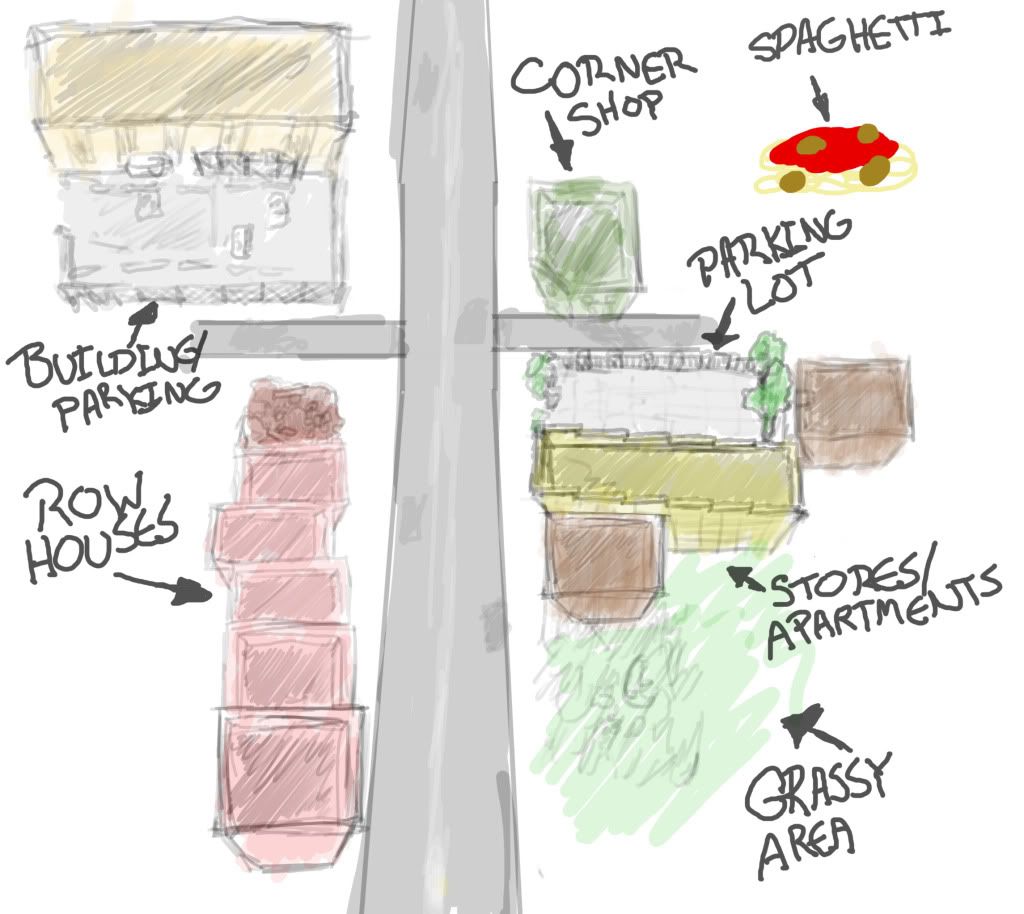
The idea is to have a high level of detail around this immediate area, but fill the rest of the area with variations of the modular buildings.
After coming up with the layout, I started making the row house building out of blocks. I set the grid up in Meters so I could get everything to be in scale, so later on when I snap the building pieces together to form a building, they will fit perfectly together.

This is the basic layout for the Row Houses. I only did the front of the buildings since they are usually built together, so the sides will only really be seen on either side of a group of these...So I'll just make that a separate piece, which gives me more flexibility in how it will look.
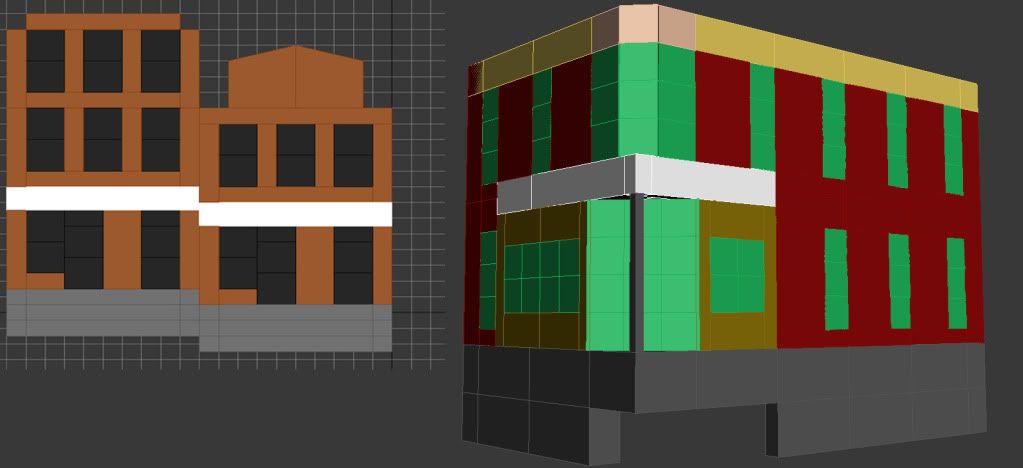
Here are a few blockouts of some other Modular buildings that will be in the scene.
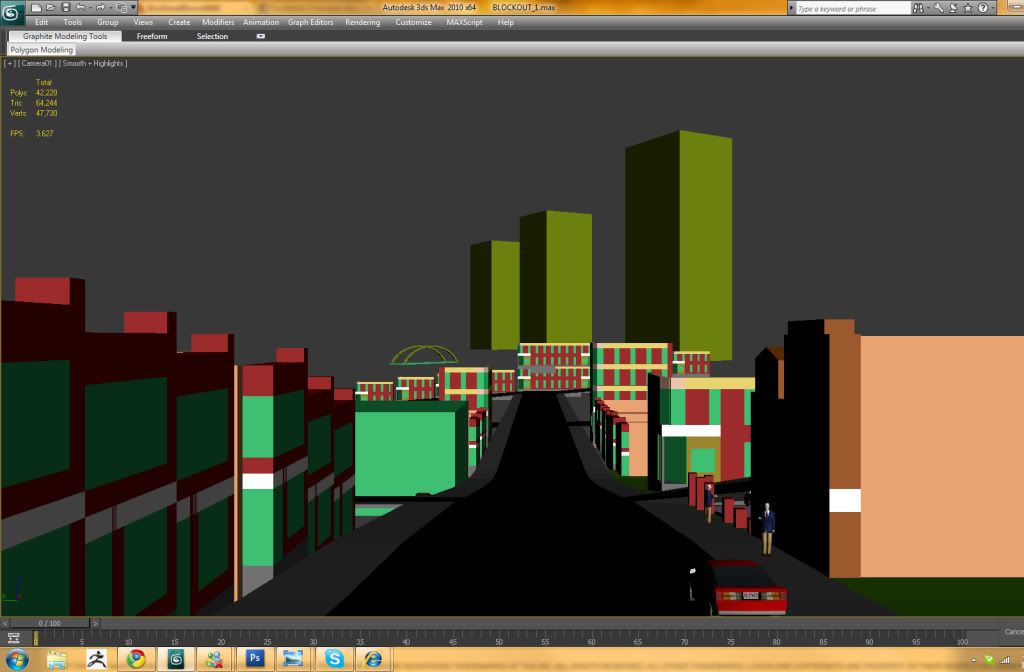
After making the blockouts of the buildings, I started setting up the scene:
Next Step: Building the Rowhouse Asset.
Critiques/Comments would be greatly appreciated!
I just started working on this scene. This is partially meant to be a practice in creating and using modular assets. Not sure yet, but may end up putting this in UDK or something.
So I started out with this layout:
The idea is to have a high level of detail around this immediate area, but fill the rest of the area with variations of the modular buildings.
After coming up with the layout, I started making the row house building out of blocks. I set the grid up in Meters so I could get everything to be in scale, so later on when I snap the building pieces together to form a building, they will fit perfectly together.
This is the basic layout for the Row Houses. I only did the front of the buildings since they are usually built together, so the sides will only really be seen on either side of a group of these...So I'll just make that a separate piece, which gives me more flexibility in how it will look.
Here are a few blockouts of some other Modular buildings that will be in the scene.
After making the blockouts of the buildings, I started setting up the scene:
Next Step: Building the Rowhouse Asset.
Critiques/Comments would be greatly appreciated!
Replies
The way how u build modular pieces depend if u want to use tiled texture or unique UVs for each bulding.
In terms of actual architecture, all your buildings look quite flat. It is always good to play with depth. Adding extruded\recessed parts and\or depth variation with height will improve the look and create better conditions for shadows
Matroskin: I knew your little avatar image looked famliar. Used to see you on CGTalk every now and then...anyways..
The UVs are set up so each piece has its own UV space, so there won't be tiled textures. I am using 1 2048x2048 for the building, which also includes a few variant pieces. Will most likely use a 1024x1024 in the end.
I have a question you may be able to answer. What if I wanted to use the same normal/spec/etc but just change the color of the brick to vary it up? I guess I'll just have to have a new material for those, but I was curious if there is a way to be more optimized..like being able to switch between 2 different color maps with the same material. Not sure how to handle that.
The architecture is indeed flat right now. I had not done any modeling or the pieces at that point..just figured out how I'll set up the pieces, and how the overall scale of things will be in the grand scheme of things. Below you will see how the low poly building kit looks now, as well as an example building using these pieces.
Also worth noting: Other things that will break up geometry, such as drain pipes, steps, etcc will be added later, but arent included in the buildilng Kit.
Looks like things going right.
Me personally i prefer to have as few building pieces as possible. Of course variety is important, but 5-6 pieces only for basement seems a bit too much. Now it is ok, but with more buildings u'll start ignoring all those numerous small pieces, and eventually u'll end up duplicating whole basements and not using all the individual pieces to construct new versions.
Therefore I would make larger and fewer pre-build blocks.
Now regarding varied materials.
As far as i know in Unreal there is such thing as instanced materials. Basically those r instances of each other, but there is one or more nodes/parameters which aren't. This way u can decide what u make instanced and what not.
Though, i guess u'll need to have 1 new material for every "variation" that u want. But don't worry too much about "optimization" side since texture files, shader complexity and quantities of IDs per mesh is what counts the most for the render and memory.
U can get a good explanation about instaced materials on eat3d.com in Unreal Materials tutorial.
Matroskin: I completely agree that there are too many basement pieces, but I already unwrapped everything, so I'm going to leave it as is on this one and definitely do less from here on out.
Anyways,
I took the pieces into Zbrush, here is the low poly building with the baked normals. This was mainly just for the edges and stuff, I'll pull some normals from the color map as well later.
Next: Texturing
So heres another update.
I finished the texture for the first rowhouse.
Next: Modeling one of the store/apartment buildings.
Overall the work is looking really nice and I look forward to seeing more of it.
Thanks!
I've been setting up storefronts to be separate from the buildings..so they can be mix and matched with the top part easily. For the upper part of the building...I'll definitely have to come back and break up the repeating brick with a combination of clutter meshes (IE wires, power lines, electrical boxes, etc...) and some dirt decals.
Next: Either setting up a UDK Scene/Stub or working on Modular Sidewalk pieces...it will be a suprise!!!
Nooooo.
Did you get that from me saying that the storefronts were separate from the buildings?
If that is the case..what I meant is that the storefront pieces are on one texture sheet, and the building top (everything except the storefront) is on a separate one. That way I can swap out storefront kits so the same building top can be used with different ones later on.
Currently there are 3 texture sheets...one for the rowhouses, one for the storefronts, and one for the building tops.
Let me know if that answers your question.
There are at least a couple of ways.
Static Switch Parameter
The problem with it is it does compile a new material eventually, so it is and isn't free if that makes sense. You only need to make one material though so
Vector Parameter Based -- Picture How To.
You could, refine it more and make a mask so that it only effects the brick facing and not the grouting, but this was more of a quick and dirty material set up just to show a basic how to.
AaronF3D: No problem. If you have any questions just ask.
Grimm_Wrecking: You rock my socks. Those links were helpful. I think this is going to be in UDK so I'll for sure try this.
snake5027: My textures come from a variety of places. I use www.cgtextures.com. www.mayang.com/textures is another useful one. Also, I use my own camera (especially when I'm on vacation) to get some photos of my own. A majority of the signs in the windows were modified versions of ones I saw when visiting NC recently.
What specifically do you suggest as far as my texturing goes? Are you talking about the bricks? One thing to keep in mind is that I don't want things too grungy/damaged/etc.... because these assets are modular, and many pieces tile/get reused..and that would make the added detail repeat too much, and be too noticeable. That being said, I want there to be some variance, but I plan to cover the noticable tiling with other objects/decals instead of working it into the modular texture sheet. Here is a pic of what I mean:
If that isn't what you mean let me know.
This tut gives you another out for texturing with modular assets for grunge that won't be so obviously tiled.
Awesome link! I'm going to have to try that. Would be perfect for grunge on my brick. That and a combination of decals.
Thanks for the comments so far guys. I really appreciate it!
So I started importing what I have so far into UDK. Its coming along, but there are/were a few hiccups impeding my progress.
First of all, I was working in meters....which is how we do things at work. Unfortunately, I didn't think about the fact that UDK's units work differently. Because of that, none of the pieces snapped together too well. I ended up having to go back in and modify the sizes of everything.
Luckily, 3dsMax's standard units coincide nicely with UDK units.
Here is what I have thus far:
The areas where the square brick sections line up creates some nasty seems, which I'm not sure how to fix. Looking at my texture, there might be the slightest crease on the upper part of one of the tiles, but it isnt so bad up close. When I get farther away though, the seams really stick out. I'm not sure if there is something I can do with this. Also...lightmass seems to color whole tiles different colors..I'm guessing this is maybe because there are only 4 verts on those tiles?
Here is an example of the seams...the close up doesn't look nearly as bad as when I pull back. anybody have any suggestions for this?
In the meantime..I just got started working on the sidewalks.
Not much to show yet, but here is an idea of how I'm planning on making a kit for them:
The idea is to have a 4 tile long version to fill it out, with a few single tiled sections to break it up. I'll be able to rotate them to.
I don't think I'll do the broken versions on here, as it might make sense to have a seperate kit that would consist of those..especially since there wont be too many areas with busted sidewalks on a main road...I would expect this to be more on side roads.
The sidewalks will be 2 tiles wide, and there are going to be skinnier curb pieces.
This may seem like overkill for the sidewalks, but I think it will be nice to have the extra detail where the player would walk, especially since I can raise up sections to break things up even further.
Progress has slowed down a little bit, and will likely be slow the rest of the week, due to spending more time at work. This weekend I should have some free time to make decent progress.
As always, crits are welcome. Let me know what you think!
And here is how they look after Zbrush/texture. One thing I haven't been doing but did here and will continue to do from now on is bake AO into the diffuse. It made making the color map much quicker.
I'll get these exported and into the UDK scene soon, and get the streets done. That will probably be in my next update.
I'm not to sure what the brown patch is on the small grey curb piece. I'm guessing that its a storm drain but I can't tell. Partly because I cant tell if the brown is rusted metal or not but I suppose mainly because its just obscured by the curved side-walk.
Thumbs up. Looking forward to seeing more.
You've got a brown stain on your 4x1 piece that is very similar to the 1x1 with the brown stain. Additionally, all the stains and stuff are unique to each tile - with your 4x1 you have the opportunity to cross tiles, you might consider doing that with a large crack+stain or something, relatively subtle but definitely connecting them.
roosterMAP: Thank you. I am actually enjoying putting all the pieces together in UDK . Exporting is a bit of a pain, but (provided things snap to grid well) putting everything together is fun.
Ghostscape: Thanks for pointing out those spots. Several of the tiles had the same brown spots, so I removed them from most of them. Adding some stains/cracks that cross over the tiles on the 4x1 piece was a good idea, so I did that. Very subtle, but it helps connect them together. I also included that in this image:
Thanks for the crits/comments!
but it's resulted in something awesome
very neat layouts bro
Placed the sidewalks in the scene (just in the immediate area...need to put them going farther down the block)
Also added the street. I couldn't come up with an easy solution to making a kitpiece for the streets, since there are elevation changes and everything, so I just made the street one mesh with a tiling texture and made a detail kit for it with potholes/patches/etc... I have pictures of that kit on my home computer..Will add later tonight.
Also added the skydome. Some work will be done here...I just got tired of staring at the black background :P. I'll more than likely be making it so the sun shows through the clouds and maybe add some buildings at the base to make it look more citylike.
Finished the rest of the buildings..at least enough to get rid of the blue/white checkered meshes
Now I'm starting to work on adding more detail to the scene. Starting off with some powerlines.
Added a few props in, and broke up the rowhouses a bit more. Going to be focusing on adding more props and vegetation when I get the time.