The BRAWL² Tournament Challenge has been announced!
It starts May 12, and ends Oct 17. Let's see what you got!
https://polycount.com/discussion/237047/the-brawl²-tournament
It starts May 12, and ends Oct 17. Let's see what you got!
https://polycount.com/discussion/237047/the-brawl²-tournament
Need Help: Low to Low poly Ambient Occlusion
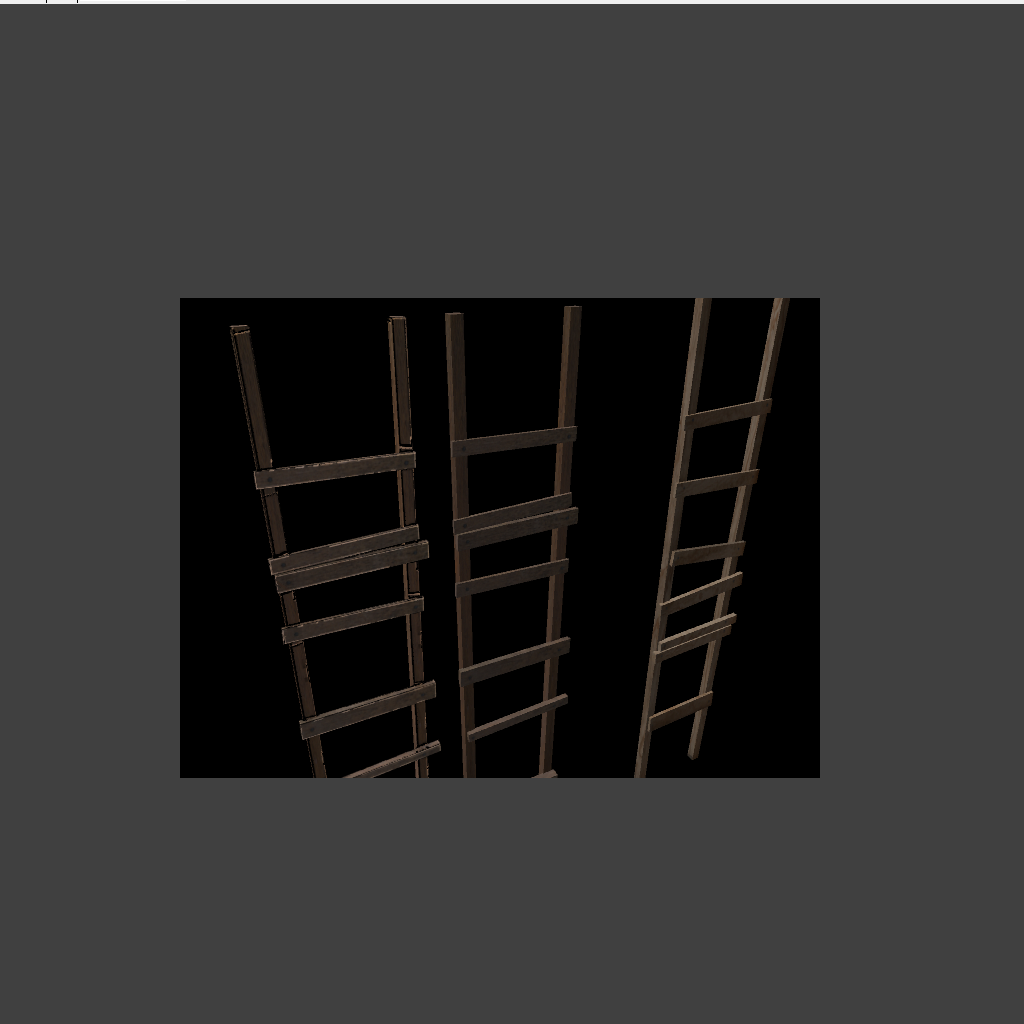
So I'm modeling a ladder for a prop project and it doesn't really need a high poly model considering the simplicity of the forms. I'm trying to do a low to low poly bake for my ambient occlusion but it looks terrible after the duplicate ladder finishes getting baked...
I don't know where I went wrong. I check my UVs and they all seem to be in order....
Any suggestions?
(the one on the far left is the duplicate ladder with AO baked onto it)

I don't know where I went wrong. I check my UVs and they all seem to be in order....
Any suggestions?
(the one on the far left is the duplicate ladder with AO baked onto it)

Replies
- What does the unwrap look like 100% unique or are pieces overlapping?
- Using MentalRayAO or you're own unique light setup like a sky light?
I suspect you have overlapping UVs?
If so move all overlapping pieces out of the 0-1 space, preferably one tile to the left top or bottom so they still line up but aren't in the live area.
If you have overlapping UV's you can also create a secondary UV channel and unwrap every piece to a unique place inside 0-1. Then use a composite map setting the AO to UV2 and your regular diffuse to UV1 and multiply UV2 on top of UV1.
Make sure you're opening the actual AO it saves out not saving out what is in the render preview window. What you see pop up when its rendering is a full render of the object the elements it breaks out are saved but never shown by themselves.
and do you use cage projection? I do this in max usually so if its done in max here are some thoughts:
by the look of it I could suggest that you keep the smothing groups hard and then use a cage projection to bake from one each other. But then again maybe not.
Here's how to do it in max.(well, at least how I do it)
You just unwrap your stuff. Then you should offset overalpping uvs by 1. So they won't be in the baking "square".(this step is optional by the way. When I have too much stuff to move I forget about it, some things have to be corrected manually then, but it's still faster).
Then you bring up your render to texture dialog window. Don't choose any procetion modifier, choose yourself a complete map of preffered size and hit bake. You might as well assign the thing you're baking from a white material, for you'll get a better result once you multiply it in photoshop over your diffuse. And you have to have a skylight in your scene with lightracer turned on. Thats pretty much it for Max.
If you use maya here's a straight forward tutorial that works perfecty.
http://www.game-artist.net/forums/spotlight-articles/1317-tutorial-ambient-occlusion-maya-alchemist101.html
If something was unclear feel free to ask. I'll explain, for I didn't go into some smaller issues just in case you know them already.^_-
I'll get more screengrabs soon if that helps illustrate my issues.
*EDIT*
Okay so I just double checked and the create mental ray node option in the drop down menu appeared. It wasn't there yesterday and I couldn't figure out why. I tried everything I could think of short of rebooting the machine. Might be that I am using a different computer now than the one I was trying to use yesterday.
If I'll be around maya sometime soon I'll see and hopefully remember what it was.
Could be the mental ray plugin wasn't loaded before? Check the plugin manager (Window > Settings/Preferences > Plugin Manager) and make sure the Loaded and Auto load boxes are checked.
You'll find it under the Polygons toolset, the Colors menu. Set it to Enable bake overide (or something along those lines) and select Occlusion from the drop down menu.
Have fun.
I think its in the "tools" tab