Home 3D Art Showcase & Critiques

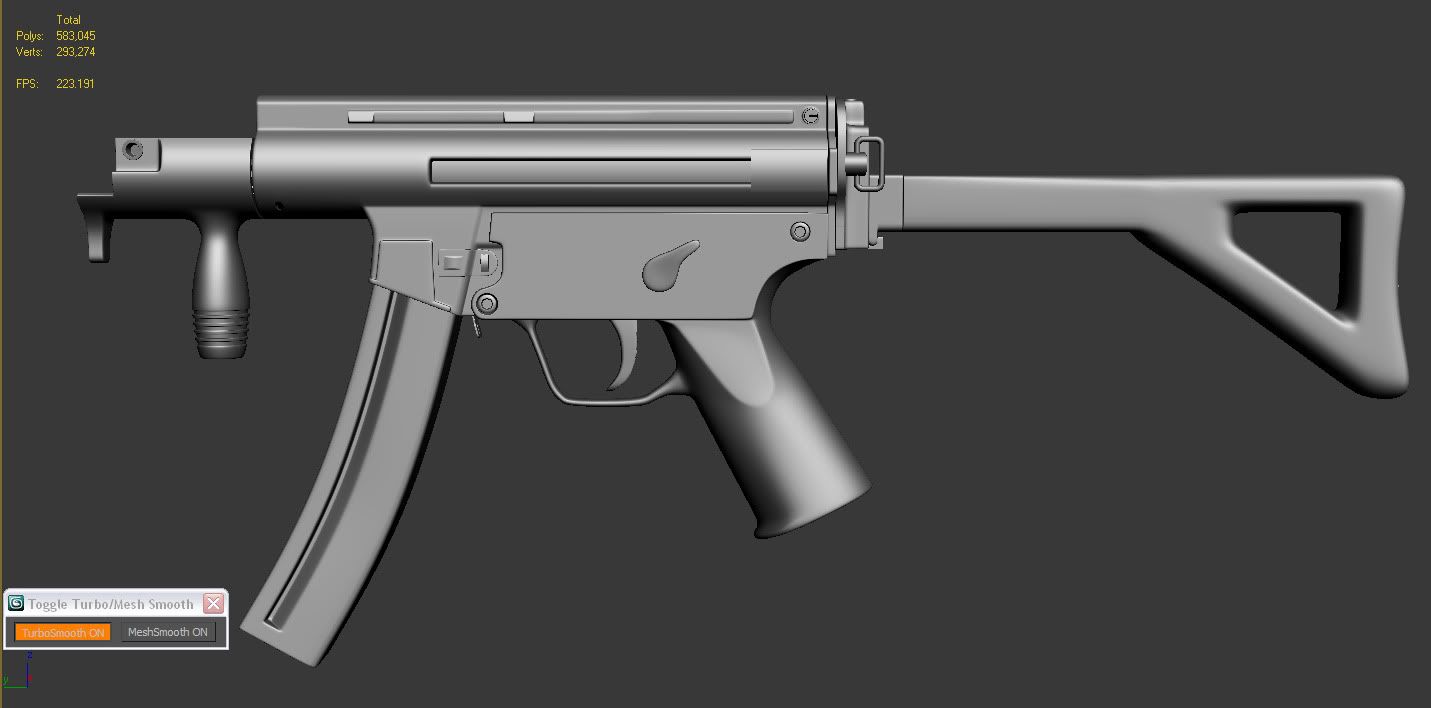
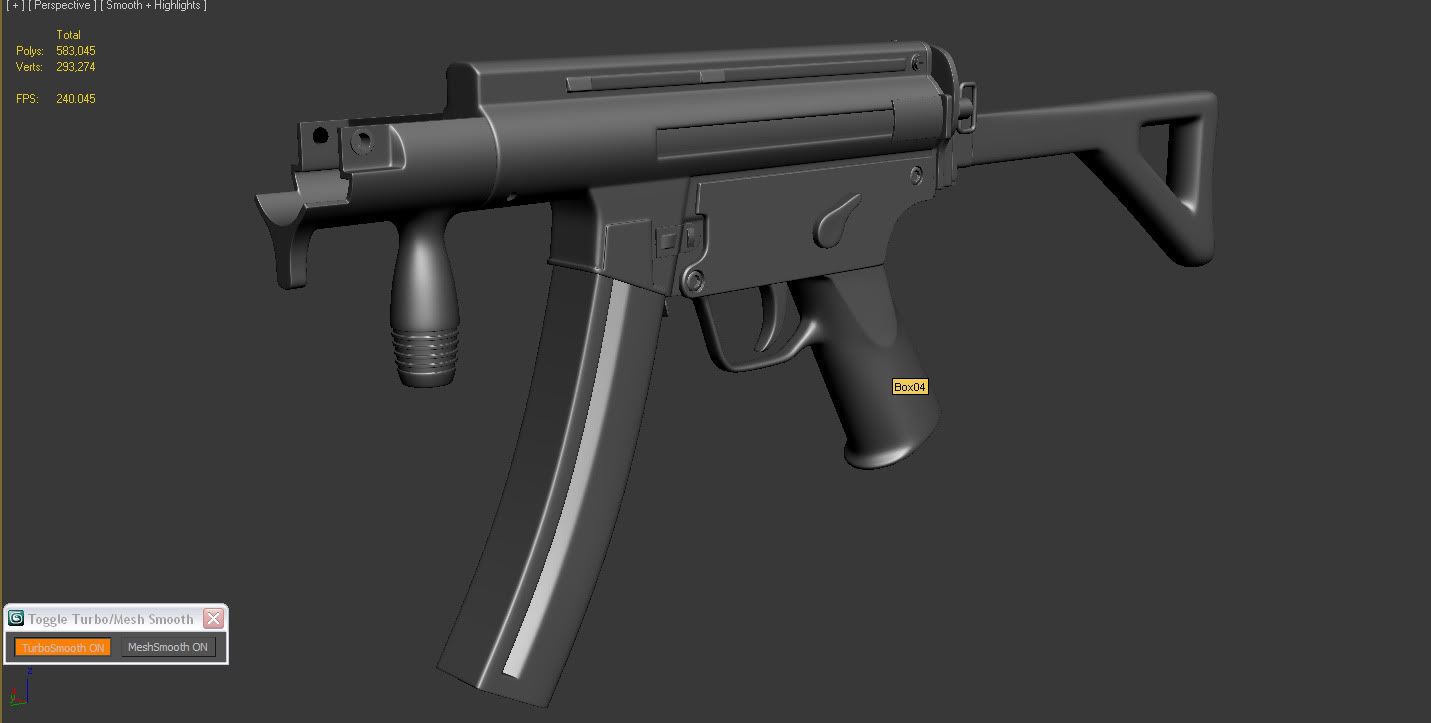
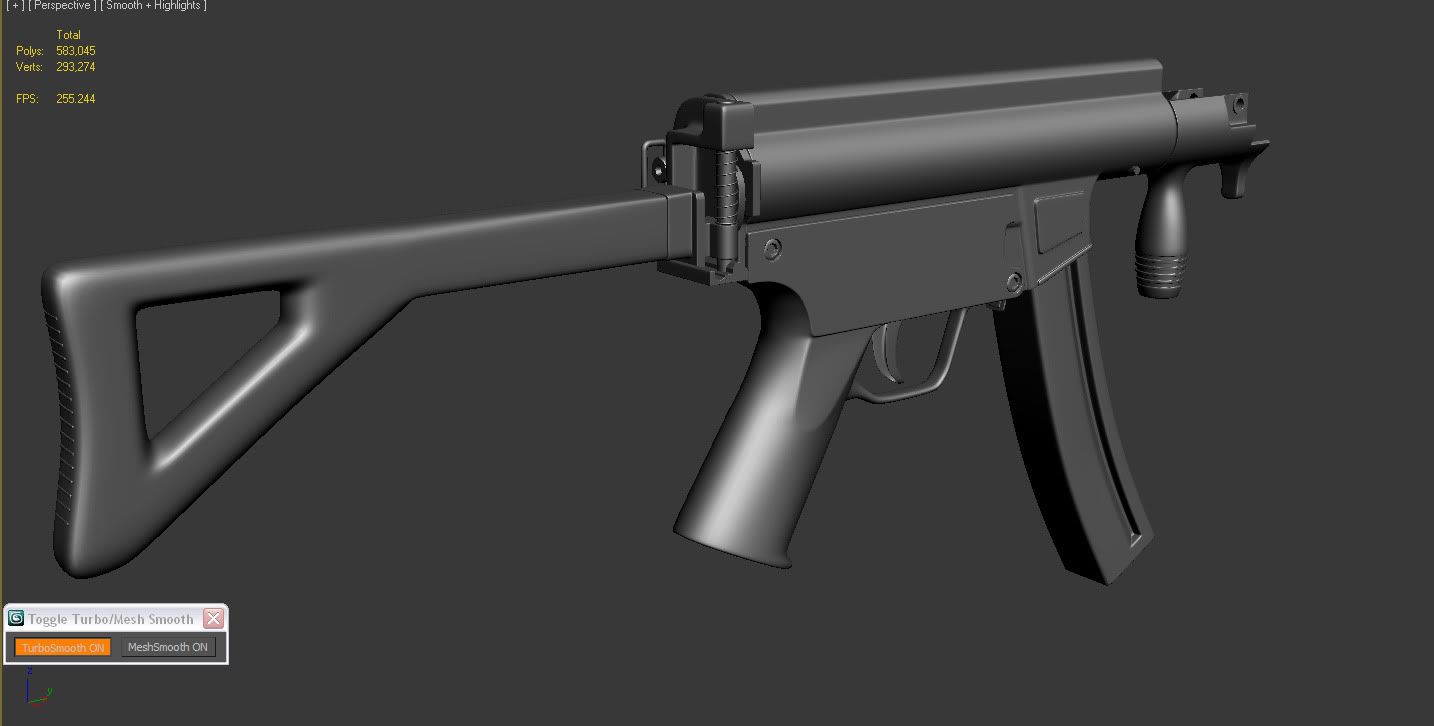
HK MP5k

polycounter lvl 16
Offline / Send Message
Billabong polycounter lvl 16
Hi Guys,

Ive been a member here for a good while, but I just now finally decide to do my first low poly project. I am hoping to have the final shot of this weapon in UE3.

Here is what I have so far of the high poly

Thanks for looking

-B

wip06.jpg

wip07.jpg

wip08.jpg

Replies

  • Billabong
    Offline / Send Message
    Billabong polycounter lvl 16
    Well I finally got some updates to the gun


    scope2.jpg

    gunwithscope2.jpg

    gunwithscope3.jpg

    Thanks for looking

    -B
  • jacob07777
    Offline / Send Message
    jacob07777 polycounter lvl 15
    The High Poly is comin along real nice so far man. Can you post the Ref image that your using?
  • vcool
    The scope looks great! Any chance of seeing the wires and maybe the low poly? :D
  • GarageBay9
    Offline / Send Message
    GarageBay9 polycounter lvl 13
    The proportions of the trigger pack (the lower receiver area with the trigger, selector and grip) don't look right. Looks too long front to back and the mag well looks a little too small in comparison. I'm also seeing some issues with the vertical foregrip and the charging handle area. Double check your refs.

    Detail looks good though. Like the ACOG. Check the scale on that against the rest of the gun - looks a bit too big.
  • Rumkugel
    Offline / Send Message
    Rumkugel polycounter lvl 14
    ACOG Scope is too big and would never mount like this on an mp5.
    mp5ers use special clamp mounts onto which you then can attach RIS parts like ACOG.
  • Spug
    Offline / Send Message
    Spug polycounter lvl 12
    Yeah, like Rumkugel said, your sense of scale if off.

    check this link, and even look up some ref as well as looking at this picture.

    http://www.kingarms.com/productimages/ka-MB-10b.jpg

    Looking great though, fix the scale of a few things, and your on your way.
  • Rumkugel
    Offline / Send Message
    Rumkugel polycounter lvl 14
    well an acog has different dimensions than an aimpoint :P

    aside from that, why puttin a 4x magnification scope onto such a short SMG.
    youd be better off with a red dot or holo sight like an eotech.

    btw. both adjustment knobs on the acog should be identical ;)
  • Billabong
    Offline / Send Message
    Billabong polycounter lvl 16
    Well I tried to mulitquoute everyone, but it wouldnt let me

    Here is alink to the ref, im using
    http://www.pixagogo.com/9767654102

    here are the wires and Low poly
    wire-1.jpg

    @GarageBay9, would you mind explaining a little more, I dont think I really get what your saying, and thanks for helping


    @Rumkugel. honeslty man I just liked the way it looked is all, but if you think I should change it, then maybe I will and as far as the buttons are conceraned, here is an image of an acog, that I use, notice the top and bottom right are different

    ACOGTA01NSNRedDotScopeDarkEarth2.jpg


    I hope I covered everything, and thanks so muich guys for the help

    edit: Ive been thinking, maybe I should change the thread to modified MP5, just kidding

    -B
  • Lonewolf
    Offline / Send Message
    Lonewolf polycounter lvl 18
    ya sure that scope is that big?
  • Billabong
    Offline / Send Message
    Billabong polycounter lvl 16
    I'm changing it as we speak, I may end up going with a different scope all together

    Thanks
    -B
  • Billabong
    Offline / Send Message
    Billabong polycounter lvl 16
    maybe I should take the k off of this thread and just call it a modified Mp5. Anyway, Ive made some adjustments. I scaled the scope down, and added an attachement for it to sit on, I still need to do a few things. Do you guys think the scope should stay or should I make a different one, I just really like how the scope came out, but Ill have quams if you think it needs to be replaced.

    I also scaled the handle and trigger area in a little to

    gunwithscope4.jpg

    gunwithscope5.jpg
  • Racer445
    Offline / Send Message
    Racer445 polycounter lvl 12
    Calling guns "modified" only works when they truly are modified in some major way. Otherwise it's just an excuse to make stuff inaccurate to the real thing.

    The scale of everything on this is way off. Are you working on top of a reference plane or anything? The ACOG scope is too small, the vertical foregrip on the front the folding stock is too long, the magazine is a bit too large, the sling mount on the back is tiny, and the receiver is too long and lacking detail.

    Here's a perfectly flat reference drawing that I cooked up using an online gun creator app. It's pretty accurate to the real thing as well. I suggest you use it. Just put it on a plane behind your gun, then scale everything to match.

    zu57rs.jpg

    Here's a shot of the common MP5 rail mount

    http://www.tacticalgeardepot.com/images/MP5%20G3%20HK33%20Universal%20Upper%20Picatinny%20Mount.jpg

    And here's photos of some of the problem areas
    stock
    foregrip

    To answer your question about the choice of optics on the gun- the ACOG is modeled decently, but doesn't fit a small SMG like this. It's up to you, and if you like it, then keep it.
  • Billabong
    Offline / Send Message
    Billabong polycounter lvl 16
    Thanks Racer for helping out, here is the railslide i went off of, its actually sitting on an MP5

    IMG_0118.jpg
  • Billabong
    Offline / Send Message
    Billabong polycounter lvl 16
    I rescaled this thing according to racers image, any thoughts. IM looking at other scopes now to put on it

    -B

    gunwithscope7.jpg
  • Billabong
    Offline / Send Message
    Billabong polycounter lvl 16
    Here is the final render of the highpoly

    -B

    final_hipoly.jpg
  • butt_sahib
    Offline / Send Message
    butt_sahib polycounter lvl 11
    As far as that negative extrude on that scope's front is concerned. i think if you beveled that in instead of extruding, it would have gotten better results through the normal map imo.
    Polycounters, correct me if im wrong :)
    http://wiki.polycount.net/Normal_Map
    http://wiki.polycount.net/3D_Tutorials/Modeling_High-Low_Poly_Models_for_Next_Gen_Games
    http://tech-artists.org/wiki/Beveling

    always consult the polywiki for your troubles *worship* http://wiki.polycount.net
  • Billabong
    Offline / Send Message
    Billabong polycounter lvl 16
    Thanks for pointing that out, will fix that right now

    -B
  • Billabong
    Offline / Send Message
    Billabong polycounter lvl 16
    Hey guys,

    I'm still in the process of unwrapping this, but I am having a problem getting all the uv space filled up. I could use some suggestions on how to better get this packed in here

    Thanks

    -B


    uvw.jpg
  • HAL
    Offline / Send Message
    HAL polycounter lvl 13
    Select everything, scale it up a little bit and redsitribute the uv space to the uv parts until everything is filled up.
  • Jet_Pilot
    Offline / Send Message
    Jet_Pilot polycounter lvl 10
    HAL wrote: »
    Select everything, scale it up a little bit and redsitribute the uv space to the uv parts until everything is filled up.

    Quoted in agreement
  • spahr
    Offline / Send Message
    spahr polycounter lvl 8
    great modeling. but it seems weird to me it has this wicked high end, looks like it could zoom 5 miles scope, on a machine gun like that. But again, i have never even picked up a real gun so my expertise comes from the call of duty games :P. But i do model! and its looking good my friend. I would say you could get away with cutting some of your edges on your cylinders for you low poly. But keep the tesselation the same for the outside edges so the silhoutte looks good. Maybe youd want to bevel the clip, would help to get those normals to POP.

    And your uv map looks confusing and great, as it should. looking forward to seeing this in unreal.

    One trick i do for uvs is take 5-6 focal parts of your gun you know you cant squish in your UV space. and get their size propper. then i usualy uUV each piece into their own mini sqaure, then block them all on top of each other in the real 0-1. then take all the misc parts I have left over and grab them and hit 'layout'. gives you a decent organization(but wastes space) and just fit it. and just fit those last pieces in there. With props like guns, with up to 100 different parts, you can UV a million ways, just make sure the main areas you see have a consistent size 0-1 to keep a even resolution for your texture.
  • Billabong
    Offline / Send Message
    Billabong polycounter lvl 16
    Thank you Spahr for taking the time to explain that. I really appreciate it

    -B
  • Rumkugel
    Offline / Send Message
    Rumkugel polycounter lvl 14
    Scope in the ref is a Replica.. most definately.

    theres good pics of real deal on the pixagogo site.
    scope looks better in size now, acog on such a short smg doesnt make too much sense.
    eventually you could fit a docter red dotsight instead of the backup ironsight on the acog.
    the line of sight vs fireline would be ridiculous tho...
  • Billabong
    Offline / Send Message
    Billabong polycounter lvl 16
    There is an Acog on an MP5 in COD4 I believe. even though it may not make sense its still there
  • Billabong
    Offline / Send Message
    Billabong polycounter lvl 16
    Well I think I got it

    unwrap2.jpg
  • Rumkugel
    Offline / Send Message
    Rumkugel polycounter lvl 14
    Srsly... COD4?? Sorry if i sound sarcastic.. but that game simply oozed with inaccuracies and complete bs..
    but anway.. thats just me.. keep up the modeling :) looks good sofar.
  • HAL
    Offline / Send Message
    HAL polycounter lvl 13
    Uv layout looks way better now.
  • Billabong
    Offline / Send Message
    Billabong polycounter lvl 16
    Well If its that important, I can just always take the scope off if you guys think it would look better without it.

    Thanks Hal
  • Xoliul
    Offline / Send Message
    Xoliul polycounter lvl 14
    Dude, it doesn't matter; if it looks cooler and believable, just keep it! Sometimes you just have to ignore accuracy to get your point across better :)
  • Jet_Pilot
    Offline / Send Message
    Jet_Pilot polycounter lvl 10
    Much better use of texture space on the new version... what size texture are you thinking about using?
  • spahr
    Offline / Send Message
    spahr polycounter lvl 8
    go with a 1024, dont sell youself short
  • EarthQuake
    you should be careful here, you have some uv islands that are only 1 pixel away from others, which is very bad news when it comes to mip-mapping, as it will bleed together. You're going to want more "padding" between islands.
  • Billabong
    Offline / Send Message
    Billabong polycounter lvl 16
    Ill probably render everything out to a 4096, but one all the painting is done, I'll reduce the size down to 2048 or 1024, whichever one you guys think it should be. I'm really new to the low poly way of thinking. Any suggestions are appreciated.

    And thanks for everyone for your replies so far

    -B
  • Billabong
    Offline / Send Message
    Billabong polycounter lvl 16
    EarthQuake wrote: »
    you should be careful here, you have some uv islands that are only 1 pixel away from others, which is very bad news when it comes to mip-mapping, as it will bleed together. You're going to want more "padding" between islands.

    Do you think its laid out ok, or do I need to unwrap it again?

    -B
  • EarthQuake
    The layout is mostly fine. I would say you jsut need to shift some stuff around a little, to make sure you've got a little extra padding. Its especially bad up in the top left corner, you see those peices are nearly touching, with like less than 1 pixel inbetween. I would just do a once over and look for areas like that.

    As far as crits on the layout, this is more general advice here, maybe you can apply it to the next mesh since this is pretty much all laid out now. But i would take a look at where you're placing your seams. ATM it seems you're choping stuff up a bit too much and this will hurt you when it comes to texturing.

    A good example of this is the but stock, really for this section you should have only 2 pieces, the left and right side with the uv seams directly down the center. You could even keep the very top edges welded, and do this with just 1 uv island, that way you wont have a seam there on the top which might be visible in first person. What you have there now seems like 7 different sections, on what could be 1 or 2 at most. So you can see how this could turn into a nightmare when you get to texturing, as there are all of those seams to fix.

    I'm sure there are a few more areas like that all around the mesh that you could find as well, but that was the most obvious one.

    Also i wouldn't suggest authoring at 4096, as your PSD will quickly become unworkable with more than a few layers unless you have a supercomputer. I would author at 2048 and leave it like that! 2048 is pretty common for FPV weapons in games. No need to work at double res when the final res will be that high.

    One final thing to note is that you should make sure you have uv seams where you plan on using hard edges(smoothing groups) to make sure your bake turns out ok, and you should also plan on adding some more geometry to fix smoothing errors and ray direction errors, so do some low quality(512 or so) testbakes before you move onto doing your final bakes.
  • Billabong
    Offline / Send Message
    Billabong polycounter lvl 16
    Thanks EarthQuake so much for explaining that. I understand what your saying and I think it would be best to just go back and try to fix some of those seams especially the stock and Ill check over the rest of the gun as well to see what I can find.

    Thanks again

    -B
  • Billabong
    Offline / Send Message
    Billabong polycounter lvl 16
    Ok next problem, I am having a shading issue with the stock. I tried to put it all in the same smoothing group but, as you can see, give its some really bad shading. The only way I found to get rid of it is to put the flat face in a different smoothing group, but that defeats the purpose. Is there a workaround for this or should I even worry about the shading issue

    Thanks

    -B

    shading.jpg
  • vcool
    turn the hidden edges, see what happens?

    Seems strange but not totally unexpected.
  • Ott
    Offline / Send Message
    Ott polycounter lvl 13
    Leave it as 1 smoothing group. Your bake should "fix" it to look like your high poly.
  • Billabong
    Offline / Send Message
    Billabong polycounter lvl 16
    tried turning the edges and that just made it worse, but thanks

    and thanks Ott. Ill leave it as one group


    -B
  • Billabong
    Offline / Send Message
    Billabong polycounter lvl 16
    Well i finally got around to re unwrapping this again. I tried to space everything out like you said EarthQuake, but now im afraid I spaced it out to much. What do you think?

    I also deleted the right side of the handle. I initially tried to weld the back seam of the handle together, but no matter how much relaxing i done to it, Max just didn't like it. So I figured if its not going to work there is no sense in having the other side there anyway.

    Let me know if you think I should redo it again

    Thanks
    -B

    gun_unwrap.jpg
  • Ninjas
    Offline / Send Message
    Ninjas polycounter lvl 18
    It looks to me that some areas may still be packed too tight. Maybe mipmap bleeding will not look bad since the gun is probably mostly black. Nice work overall, looking sweet!
  • Billabong
    Offline / Send Message
    Billabong polycounter lvl 16
    Thanks Ninjas, Ill try and work on it a little more

    -B
  • Billabong
    Offline / Send Message
    Billabong polycounter lvl 16
    OK I tried to space things a little more. How's this?

    gun_unwrap2.jpg
  • Ott
    Offline / Send Message
    Ott polycounter lvl 13
    I'm seeing a TON of single polygon / super-tiny bits that would essentially receive little-to-no detail, and would cause for a multitude of splitting all over in your textures. Try to reduce the number of UV chunks as best as possible. All of these "floaters" need to be addressed. If I ever find single polygons as a unique UV island, I figure there better be damn good reason for it.

    I see a considerable amount of UVs that look almost identical as well that should be overlapped. Especially when they are so small. Being worried about repetition being noticed on your model is a completely moot point when the pixel density is so small.

    Your high poly is really dope - but the final result can be won or lost depending on how good your UVs and pixel resolution are.
  • Billabong
    Offline / Send Message
    Billabong polycounter lvl 16
    Thanks Ott for helping me out.

    About laying uvs on top of each other, wouldnt that destroy the AO Map or screw it up?

    About the floaters, Should I just weld these pieces to thier parent, no matter, what if that stretches the checkerboard I have on there? Isnt stretching a big no no. Sorry for the dumb questions, just trying to understand it all.

    Thanks again

    -B
  • Xoliul
    Offline / Send Message
    Xoliul polycounter lvl 14
    Stacking UV's on top of each other inregards to AO:
    Not really that much of an issue. Some pieces are so tiny you'll barely notice the AO, so you can just not use any AO on them at all. In the case you get errors you can always manually paint on your AO to fix things, I pretty much allways do that.

    Stretching: as long as it's controlled, it's okay. You need to know how and where it stretches, and figure if it'll benefit you or not. Sometimes you'll want stretching in one area, where it's not noticeable, to ensure there's no stretching in other areas, where it would be alot more noticeable.
  • Billabong
    Offline / Send Message
    Billabong polycounter lvl 16
    Thanks Xoliul

    -B
Sign In or Register to comment.